
Do you wish you could take epic landscape images but aren’t too sure where to begin? Do you feel like your Instagram feed could use a little splash of awesome? This introduction to landscape photography covers everything you need to know to get started and bring home some spectacular images.
In this article, we will cover five main areas of landscape photography:
- Basic gear and settings
- Scouting and photographing landscapes
- Working with light
- Composition
- Post-processing
We'll wrap things up with some extra resources and pro tips to take your landscape photography to the next level once you’ve mastered these.
1. Basic Gear & Settings for Landscape Photography
1.1 Gear
Camera: If you want to get the most out of your landscape photography, you should really move beyond a point and shoot camera or your smartphone. It’s not that it’s impossible to capture good landscape photos using these devices, especially if the images are only going to be used on social media. And I’m not suggesting that you ditch them completely, as your smartphone is a great tool to have when doing landscape photography. However, using a basic DSLR (digital single-lens reflex) camera with interchangeable lenses will open up a whole new world of photography for you, and it will also allow you to have the most flexibility with creating and post-processing your images. The sensors in DSLR cameras are capable of capturing way more digital information, which means you will be able to produce images at a high enough resolution to print or show on a big screen. To research some of the best DSLR cameras out there, check out Improve Photography’s recommended cameras.
Lenses: Most landscape photographers start off shooting with a wide-angle lens (common focal length: 16-35mm). Wide-angle lenses allow you to capture a vast, sweeping landscape in one frame. One downside to using a wide-angle lens is that subjects in the background, such as a mountain ridge, may appear smaller than they do to the naked eye, which some photographers dislike.
There are two approaches to fix this issue. One is simply to use a telephoto lens, such as a 70-200mm, to compress the scene and effectively “get closer” to the mountains. Another more advanced approach is to use focal length image blending to combine two images taken at different focal lengths to make the mountains appear larger in the image and more akin to what you experience in person. If you are ready for this advanced option, check out Nick Page’s landscape tutorial on IP Plus.

If I had to pick just one lens to take into the field with me, it would be a 24-70mm lens. The focal length of 24mm is wide enough to capture most landscapes, and the short telephoto range means you can zoom in a little to compress the scene, if needed. If the 24mm focal length isn’t quite wide enough for your composition, you can always use panoramic stitching. Panoramic stitching is a simple method of taking a series of photos in either landscape or portrait mode and then stitching them together into one image in post-processing. It is a great way to increase the resolution of your landscape photos without buying a super expensive camera, and it also gives you some wiggle room for cropping. If you are in the market for some lenses, be sure to check out the Lens Finder on Improve Photography.
Tripod: Besides your camera and lenses, the next most important gear item you will need for landscape photography is a sturdy tripod. Why do you need a good tripod? It is the only way to ensure that you will capture the sharpest image possible. Because landscape photographers are often shooting at slower shutter speeds due to low light conditions or when capturing motion, such as in waterfall photography, it is impossible to hand hold these shots and not ruin the image with hand shake. Also, oftentimes in landscape photography, the camera needs to be at a height or location that is difficult to achieve while hand-holding.
Pro Tip: Be sure to turn off vibration reduction or image stabilization on your lens when using a tripod! Leaving vibration reduction (aka stabilization) on while your camera is on a tripod will actually increase the chance of blurry images; your lens will attempt to correct for movement that isn’t actually occurring. I’ve made the mistake of leaving this on several times and have come home with soft images. Bah! So frustrating!
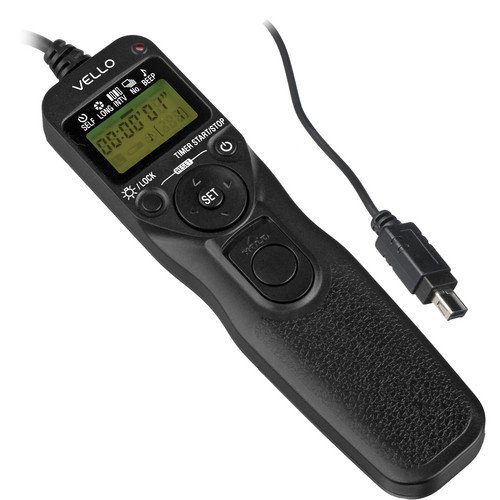
The next two gear recommendations are not absolutely necessary for beginner landscape photography, but they do help a lot, and you may want to invest in them at some point. My first recommendation is a remote shutter release cable. Be sure to get the correct one for your camera. This allows you to fire the camera without touching it, thereby avoiding camera shake that can occur (even on a tripod!) by simply depressing the shutter button.
My second not-so-critical gear recommendation is a set of filters. Filters are used in landscape photography to modify how the light in the scene is captured on the sensor of the camera. For example, one the most commonly used landscape photography filters is a circular polarizer filter. This filter polarizes light and reduces glare on water surfaces (from the ocean to wet leaves) and can also make colors pop.
Another very common filter that is used for landscape photography is a neutral density filter. Neutral density filters are used to darken an area of the composition without changing the color, such as darkening a bright sky in order to balance out the exposure of a scene. Filters can be used in various combinations to get different effects. Some effects, such as those generated with a graduated neutral density filter, can be mostly replicated in post-processing, eliminating the need for some of these filters. To help you decide whether you need filters, check out this IP article on Which Filters Do Photographers Actually Need.
1.2 Camera Settings
Before heading out into the field, be sure to understand the concepts behind the exposure triangle. The exposure triangle is the interplay between the shutter speed, aperture, and ISO (pronounced “eye-so”) settings to achieve the correct exposure of an image. Each of these settings controls exposure, yet each has its own affect on an image. If you haven’t yet heard of the exposure triangle, check out this overview on Improve Photography. It will take practice, but learning these concepts and understanding how to adjust them will give you the greatest flexibility and creativity in your images.
Camera Settings Explained for Landscapes
| Setting | What is it? | How does it affect exposure? | What is its unique property besides exposure? | What is a good starting place for landscapes? |
|---|---|---|---|---|
| Shutter Speed | The duration of time the shutter is open when shutter button is pressed | Fast shutter speeds let in less light than slow shutter speeds | Motion: fast shutter speeds freeze motion; slow shutter speeds blur motion | Adjust accordingly to achieve correct exposure after adjusting aperture and ISO |
| Aperture | The size of the opening of the iris of a lens | Wide apertures (low f-stop #) let more light into the camera than narrow apertures (high f-stop #) | Depth of field: wide apertures have shallower depth of field than narrow apertures | f/8-f/22 |
| ISO | Camera sensor sensitivity | Low ISO = less sensitive, less light High ISO = more sensitive, more light | Noise: high ISOs introduce noise into an image | ISO 100 (or base ISO for your camera) |
The real answer to “what settings should I use” is “it depends”.
The settings given in this section are just very general guidelines. The actual camera settings that will be best for your image will depend on the lens you are using, the subject, foreground elements, what mood you want to create, the time of day, whether motion is being captured or frozen, and so forth. This is why it is so important to understand the exposure triangle and be able to adjust settings accordingly as these different elements change in the field.
1.3 Camera Mode

Shoot in manual mode or aperture priority mode. Even if you are still getting comfortable with the exposure triangle, shooting in manual and playing with the settings is the best way to see the results of tweaking and to solidify concepts. That said, many landscape photographers choose to shoot in aperture priority mode. The reason for this is that unless you are trying to freeze or capture motion in your image, shutter speed is arguably the least important setting to worry about in landscape photography.
Aperture is the most important setting followed by ISO because aperture primarily controls depth of field, and this is a critical component to capturing landscape photos. For the majority of landscape compositions, you want to use the maximum depth of field possible in order to get everything in the photo “acceptably sharp” without increasing diffraction, which may decrease the quality of the image at apertures smaller (more narrow) than f/22 (this is lens dependent). By using aperture priority mode, you chose the aperture for your photo and your camera will adjust the shutter speed and ISO to achieve the correct exposure.
ISO controls the sensitivity of the camera sensor, and so it is best to use the lowest ISO (or base ISO) on your camera for the best resolution. High ISOs increase noise in an image. Typically, unless I’m shooting in very low light conditions, I won’t go above ISO 400 for my landscape images, and I always start with ISO 100 (or lower).
1.4 Image Format
Shoot in RAW file format. A RAW file is the complete picture, if you will. RAW files contain all of the digital information from every pixel captured on your expensive camera sensor. Why compromise quality when you’ve invested in a great camera? When you shoot in JPEG, the camera takes the RAW image and performs its own post-processing and compression, which results in some of information in the pixels being lost. While JPEGs will always look better than your RAW images before any post-processing, JPEGs will limit the what you can do in post-processing before introducing artifacts and noise. RAW files look terrible right out of camera because they lack any adjustments to contrast, sharpness, or color saturation, but they contain all of the information needed to make those adjustments yourself, whereas JPEGs are limited in that regard. Using JPEGs is great when you need to share photos right away on social media or as a preview of a shoot for a client, but RAW files will give you the most flexibility and options for post-processing. If you have enough memory on your cards and hard drives, then shoot in RAW+JPEG, and then you’ll have the best of both worlds.
1.5 White Balance
Using auto white balance is fine because you can change white balance in post-processing (let’s hear it for RAW format!).
2. Scouting and Photographing Landscapes
2.1 Scouting: Location, Time of Day, and Weather
How do you find good landscape locations? Thankfully, several resources are right at your fingertips. Instagram and 500px are helpful for scouting locations and seeing what sort of photos people are taking of a given area. A great app to help you find new locations is the Really Good Photo Spots app from Improve Photography. Simply plug in your location of interest anywhere in the world and see what photo opportunities are nearby that have been posted by other photographers. The app gives you the GPS location of that spot and can direct your smartphone on how to get there.

Google Earth is great for discovering new locations and determining exactly where you should be setting up your tripod for that epic sunrise shot. Another app that goes hand in hand with Google Earth is the PhotoPills app mentioned above. PhotoPills helps you determine the path of the sun and moon so that you can determine which side of a mountain range to be on to get the right angle on a sunset shot, for instance. You can also use the app to determine when the sun and moon are rising and setting and when the best times of day are for the best light (more on light later). Check out this PhotoPills review for more info.
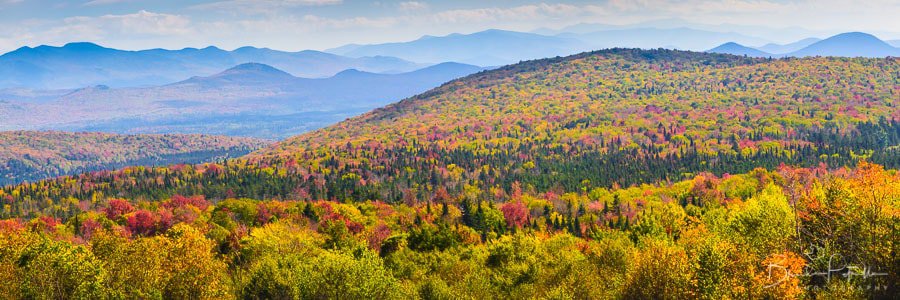
Weather is a critical factor for landscape photography, for obvious reasons. What some beginner landscape photographers don’t realize is that clear skies and beautiful sunshine often don’t make the best landscape photos. It really depends on what you are photographing, but generally speaking, the more dramatic the sky, the more interesting your photo will be. Some of the best times to do landscape photography are on cloudy days or shortly before or after a storm. The clouds basically create a gigantic soft box in the sky, evening out highlights and shadows and reducing “hot spots” that can occur between sunny and shady areas of a photo. Clouds add a level of interest to the photo and can often be used as part of the compositional approach. Right after a storm is also a great time to go out and photograph landscapes. The rain on leaves and grasses help colors pop and often fog or mist rolls in, which adds depth and mood to a photo.
After you’ve researched your location, it’s time to scout it out. This is the time to really slow down your process and take your time. It’s easy to get to a location and see the “hero” or “money” shot, which is often the most obvious composition. That usually means other people have taken the same shot, especially if it is a popular location. Go ahead and take that shot, but plan to stay in a given spot, say a waterfall, for an hour or two and really scout it out and play around with your settings and search for different compositions. Change focal lengths, subjects, perspectives, foregrounds and mid-grounds. Often, I like to start with just my smartphone, leaving my camera in my backpack, to scout potential compositions before setting up my camera and tripod. Sometimes, I’ll find compositions that have potential but wouldn’t work on that day because of the light or season, so I’ll make a note of it.
Pro Tip: Landscape photography does not mean using landscape mode only. Be sure to explore vertical orientation, too.
2.2 Focus Point
You’re standing before an incredible mountain scape with a lake in front of it, some wildflowers nearby, and a sunset on the horizon. Whew – this is going to be awesome! You should already be thinking about using a narrow aperture (f/16-f/22) to maximize depth of field, but where do you focus so that all elements in the frame are acceptably sharp? The foreground, mid-ground, or background?
It’s time to talk about hyperfocal distance. Hyperfocal distance is determined through a complicated mathematical equation that we won’t discuss here. Simply put, hyperfocal distance is the closest point at which to focus a lens (at a given focal length and given aperture) to achieve the maximum depth of field of your image (meaning all elements are in focus).
Thankfully, this complicated calculation can be easily achieved in the field. One way is to use hyperfocal distance calculators, such as the one available on the PhotoPills app. Another trick is to focus about 1/3 of the way up the frame of a composition. On average, this will approximate the hyperfocal distance well. To read more about how to do this, check out Frank Gallagher’s IP article on How to Focus ⅓ Into a Photo for Deep Depth-of-Field and also listen to the IP Roundtable Podcast (Episode 135) on Achieving Extreme Depth of Field. Check out Jim’s tutorial on how to set your focus point to learn more about focus settings on your camera.
Pro Tip: Use autofocus to focus on your focal point, and then switch the lens to manual focus before you take the shot. This will ensure that the autofocus won’t re-focus on a different element in the scene when you depress the shutter button.
3. Working With Light
To paraphrase Jim Harmer, light is what creates mood in a photo. To capture breathtaking landscape photos, you need to learn how to “see” light. Understand how light changes throughout the day, how the direction of light affects shadows and can create or eliminate compositional elements in a scene, and how to capture a certain mood or feeling. Having a good sense of light will help you decide when and at what angle to take certain landscape photos.
A good exercise is to pick a location and take photos there throughout an entire day. Observe how the same composition changes in terms of mood or interesting aspects of the subject at different times of day. You can also do this exercise under different weather conditions to see how weather also changes the mood of a given scene (think fog, dramatic clouds, sunbeams, rainbows, snow, etc.).
3.1 Histogram
You may have heard other photographers talking about checking the histogram – what the heck is that, and why is it important to landscape photography? The histogram is important for determining proper exposure, and exposure is directly related to light, and light sets the mood of a landscape photo. So there you have it.
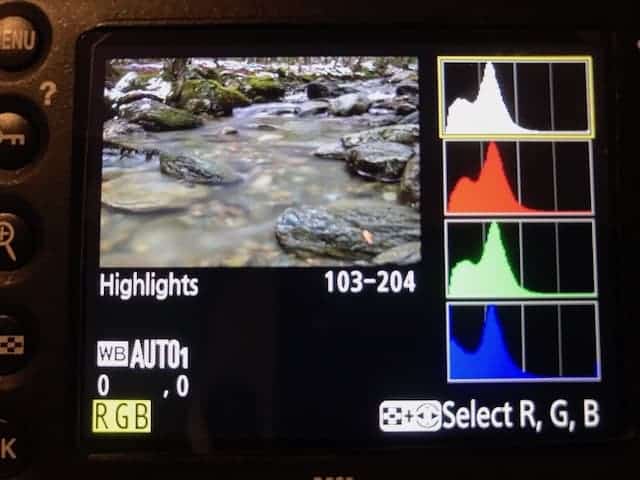
There are four histograms available to view in your camera settings (it’s different for each camera manufacturer, so best to check the manual): the luminosity histogram and red, green, blue (RGB) channel histograms. Basically, the luminosity histogram displays the dark tones, mid-tones, and bright tones of an image regardless of color, and the RGB channel histograms display how much of each of those colors are represented in the pixels.
The histogram is a valuable tool to have to check to make sure that your exposure settings are accurate and that you aren’t over-exposing or under-exposing an image. The image on the LCD display could be misleading in terms of exposure, and it is more accurate to look at the histogram and check for highlight or shadow “clipping”. Clipping occurs when you’ve over or under-exposed an image and lost information in those pixels. This is displayed on the histogram as peaks on either the far left (for shadows) or far right (for highlights). To learn more about histograms and how to use them, check out Jeff Harmon’s IP Photo Taco Podcast on Histograms Explained.
3.2 Magic Hour Versus Mid-Day Light
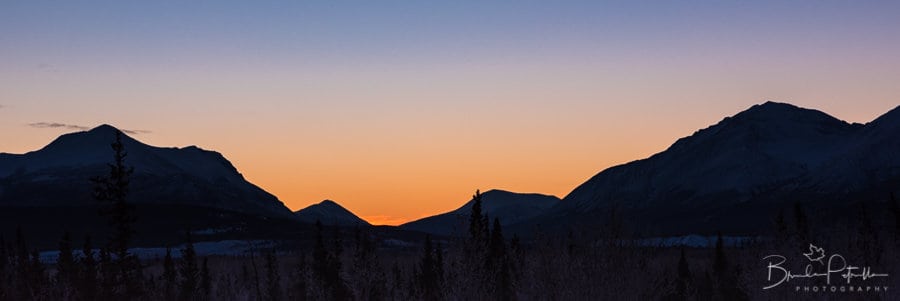
If light is so important for creating the mood of a photo, then when is the best time of day to shoot landscape photos? You may have heard about “magic hour” and for good reason. Magic hour, also known as “golden hour”, is the hour or so just before and after sunrise and the hour or so before full sunset. This is a very popular time to do landscape photography because the light is incredible during these hours. It is a warm, soft, and even light that eliminates any harsh light and shadow contrasts. Any shadows during this time are long, which can create depth in your image.
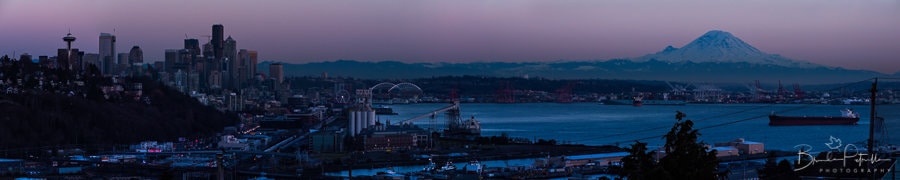
Blue hour is another popular time to shoot landscape photos. Blue hour is the time just before and just after the two golden hours of the day. Similar to golden hour, blue hour provides a soft, even light although it portrays a cool mood rather than a warm one. You can find golden hour and blue hour by using online calculators for sunrise/sunset for your location or use the PhotoPills app.
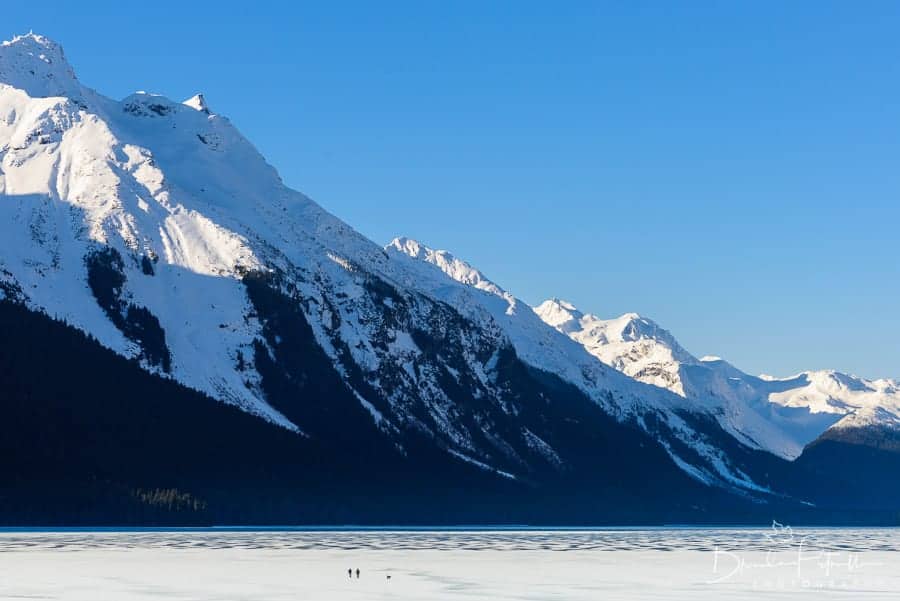
Mid-day light is generally not recommended for landscape photography and is better reserved for scouting locations. Mid-day light tends to create a lot of shadows and contrasts that can be less desirable in a landscape shot and can be difficult to correct in post-processing. Of course, this is not usually the case on a cloudy day when the light is even.
Sometimes, however, mid-morning or mid-afternoon light is appropriate for landscape photos, such as when shooting fall foliage colors, “bluebird” snowscapes, or when photographing valleys that might otherwise be cast in the shadow of a mountain during the golden hours. Another reason you might choose to shoot in the middle of the day is if the warm tones of golden hour would add too many conflicting colors in your composition.
3.3 Dynamic Range
Another important consideration when learning how to use light to create mood in your photos is dynamic range. Dynamic range is basically the tonal difference between the darkest shadows and the brightest highlights in a given photo. Camera sensor technology has improved so much so that it has become easier to capture a high dynamic range (HDR) between shadows and highlights in a given photo. That said, limitations do exist with camera sensors, and our eyes do a better job at seeing HDR in a scene. To better replicate what you see, you can take multiple exposures (called bracketing) that expose for the shadows and expose for the highlights and then combine the photos in HDR post-processing. If you are ready to dive into bracketing and HDR, check out these two resources:
- IP Photo Taco: Bracketing Explained
- IP Article by Rusty Parkhurst: How to Create an HDR in Lightroom Classic: An Illustrated Guide
4. Composition
Putting all of the technical stuff aside for a moment, what makes an epic shot is the composition. I’m not arguing that proper exposure, depth of field, and focus aren’t critical to a fantastic photo, but without a good composition, those technical aspects aren’t enough to make a photo great. Typically, a composition is pleasing when our eyes naturally move around the frame, and all of the elements of the composition work together to guide our eyes around the photo to strengthen the subject. This is why removing distractions from a frame is important; they lead the eye away from the main subject of the composition. Once you understand the general concepts of composition, it is easy to analyze photos and understand why some just seem to feel good compared to others. Here are some general compositional guidelines to get you started in landscape photography.
4.1 The Basics
Almost all landscape photographs can be compositionally broken down into the foreground, the mid-ground, and the background. The foreground is the area closest to the camera, whereas the background is the farthest from the camera, and the mid-ground is in between. It’s pretty straightforward, although it is easy to miss including each of these in landscape compositions. Often, we are focused on the mountain or the sunset and not on foreground elements, like wild-flowers or rocks. Not all landscape photos require all three, but it good to consider them when trying out different compositions. Generally speaking, the mid-ground tends to be the least interesting aspect, and so to minimize the mid-ground, landscape photographers tend to shoot low to the ground. When using a wide-angle lens, this also allows for the inclusion of a neat foreground element that could add scale or interest to the composition.
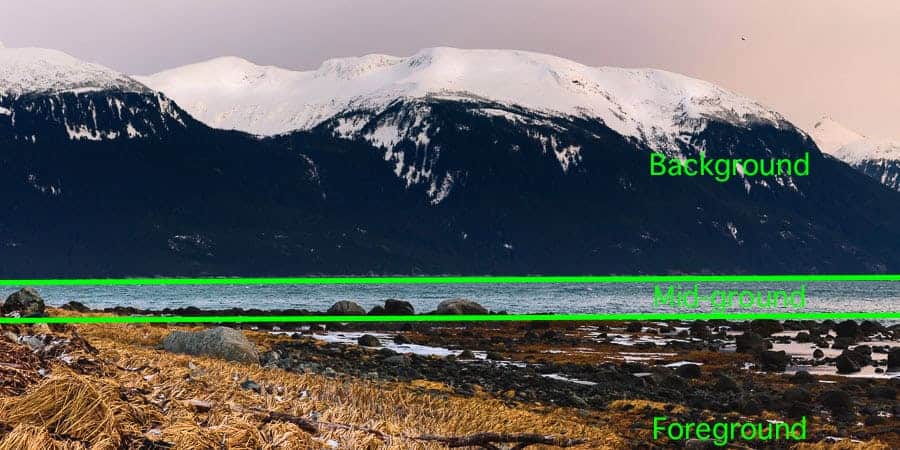
Pro Tip: For landscape photography, shoot low to the ground to emphasize a foreground element and minimize the mid-ground.
4.2 Compositional Guidelines (not rules!)
That’s right. There are no steadfast rules in photography composition. Even if they are called “rules”, they are meant to be broken. The following list of various ways to approach composition is meant as a guide rather than as a comprehensive review of landscape photography composition.
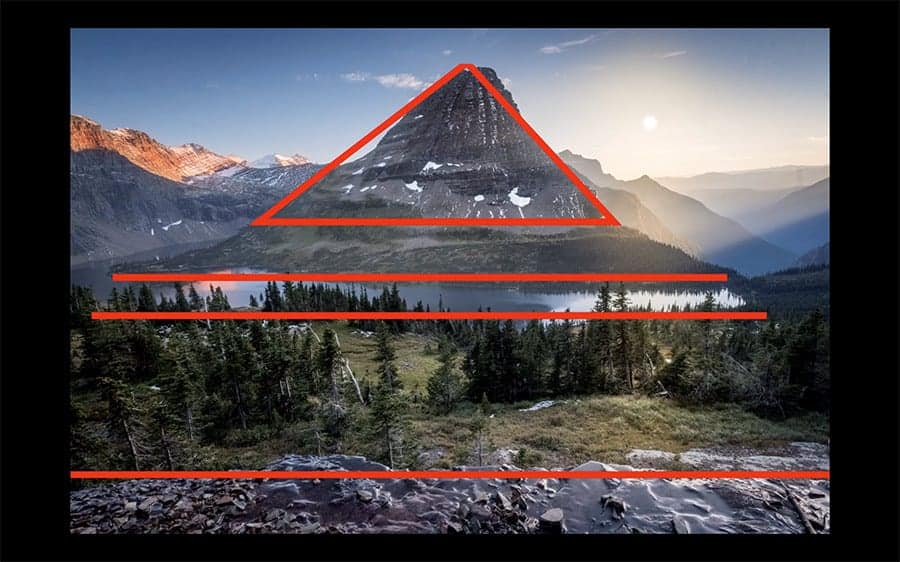
- Block Method: If you want to try just one compositional technique that will result in stellar landscape shots, I highly recommend starting with Jim Harmer’s Block Method. In this training, Jim explains how to choose elements in the frame that work together to form one overall shape. Our eyes tend to follow shapes around a photograph, and so this method is a useful technique for drawing a viewer into a photo and keeping them engaged.

Screenshot from Jim Harmer's Block Method of composition. - Rule of Thirds: Another popular compositional technique is the rule of thirds. Our eyes tend to move around a frame from the top left to the bottom right. If you imagine a photo with a tic-tack-toe grid on it, we are often attracted to photos where the main subject falls into the top or bottom thirds or left or right thirds of the frame. This is not always the case, though; so don’t feel like you need to be limited by this technique.
- Leading Lines: Similar to Jim’s Block Method, leading lines are helpful in guiding a viewer’s eyes around a frame. They are very effective at guiding a viewer to the main subject. Leading lines can also contribute to the basic shape concept in the Block Method.
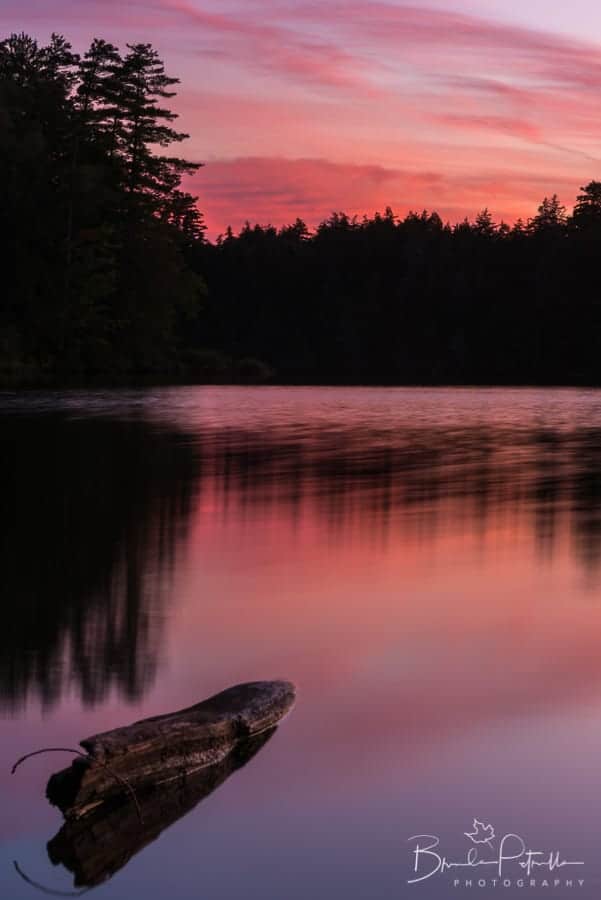
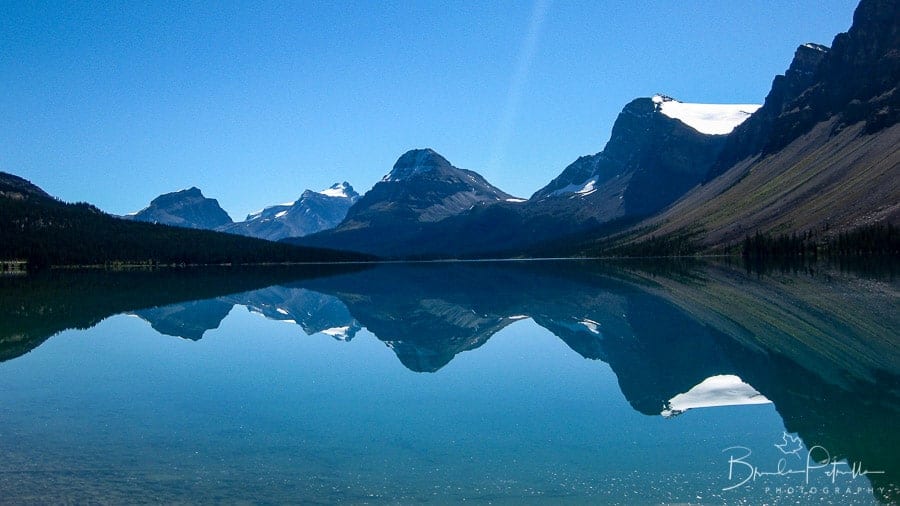
- Symmetry: Look for compositions that create a sense of balance through symmetry, such as a reflection.

Using symmetry as a compositional technique on Bow Lake in the Canadian Rockies. © Brenda Petrella Photography. - Simplification: Less is more. Be aware of elements that don’t work together to keep the viewer’s eyes moving around the composition and engaged with the subject. These should be eliminated from the frame. Examples of elements that should be eliminated include an area of high contrast or brightness that is not part of the main subject, too many interfering colors, or competing subjects.
- Frame the Subject: Use elements in the scene to create a frame around the subject, such as the bough of a tree or the curve of a rock face. This has a similar affect as applying a vignette to focus attention on the subject.
- Sense of Scale: Find something in the foreground or mid-ground to provide a sense of scale to the vastness of the landscape.
- Horizon: Where do you put the horizon? Again, this is dependent on the photographer’s preference, but generally you want to avoid sticking the horizon right in the middle of the frame unless you are using symmetry as a compositional technique. If you have a really interesting foreground, then try putting the horizon in the top 1/3 or 1/4 of the frame. On the other hand, if you have an incredible sky, showcase that by putting the horizon in the bottom 1/3 or 1/4 of the frame.
- Color Theory: Look for complementary colors and work with a reduced color palette to create more impact.
To learn more about photography composition, be sure to check out Nathan’s article on Understanding Composition in Photography: A Complete Guide and Jim’s latest Art of the Land Training on IP Plus.
5. Post-Processing
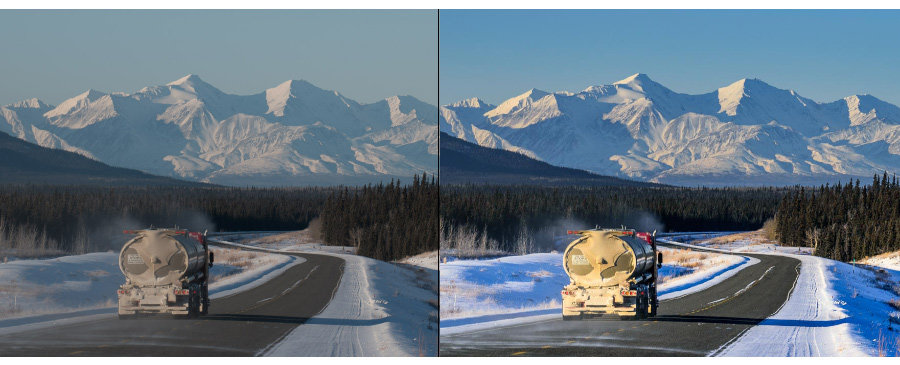
I could spend an entire post discussing post-processing techniques for landscape photography. Here, I will just give a brief overview to get you started on my basic steps in post-processing a landscape photo. To edit RAW files, you will need to invest in photo-editing software, such as Adobe Lightroom, Photoshop, Capture One, or Luminar. I use Lightroom, but the edits discussed here could be applied in any of these photo-editing programs.
As mentioned earlier, all RAW images need to be post-processed because cameras do not do any in-camera processing of these files (unlike JPEGs). The good news is that this preserves all of the pixel information of the file, but the somewhat bad news is that it means you need to process the images. For most of my landscape images, I do the following steps:
- Import images
- Perform lens corrections (if available)
- Check histogram
- Bring down the highlights and bring up the shadows
- Recheck histogram – boost exposure if needed
- Boost the clarity and vibrance
- Boost saturation and contrast if needed
- Adjust whites and blacks if needed
- Add a touch of sharpening
- Export
I do additional tweaks as needed for any given photograph, but these are some basic steps to get you started. If you would like to learn more about getting started in Lightroom, check out the IP Lightroom 101 Training.
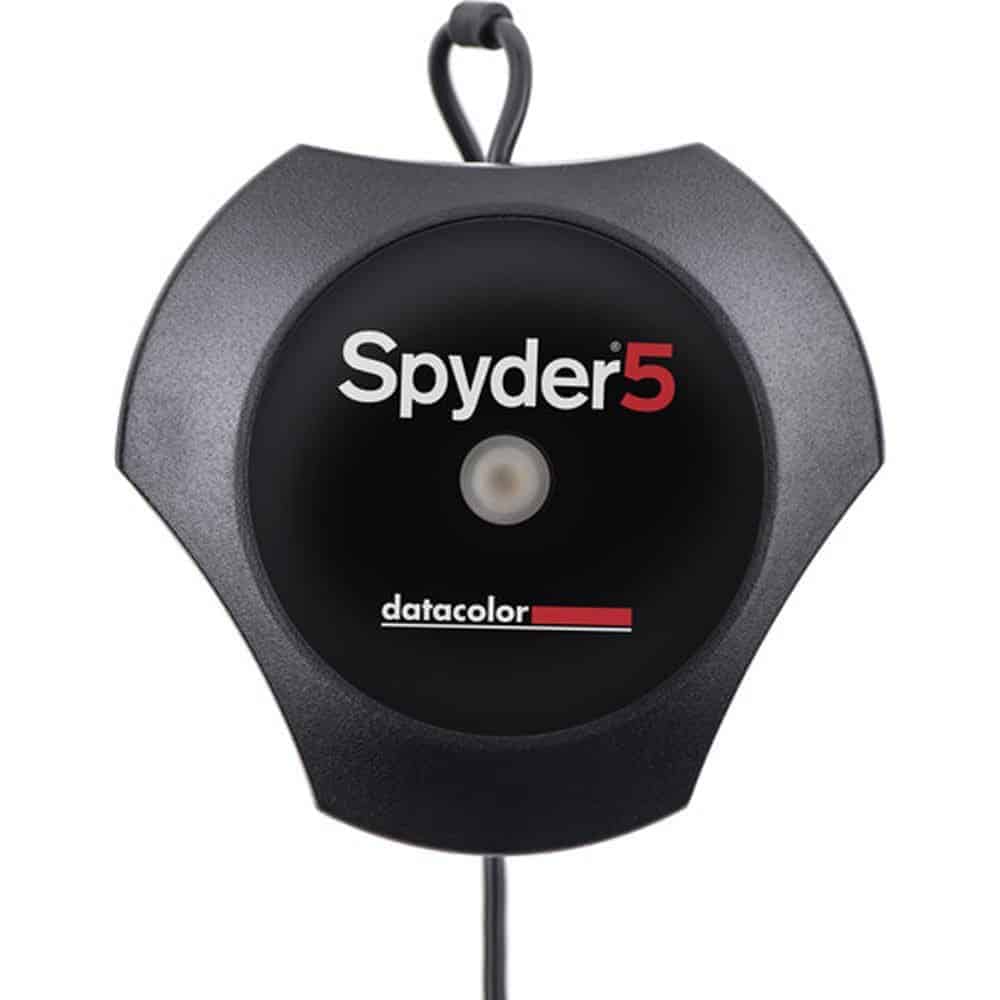
Pro Tip: Calibrate your monitor. If you are planning to print your photos, then it is critical to calibrate the monitor you use for post-processing. Regular monitor calibration is the best way to ensure that what you see on your screen is what you will receive from the printer. The process uses a device that basically color corrects and checks the brightness of your monitor and the surrounding room for optimal performance. Calibration takes about 10 minutes. I personally use and recommend the Spyder5 Pro device from Datacolor.
More Pro Tips and Resources
Pro Tip 1: Start local. Don’t invest in a big trip until you’ve mastered some of these techniques.
Pro Tip 2: Make sure your horizon is level. Some cameras have a virtual horizon setting so you can double check the horizon in camera through the viewfinder or LCD display using live view.
Pro Tip 3: Eliminate distractions. Look around the four corners of the frame and make sure you don’t have a random stick, rock, fallen tree, etc., getting in the way of your scene.
Pro Tip 4: Practice leave no trace principles. Help protect our natural resources for others to enjoy. “Leave only footprints”, which brings me to my final Pro Tip…
Pro Tip 5: Avoid getting footprints in your frame by first working your scene from farther away and then moving closer to your subject.
Here are some additional resources to help you master landscape photography. I hope you’ve found this article to be useful. Have fun exploring and don’t forget to stop and smell the flowers!
Extremely well written article. Thanks for all the additional links to read. Frankly, among all the sites i have found this one to be most useful to me.
I’ve only one question: among settings, why Active D-lighting, white balance (I’ve 6 options on my camera and don’t know to use a single one, so i use Auto), exposure correction, use of Presets like Dusk/dawn mode or sunset mode etc. are not discussed in detail.
Thank you very much for all beautiful tips you have offered.
Hi Amit – Thank you for your comments! I’m so glad you found the article to be helpful. You make a great point about not including more detailed info about camera settings. It would have made the article super long! I’m happy to write another article outlining camera settings for landscape photography in more detail. Stay tuned!
Very nice article. I generally take photos of people and life, but really want to improve my landscape photography and seeing the bigger picture. I want to be able to slow down amd get framable photos of nature around me in new england. I really liked your tips.
If you are getting download this game then i suggest to you that you must be download the latest version of this game this game was simple but this is more energetic game when you started to play this game then you have to know that the importance of this game.