
PhotoPills for Apple iOS has been around for many years now and it has built the reputation of being the Swiss army knife of photography apps. It's now available on Android but is it still the king of photography apps? Can it justify its £10 price tag or outdo the vast array of free photography apps? In this article, I'm going to look at the core capabilities of the app so that you decide if this the photography app for you.
Starting Out
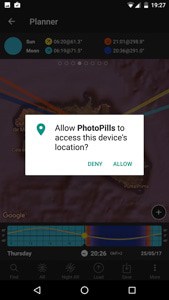
Installing the app is as straightforward as any other mobile app. It required a few permissions including access to my calendar, camera, and location services. Nothing to worry about there.
When you open the application, you are shown three tabs:
- My Stuff – this is where you can see your saved plans, POIs (Points of Interest), perform backups, change settings, and submit your photos (known as PhotoPills Awards).
- Pills – pills are the core capabilities within the app and include Planner, Sun, Moon, Exposure, various DoF (Depth of Field) and FoV (Field of View) functions, astro photography functions, and Time Lapse.
- Academy – here you will find the user guide, video tutorials, how to articles, PhotoPills merchandise, and information about the PhotoPills team.
Having a quick look around the app can seem daunting at first. It's a bit like opening Photoshop for the first time and being overwhelmed by the number of menu options and toolbars. The best approach with PhotoPills is to ask yourself what it is you want to know. Do you want to know what the Depth of Field is for a given camera and lens, or when and where the sun will rise from a given location, or what's the longest exposure time I can set before stars start to create trails?
So, don't be put off by the apparent complexity of the app. You might only ever use some of the capabilities of the app, as you might only use a fraction of the power of Photoshop, but this doesn't necessarily make the app any less useful or worth the price.
The Pills
For this article, I'm going to skip over the My Stuff and Academy tabs. I briefly mentioned what's in those tabs earlier and they are largely self-explanatory. What I will focus on is the core capabilities of the app. When you click on the pills tab you are presented with a number of buttons. Each button, or pill as they are known, allows you to access a core capability or function of the application.

Just before I jump into the pills themselves, there are a few capabilities that are shared across the pills that are worth giving an overview of:
- AR (Augmented Reality) / Night AR – Perhaps one of the most powerful capabilities in the app. AR allows data from some of the pills to be overlaid onto what the camera on your phone is seeing. You can visualise things like the path of the sun or moon, or even the position of the Milky Way.
- Action – just about any bit of information can be shared using the Action button. If you find the perfect location and date, click action and email it to a friend.
Now let's look at those pills.
Planner
The Planner pill is possibly one of the biggest pills in the app and can be used to create a quick, simple plan, or create a large complex plan.
At a basic level, you can select a point on the map and see from which direction the sun will rise and set, where it currently is and if you want, moon rise and moon set information. You can also see the data for any given date and time.

Using the slide bar at the top you can find or add the following data or graphical information to the screen:
- Object height – to calculate shadow length caused by sunlight or moonlight.
- Pin to pin geodetic information such as height difference between two points.
- Sun and moon information such azimuth, rise and set times, elevation and for the moon, its phase.
- Civil, nautical, and astronomical phase times.
- Blue and golden hour times.
- Visibility of the galactic centre and milky way elevation.
- Eclipse information.
Using the time of day bar at the bottom, you can visualise how some of these elements such as moon and sun position track across the map as time progresses.
At the bottom of the map, you will also see a button with a plus symbol on it. This allows you to:
- Move the map pin to your current GPS location.
- Move the map pin manually
- Undo and redo actions
- Expand the map to consume more of the screen
- Swap map pins and geodetic pins
- Expand Azimuth lines
- Show your position on the map
- Change the map type – standard, satellite, hybrid, terrain.
- Enable compass mode – aligns the map view with the direction you are facing.
- And finally, you can lock these buttons to the display so you don’t have to press plus button each time.
The save and load buttons at the bottom of your screen allow you to save your custom plans or points of interest. As with most pills augmented reality is available.
The information you can get from this pill will be useful to a wide range of photographers that shoot outdoors. Though the Planner pill has a wide range of capabilities that allows for some detailed and advanced planning, it’s easy to use and understand so if you just want to know which direction the sun will rise or set on a given day at a given location you’ll still find it useful.
Sun
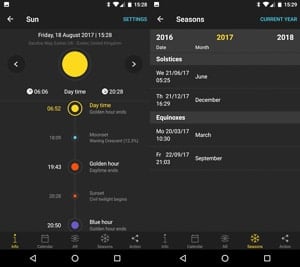
This pill is relatively straight forward and for any given location or date you can find out:
- Blue Hour – When civil twilight starts and when nautical twilight ends.
- Golden Hour – When blue hour ends and when the sun rises.
- Day Time – When the golden hour has ended.
- Golden Hour – When daytime ends and when the sunsets.
- Blue Hour – When the golden hour ends.
Basic data about the moonrise will also be listed but depending on the time of the month this could appear in different places in the data flow. Remember, the moon can be visible during the day as well as during the night.
On either side of the core day time data, you will see times relating to nautical and astronomical periods as well as basic galactic core visibility.
Additional data can be found by scrolling down and includes:
- Time to set – depends on the time selected (if not set to auto detect).
- Hours or daylight
- Azimuth and elevation – also depends on the time selected.
- Angular diameter
- Distance from the earth
- Shadow ration
- Transit
Clicking on the Calendar button will display a list view of days of the month along with sunrise and sunset times and bearings. Selecting a date will display the full set of data allowing for detailed planning in advance.
The AR function is available here allowing data to be overlayed on top of what the camera is seeing. This provides a great way to help visualise the data when you are on location.

Finally, the Seasons button will give you time and dates for the summer and winter solstices, and the equinoxes for whatever year you might want to see.
Use of this pill is straightforward and it will be really useful to any landscape photographer wanting to shoot the golden hours, or for outdoor portrait photographers.
Moon
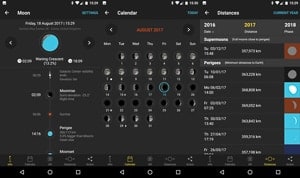
This pill displays data in much the same way as the sun pill but obviously focuses much more on the specific characteristics of the moon.
- Moonrise and Moonset – What time the moon will rise and set, and the elevation of the sun.
- Moon Phase – The current phase of the moon. For example, waxing crescent, and the percentage visible.
- Azimuth and Elevation – the bearing and altitude of the moon for the time and date specified.
- Time to Set – How long from the time specified will it be before the moon sets.
- Other data – including the angular diameter, age, distance from the earth, shadow ratio and the transit time.
Alongside the moon data, it will also show what the sunrise and sunset times are, and when the galactic centre will be visible.
Clicking on the Distances button will also show:
- Supermoon – when the next supermoon is (date and time).
- Perigees – when the moon will be at its closest to the earth.
- Apogees – when the moon will be at its furthest from the earth.
As with the Sun pill, any date can be selected for advanced planning and the AR function is also available.
Again, this pill is straight forward enough to use and provides a significant amount of moon related data. Any photographer who likes to shoot the moon, or is looking for a moonless night to take images of the starts will likely find this level of information critical.
Exposure
The Exposure pill is a clever little calculator that when provided with a set of values can calculate what the equivalent exposure will be if you change something in the exposure triangle or add something like an ND filter.
You start by specifying your starting values (test settings) of the exposure triangle:
- Aperture
- Shutter speed
- ISO
You then tell it what you want to calculate the equivalent exposure, which is again either the aperture, shutter speed or ISO. Then when you specify which of the other two exposure triangle values you want to change, it will also tell you what the third should be so you get the same exposure.
For example, imagine you take an image with the following values:
- Aperture – f/11
- Shutter speed – 1/125s
- ISO – 100
Then you want to change the aperture to f/5.6 but you wanted the exposure to be the same. To do this you would enter the first three values under Test Settings, and then select Shutter Speed from the list of Calculate options.
Then in Equivalent Settings, you would specify the new aperture as f/5.6, leave the ISO at 100, and it would then tell you that if you set the shutter speed to 1/500s you would get a matching exposure.

You can really mix things up, and change multiple values, calculate shutter speed, aperture, and ISO values for equivalent exposure. You can also keep the exposure triangle values the same and use the option to specify an ND filter to recalculate shutter speed.
It takes a little time to get your head around what this pill can be used for and how, but once you do it’s an invaluable tool. It will be very useful for those photographers that use ND filters or where you want to have equivalent exposures but don’t necessarily want to rely on the automatic metering modes of the camera to work out the exposures.
Depth of Field
There are many scenarios where knowing your depth of field (DoF) is important. Just ask a landscape photographer! The DoF pill is a handy little tool that for any given focal length, aperture, and subject distance will tell you useful information such as:
- Hyperfocal distance – the closest distance that you can focus the lens and still keep objects at infinity acceptably sharp.
- Hyperfocal near limit – The distance between the camera and the first object that would be considered acceptably sharp when the lens is focused at the hyperfocal distance.
- Depth of Field – The distance between the farthest and closest objects or points which can be considered acceptably sharp.
- DoF Near Limit – The distance between the camera and first point that will be considered acceptably sharp.
- DoF Far Limit – The distance between the camera and farthest point that will be considered acceptably sharp.
- DoF In Front – The distance between the DoF Near Limit and where the camera is focused (focus plane).
- DoF Behind – The distance between the focus plane and the DoF Far Limit.
If all that information seems a bit overwhelming the pill also displays the data in a diagrammatic form to help you visualise it.

The DoF pill also lets you:
- Switch to advanced mode so you can manually specify the Circle of Confusion (CoC) rather than specify your camera model.
- Specify if you are using a teleconverter.
- Use Augmented Reality mode.
- Switch to the inverse mode where you can calculate focal length, aperture or subject distance for a set of given values.
- Switch to the Field of View (FoV) pill.

This is another powerful pill and will be loved by many landscape photographers who regularly use hyperfocal distances. What separates this DoF calculator from the others though is the Augmented Reality mode which helps you directly visualise the DoF on the scene you are currently shooting.
Depth of Field Table
Following on from the Depth of Field pill, the DoF Table pill presents the depth of field in tabular form when you specify your camera and focal length. It will also tell you the hyperfocal distance for that camera and focal length. While much of the information in this pill is available in the Depth of Field pill, the tabular nature of the data in this pill makes browsing of the information easier.
For example, you can quickly scan the table to see how the depth of field increases or decreases for a given subject distance as your aperture changes. This will make finding the optimal aperture for a scene easier.
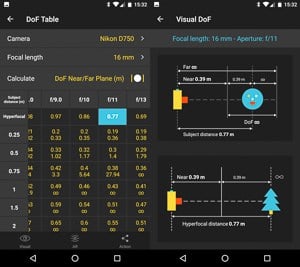
You can also get a visual representation of the data if you select a value from the table and the augmented reality feature is available.
Hyperfocal Table
If all that near and far limit stuff is all a bit much for you and all you really care about is the hyperfocal distance then the Hyperfocal table is the pill for you. Simply specify your camera, and browse a table of hyperfocal distances for varying focal length and apertures.
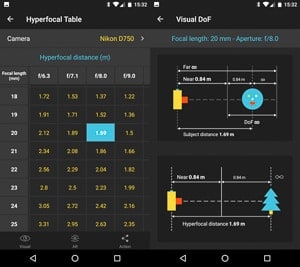
Visual and augmented reality facilities are also available in this pill.
Field of View
The Field of View (FoV) pill helps you understand what would be captured in your frame given a specified focal length, subject distance and orientation of the camera. By specifying these values along with the camera you are using you can find out:
- Horizontal angle of view
- Vertical angle of view
- Diagonal angle of view
- Horizontal field of view
- Vertical field of view
- Diagonal field of view

This information is then present in graphical form and you can use augmented reality. You can also use the inverse function and work back to calculate the subject distance for a given focal length.
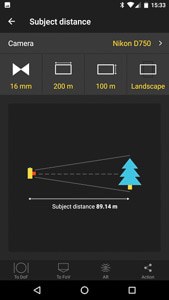
Subject Distance
Subject Distance is a straightforward pill. By specifying your camera and focal length, and the dimensions of the object you want to photograph, the pill will tell you how far away you need to be. For example, with a 16mm lens on a D750, if I wanted to photograph an object 200m x 100m, I would need to be 89.14m away to ensure the entire object was in the frame.
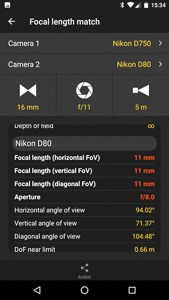
Focal Length Match
The Focal Length Match pill is an interesting feature which allows you to match the field of view, and depth of field for two different cameras with different sensor sizes. For example, if you have a Nikon D750 (full-frame camera) with a 16mm lens, at f/11, focused at an object 5m away, and you wanted the same shot but using a Nikon D80 (a crop sensor camera) then this pill will tell you. If you are interested, on a D80 that would be 11mm at f/8.
Night AR
If you are into your astrophotography then you will find the Night AR pill is very much going to be your friend. Using the same technology as the standard augmented reality capabilities, Night AR provides specific night time information on its augmented display. This includes:
- Milky Way location
- The celestial equator
- Polaris
- North and south celestial pole
- Circumpolar star path
- Moon data
- Right ascension and declination lines
All this can be set to display for the current time and location, or for a specific time and location. This will come in useful if, for example, you wanted to see when the arc of the milky way will be over an object or building.
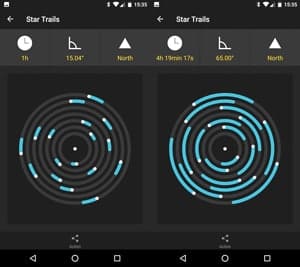
Star Trails
The Star Trails pill is another great one for the astrophotographer, particularly those who like to have star trails painted on their images. For example, if you specify a time of 1hr the pill will tell you that the stars will paint an arc of 15 degrees, and give you a visual representation. You can also flip this and specify the arc itself. So, to get the stars to paint an arc of 65 degrees it would take 4hr 19min and 17s.
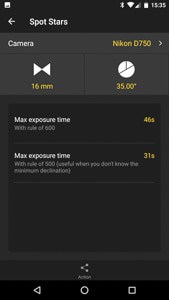
Spot Stars
If you want your stars to be bright spots rather than trails the Spot Stars pill is the one for you. By specifying your camera and focal length the pill will tell you the maximum exposure time to keep your starts pin sharp. For example, for a 16mm on a Nikon D750, my maximum exposure time would be 46 seconds (using the rule of 600).
Time Lapse
With time lapse photography becoming ever more popular, the Time Lapse pill is going to be very helpful to a growing number of photographers. Unless you are good at mental arithmetic than doing all the calculations to work our shooting intervals and the number of photos you need can be challenging. Fortunately, the Time Lapse pill makes this a bit of a breeze.
Simply tell it how long you want your final video to be, how long you want to take images for, and what the frame rate of your video will be and it will do the rest. So, for a 30-second video at 25 frames per second, recording images over a 2 hour period the pill tells me that I will need to shoot an image every 10 seconds for 750 frames.
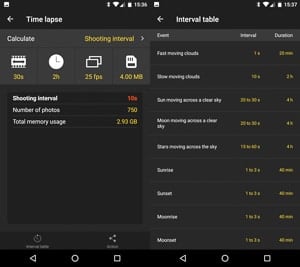
There is also a useful summary table that gives you some indicative values for certain time lapse scenarios.
If you tell it the size (MB) of each image it will even tell you how storage will be consumed on your memory card for the entire time lapse shoot.
Summary
I’ve just scratched the surface of what PhotoPills can do. However, even if you just use the basic functions of a few of the pills, there is something useful for every photographer. Sure, some of the features and data are available in individual free apps you might find in your platforms app store, but having them all available in one tool is really useful. One of the key selling points for me was the augmented reality feature which I used many times when working out focus / hyperfocal distances for my landscape shots. The ability to save, backup, and share information from the app is also powerful.
Is it worth the asking price though? At £10 it’s definitely at the higher end of the market but only you can decide if it’s worth it. For me though, and I will likely only use a small portion of the app, it’s still worth the asking price. It’s a bit like Photoshop. I’ll only ever use a small percentage of the capabilities but I wouldn’t want to be without it.
Further Information
If you want more information on PhotoPills be sure to check out these two great Photo Taco episodes on the app:
You will also find a stack of information on the PhotoPills Academy which can be accessed from the app itself or by clicking on this link here.
Love Photo Pills, but I do wish it weren’t so hard to understand how to use it.
Hey Jim, I think the key to PhotoPills is to start with the basics otherwise it’s all to easy to get overwhelmed by the mind boggling array of options. Complexity is most prevalent in the Planner pill where you can create some very detailed plans. As a landscape photographer I’m typically only concerned with sunrise / sunset times and the direction of the sun. Once I realised that I didn’t need all the other information available. I found it a lot easier to use.
That’s not to say there isn’t room for improvement in the app, it’s just that there is a bit of a learning curve. Once you’ve spent a bit of time with the app, listened to the Photo Taco episodes, and watched the PhotoPills channel, the app becomes less daunting and easier to use.
Thanks for reading the article and leaving a comment. I think a few Android users were jealous that Apple users have had the app for so long. Great to see it available to a wider community now.
Do you have to have wi-fi active to use PhotoPills? I will be in the deserts of Utah and will not likely have access to wifi with my iPad.