
 We are all busy these days, so it is important to use your time wisely when you're out taking pictures. It's especially important when you intend to shoot at multiple locations. There are a lot of things to consider:
- Which locations do you want to photograph?
- What's the best route?
- Is there a particular time you need to be at a location?
- Am I fully prepared?
I've been working toward photographing every grain elevator in my home province of Manitoba, Canada. I've photographed over 140 of them! I have already photographed all of them near to me, and now I must drive at least 3 hours to see a new one. With the distances involved, it is important for me to optimize my time to ensure that A) I photography as many as I can, and B) I don't miss any.
In August last year I photographed 48 elevators in two days, driving about 1200 km (750 miles). My next trip will be to the northwest corner of the province, where there are a bit over 40 elevators to photograph.
Target Acquisition
First, you need to decide what you are going to photograph. For me I had to find all existing grain elevators in the province. There are a few elevator-specific web sites that helped. You'll need to determine where to look for your particular photographic “target list”. Scouting locations on Flickr or 500px is helpful.
After that, Google Maps and Street View are your friends.
We live in amazing times where a satellite view of a location is available with a few mouse clicks. Google Maps (or Bing, or Yahoo!) provide great satellite views to help you identify landmarks or buildings that you wish to photograph. If you're looking for, say, abandoned farm houses or ghost towns, some hunting with Google Maps may bring up a possible target. I like to use the map view to follow rail lines then use the satellite view, zoomed in, to find the grain elevators.
Next you will want to try a Street View to see how it will look when you are there. Street View is great but not available in many locations. I've found that it will be available on major and many minor roads. Often a Street View will show me that the grain elevator I saw in the satellite view doesn't exist any more, saving me a stop!
Be sure to record the location – either the street address or the GPS coordinates.
Tip: In Google Maps on your desktop browser, you can get the GPS coordinates by right-clicking on the location and selecting “What's here?” The GPS coordinates are shown in the popup box.
If you have a limited time, you may wish to rate the targets to help you pick the ones you really, really want to shoot.
Routing
Once you have a list of locations to photograph, the next step is to plan a route to get to each spot in the most efficient way possible. I like to make a spreadsheet.
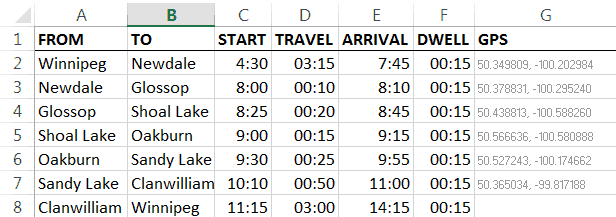
Each row has the start and end of the trip segment, four times, and the GPS coordinates. I enter the first start time, the travel time to the destination, and the dwell time (the time I plan to spend photographing at the site), and have Excel calculate the arrival time and the next row's start time. That way I can change the start time such that the last arrival time matches my goal – whether it is to be home at a certain time, sunset, or whatever.
I get the travel time from Google Maps by asking for directions between the two locations.
Once I have the spreadsheet built, I print it out so I have a hard copy in my vehicle.
Timing
Your project likely isn't exactly the same as mine (although you should give photographing all of the grain elevators in you area a try if they are around), it may not be possible to wait around for great shooting conditions. Still, just a reminder that while clear, blue sky days are wonderful, they don't tend to make the most interesting photos. Also, shooting in the middle of the day when the sun is at it's highest puts a pretty harsh light on things and also doesn't usually make for the best pictures.
By using a spreadsheet like the one above, you can see when you are at particular locations. You can use this to plan to be at a location for sunrise, sunset or another time of interest. I often have a particular time I need to be home, so I adjust the start time until the end time is acceptable. This might mean some early morning driving!
Speaking of sunrise and sunset, there are plenty of apps to tell you when those will be. The Photographer's Ephemeris and Magic Hour are two well-known apps that are very useful for photographers.
You may also want to consider adding a little variety to your project and getting a night time shot. Photos with the Milky Way or a field of stars in the background are pretty amazing – especially if you can get out beyond the bright city lights that produce so much light pollution you can't see the entire field of stars. Darksitefinder.com can help you locate a place outside the light pollution on your computer, or you can check out the Dark Sky Finder iOS app for mobile. Check out this article for tips on how to reduce noise when shooting night stars, or listen to Improve Photography Podcast Episode 137 for tips on shooting at night.
 Packing and Preparation
 Packing and Preparation
- Ensure the date/time on your camera is correct so you don't have to adjust afterward
- Format your SD/CF cards in the camera
- Consider bringing a GPS instead of using your phone to save on battery. If you do plan to use your phone, and you use Google maps, it is a really good idea to save the maps of where you are going to your phone by typing “OK Maps” into the search bar and hitting the Go button. Google maps will then ask you to pan and zoom the map data you want to save to your phone. No worries then if when you get to the sight you have little to no data connection!
- Pack the right gear
- Fuel up your vehicle
- Bring fuel (food, water) for yourself!
Plan B
No matter how much you plan ahead, something can come up to throw a wrench into your meticulously-planned schedule. Have alternates available – keep those “targets” that were rated a little lower than the ones you chose. Think of how you can adapt to keep on schedule. Keep an open mind and roll with it – maybe something great will come out of it!
Summary
Follow these steps to prepare for your photography trip:
- Build a list of subjects you want to photograph
- Plan your route
- Adjust timing to suit your schedule
- Pack properly
- Be ready for a change of plan
Good planning and preparation will go a long way to ensuring your photography excursion will be a success. The rest is up to you!
Bonus: If you like the idea of the spreadsheet shown in this poist, you can download a copy for free: Trip Planning Spreadsheet
This is very similar to my actual systems when I have to do similar trips. I find that having some extra battery, and some prepared food for avoiding stops can be quite useful. Good work!