
I recently had a client order a very large 7’ (2.1 meter) print of a night photo I took in Iceland. The project really tested my post-processing skills because making a very large print of a high ISO photo is difficult to do without noise ruining the shot.
I want to share with you a few techniques I’ve learned that help me to dramatically reduce the noise in my night photos—including one slider (and no, it’s not the noise reduction slider) that makes all the difference.
Stop Using Noise Reduction!
Noise reduction has improved significantly in Lightroom, Photoshop, and third party plugins over the last two or three years, but in my opinion, it’s still not good enough to use much without destroying the quality of a photo.
I rarely use more than the slightest amount of noise reduction. There’s a better way, which I’ll show below! But before we get to that, let me show you why noise reduction should, in my opinion, be used with great care or avoided entirely.
This image straight out of the camera looks like sandpaper (shot on ISO 6400 on a D800). It’s completely unusable.
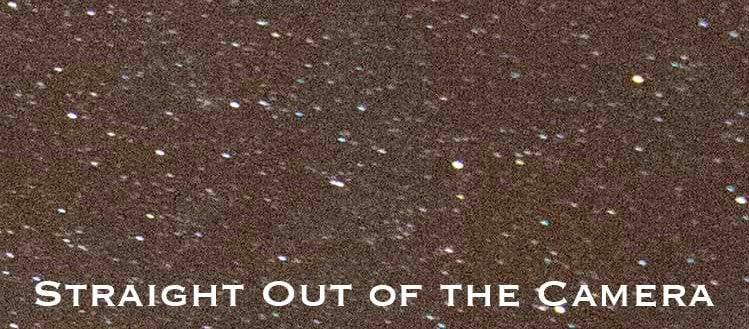
Next, let’s look at the same image, straight out of the camera and just one adjustment—noise reduction.

The noise reduced image, however, is probably even worse. It takes noise and trades it for smudginess (it’s a word—trust me). Obviously this is too much noise reduction, but I have to apply this much before the noise is removed!
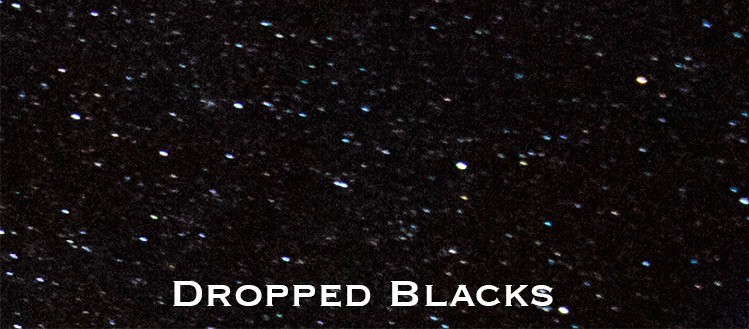
There is a better way, and it’s the blacks slider in Lightroom (or camera raw). Dropping the blacks kills the noise faster than noise reduction, and doesn’t hurt the sharpness of the image.
This photo has blacks set to -40, a slight white balance correction, and just the tiniest hint of noise reduction before it starts to impact sharpness.
Not to mention, dropping the blacks also provides much better contrast and makes the night sky look more… nightish. It looks more like what we really see when we look into the sky—darkness sprinkled with stars.
Sometimes, however, dropping the blacks can make the foreground too dark. If that happens, simply use an adjustment brush to apply the dropped blacks only to the sky, or only to whatever areas of the photo it looks good in.
Stop Using Long Exposure Noise Reduction!
Long exposure noise reduction, in theory, is a magnificent technology. When it is activated in camera, the camera takes a normal exposure and then goes blank as it takes a second, invisible exposure that you never see.
Since the shutter never opens for the second exposure, it should be entirely black. But since the sensor is still producing heat, it will produce noise in the dark image. This noise pattern is then subtracted from the noise in the normal image.
For years I used long exposure noise reduction in my night photography on the insistince of photographers who told me it would cut down the noise in the photo.
Then, I tested it and found absolutely zero difference. So I stopped using it.
Mark Gee confirmed my suspicions when he was on the podcast, and explained that long exposure noise reduction does absolutely nothing unless you use the software from your camera manufacturer to process the image (View NX from Nikon, for example).
Shooting a photo with long exposure noise reduction and then processing the photo in Lightroom or Photoshop will yield no benefit.
Long exposure noise reduction is a valid method and can be helpful, but not unless you’re ready to adjust your workflow to incorporate a new piece of software. No thanks.
Increase Your ISO
Yes, it’s true that a higher ISO does indeed produce more noise in a photo. However, as I have shot with hundreds of photographers at our completely free photography workshops all over the world over the last year, I’ve found that too low of an ISO—not too high—is often the noise culprit.
If you have ever been blinded by the light of your cell phone after waking up in the morning, you already understand why this is.
When shooting at night, your eyes naturally adjust to the darkness and allow you to see. The LCD screen on the back of your camera, however, is made up of light bulbs. It’s bright! This leads photographers to think the image they are capturing is far brighter than the file actually is.
Recently at a workshop I walked down the line of 20 cameras as we were doing night photography. I asked each of the photographers to check their histograms. 100% of them were underexposed.
It’s easy to fall into his underexposure trap when shooting at night. I only no about it because I’ve made the mistake dozens of times myself.

Part of the problem in properly exposing a photo at night is understanding what a good exposure looks like on the histogram.
The histogram above is perfectly exposed, but it would be easy to think the photo is too dark.
Night photos often have large areas of very dark tones. So it’s normal to see data piled up toward the left side of the histogram. As long as the data does not touch the left side of the scale, it still has detail.
Also, look at the tiny amount of data extending almost all the way to the right of the graph. This is a small amount of data because only a small part of the photo is bright, but if I were to increase the exposure at all, the whites would clip.
As proof, look at the image below, which is the photo that produced the histogram. You’ll see that it’s properly exposed.

The fact is that you’ll always have a photo with less noise when you properly expose the photo, rather than underexposing the image in-camera and then trying to brighten it in Photoshop.
Increasing exposure in post-processing produces a large amount of noise. Expose properly in camera to avoid it, and that often means a higher ISO.
great advice, thanks
Thanks for the tips! I had always tried to keep my ISO at 100 for almost all of my shots (excluding indoor sports photography, etc.). However, I recently read a review on the Canon 70D, where the author noted the preferred ISO setting for that body was 200. The article went on to say that each camera has a sweet spot when it comes to ISO, and that isn’t always the lowest setting.
Your article reconfirms that high(er) ISO isn’t always bad as long as it is used correctly.
Thanks bunches!
Interesting,I will definitely try this.I have to experiment with the in camera noise reduction since you mentioned it.When I tried with it switched off my images came out HORRIBLE so I set it on and forgot it there lol.
Thank you so much for the tips !!! Especially on not using long exposure noise reduction. This will help me for sure !!
Thank you so much for the tips !! Especially the one on not using long exposure noise reduction. This will help me out very much !!!
Thanks for sharing. What were the settings for the photo of the boat?
That interview with Mr Gee was great! I am a new owner of a D750 and I love the low light performance and the Long Exp NR is INDEED 100% NOT EFFECTIVE with LR and PS! Absolutely support that claim!!
On the night shot with the boat, can you tell us what your debt of field and shutter speed was set to?
Thanks
I never considered lowering the black and levels and fixing white balance a replacement for fixing noise, but it’s exactly what I do with my night photos. I also start at ISO 400 when shooting at night and find this to be perfectly fine on my Canon 6D.
I’ve never used long exposure noise reduction because I don’t have the patience for it. But like a lot of settings, I think it only applies it to the jpg in-camera. So it does do it in-camera, but not to a RAW file.
Great tips, very helpful.
Thanks
I also know that the D800 has a Sony sensor which has a much better DR than the Canon 5D3. I will give this a try as I always move black down at 3200 ISO. Thanks
I would be interested in knowing your settings for the boat shot too. Were you using 100% ambient light?
Great tips! But I have one huge question regarding what your describing… How do you adjust ‘Black’ slider in an adjustment brush? I’m in LR/CC, so newest version. Black’s in the basic menu, but not in the brush adjustment menu (as I understand it). If there’s a way to get that specific slider in a brush I want to know! You don’t mean shadow of exposure… You mean ‘Black’, right?
My brush options:
Temp, Tint, Exposure, Contrast, Highlights, Shadows, Clarity, Saturation, Sharpness, Noise, Moiré
No Black and I’ve always wondered why.
I dropped the blacks on a 20″x 30″ metal of the Heceta Head Lighthouse shot at 3200 and this technique worked extremely well too! I wasn’t thinking about noise reduction when I used it, just loved the way I enhanced the sky and added definition to the lighthouse beams. Another one for the noise reduction toolbox.
Great tips but I’m not sure I agree with you about the Long Exposure NR. I agree that in normal circumstances it doesn’t do anything but once you start going above 3 or 4 minute exposures it seems to do a good job of removing the harsh colour noise in the raw files. These very harsh, but less frequent, colour noise specks, only seem to show up on exposures longer than 3 or 4 minutes and I’ve noticed that they are almost gone when enabling LE NR.
Maybe one day I’ll find the time to do some proper tests but it’s worth bearing in mind for now.
Great info. I will have to look harder at my settings and my shots from my last night shoot in the California Desert.
I REALY USE THIS INFORMATION THANK U SO MUCH
Worked a charm, good advice. I used a Gradient Filter in Camera Raw to isolate the night sky so I could make that part blacker and less noisy, while keeping or even lightening, the foreground.
I am still a very new beginner at DSLR photography and initially had issues processing my night time photos and trying to get rid the excess noise and this advice has helped me out a lot.
My setup is a Nikon D100 and a Nikon AF Nikkor 28-80mm 3.3-5.6G lens
Definitely going to give this a go!!! Do you also turn off the high ISO noise reduction along with the long exposure NR in camera?