
Podcast: Embed
Subscribe: Apple Podcasts | RSS
In Episode 35 of the Improve Photography Podcast, Jim and Dustin answer listener questions about panning, keeping your camera dry in the rain, getting the shadow off the wall in your portrait shoots, and much more.
Guide to Episode 35
[0:25] Photo Shoot Checklist
We did a shoot for our Portrait Class this week, and we spent several days preparing for it. We did all the stuff we've mentioned before – look online for pictures, talk to people about the location, plan the day/time, etc. Unfortunately, the shoot didn't go as smoothly as we'd hoped. Hopefully you can learn from our mistakes.
-
- Don't forget your batteries!!! We ran out of batteries on this shoot. We had all the gear, just not the batteries to power that gear. It was tough to squeeze enough juice out of the batteries that we did have to make this shoot work out. In our defense, we did need several different kinds of batteries… but really, if you're running on battery power, you've got to have – you guessed it – batteries!
-
- Don't forget your bracket. When you attach a softbox to a stand you're going to need a bracket. If you forget that bracket, then some lucky soul gets to hold the softbox for the entire shoot. (Dustin's arms were pretty tired by the end of this shoot.) This goes for all your other extra little things – don't forget the little connectors, the cables, the filters, whatever – just because it's small that doesn't make it unimportant.
-
- Don't bring too much gear. We say this a lot when we talk about travelling with your photo gear, but even just going on a simple shoot like we did that was pretty close to home (it would have been just two hours or so of driving if we hadn't missed the turn by 40 miles…) you really don't need to bring every bit of photography gear you own. It is going to make it hard for you to cart it all from your vehicle to the location, and you might accidentally forget something (like your bracket) if you have too many things to keep track of.
-
- Know the location you're headed to. Neither of us had ever been to this location before, and we tried to get a feel for what it would be like by looking online. But once we got there, it really wasn't anything like we were expecting. That kind of threw us off our game.
-
- Plan your timing well. We missed the turn by about 40 miles, and consequently we were rushed to finish the shoot before we lost all the light. The more pressure you're under, the more stressed you will be and the less likely you will be to take your time and get something you're really happy with.
[5:13] We're thinking about making a physical product. What do you think?
What would have been really cool on this photo shoot is if we had a carbon fiber monopod with a permanently affixed bracket and a permanently affixed small softbox. Then we wouldn't have forgotten the bracket, and the same person who was holding the camera could also hold the softbox using the monopod. This would make it even easier to do a solo photo shoot. So we've been thinking about inventing something like this… what are your thoughts? Is this something other people are interested in too, or does it sound crazy? We'd love to hear in the comments below…
[11:30] Your site is awesome, and I've learned a lot of tips (especially as a beginning photographer). I just wanted to say thanks!
Awww… so nice of her to call in and give us a pat on the back. We're always glad to hear people are finding use in our classes and our site. Thanks!
[12:04] I've been trying to take some panning photos and I'm really having a hard time getting them to turn out. I know I need to track the subject, but no matter what I do the subject of my photo is still blurry. What am I doing wrong?
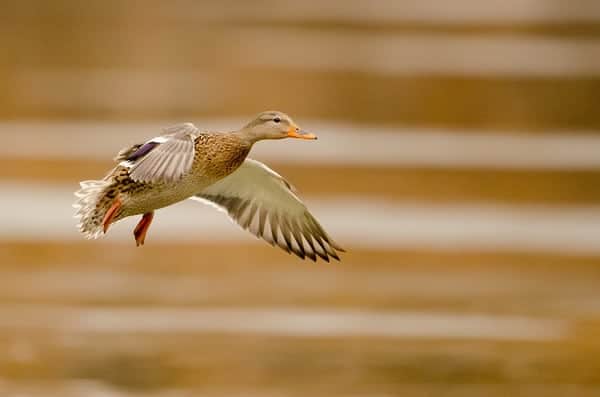
One of the most creative ways to show movement is to use a technique called panning. This image is an example of panning. The bird is in sharp focus, but the background is streaky and blurred. This was accomplished by swinging the camera with the bird as it flew by, and using a slow shutter speed to show movement in the background that wasn’t moving with the the camera.
This caller mentioned that he was setting the shutter speed between 1 and 1.5 seconds. That's where his problem is coming in. That is simply WAY too long to leave the shutter open for a panning shot. A good starting point for your shutter speed is 1/60th of a second for something really fast (like a race car) and 1/20th of a second for something a little slower (like someone biking). Check out this article for some tips to improve your panning photos.
Remember, though, that panning is a difficult technique to master. You can spend a lot of time trying to take panning shots and only get one or two that actually turn out. One thing that sometimes helps is to photograph something that has a constant speed instead of something that is speeding up and slowing down. Also, be aware that some subjects will lend themselves well to panning while others may not be such good candidates. When you try to get a panning shot of a bird while the bird's wings are flapping, you're going to get blur in the wings. Instead, wait for the bird to glide. Similarly, if you try and take a panning shot of someone running, remember that people bounce up and down as they run so you won't get a clear shot in that case either.
[17:14] What kind of results are you getting with the GoPro and your DJI Phantom?
It's been awesome to get shots from perspectives we were never able to get before. Really, there's no other way to get some of these really cool shots. But it isn't perfect – there are still some quirks they are working through: Jim took it to Hawaii and when he got there, the controls were all exactly the opposite of what they were supposed to be – up was down, right was left, etc. Turns out it was a bug in the firmware update he'd just installed before leaving town. Additionally, it takes a lot of practice to get the “jello” effect out of the video (and the stills as well, because the vibration causes blurry stills). You can watch this video to see what Jim has done.
It's a really, really cool device. Just remember that this is cutting edge technology and they're still perfecting it.
[20:03] In Lightroom, how do I view it in two screens?
Go to the Lightroom menu and choose Window->Secondary Display->Show. This will make Lightroom show on two screens. The second screen will be a full-screen preview. In the secondary display menu, there are a lot of settings that you can choose. Jim likes to set the second monitor to “Loop Live” – as you roll over photos in the film strip at the bottom, it shows you a full-screen preview off to the right and if you're working on a photo, it keeps that up on your second screen. This makes working in Lightroom really nice to see a full-screen preview with no tools over it.
[21:50] What do you do when you're on an outdoor photo shoot and it suddenly starts to rain?
Run for cover, protect your gear, and then get back out there and finish the shoot! Read this article for 5 simple (and inexpensive) ways to protect your camera from rain.
[25:06] When I take pictures with off-camera flash, I notice that it puts a really ugly shadow on the wall behind the person I'm shooting. What do I do about that?
Dustin wrote this really great article talking about this exact problem and what you can do about it. The biggest thing is to have the subject step away from the wall, but check out the article for a more detailed explanation and a few other suggestions.
[26:06] I want to tether my Canon 6D to Aperture (Apple's photo editing software) but there isn't a way to do this yet since it's such a new camera. I'm looking for a work-around. Also, I want my subject to be able to see the image I take on an iPad. Do you have some recommendations for good software I could use for this?
If you don't want to use the Canon EOS software utility that you can put on the computer, then you can use Lightroom (it will tether just fine to the 6D) or you can use the Mac Automator tool to take the photos that you take off your camera and import them automatically into Aperture. Check out this article to learn about tethering options for your 6D on your Mac.
As for tethering your camera to an iPad, Dustin uses the EOS remote app for the camera and the iPad. Create the WiFi network between the two devices, and use the “remote shooting” part of the app in tethered mode. This will make the photos come up automatically on the screen of the iPad. Alternatively, you could switch to eye-fi cards and connect that way.
[28:29] I have a Canon Rebel XTi and I want to upgrade to something that can do video, and also perform better in low light. I'm looking at the Canon T2i or T3i. How hard is the movie function to learn? And where should I go to get a used camera on a tight budget?
The T2i (the T3i really isn't much different so getting the T2i would work just fine) will give quite a bit of improvement over the XTi (which is a pretty old camera) in terms of low-light performance. Often we say it isn't worth upgrading to a new camera but in this case, there have been some really great improvements in the last few years and this upgrade would be a great choice.
The video quality is awesome and very easy to turn on, but there are some things that you need to know about when you start shooting video with your DSLR. You have to change your camera settings and you also need to manually focus the lens. Some of the newer models are coming out with auto focus during video, but that's still not working perfectly. As far as settings, in video your shutter speed is locked in and you really can't change it unless you're going for a specific effect. In general, you set your shutter speed to twice the frames per second rate of your video. So if you are shooting video at 30/fps then you'd set the shutter speed to 1/60th. For 24/fps, set the shutter speed to 1/50th. Otherwise, you get a jittery feel to your video.
When you're buying used gear, don't buy the gear with the lowest price unless you can hold it in your hand. Jim really cautions against buying used gear online, especially if it is the lowest priced item. You really want to test the gear yourself and make sure it works properly. Places like Craigslist are great resources because you can find local listings and check it out before you purchase.
[34:40] Doodads of the Week
Jim's doodad of the week is the Cowboy Studio Light Tent. This is a great little enclosure to use if you do product photography – just pop the item inside and take your picture. Then you don't have to worry about having a nice backdrop set up anywhere.
Dustin's pick of the week is the Creative Stylus (it's about $100 from Wacom). It's awesome because it makes it so you can rest your palm on the iPad while you write and you won't make any marks. Super handy for lefties (like Dustin) who tend to drag their hand across what they've written.
[38:30] Prizes for reviews!
The winner is racewell. If that's your username on iTunes, email Jim at [email protected] to get your free online photography class.
To be entered to win the online photography class each week, simply go to this podcast on iTunes and write a one or two sentence review. While they appreciate a a 5-star review, any review will get you entered to win a class for free (a $98 value).
How to Subscribe to the Podcast on Your Phone or MP3 Player (free!)
For iPhone/iPad/iPod listeners – Grab your phone or device and go to the iTunes store and search “Improve Photography Podcast.” This will help you to download the free Podcasts App (produced by Apple) and then subscribe to the show from within that app. Every time I produce a new episode, you'll get it downloaded right on your iDevice.
For Android listeners – Download the Stitcher Radio app (free) and search for “Improve Photography Podcast.” Or, if you have already downloaded a podcasting client, follow the directions in the next sentence.
For podcast enthusiasts – If you already listen to podcasts and have a podcatcher that you prefer, the feed you'll need to add is https://improvephotography.com/feed/podcast
For those who don't have a mobile device – You can always listen to the show by clicking the audio file at the top of this episode.
Just listened to your last podcast. You mentioned your mono pod flash mount. I like the idea except for one thing: it is a unitasker. If there is a way that you can change the soft box to other items, I would be more likely to buy one.
Hmm… So, if you take the diffuser of the front you can use it just as a flash stand. Then you can sell an accessory kit that has the grid adapter, a beauty dish adapter, and a gel holder. Sound like a start of a marketing plan…
@Carl Trinkle – Good point. You would only get to use a softbox. That would be a nice change. Maybe a universal modifier mount that could accept multiple accessories, like a monolight mount.
Excellent idea.
Just downloaded it, can’t wait to listen to it in the car.
Thanks!
GREAT idea – softbox alone is enough for me. When can I place an order?
Love the studio light tent doodad, definitely going on my Amazon Wishlist.
And it gives one answer to the listener question that’s still unanswered: “What’s the best way to photograph carrots”.