

What are the best settings for star photography? The answer to this question can be as simple or as complex as you want it to be. “Best” really depends on a lot of external factors. In short—you want to capture as much light as you can without over exposing your image. That is the simplest way to put it and if you follow that strategy, you are well on your way to capturing epic images of the night sky!
That is…Assuming you’ve done all the other things you need to do to plan a great night photographing under the stars. Here are some articles to get you going:
Settings: An Overview
There is a lot of information out there on what settings to use for star photography. It usually goes something like this…
“Use a slow shutter speed but not too slow because the stars will trail. Something like 20-25 seconds should work depending on your lens (use the 500 rule). Use your widest aperture (smaller number) like f/2.8 and an ISO around 3200.”
Yes, that can work…some of the time. However, it is certainly not representative of advice that is “best”. So, what is best? My goal is to have you understand the why behind each setting. If you understand the why of each, you’ll be able to think on the fly and adjust for your given situation. It’s the old parable about giving a person a fish vs. teaching them to fish.

Long story short, we want to capture light. At night, there is little light to be had and the light we want to capture is at the end of a journey that has taken thousands if not millions of years. Let’s capture it well.
Shutter Speed
Shutter speed is the first part of the equation in ensuring that we capture enough light. The longer the shutter is open, the more light is captured. So, if the goal is to capture as much light as possible, the longer the shutter speed, the better, right? Wrong…Well sort of anyway.
We astrophotographers are faced with a problem that is sort of unique. I say, “sort of” because the issue appears in many facets of photography. That issue is motion. If we wanted to capture a golfer hitting a golf ball and freeze the action, we would use a very short shutter speed. Perhaps something like 1/2500 of a second. Longer shutter speeds could mean that something in the scene changes while the shutter is open causing the moving object to streak on the frame.
When photographing stars, we are not dealing with something that moves quite so fast but there is movement. The sky appears to move with the passage of time. Of course, we are the ones that are moving as we are on Earth and the Earth is rotating about its axis. This movement is slow, but surprisingly perceptible in images.
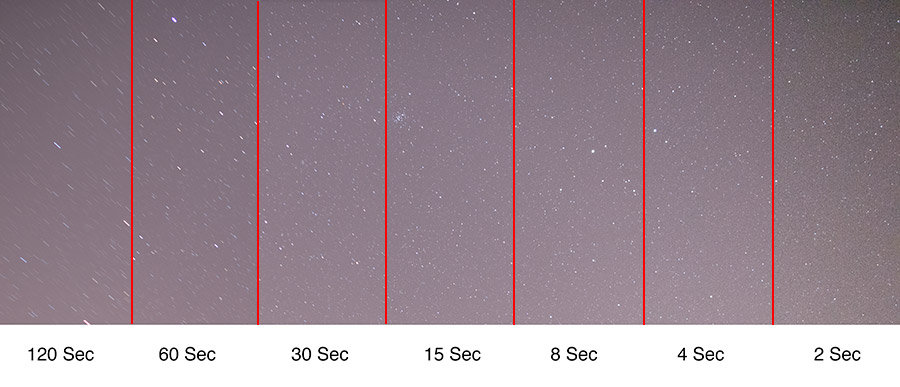
The old rule-of-thumb based on the number 500 (a.k.a. the 500 rule) mentioned in the generic example at the beginning of this article has been, and still is the go-to for many. The way it is used is by simply dividing 500 by the effective focal length of your lens (in 35mm terms). This rule (some photographers use other numbers…I’ve seen everything from 400 to 600) which comes from the days of film, can produce “acceptable” results. But we’re not after acceptable, we’re after BEST.
With modern digital camera sensors and their ever-increasing resolution, the “500 rule” and every variant of it often fails. Enter, the NPF rule.
NPF Rule
The NPF rule uses some fairly heavy math (especially when compared to the 500 rule) to calculate what your best shutter speed would be. Lucky for us, the math is pre-programmed into a number of places including PhotoPills. Basically, the equation uses your focal length as well as your aperture and sensor resolution and the part of the sky you wish to capture (declination) to determine how long your shutter speed should be.
If our goal is to have spot stars that do not trail at all we must use shorter shutter speeds. Shorter shutter speeds collect less light, so we need to push this as far as we can.
Here is an example screenshot from PhotoPills showing my best exposure times with regards to eliminating star trailing.
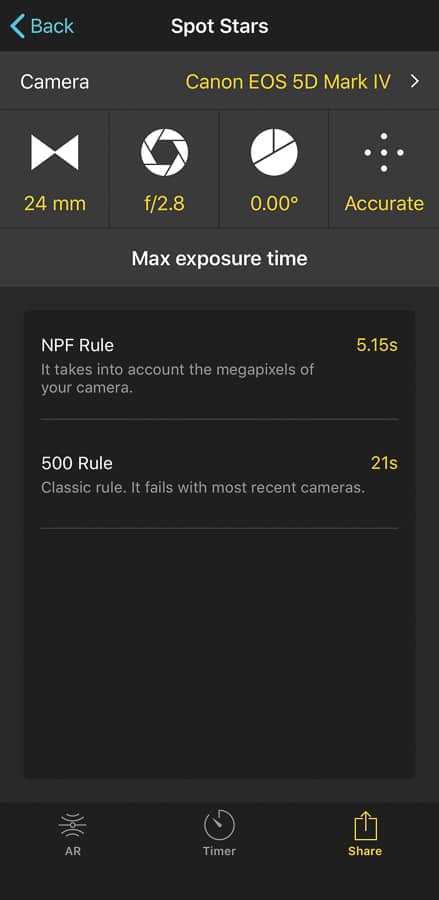
With my Canon 5D Mk IV at 24 mm my shutter speed goes from 21 seconds with the 500 rule all the way down to 5.15 seconds if I want to have perfectly pinpoint stars (at f/2.8).
Here’s the problem: Limiting your exposure and thus, your light gathering ability, you will increase noise in the image. And it probably goes without saying…Noise is NOT best.
Here is another example of the calculation allowing for “barely noticeable” trails.
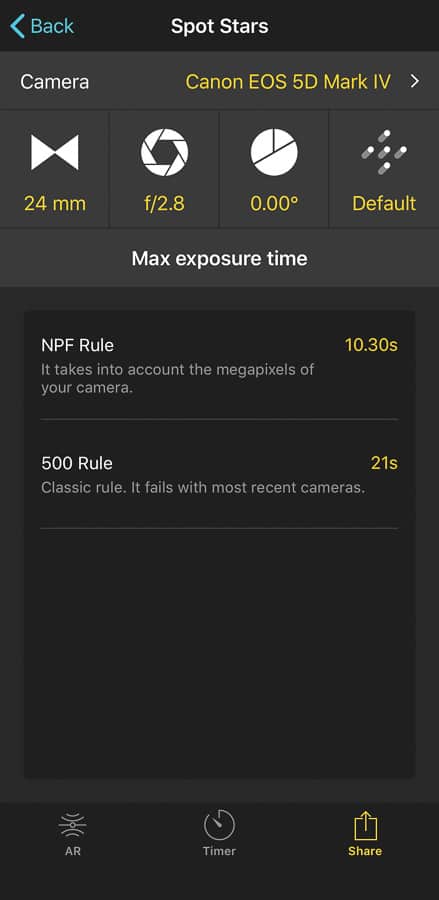
“Barely noticeable” is not clearly defined in PhotoPills but best I can figure it is allowing for 4-5 pixels of drift for a star. Only the most stringent pixel-peepers are likely to notice such a drift and nobody will notice at normal viewing sizes from normal viewing distances. This is a very welcome full stop increase in light (10.3 seconds).
Note: for the declination setting, 0.00 will be the setting most of the time. This is basically taking into account the part of the sky you are photographing. If you are photographing the Milky Way, use 0.00. About the only time you won't use this is if you're shooting through a long lens and/or looking toward the North or South Celestial pole (i.e. Polaris).
End Use
In figuring your shutter speed with regards to star trailing, your end use should be a factor. If, for example, you are planning to print the image huge and people will view it from fairly nearby, you will want to limit trailing as much as possible. If you are only going to post the image to Facebook or Instagram or some other social media platform where your viewers will probably just see it on their phone screen, you can stretch out your exposure a fair bit.
A little bit of personal taste and experimentation comes into play here. Photography is after all, in this writer’s opinion, the perfect blend of art and science. Where you will find your best setting depends too heavily on your setup and your situation for me to put a concrete recommendation here.
Now, there is a workaround for this problem. You could give a tracking mount a try. It comes with its own pitfalls in terms of cost (though they're not always as expensive as you think), complicated workflow and extra gear to carry. I chose not to address tracking mounts here as there is another article here on Improve Photography that fully addresses the topic.
Aperture
Aperture can be tricky and again what is “best” is highly dependent on the situation. My goal here is to go through the trade-offs so you can know which setting is best for you.
Typically, the resources will tell you to “shoot wide open” or always utilize your largest aperture (smallest number). So, if your lens is cable of f/2.8 that’s what you should use for astrophotography. f/1.4? Even better. f/3.5 (common kit lens)- Not ideal but you can make it work. These will certainly work, but again the question is: What is best?
Tradeoffs
Generally, lenses are sharper if they are stopped down a little. How much depends on the exact lens you are using. A lens might be said to be really sharp at f/1.4 but it is probably sharper at f/2.8. Or an f/2.8 lens will probably be sharper at f/3.2. So just stop down a little, right? Well, the problem we run into again is light collection.
A lens with an aperture smaller than f/2.8 (i.e. f/3.5, 4, 5.6, etc.) is said to be “slow”. This means that they need more time to collect the same amount of light. With a longer shutter speed, we can easily achieve proper exposure…except we saw in the previous section the problems with that.
So, it seems, we are stuck. There are a couple of ways to work this out though. If you follow the NPF formula from above and input a smaller aperture into your PhotoPills calculator, you will see that the shutter speed you can use without trailing is longer. This is due to some physics principles that we do not need to delve into here. You will not be able to change the shutter speed enough to offset the reduction in light caused by stopping down.
If you’re wondering why even bother stopping down, try it and you may notice that there is a huge benefit in terms of reducing star bloat and creating a sharper image with more detail. Furthermore, stopping down on some lenses can reduce significant vignetting caused by shooting wide open allowing you to collect light more efficiently. Look back at the grid image at the top of the article to see how f/1.4 darkens the image.
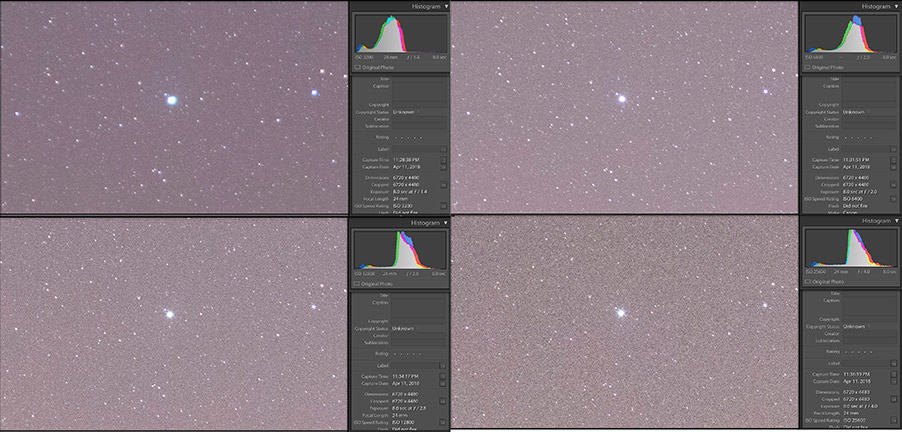
It is difficult to tell here, but the shot at f/1.4 is slightly dark due again to the vignetting problem. The Histogram gives it away. There is also significant star bloat at f/1.4 that goes away as soon as the lens is stopped down. By f/4 noise is becoming a real problem.
ISO
High ISO settings do not cause noise. Yep, you read that correctly. High ISO is correlated with noise in an image but that does not equal causation. The real causes can be complex but put into the simplest of terms, noise in your images is caused by your exposure (or lack thereof).
In this context, exposure refers to the light that actually enters the camera system. This light comes from a combination of two elements; The amount of time the shutter is open and the size of that opening. In a world with more and more camera sensors that are “ISO invariant”, ISO can be thought of more as a post processing tool than anything else.
The following image shows the difference between shots where ISO was the only factor changed and the exposures were leveled in post. If ISO was the cause of noise, the shots at the higher ISO should exhibit more noise, but they do not. In fact, the opposite tends to be true. If a camera is ISO invariant, there is no discernible difference between each shot.
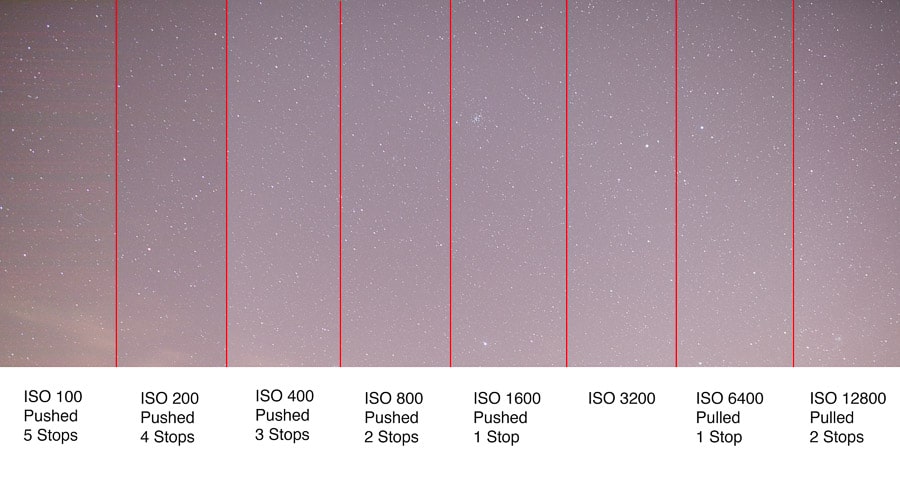
In this example, with the 5D Mk IV, you notice that the shots at 100 is quite noisy. This camera is not completely ISO invariant though it is better than some previous generations. The Fujifilm XT2 and some Sony bodies are known for being almost completely ISO invariant. ISO invariance would be considered an asset, especially in astrophotography where it enables one to boost exposure in post without worrying too much about adding noise.
In the next two examples, the same process was used, except that the true exposure elements were changed (shutter speed and aperture). As we move into shorter exposures and smaller apertures the images become unusable very quickly.
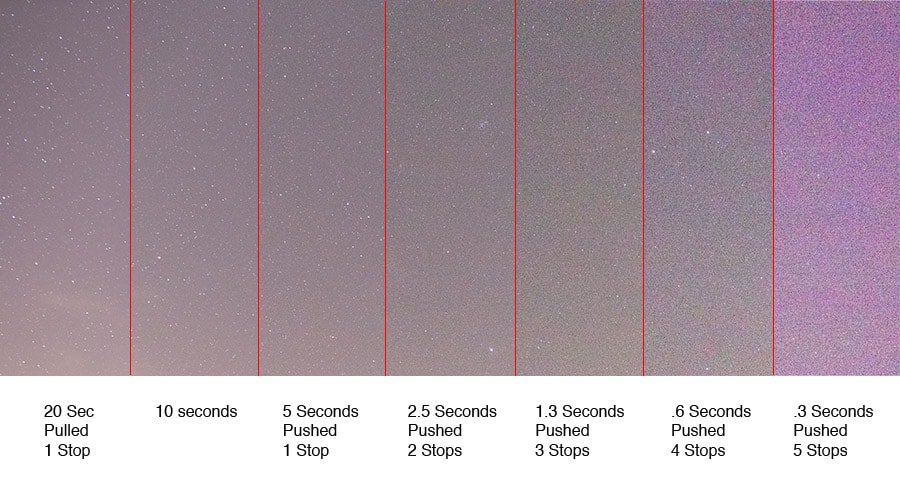

In short, when less light is allowed to pass to the sensor, noise is increased drastically. This means that it is very important to try to gather as much light as is practical for any given situation.
Correct Exposure
So how does one know when they’ve achieved the correct exposure. Your best friend in terms of getting correct exposure in astrophotography is your histogram. At night, even an under exposed image will look nice and bright to your dark adjusted eyes when it flashes on the back of your LCD. Don’t trust this initial impression. Check that histogram to make sure you have a nice balanced curve placed in the middle of the graph.
Now, if you happen to have a camera that is ISO invariant, you can get away with leaving the ISO down if you want. This comes with the potential benefit of increased dynamic range and not having to worry about over exposing and clipping highlights (which can cause your stars to “bloat”). The only drawback in this case is not being able to see your images as you shoot them.
Be careful though! If your camera is not completely ISO invariant, when you boost the exposure slider in post, the image will exhibit additional noise.
So, what does this all mean?
What is best? We’ve come full circle. It all comes down to what the photographer is willing to sacrifice in terms of trade-offs and what the end use is. It’s about creating a balance between gathering light through a long exposure that keeps star trailing to a minimum. Stopping a lens down to sharpen the stars, reduce aberration and vignetting while keeping noise from creeping into the final image. And knowing how ISO actually impacts our images with our chosen camera system so we can use it to our advantage.
Getting to know your camera system and how it behaves with regards to each of these settings will help you to make the best possible exposures of the night sky.
Good job! This was very helpful to me!
Thanks Ryan! I’m glad it was so helpful!
Wonderful job, Brad. Thank you for making this subject so clear and understandable even for a somewhat technically challenged person as myself. I have yet to tackle the night skies photographically, but the information you’ve presented is going to help enormously in getting me started.
Thanks for the feedback Gerry! Can’t wait to see your images :).
Thank you Brad, I can already think of a couple mistakes I’ve been making! Going to drive out to the middle of nowhere one of these days and test out what I’ve just learned 🙂
very informative! thank you again!