

If you want to take your landscape astrophotography to the next level, you should take a good look at tracking mounts. In short, a tracking mount rotates to negate the perceived movement of the night sky allowing for the use of longer exposures, smaller apertures and thus lower ISOs. This all equates to better representation of the fine detail in the night sky with a higher degree of sharpness and LESS NOISE!
The addition of this tool to your kit, while powerful, is not without its own drawbacks. With careful planning and execution, these drawbacks can be mitigated.
What is a Tracking Mount?
Tracking mounts come in many varieties. The mounts I will primarily reference are basically motorized heads that attach to your tripod and slowly rotate in sync with the rotation of the Earth to counteract the apparent movement of the sky. The most popular mounts rotate along one axis (RA or Right Ascension).

The mount is attached to a sturdy tripod in the same way that your ball head would be. Then the ball head is attached to the mount itself and the ball head along with your camera will rotate once the mount is activated.
The mounts require polar alignment, which basically amounts to pointing the axis of rotation at a point near Polaris (here in the Northern Hemisphere) or near the celestial pole in the southern hemisphere. Alignment is generally the part that gives most people fits. What you will find is that the wider the lens you are using, the less precise your polar alignment has to be.
Longer Exposure Times
The main benefit of using a tracking mount is the ability to use longer exposure times to get the shot. Except in the case where we explicitly want star trails in our image, we generally want to avoid them completely. Oblong, stretched stars in an astrolandscape just don’t look all that appealing.
We are limited by the movement of the sky, or rather the perceived movement of the sky as viewed from a rotating, spherical Planet Earth (sorry Flat Earthers, I have nothing for you). The exact time limitation depends on a lot of factors including camera sensor (sensor size and resolution) as well as the lens and aperture being used.
There is also the external factor of declination to be taken into consideration. Declination is basically the north/south coordinates of the star(s) that you are interested in. Imagine a line extending out from the equator of the Earth. The stars that fall on this line, such as the stars in Orion’s belt, would be at a declination of “0”. If they are North of this, they will have a positive declination (to 90) and to the South would be negative. The reason this is important is because the stars that are near 0 declination (the celestial equator) appear to move faster across the sky. This contrasts with stars near the poles. Consider Polaris (The North Star); Polaris is actually situated just over half a degree, or slightly more than the width of the full Moon, away from the actual pole. If it were located exactly at the pole (declination of 90) it would appear not to move. However, it does move in a very tight arc. Because the stars appear to move at different rates based on their location in the sky we have to be aware of where we are pointing our cameras if we want to eliminate trailing. The Galactic Core is situated at a declination of roughly -30, which means that the area of the Milky Way we most frequently capture includes the “fastest moving” stars in the night sky.

The now antiquated method for determining an acceptable exposure time was to use what was called the “rule of 500”. This rule involved dividing 500 by the focal length (with crop factor) of your system. For example, 500/24 (for a 24 mm lens) would give you an acceptable shutter speed of about 20 seconds. Note that sometimes the number of 500 is expressed as 400 or 600. These are just rules of thumb and as such, are useful in the field but tend to fail under many circumstances.
Now, if your image is viewed only on Facebook via a smart phone, this is likely to work well. However, if your plan is to make a large print that will be viewed at a fairly close distance you will probably notice star trailing.
Enter the NPF Rule. There’s a lot of math in this one and perhaps one of the best resources to help you calculate your exposure time based on this rule is now found in the popular app PhotoPills. Using PhotoPills and plugging in my Canon 6D and my 24mm lens at f/1.4 and with acceptable trailing set to the default of “barely noticeable” I get a recommended time of 10 seconds. A FULL STOP reduction in light hitting my sensor (ouch). If you want to read more about the NPF rule, I recommend starting with Aaron Priest’s web page on the topic.

Now that I’ve mentioned all of that, I’m going to let you know that with a tracker, you can just forget it. Want to take a single, 6-minute exposure of the Milky Way? Go for it. Just remember that your static landscape scene will be a mess. I cover that later.
Use of Longer Lenses
Another limitation, related to the exposure time is focal length. As you saw above, focal length plays into the calculation for exposure time. This is due to the fact that as our focal length is increased, the stars will “move” across the frame more quickly.
Without a tracker, the longest focal length that was advisable to use was around 50 mm on a full frame setup (about 30 mm on a crop camera). The other reason wide angle lenses are often more highly recommended for landscape astrophotography is because most people are interested in photographing the Milky Way and it is quite huge, requiring the wide field of view to fit into a single exposure.
The problem here is that the wide-angle lens has the effect of shrinking the apparent size of the Milky Way much in the same way that it makes impressive mountain ranges look rather unimpressive.
With a tracker, that nifty 50 lens in your bag becomes a lot more powerful as an astrophotography tool. Perhaps you even want to try your fast 85 mm lens and really make something special. I know this is a lens I have been wanting to use for Milky Way photography.
Ability to Stop Down or Use Slower Lenses

There are some real tangible benefits of not keeping your lens “wide open” when shooting photos of the night sky. We’re generally not interested in that silky smooth bokeh that is often offered by a good fast prime lens. We tend to shoot wide open because that configuration gathers the most light.
The legendary Rokinon 24 f/1.4 has a tremendous amount of light gathering power. These Rokinon (see also: Samyang) lenses are generally known for being pretty sharp and aberration free, even when wide open. However, in my copy (and I’ve gone through a couple) there is some coma and some loss of sharpness when shooting the night sky at f/1.4. Stop down to f/2.8 and the image quality takes a pretty good jump in the right direction
Additionally, I also notice that there is a significant improvement in vignetting in the corners when stopped down to that f/2.8. This is to be expected as it is how the optics function. That lessening of the vignetting can lead to a much more appealing image in the case of a landscape astrophoto.
We traditionally accept these issues as the realized benefits of lower noise in our images due to the fact that more light was gathered in the short amount of time before star trailing becomes apparent. But what if we can have the best of both worlds? With a tracker, we can stop down and compensate for the loss in light with a longer exposure. The problem then becomes a matter of dealing with the fact that the static landscape in front of us is now streaking because the camera is moving during the exposure. I’ll deal with that below.
What should also become apparent is the fact that with this technology in our tool box, we can now use some of those slower lenses we have. Given the fact that a tracking mount (the Polarie, the iOptron, or the Star Adventurer) costs less than that Rokinon 24 f/1.4 and WAY less than the new Sigma 14 f/1.8, perhaps we learn the ropes with our kit lenses and save the extra money by buying a tracking mount instead. Just a thought.
Polar Alignment
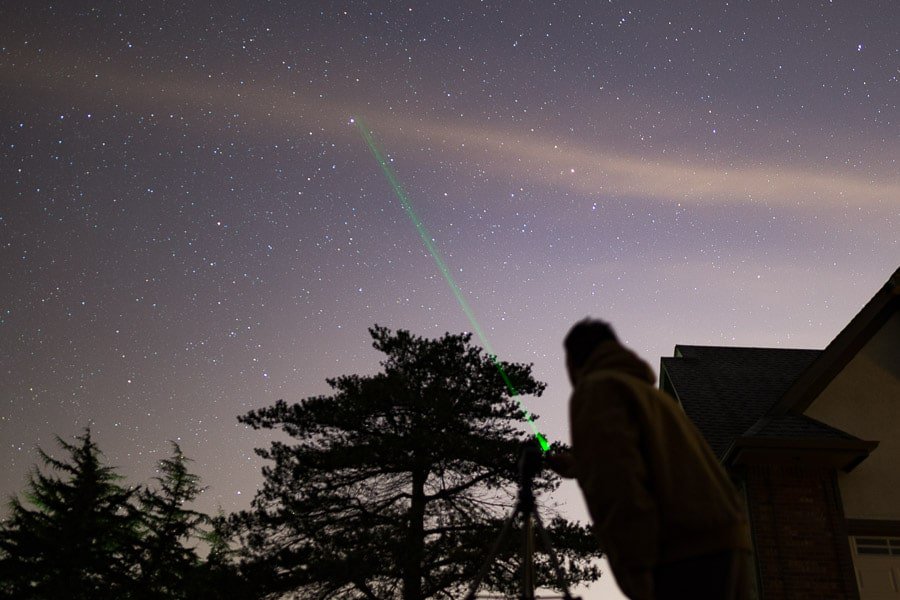
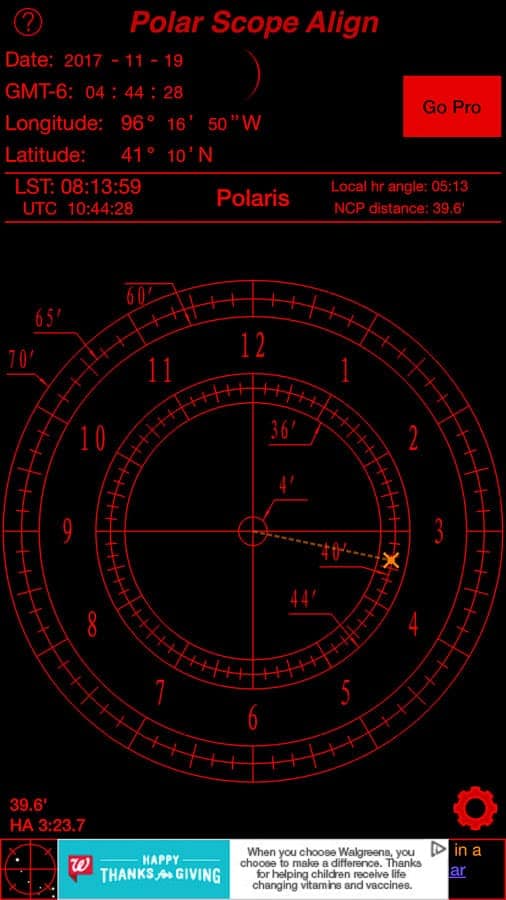
Polar alignment is the aspect of using a tracking mount that scares many away from the prospect. But it need not be so terrifying. Most tracking mounts come with or allow for the addition of a specialized scope that helps with this process. From there, it’s as simple as leveling your tripod and pointing your mount toward the celestial pole. The only difficult part of that is finding that pole, but don’t worry, there’s an app for that. Several actually.

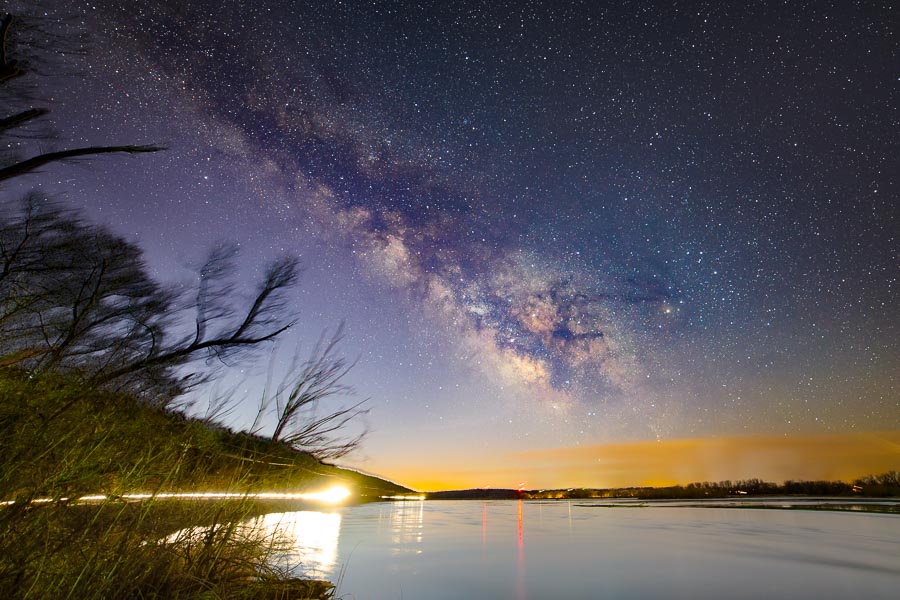
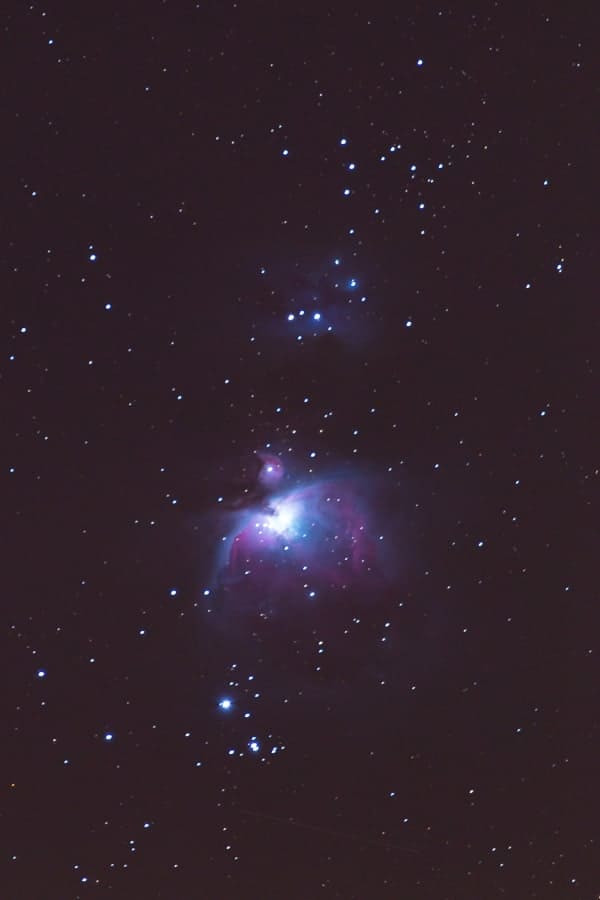
The longer your exposure and the longer your focal length, the more important precise polar alignment becomes. If you’re mounting a 14 mm lens on a full frame body and shooting for a 4-5 minute exposure, polar alignment can be pretty rough and still produce decent results. As far as how rough is a good question. I once shot the Milky Way using my tracking mount with just the above settings. I was not afforded a clear view of the Northern sky from my shooting location so I had to estimate the alignment of the mount. A compass lives in my camera bag, so I was able to get an accurate idea of which way was North and I knew that the mount had already been set for my latitude (about 41 deg N) I was good to go. The following image was the result of this “rough” polar alignment.
How polar alignment works: Your tracking mount is really actually a fairly simple device. It rotates around one axis and generally at the same rate as the Earth (called the sidereal rate). The rotation occurs in the opposite direction of the rotation of the Earth so when you align the axis of rotation with that of Earth, the effect of the rotation is canceled out. With a camera mounted to this rotating device the stars in your frame will remain stationary in the frame eliminating trails!
If that didn’t help you to understand polar alignment at all, I recommend checking out this video covering the topic. (Note: after the 9:30 mark in the video, the topic shifts to very precise polar alignment for telescopes and may or may not be of interest to you).
Dealing with a Static Landscape
So, your mount is polar aligned and you seem to be tracking the stars wonderfully. The only problem is, now the ground is moving in your frame and thus is blurred. It seems as though we simply replaced one problem with another but the problems are very different in one key way.
While we could never just turn off the rotation of the Earth (and we certainly wouldn’t want to), we can turn off the mount. This will allow us to take two images with exactly the same exposure settings and with one of two elements stable in each.
Simply composite the two images together to create your final image. It really is just that simple. In the image above, where the effectiveness of rough polar alignment was illustrated, you may have noticed an issue with the trees on the left of the frame.
Having blended tracked and non-tracked images together in the past, I was not worried about my ability to do so in this case. What I hadn’t realized was the difficulty in blending the two images when the stars were visible through the branches of the trees.
If I tried to mask out the blurring of the trees, I had star trails showing through. If I tried to make sure the star trails were masked, the blurred trees showed through. I tried several selection and blending techniques but there was always some amount of one problem and/or the other.
I will try the same location in the future and my tactic will be to take three exposures. One tracked, one untracked with the exact same settings and one un-tracked with more traditional Milky Way settings that are reciprocal to the other two and then blend the three together. I am confident that this will produce a superior result.
It is worth pointing out that many of the tracking mounts available on the market (including my own Star Adventurer) come equipped with the ability to track at “half speed”. The idea here is to try to strike a balance between allowing the sky to blur and blurring the ground by moving the camera. I have generally not employed this ability as the exposure times I am usually needing are in excess of double what a normal exposure time should be. That is to say that to realize the benefits, I want to go beyond 30-60 seconds. A two minute exposure tracked at half speed would result in everything being blurred (a.k.a. useless).
Exposure Calculation/Managing Time in “Bulb” Mode
Most who are interested in adding a tracking mount to their landscape astrophotography arsenal probably have already had some experience in determining the proper exposure for the night sky. A common approach might be: largest aperture (smallest number), longest shutter speed that produces acceptable results for your situation, ISO up until the histogram is balanced and not all stacked on the left side.
If you’re comfortable in getting a decent exposure for your scene you can make some quick calculations, or better yet, let PhotoPills do the math for you to figure out what your shutter speed should be if you change the other settings.
Typically, when I’m using my tracker, I will typically follow that exact workflow. I would take a series of test shots to determine what a proper typical exposure would be for the conditions I am in. Then I might decide that I want to stop my lens down a little for added sharpness and elimination of some aberrations. Finally, I might set a target ISO that I want to get to in order to achieve a more acceptable signal to noise ratio.
An Example
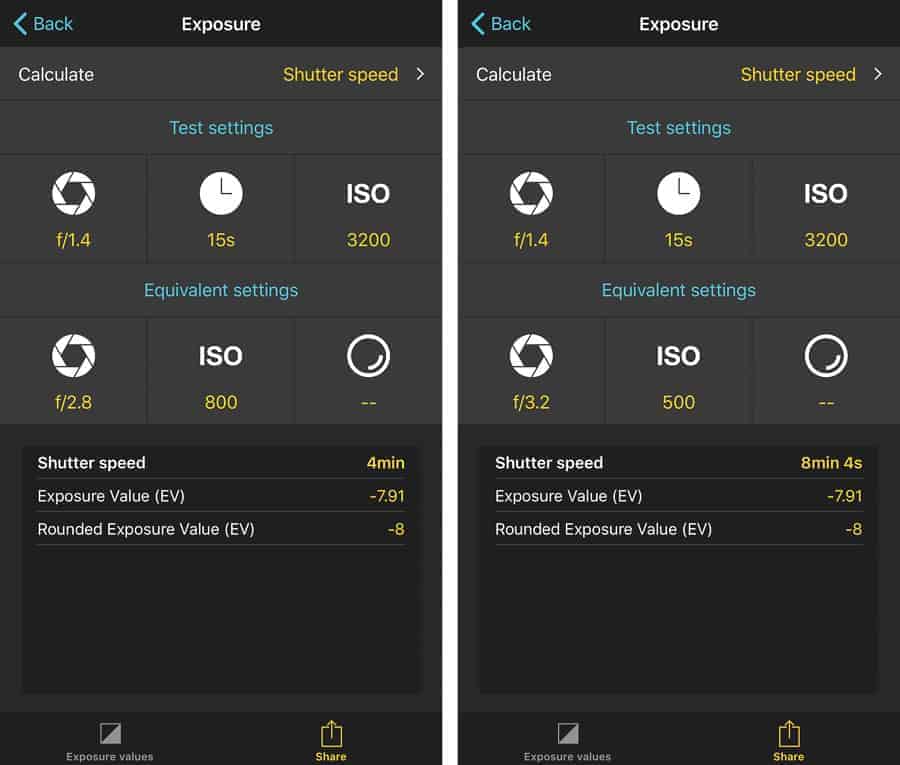
Typical shot: 15 seconds; f/1.4; ISO 3200
Tracked shot: f/2.8 (this was my first decided change, 2 stop decrease); ISO 800 (2 stop decrease); 4 minute exposure (4 stop increase)
These two sets of exposure settings are identical in terms of exposure value (-7.91) and will produce images of equal brightness assuming lighting conditions do not change. When full stop changes are used, the math is fairly straight forward, but if you’re making more abstract changes (or if you just plain hate math) there are plenty of calculators that will help you.
In the PhotoPills Exposure “Pill” (module) you can input test settings and equivalent settings and the math is done for you. Using this calculator, I can change my aperture above to f/3.2 and my ISO to 500 and see that now I will need an exposure time of 8 minutes and 4 seconds.
Managing the extended time of exposure may require a special of equipment/software. Most cameras top out in terms of shutter speed at 30 seconds. You’ll want to look to see what your camera is capable of in this regard but the option I utilize with my cameras is a wired intervalometer. I especially like these for the ability to lock the shutter button down for long exposures. They can also be programmed for long exposures and/or time lapses. If you’ve forgotten batteries for your intervalometer or if they go dead, it’s no big deal as they will still work as a shutter release with or without power. Simply use a timer app on your phone or a simple stopwatch to time the exposure.
More Advanced Tracking
The more advanced users of tracking techniques are typically astrophotograhers who create images of “deep space objects”. Accurate tracking is vital to their craft as they are typically taking VERY long exposures (sometimes lasting hours over several days) through telescopes with long focal lengths in excess of 600-1500 mm.
It is not uncommon for these setups to include a device called an autoguider or guidescope. This is basically a sophisticated imaging device that connects to the tracking mount and makes adjustments/corrections if there is an error in alignment. The mounts that best make use of this technology rotate on several axes so that adjustments can be made. The Star Adventurer Mount has a port for an autoguider, but given that it only rotates on one axis, its usability is limited.
This type of advanced tracking would have limited usefulness in a landscape astrophotography application. When shooting with the wide-angle lenses typically used, it simply doesn’t make enough of a difference to offset the added cost as well as the bulk, weight and generally more complicated setup. If you’re thinking about diving into deep space object imaging, you might give these mounts a look though.
The DIY Option
It is certainly worth noting that there are several DIY options for building your own tracker. Sometimes referred to as “barn door trackers” these devices are fascinating in their simplicity and reliability. There are some plans that exist to help you build motorized DIY trackers and others where you have to manually turn a bolt at a specific rate (just HOW much fun do you want to have?).
I’ve never built one of these myself, though I did look into it for a while. Before I got around to building one, I got the Star Adventurer for Christmas, so the DIY project got shelved.
Tracker Options
There are many options for purchasing a tracking mount. The following list represents a selection of some of the most popular options but is certainly not all-inclusive. Note that with any of the tracking options listed (except for the last one) you will need a sturdy tripod and ball head.
SkyWatcher Star Adventurer: This is the mount that I own personally. I selected it because it had the best payload rating of any of the options (without going for the full dedicated astro-imaging setup) and I wanted it to be able to hold my longer lenses. There are two basic starting options for this mount. There is an Astro Package, which includes a declination bracket (useful for mounting longer/heavier lenses or small telescopes to the rig or you could go for the Photo Package which just utilizes a basic ball head adapter. The ball head adapter will require the use of a ball head that can accept at 3/8″ bolt. One could also attach the ball head to the declination bracket via the 1/4″ thread system. Either way, there are a couple of other add-ons that you will want. The main one is the Latitude (EQ) Base, which allows for a much easier experience when polar aligning (take my word for it). Additionally, the base eliminates the need for a second ball head as it serves to attach the tracker to your tripod. Also helpful is the counterweight kit. This attaches to the declination bracket and acts as a counter weight to your camera. You'll want to use this if you're attaching something like a 70-200 or longer to the rig.
On a related note, this setup is what I used to hold my 70D with my Tamron 150-600 G2 to track the Sun during the 2017 Eclipse. It worked perfectly.
The price or the mount, the base and the counterweight kit at the time of writing is $424 on Amazon. Note: The Star Adventurer also has a camera interface (to act as a per-programed intervalometer) and a auto-guider port which would have limited usefulness due to the fact that it tracks around one axis only. I have never used either of these features.

iOptron SkyGuider Pro and SkyTracker Pro: The SkyGuider Pro is very similar to the Star Adventurer in seemingly every way. Where it gets a bit of an edge over the Star Adventurer is in the fact that it comes pre-bundled with everything you would want (The declination bracket, EQ base, counter weight kit are all included) which is nice. Price is essentially the same as the Star Adventurer coming in at $428 on Amazon.
If you don't want to spend over $400 on a tracking mount, you could look at the SkyTracker Pro. This is a slightly less robust version of the SkyGuider at a slightly less robust sticker price of $299. The listed weight payload capacity of this mount is 6.6 pounds or about 3000 grams. The payload of the previous two mounts is listed at 11 pounds our 5000 grams. It is possible to add a counterweight kit to the SkyTracker but I'm guessing if that is something you're interested in, you would be better served by either of the two other systems.
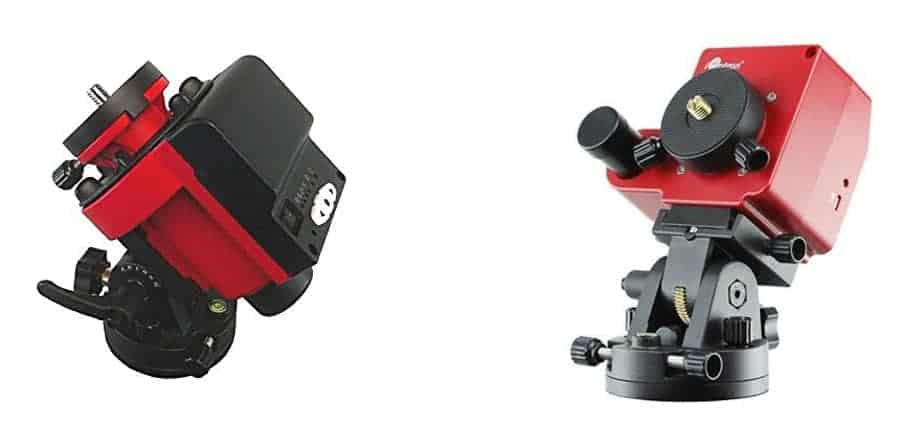
Vixen Optics Polarie: Another popular option is the Polarie. It has a much different form factor compared to the previous mounts mentioned. It sort of reminds me of an old rangefinder camera. With a payload of 7 pounds or about 3200 grams it is quite comparable to the SkyTracker Pro. It utilizes an alignment window (simply framing Polaris) and a compass for polar alignment. For more precise alignment you can add the optional polar scope. It should be noted that I was shooting with a friend who was using this mount with a d810 and 70-200 at 200mm and getting pretty solid tracking results with 2+ minute exposures. The cost of the mount is $369 and the polar scope will set you back another $290 putting the total at $659 USD.

SkyWatcher 30300 EQ6-R: If you're wanting to get into hardcore astro-imaging, you might want to take a look at some of the more “professional” mounts that are out there. An example is the EQ6-R (though there are TONS of these things out there). With a hefty 44 pound/20 kg payload and an equally hefty price tag ($1595 USD) it's a very capable system even with a large heavy lens/telescope attached. The main drawback to these large systems is the added difficulty in transportation, and setup as compared to the lighter mounts listed above. This is the mount in the photograph in the Advanced Tracking section.
A Bonus Tip!
As a bonus for reading all the way to the end of the article, you get a bonus tip! Any of the tracking mounts described will work as a motorized panning head for time-lapses. By simply pointing the mount straight up (or sideways or any other ways) you can start your time-lapse and let the motor move the camera as it takes photos for that stunning motion effect. Most of the mounts available have various tracking speeds so you can customize your motion to some degree. Keep in mind that the mount will continue to move and will not stop during exposures. For that functionality, you need a dedicated time-lapse panning head.
Conclusion
Should you choose to implement tracking into your landscape astrophotography, you will quickly see the huge benefits it can offer. I highly recommend giving tracking a try to see what it can do for you. Many people have tried it and sworn off taking non-tracked single images of the Milky Way, etc. While this may be a little extreme in this author’s opinion, I can certainly see where they are coming from.
Excellent article and references. Having the same Star Adventurer for the first time use during the Total Eclipse 2017, the ability to set polar alignment during full daylight was the real challenge. It has to be very close as you point out at long focal lengths. In spite of that challenge, I still was able to get much better results by using the tracker than without.
Thank you Brad!!
Thanks John! It is a great piece of gear! I found it very useful for the eclipse as well. It allowed me the freedom to move around and get some other shots without having to constantly worry about realignment. I took a look at your eclipse photos on your website and they’re impressive! Nice work!
Great write up Brad,I have just purchased SkyWatcher Star Adventurer package to take my Astrophotography to another level
Jim
Great timing! Milky Way season is officially here and it’s time to get out and get some great shots of our home galaxy ;). You’ll love the Star Adventurer as much as I do. It’s a great little piece of kit!
Cheers!
Brad
If they can do a pretty good viewing alignment with the three star auto alignment, why can’t they auto polar align?
Hi Jim,
Thanks for the comment! I know there are some advanced mounts that can do auto alignment. In order to be able to do that they need to have the ability to move by motor in an least two axes. Otherwise one would have to do some manual alignment.
Really making me want to get an astro mount now! I’ve been on the fence for a while about it. Great article Brad.
Go for it Kirk! You’ll be glad you did :). If I were buying again, I’d stick to the Star Adventurer but that’s just because that’s what I know. I think you’d be happy with any of the options. Thanks!!
Going to have to give this a try. I have a trip in December to Alaska where I was planning on trying to get some awesome north lights photos.
Any suggestions for getting the perfect shot?
A useful piece of kit for sure! I can’t wait to make it to Alaska! Been wanting to go for a while… For Aurora shots though, I’d stick to faster shutter speeds. 10-15 seconds max (don’t be afraid to bump the ISO). The reason being that the lights move surprisingly quickly and longer exposures will blur all those details that make the shot. Can’t wait to see what you get!!
Thank you Brad for such an informative article without getting super complicated. You didn’t drag anyone down some overly technical-“I’m so smart” rabbit hole and I’m sure many other readers appreciate that too! I got the iOptron Sky Guider and so far I am loving it.
Thanks for the great feedback Steve! Glad to know the article came across in such a positive way :).
Enjoy the iOptron…it’s a great piece of gear!
Quick question for you, I hope you don’t mind. I’m planning my May new moon shoot and want to try my tracker with some pano shots to stitch together for a wide view and possibly the full milky way arc. My plan is to slew back to my level starting spot every one or two frames depending on how long an exposure I am using. Obviously I won’t be trying to stitch together a bunch of 5 minute exposures but rather 80 – 120 second exposures.
My setup is very stable and sound. I have my 5d mark4 attached to the ball head I have attached to the DEC mount on my tracker. I level it at my starting point and once I start the tracking, that’s where I am thinking I may need to slew back to the leveled position. At some point anyway, I will be doing some practice first. PTGui does a great job stitching but I may be putting it to the test here.
Any experience or thoughts on this? (that was’t a very quick question I know, LOL)
I definitely don’t mind…Glad you put it out there! This is a great, challenging project you’re taking on. I think you’re right that you’ll be putting PTGui to the test. I’d say skip right over Photoshop for stitching this but the initial output results might actually be amusing ;).
I haven’t done any pano work with my tracking mount but I would think re-leveling every couple shots would be a good idea.
The only other thing I can think is to shoot the pano a couple of times, once focusing on the ground without tracking and another focusing on the sky with tracking. Not sure how well that would work but then you could do longer exposures of the foreground to reduce noise and then blend it all together in post. I haven’t tried tracked panoramas so this is all theory to me but it should be fun.
Good Luck and share what you capture!
Brad
Quick question for you, I hope you don’t mind. I’m planning my May new moon shoot and want to try my tracker with some pano shots to stitch together for a wide view and possibly the full milky way arc. My plan is to slew back to my leveled starting spot every one or two frames depending on how long an exposure I am using. Obviously I won’t be trying to stitch together a bunch of 5 minute exposures but rather 80 – 120 second exposures.
Any experience or thoughts on this?
Stellar Write Up!
On the EQ base. This looks like it allows multi-axis alignment to put alignment control in the head and not the tripod correct? Asking because I’ve got a Manfrotto 410 3-way pan. I’m wondering if i could use this and save money on the EQ base?