

You know how to compose, light, and operate your camera. You’re handy with a flash. You consider yourself a pretty good photographer. But how fast are you? When the difference between getting and missing the shot is measured in milliseconds, are your reflexes and trigger finger up to the task?
My first article for Improve Photography was called “A Beginner’s Guide to High-Speed Photography.” In it, I showed shots where using a high-speed shutter or the blazingly fast speed of a flash, allowed freezing of high-speed action. But I also acknowledged that my method had limitations and wrote –
When you're ready to start shooting even faster-moving objects or find that the “fast hands and timing luck method” isn't sufficient to capture your moving object, you may want to look into a shutter trigger. Some of these use sound to trigger the shutter and flash, others may use laser beams so that when the beam is broken by the moving object, the shutter and flash are triggered. The MIOPS Smart Trigger has multiple modes for sound, laser, lightning triggering as well as Time Lapse and HDR modes.
 I’d never used a camera trigger and only had a passing acquaintance with them. I learned of the MIOPS trigger only by Googling the web with the search phrase, “camera trigger.” Reading about what it could do, I linked to it as an example of what I was talking about. A lucky choice as it turned out! As Improve Photography has an international following, around the world in Istanbul, Turkey, MIOPS CEO, Onur Celik read my article and noted my mention of his product. A few weeks later I had a message with an invitation to try the MIOPS Smart. He didn’t have to ask twice. A few days later a DHL package arrived from Istanbul. The fun was about to begin!
My intent here is not to write a full description of the MIOPS Smart with a description of each feature and photos of the device itself. Many such reviews have already done, there are video reviews on Youtube, and the MIOPS site itself is a wealth of information. The MIOPS Smart manual is one of the best I’ve seen and can be downloaded. Instead, I intend to write about my experiences with the device, what worked well and not as well, and where I see it fitting into my photography.
First, you should understand what a trigger does and doesn’t do. Responding to an external event, it trips the shutter or fires the flash(es). It does not control camera settings, flash output, exposure, light or compose your photo. You will still need to do what good photographers do – Conceive, compose, light, and otherwise craft a good photo. What it can do is capture the “moment”, doing it with lightning-fast response and repeatability. It takes out the “fast hands and timing luck” element I mentioned in my first article.
The MIOPS supports several different modes: Lightning, Sound, Timelapse, Laser, HDR, DIY, Scenario, and Cable Release. Let’s look at each mode, how I tested it, and the results I did and sometimes didn’t, achieve.
LIGHTNING MODE

With no lightning in January in Meridian, Idaho I knew I couldn’t actually test this mode. So I put the MIOPS in Lightning Mode, connected the cable to my Canon 6D, and manually popped a flash into the camera lens. The MIOPS triggered the camera as expected, but the flash didn’t appear in the shot. Huh? How could it capture a lightning bolt if it couldn't capture the flash? The problem was the shutter lag of the camera. Though immediately triggered by the MIOPS, the quick burst of flash was missed. (More about shutter lag later). I questioned the guys at MIOPS, (who I should mention always provided superb support, usually answering my e-mails in a few hours). Emir Bayraktar answered telling me, “Real lightning stays visible for about 300-400 ms, so the camera has plenty time to capture it. The shutter lag does not cause an issue at that point.”
Unable to test this for myself, I wanted to find someone who had. Back to the “Goog” and I found photos by Sean Setters of Savannah, Georgia showing lightning images he’d captured with the MIOPS. Lightning is a more frequent occurrence in his part of the country and he’d tried other triggers to capture it.
He said, “With storm season well underway, I can say I've been very impressed with the MIOPS. It can be set to detect lightning and trigger the camera in significantly brighter conditions compared to the (other trigger) I’d previously used”. I contacted Sean and he was most gracious about providing the photo proof, this excellent shot of Savannah City Hall which he said he was able to get on his first try. Boom! The Lightning Mode delivers!
A side benefit to the laser mode – The MIOPS also responds to infrared light in Lightning mode and using an old TV or other IR remote gives you a remote shutter release. Could be useful!
SOUND MODE

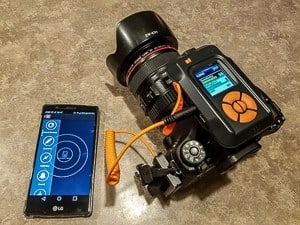
This was the one I was most interested to try. I knew I wanted the MIOPS to trigger my flash, a Canon 550EX, but it had no PC-type connection which is the type of cord provided with the trigger had. What did have a PC connector however was my Yongnuo RF-602TX flash trigger. Connecting that to the MIOPS and with a Yongnuo RF-602RX receiver connected to my flash, I was able to wirelessly trigger the flash with the MIOPS. This was even better as it freed me from the very short flash cord and had it wanted to, I could have used multiple flashes or if I’d had them, studio lights. With this setup, I made the shot of my wife and I toasting the New Year. I was surprised at how much delay I needed to add to catch the slosh of liquid in the glasses.

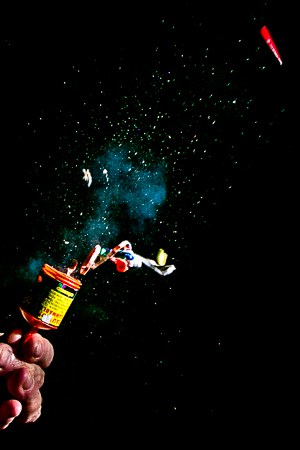
So using the MIOPS to trigger the flash worked great. How about using the MIOPS to trigger the camera and using a high camera shutter speed freeze the motion? I’d done this with the “luck and timing” method when I’d done my “Red Bell Splashdown” shot (above), outdoors with only the sun to light it and a shutter speed of 1/3200. This time I wanted to capture the breaking of a Christmas ornament using the MIOPS to respond to the sound and fire the camera. I tried it with my Canon 50D which can shoot up to 1/8000 second and… no joy…the camera missed the shot every time, even with the Delay set to “0” milliseconds. Huh? Another inquiry to MIOPS.

Emir responded – “This is a question that we get very often. The reason for the delay is the shutter lag of the camera. Even though the MIOPS can trigger the camera instantly, it takes some time before the camera can take a picture. The shutter lag of Canon 50D must be somewhere around 100 msec. So, the delay parameter of the MIOPS is irrelevant as the camera is already delayed for 100 msec. You can try “Mirror Lock-Up” function. This would not totally eliminate the shutter lag but it can reduce the lag by about 40%.This is about 40 msec and this can make a difference.”
I tried his suggestion and though a mirror lockup did reduce the delay a bit, it was not enough to make the shot using only sunlight, a fast shutter, and triggering the camera with the MIOPS.

Now, trying the same shot with the MIOPS triggering the flash was a whole new ballgame! Check the image at the top of this article as well as the one above and the settings used when I dropped a water-filled Christmas ornament on a hammer. With the flash set at 1/64th power giving a flash duration of just 1/14,000 of second and an almost instantaneous trigger of the flash I actually had to introduce about 8 milliseconds of delay to get the ornament breaking. A previous shot with no delay had the ornament just touching the hammer. Crazy to think how just eight milliseconds made the difference! Even more amazing, having dialed in the right settings, that shot could be repeated easily enough. No way to do that without a trigger!
TIME LAPSE MODE
The MIOPS in this mode is essentially an intervalometer. Set the Interval between exposures, the number of shots to be made each time and the total number of shots to be made. Connect the MIOPS to the camera, activate it and watch it work. I did a 300-shot time exposure (one shot every 10 seconds for about 90 minutes) of a melting ice cube and it all worked great. I’d post the video, but it was rather unimpressive, not the fault of the MIOPS, just my fault for not setting up a better shot!
LASER MODE


This worked pretty much like the Sound Mode except the triggering event was the breaking of a laser beam. It took a little finesse to get everything lined up just right but used as a flash trigger, it worked great as my raspberry and lime splashdown shots show. The difficulty with the raspberry was dropping a small object through a small laser beam onto a small target, the spoon. I practiced with a piece of cereal until I got the MIOPS setting right and when dropping the raspberry, nailed it on the first try. That is the real beauty of the MIOPS, once settings are right the shot is quite repeatable. The lime shot was much easier with a bigger object and target. Drop the lime through the beam and adjust the delay to capture the moment desired. Easy peasy.
I didn’t even try using the laser mode with the MIOPS connected to the camera as I knew for my shots that shutter lag would be a problem. I have seen others however using the laser mode to trigger the camera for wildlife shots or sports action with good results. Being able to position the laser further from “peak action” would help compensate for the delay and being able to wirelessly connect the MIOPS to the camera (my Yongnuo gear worked great for this too) would make placement of the MIOPS much more flexible. If you don’t go wirelessly, plan on getting much longer cords as those provided are rather limiting.
HDR MODE
I wondered as to the usefulness of this as my Canon 6D, (as many newer cameras do) have built-in exposure bracketing. The 6D allows for a 5-shot bracket, so I thought maybe the MIOPS 7-shot capability might be better. Using the MIOPS, you put your camera in Bulb mode, set your ISO and f/stop for proper exposure, and the MIOPS holds open the shutter for the required time, decreasing that time with each subsequent shot, a kind of bracketing. Ok that works but… Trying to decipher the settings I learned that the term “Center” on the MIOPS control in this mode means the center shutter speed. It’s only adjustable from 1/15th to 15 seconds. According to the MIOPS guys, this is a limitation of how a remote trigger can control the Bulb mode on most cameras. In dim light with a low ISO or maybe using an ND filter this could work, but considering the limitations and the much easier in-camera means of bracketing, I personally don’t expect to use this mode on the MIOPS.
DIY MODE
The inputs on the side of the MIOPS allow other devices to be connected that would activate the trigger. Temperature, pressure, motion, whatever can be used to generate the right signal could be used to work with the MIOPS. Now, not being an electronics geek I don’t expect to do this anytime soon. It’s good to know though that those who have such skills or companies that might wish to provide third-party devices can do so as the MIOPS engineers have built expansion possibilities into the device.
SCENARIO MODE
The idea behind the Scenario mode is being able to script a series of multiple events that combine to trigger the MIOPS. For example, the Sound Mode could “hear” the starting gun at a race and then trigger the Time Lapse Mode to record the race. Maybe the Laser Mode could be combined with the Sound Mode so that a bowling ball passing through the beam combined with the ball hitting the pins would make the shot. The possibilities are limited only by your imagination.
Well, and maybe the delay. I’d hoped to perhaps put two sound events back-to-back to trigger the flash on the second, not the first sound. Think about firing a gun at an object; The gun bang would be Sound 1, the breaking of the object the second triggering event. The problem I found even testing this with a double snap of my fingers is that the delay between the Sound 1 and Sound 2 events was too long. If the sounds were too close together, the second sound was not detected. Perhaps the MIOPS techs can work on this and improve it in a future firmware release.
CABLE RELEASE
One nice feature of the MIOPS Smart is the ability to use a companion Bluetooth app on your Smartphone. Both Android and IOS devices work. The app also gives a nicer user interface plus extended options, one being Cable Release controls. They are:
- Cable Release – Tap to trigger the shutter.
- Press and Hold – Useful in Bulb Mode. Hold down the button and the shutter stays open until you release.
- Press and Lock – Press once to open the shutter, press again to close it.
- Timed Release – Enter a time (minutes and seconds) and the shutter will trip when the time runs down.
- (This one needs the timer to countdown to zero as the duration runs down – Are you listening MIOPS engineers?)
One thing I really like about the MIOPS Smart is its built-in color LCD screen allowing complete operation without a phone. Other competing devices have no screen and require a phone app to use them. Because I am often fighting low battery issues with my phone or surely wouldn’t want it tied up during a long time lapse, I like that the MIOPS doesn’t require the phone. On the other hand, the phone app is nice and very useful allowing remote wireless operation of the MIOPS. This is great when you’ve carefully placed the MIOPS in Laser or Sound Modes and don’t want to touch it again. I’m told those using it in Lightning Mode also like to go sit in their car out of the rain while their camera and the MIOPS, (properly covered with plastic) gets the lightning shots.

SUMMARY
Here would be my takeaway thoughts having tried and tested the MIOPS Smart for a few weeks:
- Having multiple modes, the MIOPS saves having to buy multiple devices to accomplish these kinds of shots. A good lightning trigger alone would cost almost as much as the MIOPS which then does all these other things as well.
- If there are any limitations to how well the MIOPS works, they are usually imposed by your camera, not the MIOPS. Example – Triggering the flash will allow capture of extremely fast action. Used to trigger the camera however, shutter lag may limit what you can do. Understanding this will help you decide how best to use the MIOPS to make the shot you want.
-

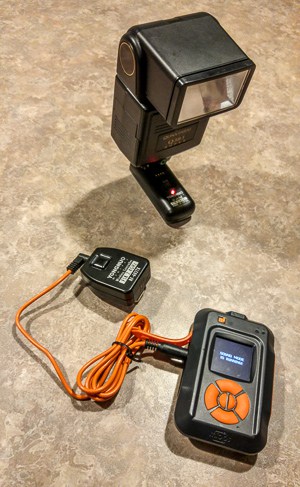
A party popper triggers the flash with the MIOPS in Sound Mode. 
A Yongnuo RF-602 transmitter/receiver allowed me to go wireless. The receiver could be connected to either the flash or camera and the MIOPS would trigger them. Cool! The supplied cords, (one to connect the MIOPS to your camera – (be sure you request the proper one for your camera make/model), and another to connect to your flash (be sure your flash or flash trigger has a PC connection) are very short. This would be fine for perhaps the Lightning mode where you can put the MIOPS in your camera hotshoe, but almost anything else will require getting the MIOPS close to the action and further from your camera. Buy the proper extension cords or devise a way to use wireless devices. (The Yongnuo equipment I used worked great and is very inexpensive).
- Know it will take time to set up and understand how to use Sensitivity, Delay, and other controls to get the shot you want. If you will be using breakable objects or have to make the shot work the first time, practice with “stand-in objects” while you get everything dialed in.
- The MIOPS website has a gallery of user images. To assist others learning to use the device I would really like to see the shots include the “recipe” of settings used: Camera, Lens, ISO, Shutter speed, F/stop, MIOPS Mode, MIOPS Settings, Notes. The beauty of the MIOPS is once you get the settings right, things that used to depend on “fast hands and timing luck” are very repeatable. Having a starting point for settings would at least give you a ballpark idea where to begin.
If you’re just starting with this kind of photography, I suggest you read my first article and try some of the things I show there with no trigger. Then, understanding the concepts, not only will you very possibly want a trigger, but you will better understand how to use it, (and appreciate it even more!), having some hands-on experience. I have to say, (pun warning!) the MIOPS has made me “Trigger Happy!” Now go “pull the trigger” yourself and have fun!
If you have questions or comments, please write me in the section below. I’d be happy to help.
Some great information here Rick, looking forward to more in the future.
Looks similar to a TriggerTrap.
Hello Alan,
You can check our MIOPS Mobile Dongle. MIOPS Smart Trigger is especially designed for High Speed Photography. Triggertrap does not contain Lightning and Laser Trigger modes.
Regards,
Onur
I had a Trigger Trap. (I believe they are now out of business). It was pretty much a few wires and a dongle that plugged into your smartphone. All the controls were done by the phone app. It was ok, but I didn’t like the fact it tied up my phone. To me, the real advantage of the MIOPS Smart is that is can be completely used with no phone at all. There is a phone app that adds some enhancements and the user interface is nice, but using it is not mandatory. There also was nothing like the laser or lightning trigger on the Trigger Trap which the MIOPS Smart has.
great information can it be dan at low cost
Hi great informative article, iv got a miops triger but am having difficulty getting information on the type of laser i need to use the laser feature.
I hav Googled and watched lots of video reviews like this one.
Unfortunately no one is telling me what type of laser is needed. I keep geting cat toys when i look at Amazon..
Also i would like to know what cables i need to conect the miops triger remotly for laser use my camara is a canon eos 800d.
Thanks i look forward to hearing from you.
Paul Stearne
Nothing special. A “cat toy” type will work just fine. Anything that can be pointing at the MIOPS receiver so that it will respond when the beam is broken. The one I used when I wrote the article was the kind used as a pointer by lecturers.
Dear Sir,
Please help me known in detail your setting up MIOPS Smart wireless with YONGNUO RF-602 .
Best Regards,
Hi tried a balloon using sound mode and took 3 pictures and got these results, I was extremely happy
https://www.instagram.com/p/BoTuU7uhUI2/?utm_source=ig_share_sheet&igshid=16xivxh0beqml
Impressive Steve!
The photo in the article shows how this is connected. The transmitter is connected to the MIOPS and the reciever to the flash. https://improvephotography.com/wp-content/uploads/2018/01/20171227_194655_HDR.jpg