
So you're feeling the “Need for Speed?” You've seen some of those cool high-speed photos of dynamic action totally frozen and want to know what it takes to make them. You want to try a little “photo wizardry,” maybe stop things in mid-air? Well, let's show you how.
The longer you are a photographer, the more you begin to appreciate the ability of a camera to make magic. One of the special properties of our “magic boxes” is the power to freeze time. I like the way artist/photographer John Berger put it:
“What makes photography a strange invention is that its primary raw materials are light and time.”
When you snap the shutter, you are literally using light to capture a moment of time that did not exist before nor does it exist after you make that exposure. Time moves on, but you've frozen a moment and the shorter the exposure, the thinner that sliver of time.
HIGH-SPEED PHOTOGRAPHY – WHAT IS IT?
For the purposes of this article, we will define high-speed photography as the ability to manipulate the exposure of a photograph so that all movement is frozen and things can be seen that could not be seen with the eye alone. There are two basic ways to do this: One, shorten the shutter speed or Two, use flash in a way that the time the subject is illuminated is extremely minimal. The common denominator between these two methods is that the exposure made on the camera sensor is extremely brief. How brief? Like many things in photography, it depends.
SLIVERS OF TIME IN THE SUNLIGHT
In locations where you are using just the ambient light, say outdoors on a bright day, it's likely you have already employed the first method. You probably know that to freeze a moving object you should use a higher shutter speed. But how fast? If your intention is to totally freeze the moving subject, you need a shutter speed sufficiently fast enough that there is no discernible movement during the time of the exposure. The necessary shutter speed to freeze the action will depend on how fast your subject is moving. The direction the subject is moving relative to the camera, (toward or away, diagonally, or perpendicular to the camera) will matter as well. How far the subject is from the camera or how much you are zoomed in will matter too.
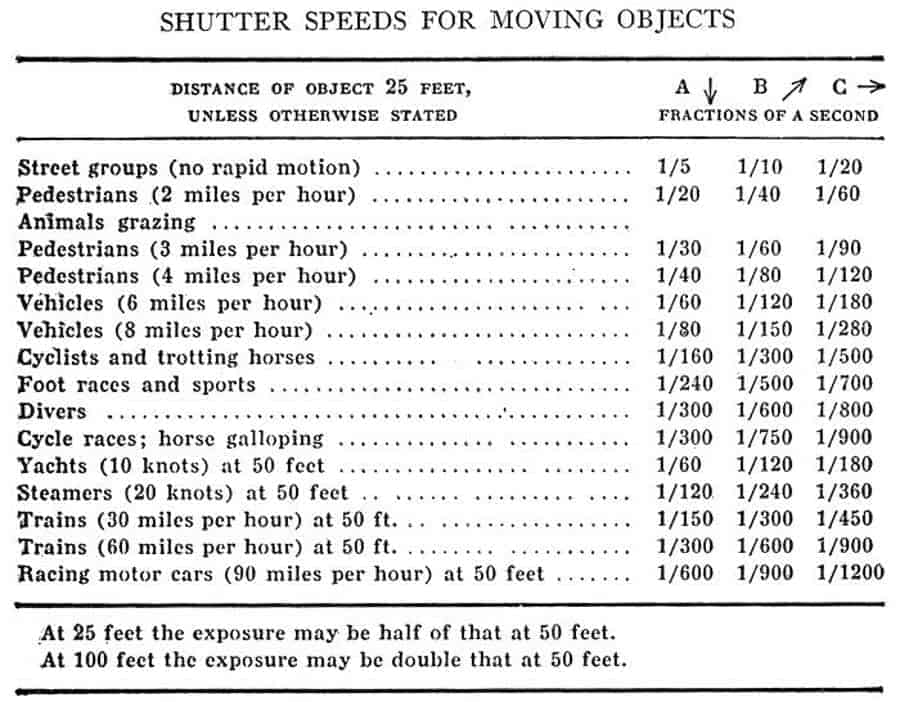
Aaron Sussman's The Amateur Photographer's Handbook (7th ed., 1965, Thomas Y. Crowell, New York) p. 210. *A=toward you, B=diagonal movement, C=right-angle movement, as the arrows show.
This chart gives a rough idea of the shutter speed you might want for common subjects. These are shutter speeds for stopping motion, so longer speeds will allow blurring progressively of all or a faster moving part of the image.
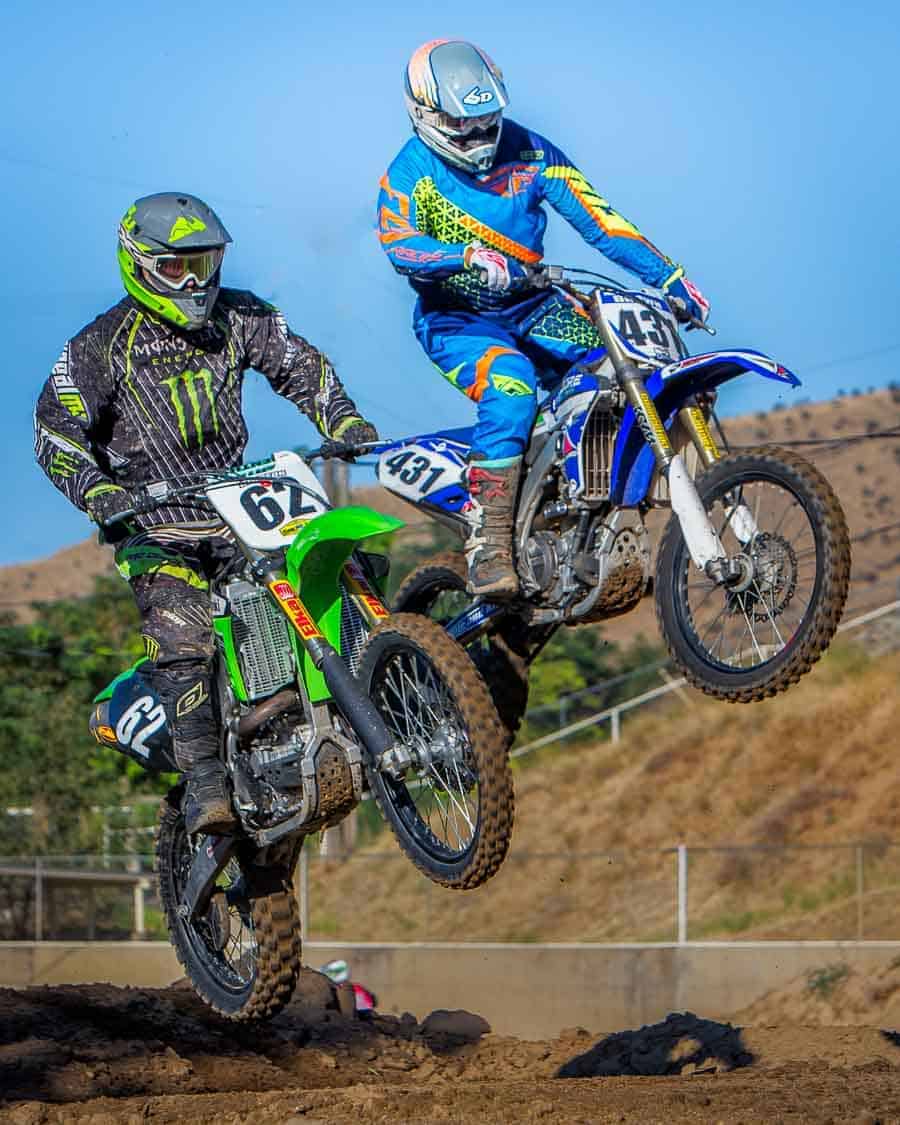
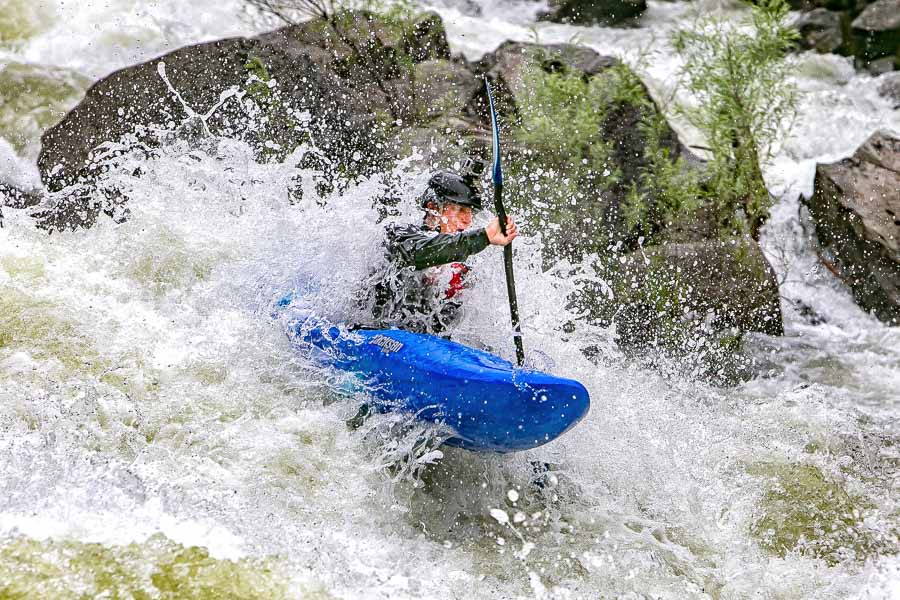
SPORTS, ACTION AND CAMERA SETTINGS
A typical example of when you might want to use higher shutter speeds to freeze the action would be at a sporting event or activity with lots of action. Say you're shooting a dirt track motorcycle race. You are shooting handheld with a long lens so you have to contend with not just the movement of the subject but possible camera shake as well amplified by the zoom. You take a guess and figure that perhaps 1/500th of a second would be about right. So why not just crank it up to 1/1000th, faster is better right? Great if you have the light to do it.
Here are some things to think about when doing non-flash high-speed photography.
- Keep in mind that adjusting one “leg” of the exposure triangle affects the other two. A shutter speed increase will require corresponding changes of either aperture, ISO, or both.
- A good method when you are new to action photography is to use Shutter Priority mode (S mode on Nikons, Tv on Canons). You can lock in what you think might be the correct shutter speed and the camera will adjust the aperture, (and/or ISO if you are in Auto ISO). You can then try various shutter speeds to determine what is about right, relying on the camera to adjust the exposure for you.
- Continous shutter mode and AI Servo focus (AF-C on a Nikon) will help you catch a good shot. Anticipate the peak action, start a second before that, and blast away through the action.
- Keep an eye on what is happening to the aperture and ISO so you don't run into problems with depth-of-field or high ISO noise.
- Don't be afraid of using higher ISO settings however if needed get high shutter speed. Higher ISO numbers aren't to be feared nearly as much on the newer cameras. If it's a choice between a noisy image or a blurry one, noise reduction software can often fix the former. There is no fix for a blurry shot.
Many sports shooters prefer shooting in Aperture Priority mode, (A on Nikon, Av on Canon). You retain depth of field control and can “lock” the aperture wide open to let in the most light possible and hopefully keep the shutter speed high. Just watch be sure you have sufficient depth of field and that your shutter speed doesn't drop below what you have determined is needed to freeze the action. If you are comfortable with Manual Mode, that too will work and you will retain full control, but will also need to monitor all your settings. This works fine where the light is reasonably consistent, but if you're panning with the action and lighting or backgrounds change this is a challenge. With many newer cameras having Auto ISO you might want to see how that can be used in combination with one of the other modes.
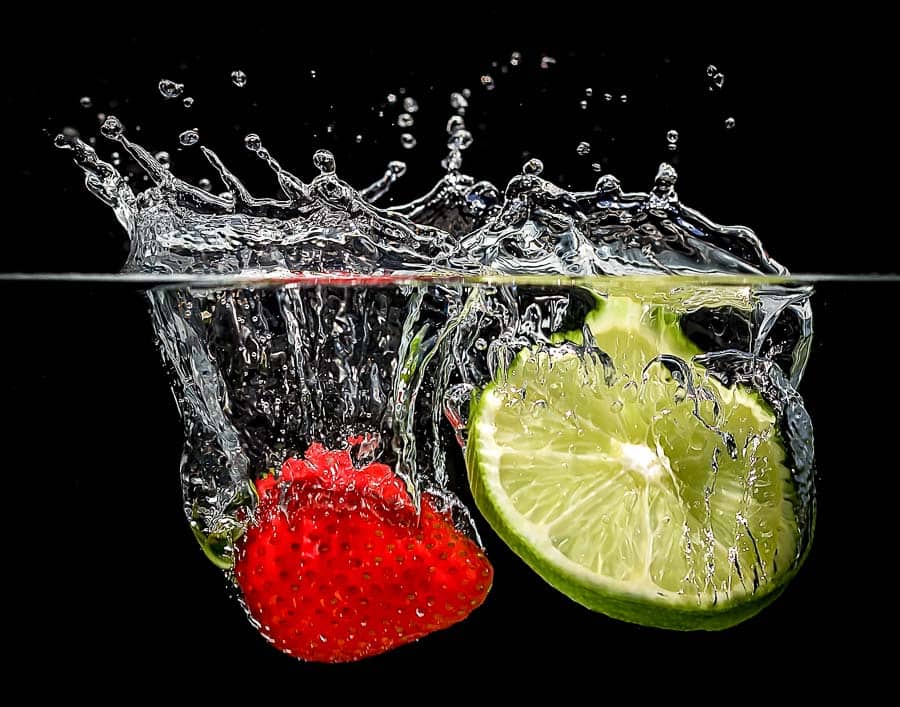
MAKING A SPLASH
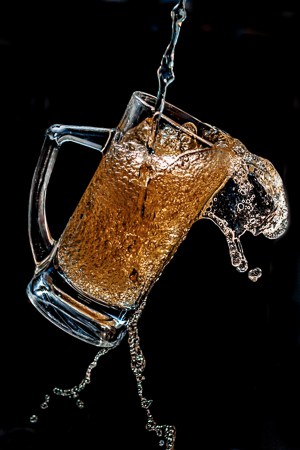
A popular use for high-speed photography is making images where the “subject” (water, powder, etc.) spills, scatters, fragments, drips, drops or otherwise flies around. Dramatic shots of materials frozen which we cannot see with our eyes are possible. Making these shots is often messy as well! With bright outdoor light, these kinds of images can often be made outdoors however where cleanup is easier and a fast shutter can freeze the action. Most modern cameras will shoot up to 1/4000th of a second, many will go up to 1/8000th. This is plenty fast enough to freeze things like tiny drops of water in mid-air.
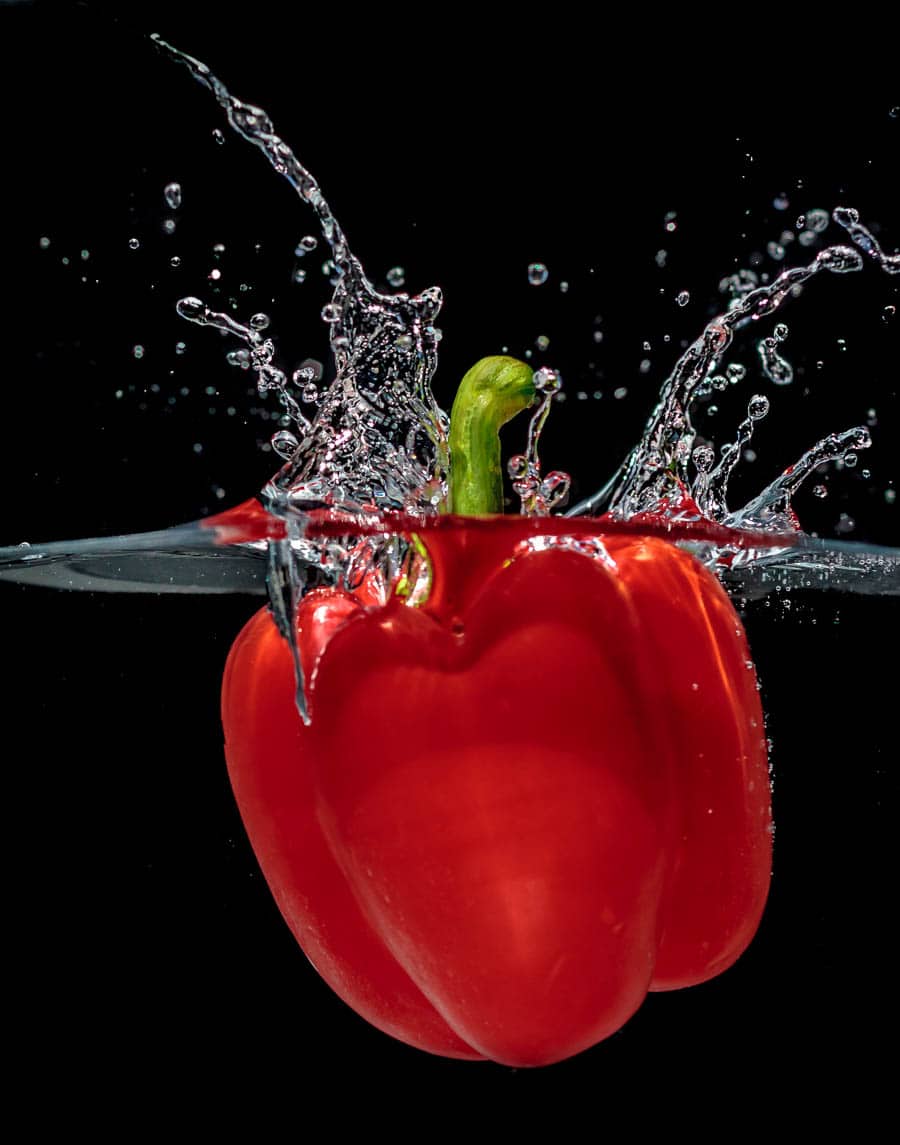
Above are some examples of shots I made with only the sun as illumination. I used reflectors in some of the shots to bounce the light. The exposure details are noted. Click here for a complete write-up on the way this image was done.
THE FLASH – PHOTOS AT THE SPEED OF LIGHT
So you need something faster yet? You don't have enough ambient light to get to the top shutter speeds or perhaps if you do, the shutter speed still isn't fast enough to freeze the action. Maybe your subject is more easily shot in the studio. Enter the flash where the brief burst of light gets really fast and exposure times are sliver thin.
The key to making high-speed photos with a flash is that the output power of the flash can be adjusted and the lower the power, the shorter the duration of the flash. Here are some examples for a Canon 580EX flash: (Chart from Jim Harmer's article on Flash Duration).
| Flash Output Setting | Flash Duration |
|---|---|
| 1/1 | 1/250 of a second |
| 1/2 | 1/919 of a second |
| 1/4 | 1/2,066 of a second |
| 1/8 | 1/3,759 of a second |
| 1/16 | 1/6,024 of a second |
| 1/32 | 1/9,470 of a second |
| 1/64 | 1/14,000 of a second |
| 1/128 | 1/20,000 of a second |
AN EXPOSURE WITHIN AN EXPOSURE
So what about shutter speed? When using a flash to make a high-speed photo the shutter speed isn't what is doing the work. It's that lightning-fast blast of light that freezes the motion and captures an extremely thin sliver of time. In essence, when you make a flash photo you are making an exposure within an exposure. The total time the shutter is open is when ambient light is being captured, but within that same time the flash fires and exposes the subject for that tiny fraction of a second. Unless you change it, (and we will discuss why you might do that in a bit), the shutter opens and the flash immediately fires. This is called First Curtain Sync (and is typically the default on most cameras.) Then the exposure continues through its duration capturing ambient light until it's done. When using the flash in TTL (Through the Lens) mode, a pre-flash is fired and the flash calculates how much power to use. This diagram using a sample 125th of a second shutter speed might help you understand the concept.
 TAKING CONTROL

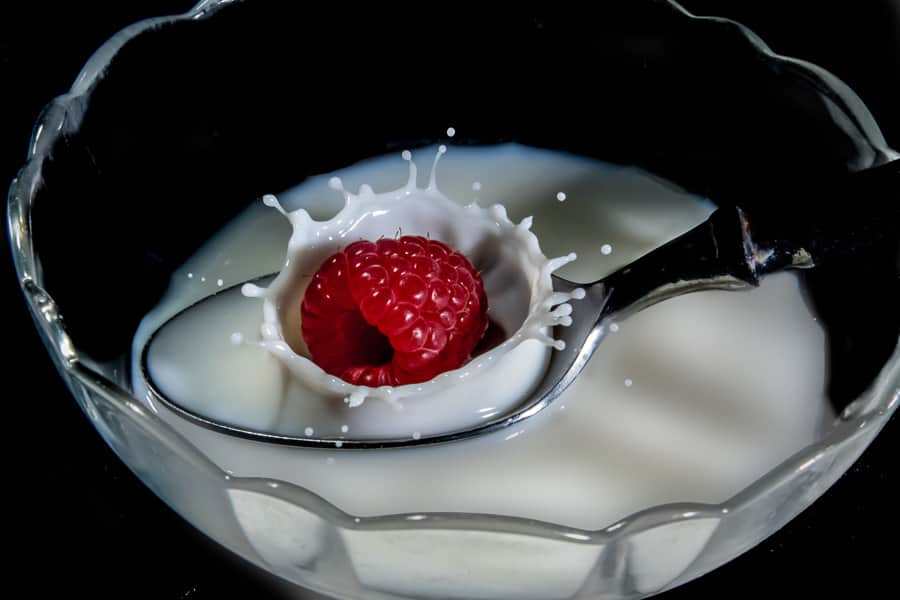
Let's analyze the photo below to understand how this works. The bowl of milk with a spoon in it was placed in the frame. The camera was a Canon 6D equipped with my sharpest lens, the “nifty fifty”, a Canon 50mm f/1.8 prime. Two Sunpak flashes equipped with Yongnuo wireless triggers were placed on either side of the bowl. The room was dark with minimal ambient light and I made several exposures in manual mode, determining that 160th of a second would work with the ISO at 100 for minimal noise and f/25 for greatest depth of field. That exposure with no flash resulted in an almost black frame. I did not want the ambient light affecting the shot. I then tested the shot with the flashes firing at 1/16th power. This was easily set with the sliding switches on the back of the flash units. (More modern flashes typically set power output in Manual flash mode via a button and LCD readout.) Trying more or less power using the switches was how the exposure was regulated. At that 1/16th power the flash duration was 1/15,000th of a second! I was ready for the subject to take the plunge.
MAKING THE SHOT
Here's where it became more a matter of reaction time and a good measure of luck. I would drop the raspberry and a fraction of a second later push the button on the remote shutter. Timing was everything and it took more than a few tries to get a perfectly timed shot. This had also been true when making the outdoor shots of the pepper and fruit splashes. Count on repetitive tries before you will get that “just right” image.
So the steps for making these kinds of shots are:
- Set up your shot and place your flash(es) where you think they will best light the subject.
- Wireless flash triggers may give you more flexibility in flash location placement.
- Put your flashes in manual mode so you can control the power output.
- Put your camera in manual mode so you can control ISO, aperture, and shutter speed.
- Set your focus to manual and focus on the spot where your subject will be.
- A location with low ambient light will help, allowing you to make the exposure primarily with the flash.
- Consider using a small f/stop for maximum depth of field.
- Consider using your lowest ISO to limit noise.
- Shutter speed is not critical here. It is the flash that makes the exposure. Shutter speed will control the ambient portion of the exposure.
- Take a test shot without the flash(es) firing. The image should be mostly if not totally black. Increase your shutter speed and/or lower your aperture or ISO until it is.
- Turn on your flashes and take some test shots. Adjust your flash output(s) to the lowest power setting that will adequately expose the shot. Remember less power = shorter flash duration. The less power, the more “freezing capability” you will have.
- Set your camera to shoot in continuous mode. Having multiple shots fire will increase your chances that one will catch the action just right.
- Ready, set, action and shoot!
- Expect you may need multiple tries to get the “moment” you want. “Chimp” your shots and repeat the process as needed.
COMBINING SLOW AND FAST
Sometimes you might want a shot which combines motion blur with a sharp frozen image at the end of that blur. To achieve this, you will want to set your camera to use Second Curtain Sync. This means the shutter will open, allowing ambient light to come in and finally, just before the end of that exposure, the flash will fire freezing the subject at the end of the motion blur. If you do not change from first curtain sync, the flash will fire at the start of the exposure and the motion blur will be in front of, rather than behind the moving object. This looks unnatural so second curtain sync should be your choice.
FURTHER AND FASTER
When you're ready to start shooting even faster-moving objects or find that the “fast hands and timing luck method” isn't sufficient to capture your moving object you may want to look into a shutter trigger. Some of these use sound to trigger the shutter and flash, others may use laser beams so that when the beam is broken by the moving object, the shutter and flash are triggered. The MIOPS Smart Trigger has multiple modes for sound, laser, lightning triggering as well as Time Lapse and HDR modes. If you're into DIY stuff and handy with electronics, you may also want to check out the Youtube posts which show how to build your own Arduino-based trigger.
For the capture of really fast objects, (think freezing a bullet in motion), a Speedlight which uses a xenon gas flash tube may not be sufficient. What is called an air-gap flash can give a duration as short as 1,000,000th of a second rather than the 1/35,000th second. Rather than xenon gas, it uses air and instead of 100s of volts it uses a lethal 30K volts. If you get into this realm, you certainly have advanced well beyond the beginner stage and shot past me like well, a speeding bullet.
Best wishes for some great high-speed photography. Post your questions, comments, and links to your images. I'd love to see what you achieve!
Great information Rick, there are so many things to consider in capturing photos like these.
Very well written article that has lots of helpful information. Is a subject that is very well covered & makes me want to experiment & try some to your tips.
Thanks Russ. I hope you do try it and if so, post a reply with a link to your pics.
Thank you for this article. There is always something to try in speed photography and your article is proving it!
Thanks! I hope you give it a try.
This is just the information I’ve been looking for! It’s very comprehensive, and I LOVE your photos! I’m definitely bookmarking this to come back to.
I hope you do Tracy. I should have new articles here on IP every other Monday. There’s also a vast collection of other good photo information to be found. I hope you will make Improve Photography a regular visit.
Quick update–I’ve now tried several of the techniques you describe in your article for the splash photos, and I’m thrilled with the results. I even bought a 5 gallon fish tank so I could try out some of the fruit plunges! So much fun!
Great article Rick!
Thanks for this, Rick. I had no idea you could do splash photography with such a simple setup.
So we had you believing you had to be a “master photographer” or have expensive equipment to do this stuff huh? I’m happy to give away the “secret” and hope you will have fun with it.
This is a great article. It really spells out the steps and gives alternative methods to achieve the same results. Great resource for the photographer who wants to improve their skills in capturing motion more effectively.
Thanks Elaine. I hope you will give this a try and then post links to your results.
This is a very informative and comprehensive review of a type of photography that most people recognize as an “I could never take that kind of shot” class of images. You’ve written in very structured, understandable language, in a non-intimidating fashion. A big bonus is the excellent example photos you’ve used to illustrate your points! What a treat!
Now, to get out there and shoot!
Well written, with lots of useful information. I hope you will do more! Actually I hope you publish an E Book.
You are a very gifted and talented individual in the photography field! Thanks for sharing your experiences and your photo knowledge.
Thanks for joining the Improve Photography team of educators. Enjoy the way you give optional ways to achieve the results desired since one size never seems to fit all in the photography world.
Great article. Taking a complicated subject and making it understandable. Lot of detail but stil easy to understand. Thanks for bringing this subject into focus.
Thanks for the terrific article. I particularly enjoyed the information you presented about Second Curtin Synch.
You were very thorough in covering the topic. I like the organization and flow of your article.
Now This a work of A GURU in photography!
for me as a newbie, it’s a great help to grow and absorb more knowledge and I believe this is just a basic strategy to him since he already mastered the craft of photography, how I wish you can share us more like a seminar or something, anyway I very much love your idea thank you.
A Guru? I’ve not been called that before and I’m very flattered. This was my first IP article as I’m a brand new contract writer for the site. I’ll be writing more however with my stuff to appear every other Monday. I hope you will become a “regular.” Thanks again. 🙂
Dear Rick,
Thanks for mentioning our MIOPS trigger in your article. We will happy to send a unit for your review. BTW, is it possible to add our webpage url to your content so the audience can reach to us easily and find out more about our products and solutions.
Regards,
Onur
I’ll be happy to give your unit a test! Having not yet gone to this next level in high speed photography, it will be fun to see what can be done. For our IP readers, here is the MIOPS website – https://www.miops.com/
Sorry, I forgot to add our website url: https://www.miops.com/
This article is good and it clearly spells about high speed photography for bigioners. How to take it ? If you are interest in bullet photography then read more at bulletimg pro . There how to take bullet shots is discussed in step by step.
Sounds interesting Illena, but I can’t find it. What is the correct URL?