

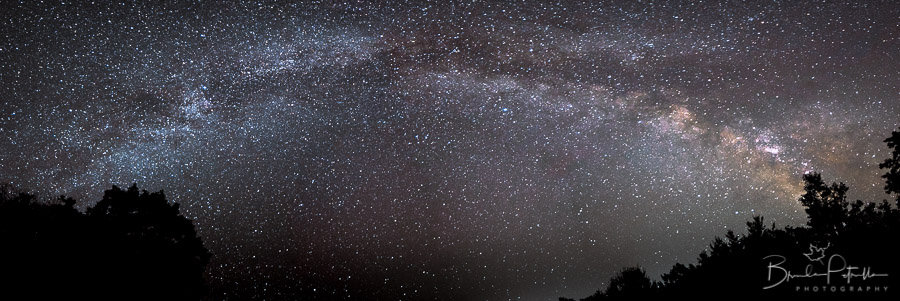
Are you curious about exploring night photography but aren’t really sure what you need to make the shoot a success? To create pro-quality photographs at night, you will need a DSLR camera capable of shooting at high ISOs and a fast (<f/2.8) wide-angle lens. But there are other items you should consider before trekking out in the dark. If you want to learn about what you should have with you for a successful shoot, don't miss this list of night photography accessories. If you want to learn more about how to shoot night photography, please check out the Improve Photography article on night photography camera settings.
Whether you want to photograph the Milky Way, create stunning star trails, shoot the Northern Lights, capture craters on the moon, or catch some fireworks, the following 10 accessories are must-have additions to your photography kit.
#1. Pro-quality Tripod and Ballhead
If you can only pick one thing on this list to add to your photography kit, prioritize investing in a pro-quality tripod and ballhead. Because night photography requires long exposure times, it is impossible to produce high quality night images without a good tripod, even if you are superstar hand-held photographer. The long exposures will make any minute movement of the camera evident in your photos, so choose a tripod that will keep your camera steady, even in windy conditions.
In terms of tripod heads, a ballhead is the best head for night photography (as opposed to a pan/tilt or gimbal head) because a ballhead allows you to easily compose in either landscape or portrait modes and aim the camera at the sky at different angles. My current favorite ballhead is the Really Right Stuff BH-40, which is extremely well-built, has excellent tension control, and has a 90° drop-notch that is super handy when shooting the night sky and other subjects requiring extreme angle shots. Check out this article on Improve Photography to learn more about how to choose a tripod and ballhead.
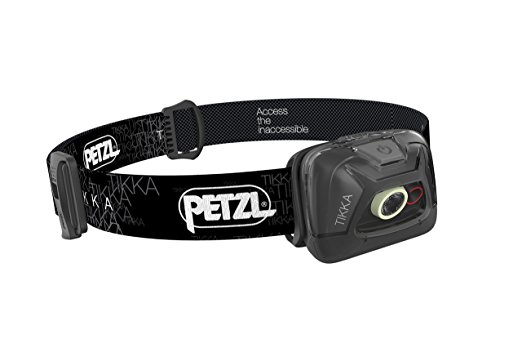
#2. Multimode Headlamp and/or Flashlight
It should probably go without saying, but you will need a source of light when photographing at night. I prefer to keep my hands free for working with my camera, and so I always bring along a headlamp. I recommend choosing a headlamp that is bright enough to illuminate trails and has a red light mode option, such as the Petzl Tikka headlamp. Use the red light when making camera adjustments to maintain your night vision. More on red light and night vision later.
Some of you might not like the idea of having a light strapped to your head. Fair enough! You will still need to bring along a flashlight of some sort. The flashlight on your smartphone will likely suffice, but you might want to use your phone for apps that are helpful for night photography, so why waste the battery on the flashlight? I recommend bringing a lightweight flashlight, such as the Fenix tactical flashlight, which you can also use for light painting to add some artistic flair to your night photos. Checkout this Improve Photography article on light painting techniques to learn how to properly illuminate subjects in your photos at night.
#3. Something to Keep Your Lens Warm

As we all know, the temperature drops at night. When the air cools, the water vapor (humidity) in the air condenses on cooled surfaces in the form of dew. In the winter, the dew condenses and freezes, forming frost. When your camera is out all night, it is highly likely dew (or frost) will condense on the end of your lens and on your camera. Don’t let this happen!
A very simple way to prevent dew or frost from ruining your photos or your equipment is to keep your lens warm throughout the night. There are two ways of doing this. You could get a USB powered lens heater that is designed to wrap around your lens and keep it nice and toasty. You don’t have to worry about it overheating your camera, since it is designed for this purpose. The downside of this approach is that you need to have a USB power supply available, and that may not always be feasible.
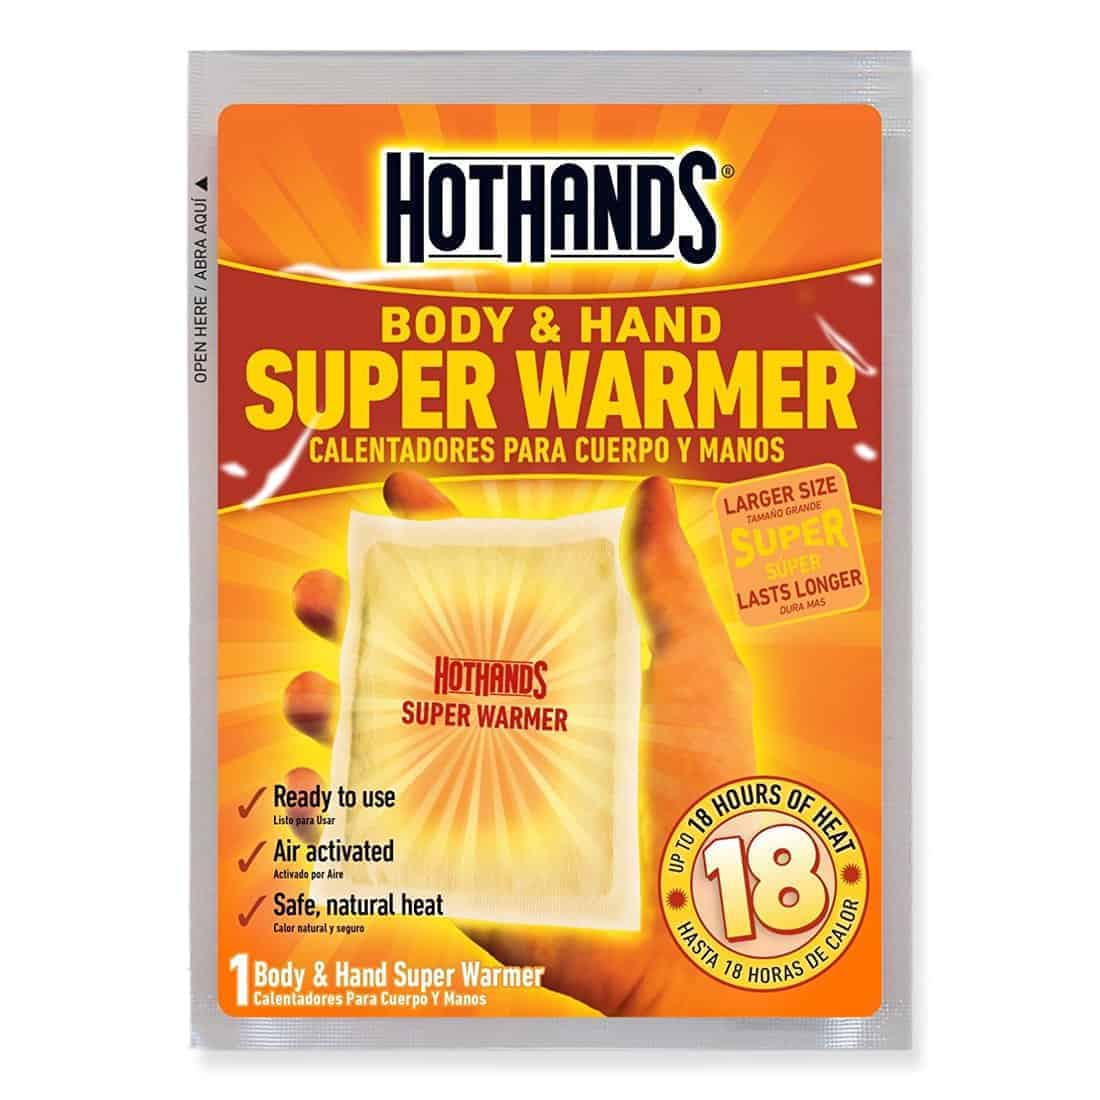
Alternatively, a do-it-yourself (DIY) approach to keeping your lens warm is to simply use disposable hand warmers and a couple of rubber bands. If you are shooting in the winter, you may already have hand warmers with you to keep your fingers from freezing. I’ve opted for this technique, and find it helpful to use the 12-18 hour hand warmers if I’m doing timelapse photography lasting more than a few hours. The hand warmers are still warm come morning, and your camera lens will be dew free.
Use this tip in the summer months, too, even if the temperatures don’t seem like they are going to be too cool at night. Dew formation is dependent on the dew point, not simply the number on the thermometer. Using a lens hood also helps with preventing dew or frost formation.
#4. Rain Cover for Camera
Since we’re already talking about dew and frost and how to prevent them from ruining your night photos, the next accessory I recommend for night photography is a simple rain cover for your lens and camera. I have found this to be cheap insurance for keeping moisture from damaging my camera and lenses, which aren’t necessarily weather-sealed. It’s like a little poncho for your camera that you can cinch up around the end of your lens, and your equipment will stay protected. The rain cover also helps to keep your equipment warm, enhancing the benefits of the recommendations in #3 above.
#5. Remote Shutter Release
A remote shutter release might not be an absolute necessary accessory, but I will never shoot night sky photography without one. The primary reason to use a remote shutter release is to trigger your camera without touching it – – a key to success in long exposure photography. Sure, you could set your camera to timer mode, depress the shutter button and remove your hand before the camera fires, but having a remote release reduces the probability that you will bump the camera ever so slightly and change your composition or get motion blur. Some shutter releases, like the Vello Wireless Shutterboss , are also intervalometers that allow you to program not only long exposures and the bulb mode, but also intervals for timelapse photography and/or star trails. The wireless feature is also fun for taking selfies. Just sayin’.

#6. Lightweight Camp Chair
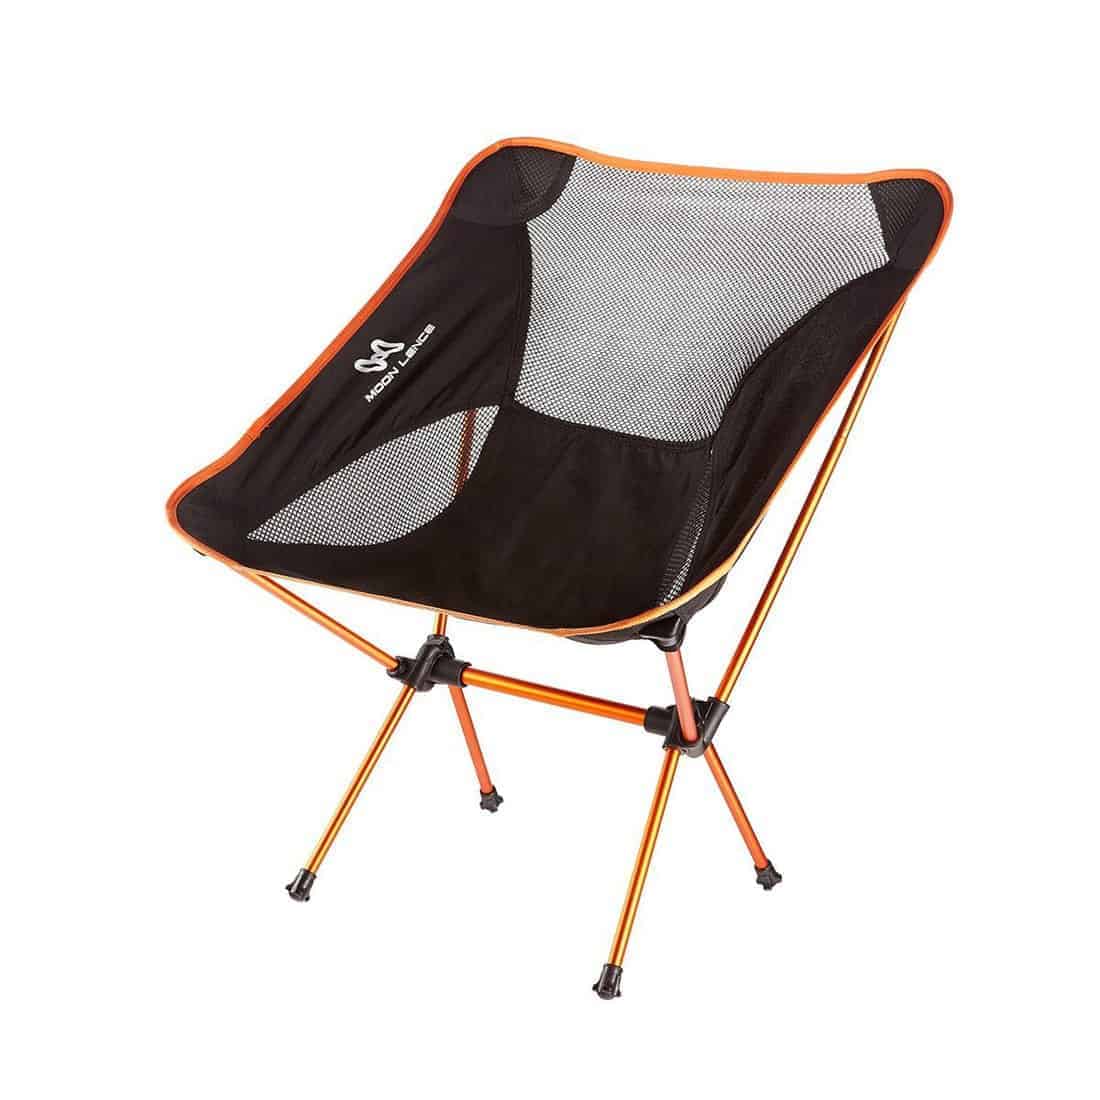
If you plan on being out for a few hours or all night, I recommend bringing along a lightweight, compact camp chair. I mean, why not be comfortable, right? You are already going to be away from your cozy bed, and you are more likely going to stick it out if you are comfortable. If I am shooting the night sky, I find that I get a major crick in the neck from craning my head up towards the sky for hours on end. A camp chair, or even a camp mattress, can help prevent that. It also keeps you off of the cold ground, and so you are more likely to stay warm.
#7. Warm Layers
Speaking of staying warm, layers are a must even in the summer season. If you live in an unpredictable climate, like the Northeast where I live, then bring along several layers and a rain jacket. There is no reason to risk hypothermia for the sake of a photo. Hypothermia can occur at above-freezing temperatures, so be safe and bring some extra layers to keep you warm and dry. I also tend to pack a light pair of gloves because my hands get cold really easily. Know thyself, and be safe and comfortable.
#8. Spare Charged Batteries and Memory Cards
Long exposure photography and timelapse night photography will eat up battery power and memory cards very quickly. Always be sure to pack extra charged batteries and empty, formatted memory cards. You don’t want to be caught out in the middle of a perfect night and run out of either of those. You will dope slap yourself. If you are shooting in cold weather, keep your charged batteries in a pocket near your body heat to keep the charge from dissipating.

#9. Gaffer Tape
Your camera might look like a stealthy, black device by day, but by night, it turns into a blinking annoyance. Cover up the illuminators and lamps on your camera with some gaffer tape. Gaffer tape won't leave a gummy residue like other types of tape, it is easy to tear, and it stays put even in extreme temperatures. You only need a tiny bit, which you can apply before you head out. I like to wrap a little around an old credit card to keep in a pocket in case I need some more tape in a pinch. If you are shooting with others at night, they will thank you for not exposing their shots with your blinking camera.
#10. Transparent Red Film for LCD Display
Last but not least, one of my favorite night photography accessories is transparent red film for the back LCD display on my camera. It is inarguably the brightest part of the camera at night, and inevitably, it will destroy your night vision every time it lights up. Always turn your LCD display brightness all the way down when shooting night photography. This will help a great deal with not blinding yourself when you want to check your LCD display.

That said, I don’t generally find this to be enough of a brightness reduction, and if I have to recompose a photo with my eye to the viewfinder, my eye would be totally blinded by the LCD display and it would take several minutes to regain my night vision again. So frustrating!
Then it dawned on me. Red light has been used for decades in darkrooms, submarines, by pilots flying at night, and so forth. Hmmmm. Would covering the LCD display with a transparent red film help preserve my adaptation to night vision? The short answer is yes, yes it does. I’ve done the experiment of comparing my night vision with and without the red film, and it definitely makes a difference. It is easy to peel off without leaving a residue, and you can still use the touchscreen, if your camera has that function. Simply cut the adhesive film to match the size of your LCD display and apply as you would a screen protector.
Bear with me on this. I’m about to get scientific on you. If you don’t want the details, feel free to skip to the end for some additional quick tips for night photography.
How does it work?
There is a lot of debate on the interweb about whether red light actually helps preserve night vision or if this is a myth. My understanding is this: we have two photoreceptor cells in our eyes that allow us to see: rods and cones. Cone cells are very light insensitive and allow us to perceive definition in bright light conditions. Rod cells, on the other hand, are very light sensitive, especially to blue-green light.
Rods are important for dark adaptation because:
- they are more active in low light compared to cones, and
- they contain a photopigment, called rhodopsin, which is a key chemical that transmits the signal from the photon of light to our brains in low light conditions.
Rhodopsin quickly degrades in bright light (photo-bleaching), and it takes about 20-30 minutes for rhodopsin to be replenished in the rod cells; this is why it takes about 20-30 minutes to adjust your eyes to the dark. Rhodopsin is less sensitive to long wavelengths of light (such as red) as compared to shorter wavelengths (such as blue-green). This means that rhodopsin is less likely to degrade in response to red light than blue-green light, and night vision is more likely to be preserved under red light conditions thanks to rhodopsin sticking around a little longer.
This is why red light works for night photography and other activities requiring adaptation to the dark. Even at the lowest brightness setting, the LCD display is illuminated enough to stimulate the cone cells. This allows us to see colors and details (such as text) well, which is obviously helpful for working in low light. However, it also photobleaches the very light sensitive rhodopsin in the rod cells, thereby losing any dark adaptation of our eyes. As soon as the LCD display turns off, we have to wait for 20 or so minutes for that rhodopsin to build back up so that we can have the sensitivity we need to see in the dark. By covering the LCD display with a red transparent film, we are effectively preserving our rhodopsin levels since they don't deplete as rapidly in response to low levels of red light. Therefore, by only allowing red light to hit your photoreceptor cells, you are taking advantage of the resolution provided by the cone cells AND the night vision provided by the rod cells. Handy dandy.
I don’t know about you, but my brain hurts…
Should you always use the red transparent film? No. It is not useful when you need to check the RGB channel histogram (you won't be able to see the red curve), when you need to adjust the white balance, or when you are photographing the Northern Lights. I also don't find it necessary when photographing the moon or in other night photography settings with ample light, as in shooting cityscapes.

Other Practical Tips for Night Photography
- Let people know where you are going – or bring a buddy
- Bring bug spray if you live in an area with mosquitoes or other biting insects
- Scout the location in daylight, pay attention to rocky ledges or other terrain that may be difficult to traverse at night
- Focus your lens to infinity before dark and secure with some gaffer tape
- Once you’ve taken a few test shots, turn off the playback function
I hope these night photography accessories and tips help you come home with some stellar night photos! What are some accessories or tips that you use for your night photography? Please share them below. Thanks!
Well done. Thank you. Congratulations on the new outdoor career!!
Thanks so much, Kevin! 🙂 No regrets.
Great article Brenda, some wonderful and helpful tips.
Thanks so much, Sam! Glad it was helpful. I enjoy following your work and also VTpixels on Instagram!
Great tips Brenda, now I must get to a dark sky area and allow the magic to appear.
Thanks, Sherman! Check out this website to find locations with low light pollution: http://www.darksky.org/idsp/finder/. Have fun!
I just ordered my Petzl Tikka headlamp, I used to use a flashlight with red lamp but nothing compares to having free hands for equipment. Thanks again.
Awesome! I think you’ll love it. It’s handy for a lot of things outside of photography, too.
Good advise, but surely if my Canon 100d entry level DSLR allows me to change the colour of my backscreen, red being 1 of the options, most other cameras do the same?
Hi Gerry – That’s a great question. I shoot Nikon, and as far as I can tell, I don’t have the option to change the color of the LCD display. Very cool that you can do that on your Canon. I would recommend doing that for night photography given that you have that handy option. Thanks for sharing!
Hello! I’m looking to set up a shoot much like your Milky Way Over Campfire and I was wondering how I can capture such a bright source – in my case a lantern emitting light and at the same time having the stars in focus? Is it as simple as using a long exposure time? Lastly, are there any other factors I should take into consideration? Great article!