
One of the biggest challenges when photographing at night is capturing images that are in sharp focus. The reason is really pretty simple and should come as no surprise. Our cameras have a much more difficult time ‘seeing' when it is dark, just like we do. Depending on how dark it actually is, and the availability of distant light sources, the auto-focus function of your camera may become very difficult if not impossible to use. However, there are ways to overcome these obstacles and come away with some fantastic night photos.
Finding focus at night isn't as difficult as it may seem. It just takes a little bit of practice to learn and perfect the techniques that work best. The following techniques have proven to be effective, depending on the situation, and are discussed in greater detail in this article:
- Auto-focus on a distant object during the day, then turn off auto-focus and lock the focus ring until the night shoot.
- Auto-focus on the moon or a light on the horizon, then turn off auto-focus on the lens or camera.
- Use a flashlight to illuminate an object and auto-focus on it.
- Set the flashlight in the scene some distance from the camera and auto-focus on that.
- Turn off auto-focus and manually focus the lens.
What is Infinity Focus?
It is important to note that these tips are primarily aimed at nighttime shooting where infinity focus is desired. Things such as the Milky Way, stars, the moon, or other astronomical objects are far away. Depth-of-field isn't really a concern here, but knowing that those far away things are in critical focus is. That is essentially what infinity focus of a lens is, where very far subjects are sharp. Finding infinity focus is a little different on each lens. Some lenses have a focus scale and even an infinity symbol (∞). The problem is that the focus rings on most modern lenses don't stop turning when they reach the infinity mark. Furthermore, infinity focus is often not actually right on the infinity symbol, but is rather somewhere just before reaching that mark on the lens.
Infinity Focus vs. Hyperfocal Distance
This discussion could quickly go down a deep, dark ‘rabbit hole'. Simply put, hyperfocal distance is the closest distance at which a lens can be focused while keeping objects at infinity ‘acceptably sharp'. This is important in landscape photography, particularly when there is a foreground element relatively close to the camera. In that situation, we typically want everything from that foreground to the background (infinity) to be sharp. That distance varies, depending on focal length, aperture, distance to subject, and even sensor size.
The problem with using hyperfocal distance is some situations is that the background isn't as sharp as it should be (or as sharp as we would like). Infinity focus will help you to achieve that sharpness. If you are shooting something very far away, and depth of field isn't a concern, focusing to infinity is the best approach.
Where is Infinity Focus?
OK, we've already established that infinity focus on many lenses isn't actually on the infinity symbol on the lens. To muddy the waters even more, most kit or lower-end lenses don't even have a focus scale or an infinity symbol. So how is one to find where infinity focus is on a particular lens? As with most other things in photography, this is going to be much easier if you are intimately familiar with your gear. Really get to know how each of your lenses works with the camera body that you have. While out shooting during the day, auto-focus on a very distant object and then note the reading on the focus scale (if your lens has one). It should be close to that infinity mark.
For lenses without a focus scale (and infinity symbol), switch to Live View, zoom in on very distant object, and manually focus the lens. If you are focused on something very far away, then the lens should be focused to infinity. Unfortunately, if your lens does not have a focus scale and the focus ring turns without stopping, this really won't help you to figure out exactly where infinity focus is to come back to it later. However, the practice of manually focusing will be helpful for those times when auto-focus doesn't work.
Find Focus at Night
Now that some of the technical details are out of the way, let's focus (pun intended) on how to find focus at night. Remember that this method will work well for getting distant objects in sharp focus. With this in mind, let's look in more detail at some techniques for finding focus at night.
Auto-focus during the day and lock the focus ring
This method is pretty straightforward, but requires some patience. Basically, the idea is to auto-focus on a distant object while there is still enough light to do so. It could be anything, from a tree on the horizon, a mountain that is far away, or a building in the distance. Once you do this, the lens should be focused to infinity. Now the trick is to keep it there until it gets dark and you are ready to start shooting. A common way to do this is to place a piece of gaffer's tape on the lens barrel to keep the focus ring from moving. Be careful when doing this so that you don't move it when placing the piece of tape. It is best to do this with the camera on a tripod, so your hands are free. You will likely need to tripod after the sun goes down anyway. Also, don't forget to switch the camera or lens to manual focus after doing this so it isn't hunting for focus the next time you press the shutter button.
Auto-focus on a distant light source
This method works even when it is dark. If the moon is out, that is an obvious choice. Auto-focus on the moon, switch the camera or lens to manual focus, then you are ready to capture sharp images of other distant objects. Just be sure to not accidentally bump the focus ring. A piece of gaffer's tape can be used here as well.
If the objective is to capture the Milky Way, hopefully there is no moon in the sky (or it is a New Moon). In that case, look for a distant house or yard light on the horizon and auto-focus on that. If the light is bright enough and large enough, your camera should have no problem locking onto it. Then again, switch the camera or lens to manual focus and consider using gaffer's tape to prevent the focus ring from moving.
Use your own light source
When shooting at night, you will need either a flashlight or, more preferably, a headlamp. A light will not only help you see where you're going and help to set things up, but can also be used as a focusing tool. There are a couple ways to do this. If the light is bright enough, you may be able to shine it on a distant object and auto-focus on that. However, if the light doesn't provide enough illumination, just walk it out into the scene, lay it on the ground or a rock shining back at the camera, and auto-focus right on the light.
Use manual focus
If all attempts at using auto-focus fail, or if you simply desire to fine tune focus, then manual focus is always an option. Simply turn off auto-focus on the lens and/or the camera and use the focus ring on the lens barrel. A good way to do this is by using Live View and zooming in to the focus point on the LCD screen. When focusing on a point light source, zoom in as far as possible and slowly turn the focus ring. The lens is focused when the point of light is at its smallest on the screen. After getting focused, place a piece of gaffer's tape on the lens to hold the focus ring in place.
Don't Be Afraid of the Dark
Don't be afraid to venture out into the night after the sun goes down. Shooting at night certainly does present some unique challenges, but it's a great way to really learn how to dial in the exposure settings on your camera. Focusing at night can be challenging, but with a little effort and some practice, you'll be capturing sharp images in no time.
Once you use the above techniques, it’s often helpful to use Live View or the equivalent and magnify the view to confirm that you have good focus.
Great idea, Steve, and something I use regularly when shooting landscapes and night photography. Thanks for reading!
Nice job, Rusty–lots of good advice.
Thanks for reading, John! I really appreciate the comment, too!
Yes, the article I was looking for. Your article gives me another approach on the subject. I hope to read more articles from you.
“When focusing on a point light source, zoom in as far as possible and slowly turn the focus ring.”
But I wonder … is a zoomed in focus point not a bit different from a (completely) zoomed out focus point? Isn’t there a small shift, that makes the image “out of focus” again once zoomed back?
I never tried this to look what’s happening …
You’re right if talking about zooming in with the lens. The method I was referring to was zooming in on the back LCD screen. When in Live View, press the little magnifying glass button (assuming your camera has that like mine do), and the image on the screen will be magnified so you can see what you are focusing on better.
Thanks for reading!
Ah, OK. But then, I find it hard to see any “bright” stars when at 28mm or even 18mm. With digital zoom, I have to up the ISO so much, that beneath the digital noise the star is completely buried.
Therefore, I tried the way of sending my wife for 30, 40m (or more, didn’t measure it) away and let her point a bright Maglite at me. I used a modified UV-Filter with a selfmade Bahtinov-pattern on it to set the focus.
This turned out to be the sharpest images I got till then. Will try this again when the next opportunity comes along.
Agree that seeing stars on the LCD screen isn’t the easiest thing. Some of that has to do with the limitations of our cameras and some just don’t have very good LCD screens. For the most part, I try to use the brightest star that is available, frame it up on the LCD, then move the focus ring back and forth. It is mostly just a big blob when out of focus. When it becomes a small blob, then I know it is probably focused. A
After taking the shot, I’ll review and zoom in on the image just to check.
Using an artificial light source to focus on is a great method to use.
“Also, don’t forget to switch the camera or lens to manual focus after doing this so it isn’t hunting for focus the next time you press the shutter button”
If you use back button focus you don’t need to switch the lens to manual as the camera won’t refocus when pressing the shutter button.
One thing which also may help in a dark scene is cranking up the ISO while manually focusing using live view, which could make things easier to see.
Right on, Patrick. That’s one big reason I use back-button focus on all my camera bodies. I was afraid to go off on too much of a tangent about that in this article, but it is worth mentioning.
Boosting the ISO is a good tip to use also.
Thanks for reading!
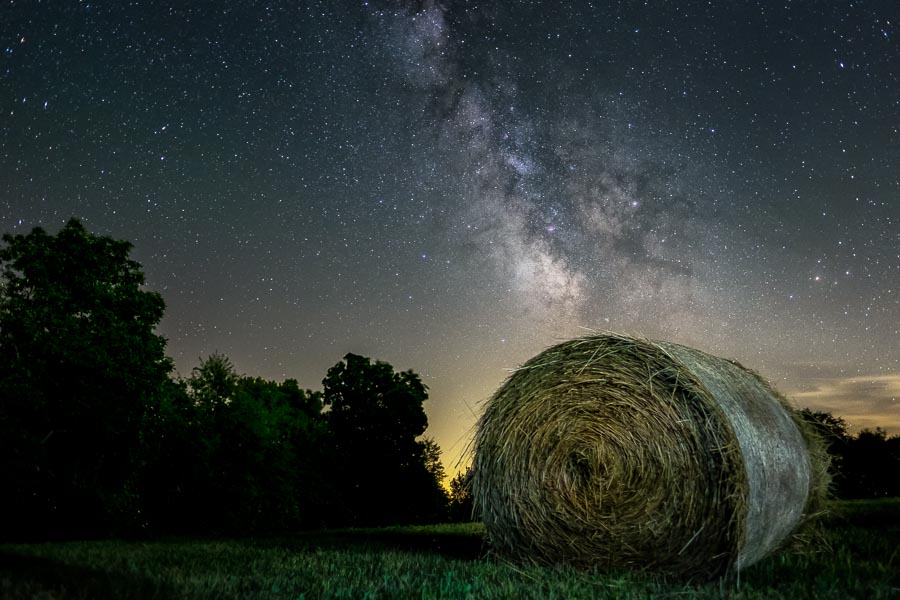
Wow! The first photo of the haystack is cosmically awesome. Love it 😀
Haha, thanks Mirat! Glad you like it.
Another thought would be to switch off ‘Image Stabalisation’ on the lens for the long exposures at night.
Good idea, Paulo. My primary night photography lenses do not have IS, but it’s not a bad idea to shut that off if you have it.
Very well done, Rusty. Every time I go out shooting with other photographers to do night photography, there are a few who just CAN’T seem to get the focus and go away from the shoot frustrated unless they get some help. Great guide.
Thanks, Jim. It does seem to be a huge challenge, and definitely not easy at first. I struggled with it when I first started shooting at night. I think a big part is really getting to know your lenses. Now I pretty much know where to set my focus ring on each lens to achieve infinity focus.
I’ve been spoiled by my Fuji cameras…the depth of field indicator in the EVF means that when I am shooting with Fuji lenses I never have to use autofocus. I just adjust manual focus to get the depth of field right where I want it and I’ve never missed the shot, even at night. It’s more difficult when shooting with a long lens and for that I use the manual focus assist tools and done great with them.
Couldn’t agree more, Mark. I love using my Fuji (X-T1), and this is one of the many reasons why. For anything that is not fast action, manual focus is pretty easy. Especially with all the tools, including the DOF indicator and focus peeking. When I switch back to using the Canon 5D Mark iii, in some ways it feels like I’m using a much much older camera (even older than it is) to accomplish the same things.
I have a Canon 5D3 with wide lens 16-32mm. It has “00” mark on it’s lens which I guess for infinity focus. Can I manually move the scale of the lens to that” 00″ mark and not further focus on anything other than dark sky to shoot?
Hi Quazi. I assume that you mean the 16-35mm lens. I also assume that the “00” mark that you speak of is the infinity symbol on the lens focus scale. The infinity symbol looks like a sideways “8” (∞). On most Canon lenses that I’ve used, infinity focus is not right on that symbol. You will likely need to turn the focus ring to the infinity symbol, then turn back the other way a little to get infinity focus. Give that a try and check for sharpness on the LCD screen.
Thanks for reading!
the other way a little to get infinity focus
It is amazing to know that this can be a huge possibility today. Check out this website http://writemypaper.com.au/ to learn different writing styles.