
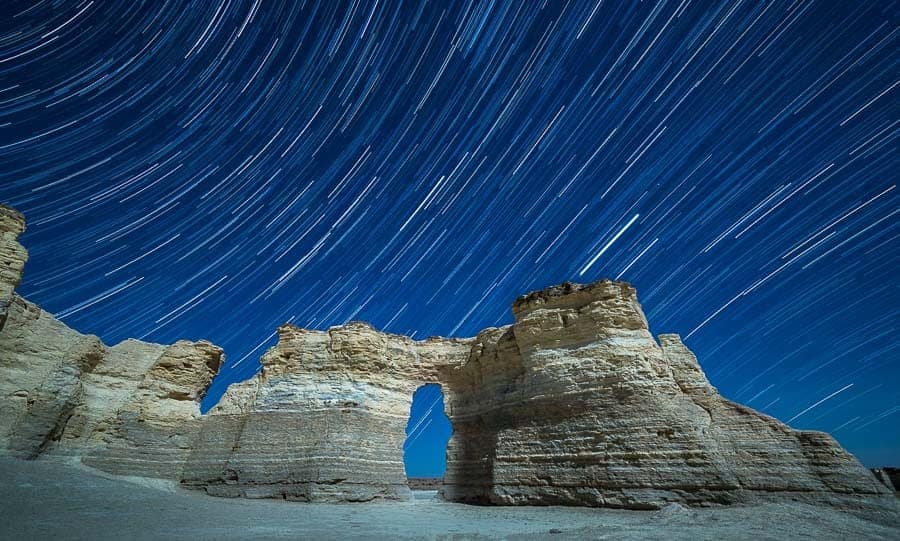
Star trails are so much fun to photograph and create. I think it's natural curiosity to look up into the night sky and wonder what is out there. As a photographer, it is even more enjoyable to capture images that show some of the amazing things that are happening above us every night. As camera bodies and lenses have improved over the years, it has become easier to make some incredible images of the night sky. That's not to say capturing these images is easy. There are still plenty of things that need to happen to create good images of star trails. Camera settings, and particularly exposure time (shutter speed), is one of those things.
There is no one shutter speed that is always going to be perfect for all star trail images. There are many variables, such as sensor size, focal length, and the type of image you want to create. In order to make an image that shows the movement of the stars, shutter speed needs to be several minutes long. A total exposure time of 15 minutes or more will be needed to create an image with prominent star trails.
The Effect of Focal Length
In a nutshell, the focal length of a lens will impact the apparent length of star trails at a given shutter speed. The more zoomed in a lens is, the longer the star trails will be. Conversely, a wide angle lens will require a longer shutter speed to show star trails.
You may have heard of the “500 rule”. It is only a guideline, but will give you an idea of the longest the shutter speed can be before motion becomes apparent when photographing stars. This rule-of-thumb is typically used to help make stars as sharp as possible, while at the same time allowing in as much light as possible by leaving the shutter open. However, it will give you an idea of just how long the shutter should be open for a given focal length if you want to show star trails.
The 500 rule works by dividing 500 by the focal length of a lens. The resulting number is the amount of time, in seconds, that the shutter would need to stay open before stars begin to show perceptible movement in the frame. For example, let's say you are using a lens at 14mm. The maximum shutter speed before star trails become noticeable would be as follows:
500/14mm = approx. 35 seconds
Leaving the shutter open for 35 seconds or longer would be just the beginning of showing star trails. A longer focal length, such as 50mm, would be much different:
500/50mm = 10 seconds
As you can see, a much shorter shutter speed will begin to show star trails at longer focal lengths.
Does Sensor Size Matter?
Yes. The calculations in the above examples are assuming a full-frame, 35mm sensor. For smaller sensor-sized cameras, the crop will need to be factored into the calculations. One very common crop factor is 1.5x, which would need to be applied to the focal length, as follows:
14mm x 1.5 = 21mm, then 500/21mm = approx. 23 seconds
or
50mm x 1.5 = 75mm, then 500/75mm = approx. 6 seconds
So not only does focal length matter, but the size of the camera's sensor will also have an affect on how long the shutter can be open before star trails become apparent. Whether you are using an APS-C sensor camera from Canon(1.6x crop factor), Nikon (1.5x crop factor), Sony (1.5x crop factor), or Fuji (1.5x crop factor), or a micro four-thirds system (2.0x crop factor), don't forget to apply the crop factor to the calculations.
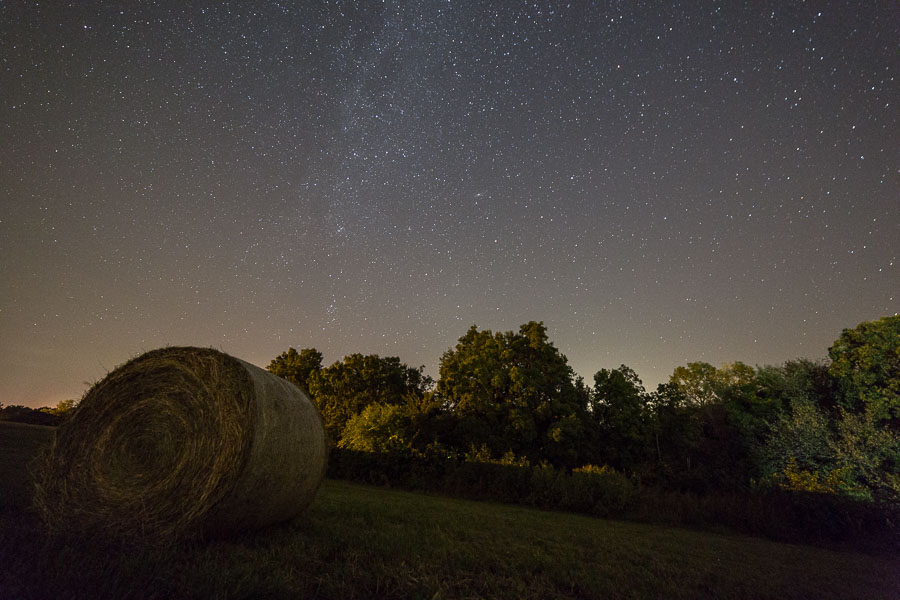
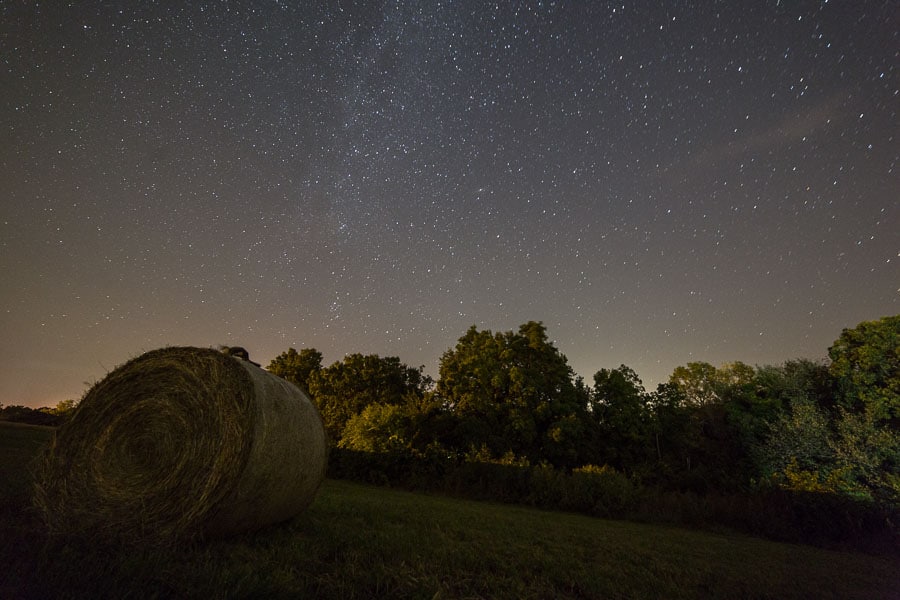
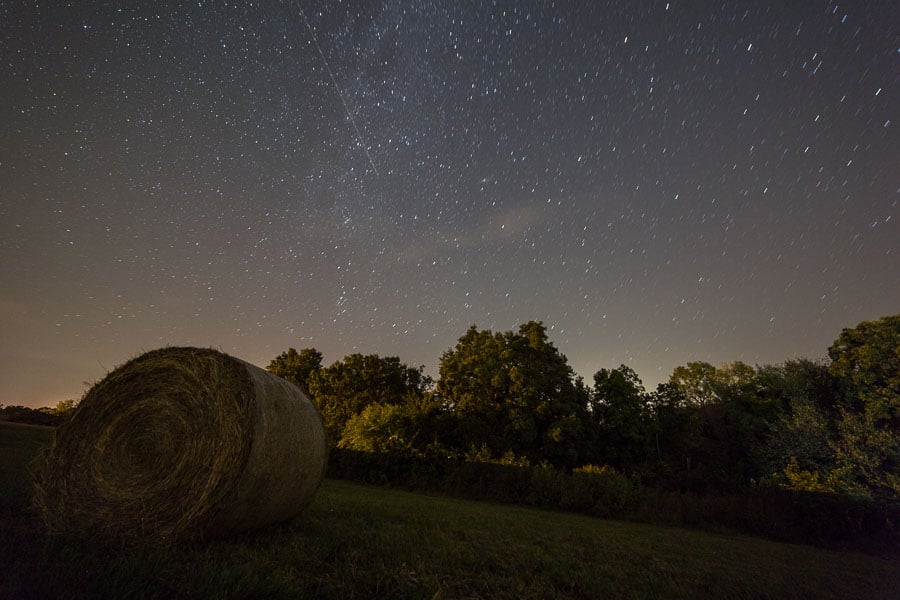
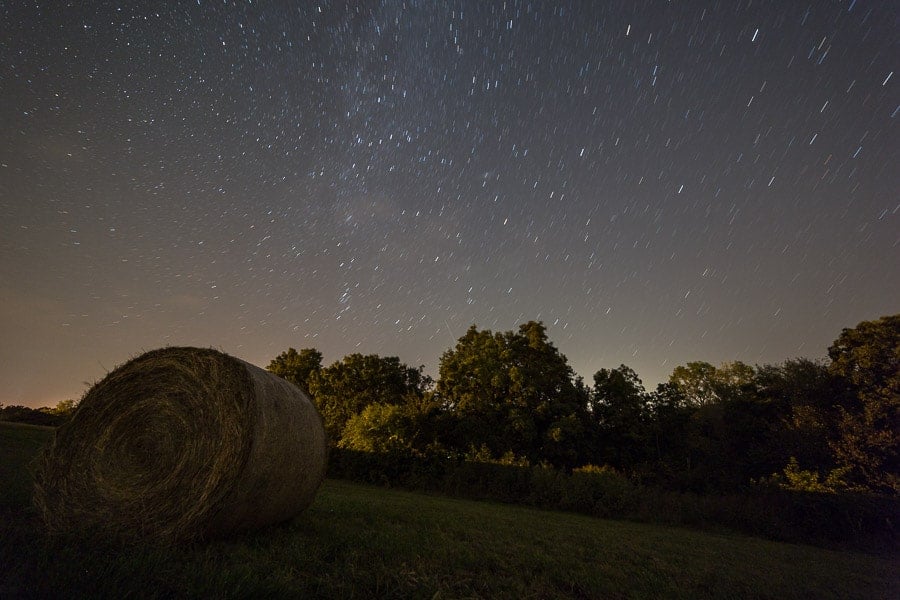
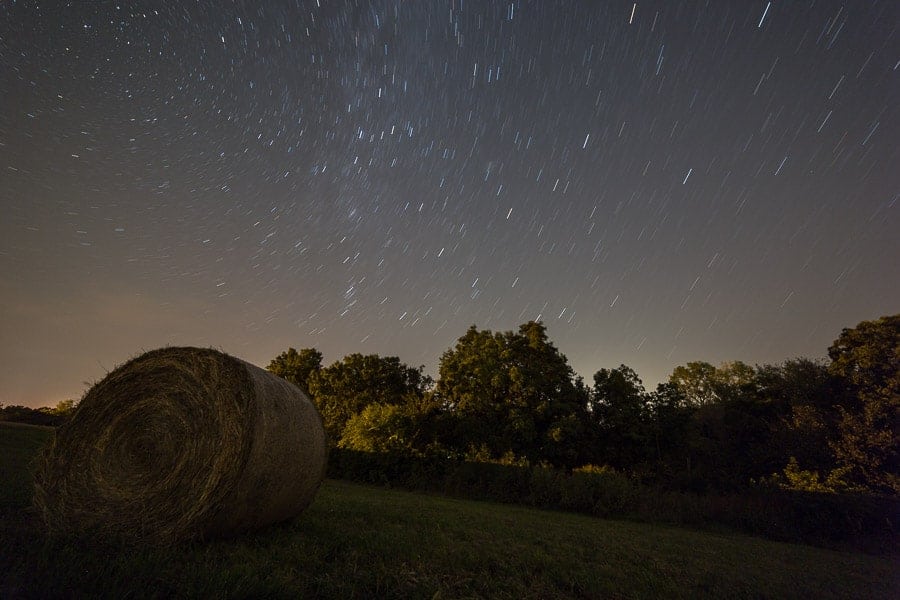
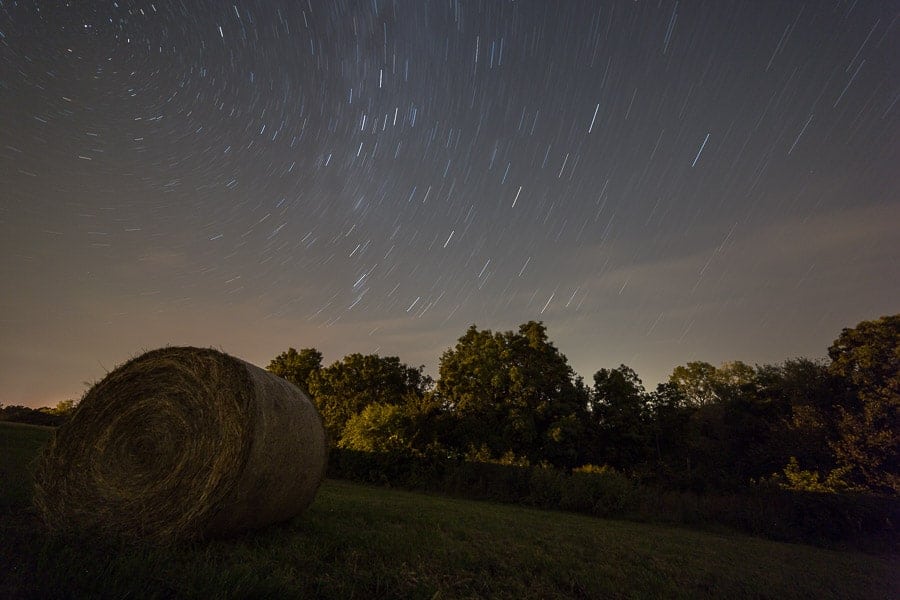
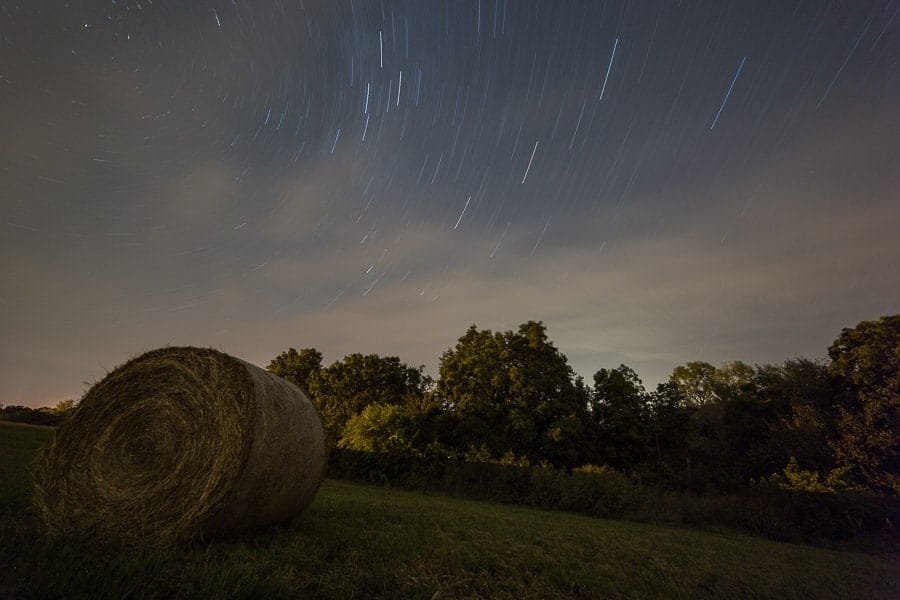
Sample Images
In this section, sample images are included to demonstrate the effect that shutter speed has on the length of star trails. Each of these images were captured using a Canon 5D Mark III and Rokinon 14mm f/2.8 lens. Aperture was kept as a constant f/2.8 for each image. Exposure was adjusted using the shutter speed and ISO. The camera was locked down on a sturdy tripod and a wired intervalometer was used to avoid touching the camera to capture the shots. In each image, the ISO was reduced by one stop as the shutter speed was doubled. The one exception was the last image, where I had reached the lowest native ISO for my camera. For that image, the exposure was decrease in Lightroom by about one stop to match the other images.
Shooting Star Trails: Two Techniques
There are basically two techniques used to create star trail images. One is to capture a single image, with a very long shutter speed. The second is to capture multiple images, each with shorter shutter speeds, then stack the images in post-processing.
Single Image Technique
As the name implies, this one is just using a single image for star trails. The shutter speed would need to be very long, in excess of at least 15 minutes, and probably even longer. Again, it depends on the focal length and also how long you want the star trails to be. “Bulb” mode will need to be used, which means there has to be a way to hold the shutter open for the desired length of time, preferably without physically holding the shutter button down with your finger. The best way is to use a cable release to actuate and lock the shutter in place. After the desired time has elapsed, simply release the shutter. Pros and cons of this method are as follows:
Pros
- Relatively simple to capture a single image.
- Easier and faster to post-process.
Cons
- A single mistake (i.e. light pollution, bumping the tripod, etc.) could ruin the entire shot.
- Longer shutter speeds generate more heat in-camera, and could result in “hot pixels”.
Multiple Exposure Technique
This technique involves shooting a number of images, then stacking them together in post-processing software to create star trails. Each of the images would have a shorter shutter speed, probably around 30 seconds, than the single image technique. Images are captured at short, consistent intervals by using an intervalometer, which could be an in-camera feature or an accessory that needs to be attached to the camera. The number of images that need to be captured depends on how long you want the star trails to be. A total of 30 images, each with an exposure of 30 seconds would be roughly the equivalent of a single 15 minute exposure. Pros and cons of this method are as follows:
Pros
- Single images can be thrown out if there are issues, and still have plenty of others to create the final image.
- Hot pixels not as much of an issue.
- Multiple images can also be used to create a time-lapse.
Cons
- May have to use additional gear (external intervalometer) to capture images.
- Images need to be stacked in post-production, taking more time.
Creating Star Trail Images: The Shoot
In my opinion, shooting multiple exposures to be stacked later is the best technique for creating star trails. Shooting multiple exposures minimizes the possibility of getting hot pixels, cuts down on the noise generated by a hot sensor, and leaves much more room for error during capture. If a car's headlights drown out my scene for an image or two, then those frames can simply be deleted and there's still plenty of data to create the final result. If the same car passes by 15 minutes into a 30-minute single exposure, then that shot is probably ruined and I would have to start over. It does take more time to stack all the images, but the process is pretty easy and the software does all the heavy lifting for you.
With that said, the process of capturing multiple star exposures and assembling them into a completed star trail image is not all that complicated. It does take some time commitment, but can be done with some basic photography gear. Following the steps below will help get you started on creating some star trails of your own.
Check the weather forecast
Clear skies are going to be most desirable when shooting the stars. A few light clouds could add interest, but look for a night that is going to be clear. There are so many weather apps that this should be easy to do. Of course, weather can be unpredictable, so be prepared to get shut down by some surprise clouds or rain once in a while.
Scout the Location
There are two primary things to look for when scouting locations for star trail photography: relatively dark skies and interesting compositions. There are many websites and apps to check a location for potential light pollution. Dark Site Finder is a good place to start. Finding an interesting composition is going to be totally up to you and your creative vision. Look for things that could be included in the frame to add visual interest. Things like an old barn, some trees, a mountain, or a body of water work for this. Something on the horizon would most likely be a silhouette, but would still make the image more interesting.
Use a Tripod
A sturdy tripod and ballhead is a must for night photography. Shutter speeds will be much too slow to hand-hold the camera. There are many very good quality tripods and ballheads on the market that won't break the bank. If you don't already have one, check out this guide for some recommendations.
Focus to Infinity
Focus is important. You can have the best composition ever, but if the image is not in focus, it won't matter. Finding focus at night presents its own challenges, but they can be overcome. My last article deals with this very topic and provides more details about ways to do this. You may be able to auto-focus on a distant light on the horizon, then turn off the auto-focus feature. Note that if you use back button focus, there's no need to shut off auto-focus, since the camera won't try to focus again when you press the shutter button. Another way is to focus on something distant before it gets dark, then turn off auto-focus and use gaffer's tape to hold the focus ring in place for later. If neither of those are an option, switch to manual focus, turn on live view, find a bright star and magnify it on the LCD, then use the focus ring to make it as small as possible.
Shoot Wide Open
The name of the game here is to let in as much light as possible. One way to do that is to open your lens to its widest possible aperture. The larger the aperture (smaller f-number), the more light the lens will let in to the sensor. An aperture of f/2.8, f/1.8, or even f/1.4 would be ideal. However, even a kit lens, with a maximum aperture of f/3.5 at its widest focal length will suffice. Don't let gear be an issue.
Take a test shot
After getting the camera setup and focused, it is time to take some test shots. This is an important step to check your composition. To check the composition, set a shutter speed of about 5-10 seconds and crank up the ISO to 6400 or higher. Don't worry about the noise. You are only wanting to make the image as bright as possible to see what is going on around the frame. It's difficult to see in the dark, so it is likely you will need to make at least some small adjustments and take more test shots to get the composition just right. After getting the composition the way you want it, the shutter speed and ISO will be set as normal.
Use a 30-second shutter speed
This shutter speed is not set in stone. You could use more or less. To simplify things, I typically just use the longest my camera's shutter can remain open without being in bulb mode. The point is to capture multiple images that will be stacked later.
Set ISO to taste
The ISO setting will depend on several factors, such as how dark it is and the aperture setting. A good place to start would be ISO 800. You will likely change it based on the conditions (see next step).
Take another test shot
This time, your test shots will be to check the exposure and focus. With a wide open aperture, 30 second shutter speed, and ISO 1600, take a shot and see how it looks on the LCD. More importantly, see how the histogram looks. Simply looking at the image on the LCD can fool you into thinking it is bright enough, since you are viewing it in the dark on a bright screen. In reality, it may be way underexposed. The histogram will help with getting the exposure set. The frame is mostly dark, so most of the data will be to the left side of the histogram. However, you don't want all the data to be squished against the left side. Shoot for a peak that is just to the right of the far left side of the graph. If it is too dark, raise the ISO. Bonus tip: decrease the brightness of the LCD when shooting at night. This will help preserve your night vision, but also help you make better judgements about image exposure in the dark.
After getting the exposure set, review the image on the LCD. Magnify the image as much as possible and pan around the image looking at the stars for sharpness. There will probably be some trailing, and that's OK. The individual stars or trails should look sharp in the image.
Use an intervalometer
Now that the camera settings and composition are good, it's time to start capturing the image sequence. The best way to do this is by using an intervalometer. Some cameras have a built-in intervalometer feature, which is great. If yours doesn't, you can use one like this to attach to the camera. Just make sure to get one that is compatible with your camera model.
The goal is to capture a sequence of images with very little gap between them. Set up the intervalometer to capture images about 2-3 seconds apart. That should be enough time for the shutter to actuate, capture the image, and write it to the card. If you allow too much time between images, you could end up with gaps in the final star trail image. Shoot for at least 50 images. If your shutter speed is 30 seconds, that will be roughly 25 minutes of elapsed time. More images will result in longer star trails. Experiment to see what you like.
Other Tips
Shooting at night is a blast. Here are a few more random tips to make the experience much better:
- When shooting at night, it's a good idea to have a headlamp to see where you are going and what you are doing. Use a headlamp that has a red light option to help preserve night vision.
- If you want to get the neat circular pattern in your star trails, make sure to have Polaris (the north star) in your frame.
- To add more interest to your image, try light painting something in the foreground.
- Make sure to dress appropriately for the weather. Keep in mind you will be standing in one place for a while, unless you can go indoors or sit in a car while the camera is capturing images. Staying comfortable while out shooting is important. If you get too cold, that really makes it a lot less fun.
- On the flip side, if you are shooting in warm weather, make sure to prepare for mosquitos or other insects. Those pesky critters will find you and feast on you all night if you don't have something to ward them off.
- Bring a small stool or chair to take a break while waiting for the camera to do its thing. The more comfortable you are, the more fun you will have, and the longer you will want to stay out shooting.
- Make sure your camera's battery is fully charged and have a spare or two with you.
- Be sure the memory card in the camera has plenty of space to capture all those images. Carry and extra card or two, just in case.
- In a humid climate, dew on the front lens element can be an issue as the night air cools. One way to combat this is to wrap a chemically-activated hand warmer around the lens and hold it in place with a rubber band. The same is true in the winter, when frost could be an issue.
- A small piece of velcro works great to hold a cable release (intervalometer) on one of the tripod legs instead of letting it dangle in the breeze.
Creating Star Trail Images: Post-Processing
Now that you have all those images of the stars, it's time to get them onto the computer and create the final star trail image. As the saying goes, “there's more than one way to skin a cat”. In the same way, there are multiple ways to stack images to make star trails. This includes several different computer programs that could be used to accomplish the task. I've only used StarStax and Photoshop to do this. The easier (and probably quickest) of the two is StarStax. It is free software, for Mac and PC, that handles the task of assembling star trails with ease. It works well, and is a great alternative if you don't have Photoshop. Check out this article for a tutorial on using StarStax.
For this article, we will look at one of the many ways to create star trails using Photoshop. It's not a super complicated technique, but can take some time, especially on a slower computer. My 6-year-old iMac really struggles to churn through and stack images for star trails. The process would be much more bearable on a faster computer.
Edit images in Lightroom
The first step is to import all the images into Lightroom. Place them all into a folder on your desktop, navigate to that folder within the Lightroom Library Module, select all the photos, and click Import. Once they are in Lightroom, go into the Develop Module and edit the first image in the sequence. Edits should be basic, such as correcting white balance, adding some exposure (as necessary), decreasing highlights, boosting shadows and whites, and maybe add a little clarity and sharpness. After the image looks good to you, Shift+click on the last image in the sequence to select them all. Click the Sync button in the bottom right corner to apply the adjustments across all images.
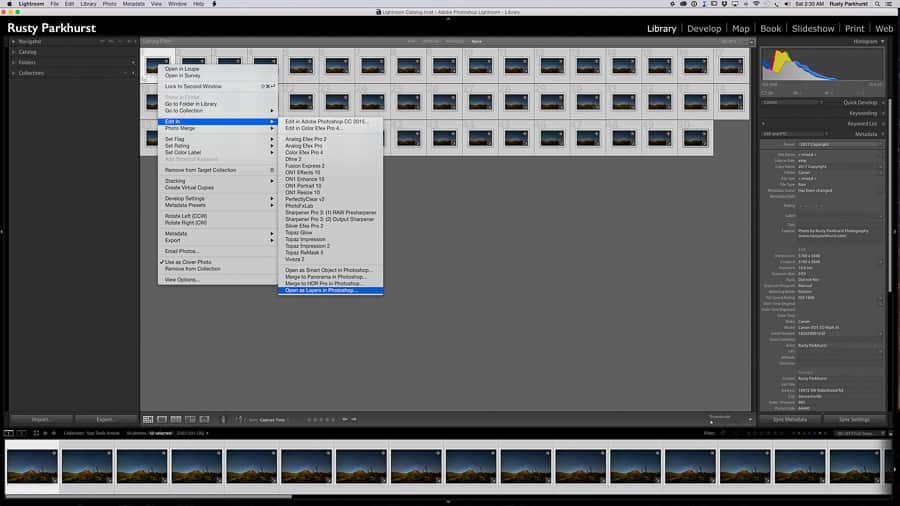
Take a trip into Photoshop
With all of the edited images selected in Lightroom, right click on one of the images. In the popup window, go to Edit In and select Open as Layers in Photoshop. It will be the bottom option. Now go walk the dog, run some errands, and have lunch. All of the images may be in Photoshop as layers by the time you return to the computer. That's a slight exaggeration, but for 70 images, the process did take nearly 25 minutes to complete on my archaic machine. YMMV.
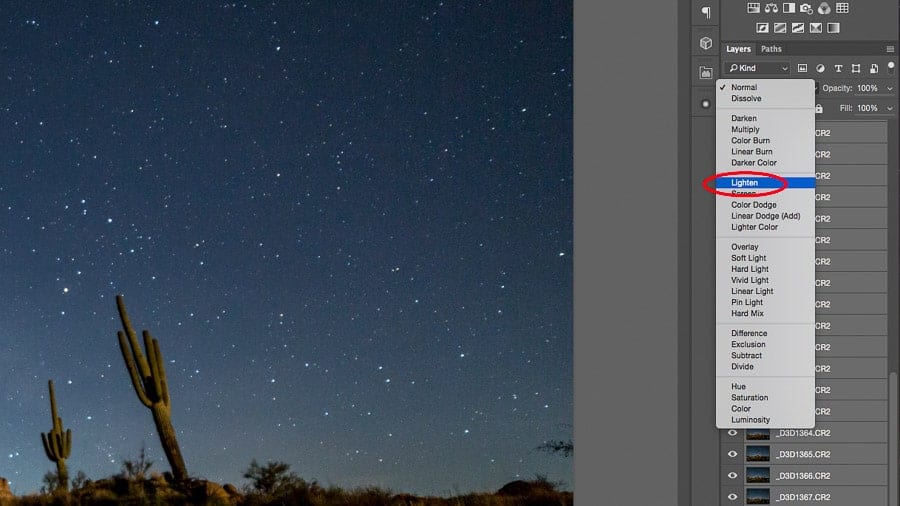
Use Blend Modes
Select all but the very last layer that was brought into Photoshop. Do this by selecting the first layer, then Shift+Click on the next to last layer. The very last layer is being saved for an optional step later. Next, change the blend mode to ‘Lighten'. This allows the stars in each succeeding layer to show through the layer above. And, voila! You now have a star trail image. Due to the rotation of the earth, the stars appear to be moving, while everything else is stationary. Therefore, over the course of several minutes (or hours), each star leaves a trail, resulting in the desired effect.
Tone down the landscape
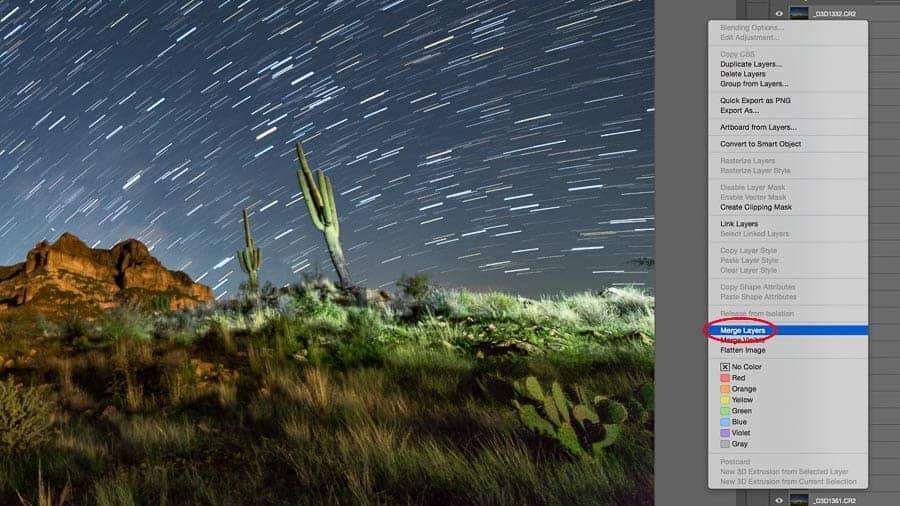
After changing the blend mode, you may notice that not only do the star trails come through, but the landscape may also be too bright. This will depend on your particular situation, and this is an optional step in the process. If you like the image the way it is, just skip this part. In my image, there was light pollution from other photographers turning on lights throughout the shoot, so parts of the scene below were too bright. The very last layer that was not blended with the others will serve as the ‘normal' exposure, and some of that light contamination will be brushed out using a layer mask.
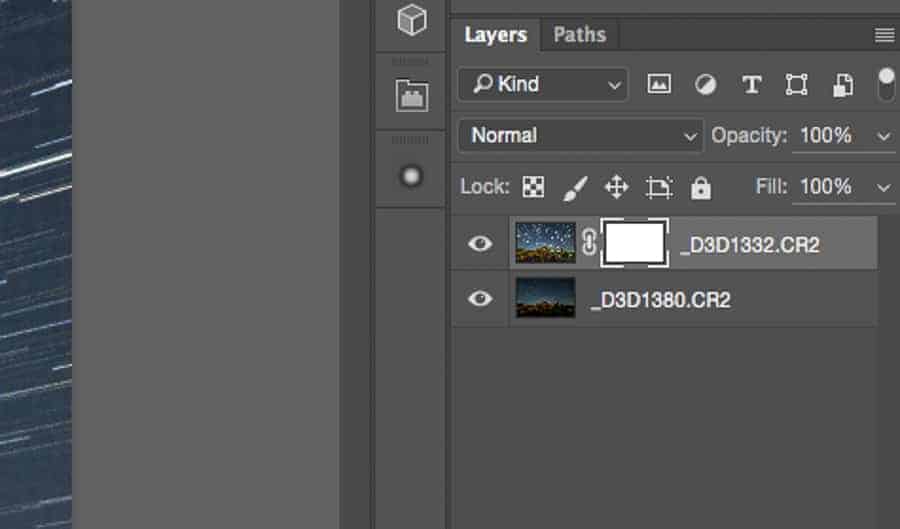
Once again, select all but the very last layer. Right click on the selected layers, and choose the Merge Layers option, about two-thirds of the way down. As the name implies, all the selected layers will now be merged into one. With the merged layers (which should be the top layer) selected, click the ‘Add Layer Mask' icon at the bottom of the panel. You will see a blank layer mask added to the selected layer. With the layer mask selected, choose the Brush tool by pressing B on your keyboard. Making sure that black is selected as the foreground color (remember black conceals), begin brushing out areas of the landscape that you want to darken. The opacity and flow settings for the brush can be adjusted in the options bar right above the image area. This gives you full control of how bright or dark you want some areas of the image to be.
Flatten and Save Image
After the blending is complete, it is time to flatten and save the image. Right click on the layers and choose the Flatten Image option. This will combine the layers into a single background layer and reduce file size. Now click File > Save to save the star trail image and send it back into the Lightroom catalog. If necessary, final adjustments can be made within Lightroom.
Export and Share
After all that hard work, it's time to share the fruits of your labor. Export the image from Lightroom and share with the Improve Photography community.
In Conclusion
I realize that creating images of star trails can seem like a really daunting task. There are a lot of steps to follow, not only in shooting the images, but also to post-process to achieve the final result. However, it's not as bad as it seems. It is time consuming, but the end result is worth it. Get out there and make some star trails of your own. I closely monitor the comments section below, so don't hesitate to ask any questions you may have. Also, don't forget to share your images and your experiences. That's part of the fun!
Nice Job, Rusty. Wish I would have known all this when I was first starting out! Keep up the good work!
Thanks, John. Glad you enjoyed it and hope there is some useful tidbits of information in there somewhere!
Thank you! So much to learn and try.
Thank you for reading, Howard!
An excellent article. One extra tip that has caught me out a number of times, is to brighten your display after you have finished. The next day when the sun is up, renders a darkened screen useless and it is hard to find the menu item to brighten the screen again.
Yes indeed, Kevin. That has happened to me many times. Shooting during the day and wondering why the photo on the LCD looks so dark, even when the histogram looks good. Then I realize…the LCD brightness was turned way down during last night’s shoot.
Really a great addition. I have read this marvelous post. Thanks for sharing information about it. I really like that. Thanks so lot for your convene.
Your article is detailed, thanks to it I solved the problem I am entangled. I will regularly follow your writers and visit this site daily.