

In my journey to learn and master real estate photography, I have learned a few things the easy way and learned more things the hard way. There are tons of sites out there offering advice for shooting real estate photography with many of them giving advice so watered down you are left wondering how long the author has actually owned his or her camera. I am also deeply disappointed in the sites that critique photos that were obviously not taken by a professional and in no way warrant the ridicule of the article's author.
In my article this week, I hope to provide 13 real and useful (and hopefully really useful) tips and share a few things I've learned from mistakes I've made. My thoughts will be directed mostly to the advanced amateur or intermediate photographer, someone who already understands that a tripod and wide angle lens are necessary items. Let's skip over the generic advice you can get everywhere else and really dig into the meat of the subject to really step up your real estate photography game. Some of these are shooting tips, some are editing tips, and some are business management tips.
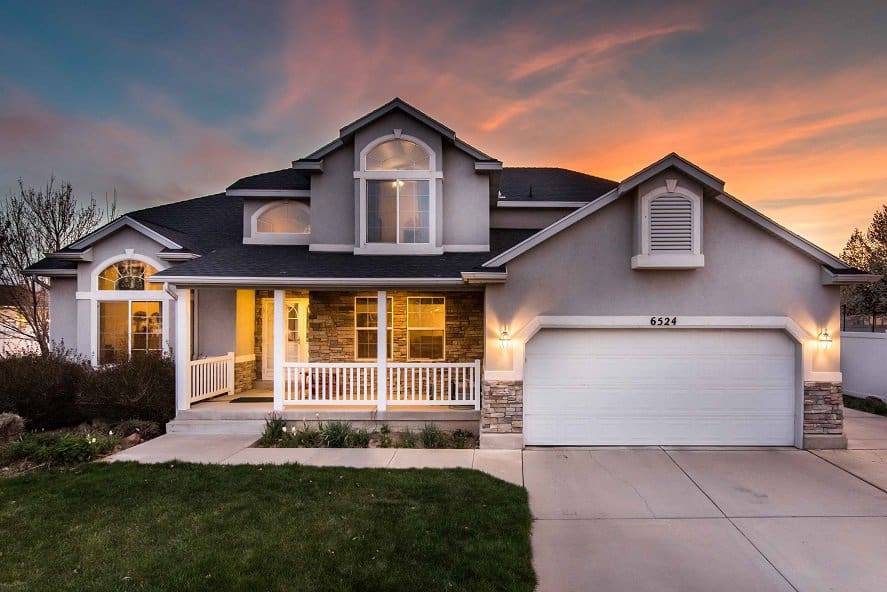
1: Nuclear Sky Replacements
Sky replacements are beneficial most of the time, especially when doing twilight real estate photography. Some agents like clean, blue skies and other agents like to dress them up a bit. Most photographers, when first playing with sky replacements, will choose a very dramatic, oversaturated sky to “add some punch!” This is a mistake. When it comes to sky replacements, less is more. The home is the whole point of the photograph, don't pull someone's attention away from it. Instead, choose a simple, clean sky. A few wispy clouds go much farther than candy red and orange sunsets.
The above photo is an example of a nuclear sky replacement. Don't do this.
2: Mind Your Verticals
I'm sure you've heard this one a thousand times already but it is so important that everyone understands this rule. And it isn't really one of those “you have to know the rules before you can break them” rules. It is almost always a hard and fast rule that must be obeyed. There are very few occasions where you can tip your camera up or down and have a decent image come out. To keep your verticals straight up and down, use a bubble level or your camera's digital level. And then, in post processing, use the “auto” button (in the transform section) to make sure that things are straight up and down. However, even this might not work all the time and you'll have to play with the “vertical” slider to adjust your image. Keep an eye on the edges of walls, window frames, or cabinets and try to align them with the automatic grid lines that pop up when using this slider.
3: Flash Shadows
Flash shadows will pop up where you least expect them. And you almost never notice all of them while on-site. Flash shadows turn a great photograph into a good photograph. The obvious ones are behind ceiling fans or light fixtures. The less obvious ones are going to be behind couches, pillows, desks, plants, tables, or chairs. Flash shadows are a problem where shadows aren't supposed to exist (ceilings) but are are more acceptable (if under control) around things like chair legs. In order to prevent shadows, you have a couple options.
First is to produce very soft light by bouncing off a wall or ceiling behind the camera. Second is to use 3 points of light like a window and 2 flashes on either side of the camera, for example. One trick I learned that really helped prevent shadows was to take the Fresnel lens off my flash so the light was more directional instead of spreading out. If you don't want to explore using flashes, let's talk about HDR next.

4: Bad HDR
There is good HDR and there is bad “clown vomit” HDR. I have seen real estate images done with Enfuse or Photomatix (Lightroom plugins) that looked absolutely incredible. And then, I have seen super lazy, churn and burn HDR that looks like someone turned the saturation slider to 11. I don't shoot using HDR but have come to understand that you must play around with the settings in the software of your choice in order to produce a clean, crisp image. Rarely will the presets work for your shooting style. But if you want to dedicate the time in post processing (or develop your own presets to match your style) then this can be a great way to employ HDR photography.
Examples of bad HDR include bad shadowing or dark areas around window frames and light fixtures, odd color transitions on walls, and haloing around trees and their blue sky backgrounds.
Bonus Tip: Always Use a Contract Before Photographing a Home
Photographing a home for a client without a contract in place can be a disastrous move! If you're really interested in learning more about the business of real estate photography, be sure to check out Improve Photography's Real Estate Starter Pack. For just $15 you get:
- The real estate photo contract Jim uses for all his real estate shoots (a $250 value)
- 10 Lightroom presets to help you make bright, clean, and airy images
- The pricing template that Jim uses for his real estate shoots
See all the details here: https://improvephotography.com/real-estate-photographers-starter-package/
5: Giving Away Work for Free
I get it. You are super excited to start working real jobs for real agents. And you think, “Hey, maybe I can make a more attractive offer if I include this, this, this, this, this, this, and this for free!” Please don't do it. What you do as a photographer is valuable and you deserve to get paid for everything you do. When trying to start a relationship with a new client of mine, I gave her everything in my portfolio for the low, low price of one of my basic packages. I even went back to do re-shoots for free when she forgot to move that one thing out of the room first. I did it all:
Sky Replacements: FREE
Aerials: FREE
Flyers: FREE
Virtual Tours: FREEEEEE!
This will not help you create a name for yourself nor will it help you build meaningful relationships with future or potential clients. The only people it will attract are those looking for a deal and they will drop you as a service provider as soon as they find someone else who will do it for cheaper. If you are asked to do extra work, make sure you charge extra for it. We recently had our carpets cleaned and my wife wanted to add a couple more rooms at the last minute. The cleaning guy was happy to do it but you know what he said? “Yeah, I can do that no problem, it will be another $50 per room.” He didn't say “Oh, sure I can do that, no charge.” Because how is he supposed to run a profitable business if he's just giving away his time and talents? It would be like if you opened a pizzeria and just gave away free pizzas all the time and then you're surprised when you go out of business after 3 months.
There is also a big difference between doing things for “free” and doing things as “included” in the price. I really recommend you make the differentiation in how you word your services. Always say “included” if you have built it into your pricing structure. Never say “free” because it makes what you have to offer sound not valuable.
6: Get Paid Before You Deliver
This may seem like a “no duh” kind of statement but a lot of real estate photographers deliver photos before they collect payment. And subsequently, a lot of real estate photographers ask how to deal with clients who go weeks with unpaid invoices. The simple answer is to require payment before you release any photos.
In the email that contains my invoice, I write, “Your photos are ready for download. Please view them here and if you are satisfied, click on the link below to pay your invoice. Once payment has been sent, I will send you a download password for the photos. If you have any concerns, please let me know before making your payment.” Nothing fancy, nothing confrontational. It seems though, that a lot of photographers have a hard time charging for their work in the first place and an even harder time collecting payment. Many wait for the customer to bring it up or they mention it as an “after the fact” suggestion. Remember, what you do is valuable and you need to get paid to do it. You are trying to make a living here.
I made the mistake of sending out photos before getting paid on one shoot and I was chasing a real estate agent for weeks. In the end, when I finally got him on the phone he claimed that he already paid me. I told him I hadn't seen anything come through and he replied, “Well, my credit card statement shows that I paid you $300 two weeks ago.” That amount wasn't even close to what he owed me. I had to argue with him just to get paid for work I did almost a month prior. It was exhausting and just about the last thing I wanted to be doing with my morning.
There used to be (still is, really) a payment term called Net15 or Net30. This means that the client has 15 or 30 days to pay the invoice. It even goes so far as 10Net15 which means the client gets a 10% discount if they pay the invoice in 15 days. This is a throwback to the days of paper checks and bookkeepers. When you had to receive the invoice in the mail, send it to your bookkeeper, they had to cut a check, update their books, and send it all back through the mail again. Some times this process took a while and because time is money you gave an extra incentive to get paid quickly.
I do not agree with these payment terms. In today's age of online payments and credit cards, there is absolutely NO REASON why someone shouldn't be able to pay the invoice upon receipt. A lot of agents will try to argue that they don't get paid until the house sells (so you shouldn't get paid until they get paid). That is something they have to manage as a reality of being a Realtor. It is not a problem you need to worry about. When that agent went into Starbucks that morning do you think the manager let them walk away with their triple-caf-double-whip-soy-mocha latte with the promise that they'll pay when their commission check comes in? Heck no.
Now, there are very few close clients of mine who I have built up enough trust with that I will shoot for them and invoice them later. I have no problem doing this because they have a track record of paying me on time and without pushback. These are very rare cases and shouldn't be the norm.
7: Gear Acquisition Syndrome
Oh, we all love new gear, don't we? There are literally thousands of dollars of things I could buy right now. Many, many photographers have bad GAS (so don't shoot downwind of them). In the real estate photography world, this comes in the form of lighting setups, new cameras and lenses, drones, and video rigs. Many real estate photographers just getting started struggle with finding their footing and getting traction (new clients). So they think, “Hey, if I buy a drone, I'll offer that and the clients will come running!” Not likely. But they buy a drone anyway. Next is this fancy new flash that someone else is using that costs $600. Next is a video rig to get buttery smooth video for video walkthroughs. I know because I was there.
I found a guy selling a fancy pants 3 axis gimbal that I thought was the end all, be all of video rigs (a Defy G12). I bought it off him for $1200 even before I had any clients even hinting they wanted video work. I used that gimbal for ONE paid shoot before I tried to sell it a year later. It was big and bulky and I never used the darn thing. I sat on it for 4 months while it was up for sale and eventually sold it for $700 to some guy who wanted to shoot music videos with it. Ugh. What a waste of money.
It is better to use the gear you currently have until your skills outperform them. Then you upgrade. If you have a Canon 6D, don't run out and buy a 5D Mark III or a brand new 6D Mark II. The 6D is a perfectly fine camera and it will be a looooong time before you will outgrow it. I know a guy who shoots million dollar properties and is featured in numerous high-end real estate magazines and he uses a 6D. Better gear rarely gives you better photos. The only exception to this is to add gear you don't have, like speedlights. But only when you have established a need for it (unlike my gimbal purchase) and then don't go out and spend $400 on Canon speedlights when $65 Yongnuo lights work just fine. I heard a funny joke that said, “The biggest first world problem is to use our smartphones and MacBooks to see our $0 checking account balance.” If you buy all the fancy gear, you can admire it while you look at your empty lead gen mailbox.
8: Set Expectations Upfront
Setting expectations about when you will be there, how long you will be there, and when you'll have the photos ready is Photo Business 101. In addition, you'll also want to understand the most important features of the home (provided by either the homeowner or the agent) and how you will get those shots. Also, you'll want to set the expectation about “ready to shoot” conditions. Some photographers will help tidy up a little bit while others are just there to take pictures and won't move or touch anything. It is important to make this distinction with your clients because you may get burned like I did on a shoot where I took photos of the house, agent loved them, paid me, and then 2 days later she said, “I noticed I accidentally left the rugs in the kitchen. Can you come back and reshoot that for me?” I didn't set any expectation about charging extra fees to reshoot her oversight so I went back and did it for free (and it ended up costing me 2 hours). I have since learned and unless the error is on my part (bad composition, bad focus, etc) there will be a small fee to come back and do reshoots. This is all stated in my Terms and Conditions so there are no surprises.
9: Don't Let Your Ego Take Control
The most expensive home I shot at a certain point in my career last summer resulted in the worst product I have ever delivered to date. I had built up my portfolio, shot a few paid gigs and this guy calls me up to photograph his $750,000 listing. I walked in there like I was a real estate photography god and I botched that photo shoot so hard I still cringe when I think about it.
Here I am, Mr. Hotshot Photographer making stupid mistakes with lighting and composition, missing entire rooms, leaving lights off in one shot then turning them on in another. I had to actually go back a second day because I had promised 35 photos but only had 18 to deliver after the first shoot. I wanted to tuck my tail between my legs and hang my head in shame.
That experience has helped me keep my ego in check every time I go into a home. I never go into the ring thinking I can box with the likes of Ansel Adams or Annie Leibovitz. If you keep your ego small, you'll understand that the challenges presented in each home are to be respected and learned from. And when you do, you'll grow faster as a photographer.
10: Constructive Criticism
This is by far one of the best ways to improve your photography. Show it to others, no matter how much it hurts, and gather valuable feedback. Because the Internet is a harsh, cold, desolate world full of trolls, it can be a little scary. I was scared to death to share my obviously amateur work to the titans of photography. Yes, I did get some rude and not helpful comments. But others also pointed out things to me that I wouldn't have seen otherwise.
“If you move your camera down a foot you'll get a better composition.”
“If you bounce the flash here instead of there, you'll get more natural lighting.”
“Don't use so much saturation in the sky and it will look more realistic.”
There are tons of forums and groups that will help you be a better photographer. Get feedback from others so you can discover the things only a more experienced eye can point out.
Improve Photography offers portfolio reviews for a very reasonable price. This is a great way to get personal advice from an experienced photographer. Learn more about it here.
11: Photoshop is not a Crutch
“You can just Photoshop that out, right?”
Oh, how we've heard that a thousand times. Photoshop is not magic (mostly). I've even committed the unforgivable sin of saying, “I could move that thing….but I'll just clone stamp it out.” Just this last week I was doing a twilight photo and there were some bags of wood chips in front of the garage that I was too lazy to move. I then spent 15 minutes trying to get it to look natural in post processing when it would have taken me literally 10 seconds to walk over and move them out of the way. Tripping over dollars to save dimes. Get the image right in camera and your post processing will speed up immensely.
Also, make sure you charge for extra Photoshop work. You will get to the point where using a few presets will get your images 85% of the way and then 30 seconds of playing around with sliders will get them to 95% (even though there is literally no Realtor on Earth who will notice the difference between an 85% finished photo and a 95% finished photo). If an agent wants you to do some crazy Photoshop like sky replacements on all the exterior images or “clean up the grass a bit” make sure you are charging for that. I charge $1.50/min for extra Photoshop work to make it worth my while.
Do remember that even the best real estate photography tips can’t do with dull lightning and bad weather conditions. You always need Photoshop or Lightroom’s help. If you can’t edit property photos and use real estate photo editing services, charge for this work too. Don’t forget to mention this matter in your pricing package.
12: Elevate Your Exteriors
Adding a few extra feet to your exterior photos is a great way to make impressive images that have a little extra something. You don't need to buy a drone for this either. There are several ways to gives your photos a boost (ha!):
Extend your tripod legs all the way, set your camera timer to 20 seconds, then hold your tripod above your head, and snap 5 photos in quick succession. Not the most professional option, but it gets the job done.
Buy a painter's pole and a tripod attachment. Then hoist your camera up in the air. Use the same technique as before and try to stabilize it while the timer counts down.
Using a painter's pole and a CamRanger (or similar remote control tool) strap your pole to your tripod with bungee cords and then compose your shot. This works especially well if you want to light paint the house with a flash and blend the images together in Photoshop.
Just don't go too high with your camera. People don't want to see the roof, they want to see the house. If you find that you are “looking down” on the house, you've gone too high. A good reference is not to go higher than the top 2/3rds of the house (the 2nd story windows or the rain gutter, for example).
13: Use Smartphone Apps: Google Streetview, Blue Hour, Wunderground, etc.
To eliminate surprises and help me plan out my exterior shots (and to see what size and composition of the house I'll be working with) I usually check it out on Google Streetview. This way I know where trees are, what the road looks like, where I can park (don't park in front of the house you are about to photograph) and have a better idea of what I'll be working on.
I also use an app called Blue Hour. It tells me the times that the sun will rise and set and gives me estimates on the Golden Hour (sunrise) and the Blue Hour (sunset). This is very helpful when planning out twilight shots so I'm not guessing when I have to be there (and show up too late or too early). I can give clients the exact time of the sunset and when I'll be at the property (usually 15 or 20 minutes beforehand).
I also like to use weather apps like Wunderground to know what the day will be like or the forecast for the next week. Just a few days ago I had a client contact me to get a shot of the city view from a house but she thought it was going to be too hazy. I found that it was going to rain in a couple days so we postponed until after the rain when a lot of the dust had been cleaned up.
BONUS TIP: Become an Affiliate Member of your Local Real Estate Board
Many Real Estate Boards offer an affiliate level membership. In Salt Lake City it costs $200/year to be an affiliate member. This membership gives me invites to all the real estate luncheons, events, and parties where I can meet new clients and talk shop. You can also state that you are an affiliate member of your local board on your website which usually gives a little bit of extra confidence in your services because you'll have to take the same Code of Ethics class that Realtors have to take before they get their license. This helps to add to your credibility as an honest service provider.
Conclusion
When I first started shooting real estate I thought that a few weeks of practice and I would have it all buttoned up. The fact is, I'm still learning and I'm all about sharing deep knowledge with my peers so we can all get better. I would love to see all photographers charge what they are worth and these tips will help you move in that direction.
When it comes to real estate photography, there are 2 types: photography that sells houses and photography that sells agents (or photographers). Cell phone pictures work just great for selling houses since millions of homes each year are sold using an iPhone camera. The next level of real estate photography is where the real magic and the real money happen. Strive to take the photos that someone would actually want to print and frame. And use these tips to help you get there and run your business successfully.
Wow…thanks Kirk. Good stuff! Kirk, what is Sky Replacement? Is that when you actually Photoshop the sky into the outside house photo? I live here in Scottsdale Arizona and I take Landscape shots for a hobby. https://www.viewbug.com/member/roblopez
But I wanted to start making a little cash with my camera and I was thinking about shooting homes like you. The information that you provided was great. Thanks for your help and advice.
That’s exactly what it is, Rob. Check out this page on my website where I show some different before and after images with sky replacements. Thanks to the magic of Photoshop we can liven up those sometimes borng skies.
http://www.agyntstudio.com/twilights-and-sky-replacements
Great article, Kirk! Thanks for the tips. And extra points for “clown vomit HDR” 😀
Great article Kirk! Need to reconsider my terms. Charging extra for Photoshopping things out. Why didn’t I think of that 10 years ago?
Don’t give away your time and talents for free 🙂
I found it interesting when you said that most photographers charge extra for photoshop. It would make sense to check with a photographer before you hire them to see what they charge extra for. My sister wants some photos taken of her house that she is trying to sell, so she’ll have to consider asking what they charge extra for.
Usually post processing is included in the charge for RE photography. But for extra stuff (sky replacements, grass replacements, clone stamping things out, etc) you should charge extra for this or make sure you identify these services as “included” (not free) in your price. This helps your client understand that this is extra work that requires extra time and talent.
What makes your tips great is the practicality. I especially enjoyed number 12. I’ve had a look at your Portfolio Facebook page as well. You truly are an artist!
Thank you so much, Tim!
Great article. Thanks for all of the tips. I am not a photographer, but I definitely appreciate photography. Especially real estate photography so thanks for sharing your talent!
Great tips and advice. I incorporated these into a recent shoot and my client loved the images! Thanks for sharing.
These are really amazing tips on real estate photography mistakes. I agree that perfect photography is crucial to creating a positive first impression on home buyer. Thanks for sharing..!!
This is the best article for real estate photography and you are a very good person!
Thank you for that mate!
Hi Kirk,
I do secondary work doing a few realestate jobs, and just love to learn more. I love the way you write, it’s just rolls along, and I know I want to read more of what you write.!
Love the idea of the camera on a tripod held above your head, I had done arms length before, but not tried that ! Excellent idea!