fbpx

The Ultimate Guide to Starting a Photography Business with Little Start-Up Money

Two years ago, I began a family photography business. I didn't have a large chunk of money to invest in the business. In fact, I started the business as a way to supplement my income as a high school English teacher. My wife and I had a second kid on the way, so she encouraged me to nurture my hobby into something more.

Dipping into my savings account or asking relatives for extra cash wasn't an option for my new venture, but I found a way to make it work.

Now I have a solid client list in two states since I recently moved to Ohio from Maryland. Also, I've expanded to senior portraits, weddings, and corporate headshots.

Most importantly, I did it all on a shoestring budget. Over the course of this article, I'll detail the inexpensive ways I got my business up and running.

Before I continue, I'll say again that this article is written from the perspective of someone who began a family photography business. While it will apply to all types of photography, just keep in mind the perspective I am writing from.

The Essentials

Post Processing

Before you begin your photography business, work on gaining experience in Lightroom and Photoshop. These two programs are the standard for photo editing these days. Prioritize your comfort with Lightroom due to its ability to organize photos and edit batches of photos rather than one at a time like Photoshop.

Abobe has a $9.99/month photographer plan that comes with Lightroom & Photoshop. If you are a student or teacher, you can get all of the Adobe apps for only $19.99/month. Trust me. Both of these plans are well worth the money!

Your First Camera & Lenses

There are tons of really great camera options for beginner photographers! I recommend using two stores to purchase camera gear:

KEH Camera is an amazing company that offers really great deals on used photography equipment. They have a really intense grading and inspection process on all the gear they sell, so you know exactly what you are getting when you buy.

They also have extremely attractive financing options through Affirm. Interest rates start at 0% APR. You simply can’t beat that. If can get it, it’s almost always worth it to finance at 0%. You can keep that money in your pocket and use it to make more money! Of course, you still should never finance something that you aren’t 100% sure you can pay off.

B&H Photo has been in this photography game since 1973. Boasting around half a million items in stock, it’s almost certain that they have what you need!

One of my favorite things B&H offers is their accessory kits. Accessory kits are perfect for beginners because it comes with many of the things you need to get started, such as a camera bag, lens, memory card, extra batteries, and sometimes more. You get it all for a discounted bundle price!

Best Beginner Camera Setups

I recommend having one decent lens beyond your walk around lens. That’s why I love these kits from B&H Photo that come with two lenses, but if you want to save the most money, I would just buy the camera and 18-55mm lens used from KEH Camera.

Choosing between the Canon or Nikon setup is completely based on your preference!

The prices are based on the current price as I created the chart. Prices change constantly, especially at KEH camera since their gear is used.

All KEH Camera prices are based on gear in excellent condition. You can definitely save some money by going with gear in less good condition. If you want, you can read more about KEH’s Equipment Grading System.

System Kit Purchased Used, Individually
Canon $399 $329
Nikon $596 $643

With the Canon system, you definitely save some money by going used. With the Nikon system, you are better off just grabbing the kit unless you go with lesser quality used gear.

Learn Your Camera

Before you begin your business, you should know your camera inside and out. You should know how to use Aperture priority, Shutter priority, and Manual modes.

You should be able to change the exposure triangle settings without taking your eye away from the viewfinder. That means you should be able to use the exposure meter in the viewfinder to adjust your exposure. 

Yes, you can peek at the screen to see what your images look like, but you shouldn't have to look at the screen or the body to see how you're changing the settings.

Of course, any good photographer will tell you that you need to know the basics like light and composition, but all of that will come with time and practice. 

You can begin a basic family portrait business with just the knowledge you gain from the photography basics series. I did.

Everyone has to start somewhere. Plus, paying clients will force you to improve!

Current Costs
Post-processing Software $9.99/month
Beginner's Camera Kit $329
Total First Month Cost $339

Google Apps

I use the Google applications suite to do most of my client database work. Google Docs to save email templates. Google Sheets to keep track of client information and track my client workflow.

Google Docs

I am constantly using my email templates, price sheet, and contract templates. We’ll discuss all of these in further detail later.

I also have a document outlining any pricing specials or unique offers I've made in the last two years and pricing history since I began. Google docs is excellent for drafting my blog posts too.

Google Sheets

When it comes to Google Sheets, I have several sheets to help keep track of client data and my session workflow.

I’m going to give you a really easy to use template of my sheet, but I want to walk you through it first!

The first important spreadsheet I have is my “job list,” which includes the date and time of the session, the client name, email, and family information such as names and ages. It also includes the location, session package and session fee.


I “freeze” the first three columns and the first row so that I always see the column titles as well as the date and time of each session as well as the client name.

On the same sheet, I then have a series of columns to keep track of whether or not I have completed the following steps in my client process.

Each cell has a check box showing if the task is complete or not.

The easiest way to get started is to use my pre-made template and customize it to your liking.

  1. Click here to get my pre-made template.
  2. Click “File”, then “Make a Copy”
  3. Name your copy whatever you want.
  4. Now you can edit the file as much as you want! Overwrite the sample information with your upcoming sessions!
  5. I’ve already added the conditional formatting for the check boxes. By default, they are red. When you check them off, they turn great. For N/A tasks, simply delete the checkbox.
  6. When you add new rows, simply copy and paste the checkboxes into your new row.

I add a new sheet on the bottom for each calendar year.

Google Forms

I use Google Forms to send a simple, three-question survey to clients when I deliver their photo galleries. The responses are tracked in a separate spreadsheet. To learn how to do this specifically, check out this article on How to use Google Forms.

Updated Costs
Post-processing Software $9.99/month
Beginner's Camera Kit $329
Google Apps $0
Total First Month Cost $339

Build Your Website

A website should be your first major business investment besides your camera of course. Don’t worry! It’s probably much less of an investment than you think and it is not as difficult as it seems.

First, you need to buy your domain name and set up your hosting account. In my experience, the best company to use is Blue Host. It’s a quality, affordable hosting service. It starts as low as $3.95/month!

Let’s go through the process step by step:

  1. Go to Blue Host.
  2. Click “Get Started”
  3. Choose your plan. The basic plan will work for most photographers. The only feature worth paying extra for is the Privacy + Protection and we can add that later. To me, it is worth the extra money because if you don’t have that you will get tons of spam calls.
  4. Search for your preferred domain name in the “Create a new domain” box. Try to keep it simple. Ideally, it would just be yourbusinessname.com. Worst case, you can get creative and find a similar domain name available. Try to stick with a .com, but if you can’t a .co is second best.
  5. Click “Next”. Then fill out your account information.
  6. Under package information, change the account plan to the 12-month plan. This will slightly raise your monthly cost, but that’s okay. You don’t want to pay 3 years in advance for a brand new business.
  7. Under package extras, leave Domain Privacy + Protection checked. It’s well worth the extra money. If you don’t have this, you will get blasted with spam calls. Uncheck the “SiteLock” and “Codeguard Basic” boxes. You don’t need it. Don’t worry about adding an email address that matches your domain. We will cover that later.
  8. Enter your payment information. The total should be around $80.
  9. Click “Submit” and you are good to go! It’s that easy! You’re hosting account is set up automatically and will be connected with Wix later.

Now that hosting is set up, let’s move on to building the actual website.

Building Your Site

Wix is hands down my favorite website builder for photographers!

You'll need to spend some time learning and designing your website. Don't rush this process.

I definitely wouldn’t spend money on professional web design during the infancy of your business. I’ll walk you through the steps!

  1. Go to Wix.
  2. Click “Start Now”
  3. Enter your information and click “Sign Up”
  4. Choose your template. On the left, click “Photography” to see tons of templates just for photographers. Click your favorite.
  5. Now you are in the Wix Editor. I recommend watching the short video on how to use it.
  6. Now, let’s connect your domain. Click “Settings” then “Connect Domain”.
  7. Click “Connect a domain you already own”.
  8. Click “Select a plan”
  9. Choose your plan. For most photographers, the unlimited plan is going to be the best option to start. You can always upgrade later!
  10. My preference is always to save some money and choose yearly, but if money is tight right now, there is nothing wrong with paying a little more per month for monthly. I did that with all of my first sites. You can always pay yearly later!
  11. Complete your purchase.
  12. Connect your domain

Build your photography site. I recommend watching the video below to radically reduce your learning curve.

Not only will building the site yourself be more cost-efficient, basic web design is a very valuable skill. Think about it. You don’t want to have to email your web designer every time you need to make a basic change on the site.

It is very common for photographers to cut corners here. You can save money by allowing an ad banner like “This website is brought to you by Wix.com”

That is highly unprofessional. I definitely recommend upgrading to a paid plan and connecting your domain name!

What to put on your website

You have the freedom to put whatever you want, but I recommend at least having these pages:

Portfolio – This is your opportunity to showcase your work. When starting out, you may need to shoot for free or heavily discounted. It will be worth it to build your portfolio.

Pricing – We’ll discuss how you should price your services later. I firmly believe in having your prices displayed on your website. People don’t want to wait for a response just to get the price.

Testimonials – Use your survey answers to create a page full of the amazing things people have to say about you!

About – Give your clients and potential clients some background information on yourself. They want to know who they are dealing with!

Contact – Make it clear that you are available to potential clients.

Booking Software

In addition to Wix’s amazing website builder, they also have an app called Wix Bookings. This app lets you embed a schedule into your website. You can post your availability and session options.

This gives clients the ability to book directly from your site saving you countless hours on the phone! Wix Bookings syncs with your calendar so new appointments are automatically added to your calendar.

Design

Professional Email Address

Another way to add professionalism to your photography business is to avoid generic email addresses (like @gmail or @yahoo addresses)

My company's email is run through G Suite by Google.

G Suite lets you easily create a professional company email. For example, [email protected]. I use my name as my main email, so it’s [email protected].

Reason Alias
General Questions [email protected] or [email protected]
Customer Support [email protected]
Store Questions [email protected]

How to Set Up an Alias

Having a G Suite account keeps your Gmail, Drive, Docs, Sheets, and Calendar, and all other G Suite apps with one business account.

We actually have a unique coupon code to get 20% off your first year.

Account Type Coupon Code
Basic QCFFQDMDGCQT3QR
Business J3KEUMDELEAP3YN
Updated Costs
Post-processing Software $9.99/month
Beginner's Camera Kit $329
G Suite $4.80/month
Wix Website Builder $17/month
Blue Host Hosting $6.92/month
Total First Month Cost $368

Pricing

Once you get your website up or even before, you’re going to want to think about the prices that will be displayed on your website.

Pricing is an extremely important part of your photography business. If you price too high, you won’t have enough clients. If you price too low, you will be overwhelmed. It’s all about finding that perfect balance.

My recommendation would be to follow this pricing guide. That will give you a starting point. From there, you can adjust based on the demand. Don’t be afraid to adjust.

When starting out, you just want to gain some clients. If they don’t commit to the shoot after giving hearing the price, it’s okay to call them back a day later and lower your price a little to see if that will help them make a decision.

In the beginning, it’s important to get experience however you can even if that means lowering prices, but don’t get caught up in the trap of constantly low prices. Your prices have to be high enough for it all to be worth it for you!

Make sure you are factoring in all of your expenses. The last thing you want it to feel like you are working for hardly any reward. That’s the quickest way to burn out.

Never Stop Learning

As you get your business up and running, don't stop learning. Reading a book, listening to an audiobook or podcast, or taking a course to improve your photography.

To save money, use your public library system to read books that you don't necessarily want to buy. My public library system allows me to borrow books from any library in the state.

I may have to wait a few weeks for a book to arrive at my local library from somewhere out of town, but I do get the book eventually. Plus, it's free!

Audiobooks are one of the best things that ever happened to my photography career. That dead time driving between photo locations and shoots was no longer dead.

In fact, it was very alive. I stopped listening to music in the car and started listening to audiobooks. You will be absolutely amazed with the knowledge you can gain by turning your wasted time into time that is immensely valuable.

Audible is easily my favorite way to consume your audiobooks. Every month I get credits for new books!

Book Recommendations

Podcast Recommendations

Course Recommendations

Improve Photography Plus

A monthly subscription with a massive library of video training, presets, contracts, and much more!
14 Day Free Trial
Updated Costs
Post-processing Software $9.99/month
Beginner's Camera Kit $329
G Suite $4.80/month
Wix Website Builder $17/month
Blue Host Hosting $6.92/month
Books & Podcasts $0
Total First Month Cost $368

Rent, Don't Buy

I have always run my photography business with a fairly sparse set of gear. In fact, for the first year of my business, I only used a kit lens and a 50mm f/1.4. As my client list grew, I was also being hired for more than just family portraits.

When the job was more complicated than my current gear could handle, I didn't panic. I also didn't buy anything. Instead, I rented. When I needed a 70mm-200mm f/2.8 for a wedding, I didn't spend the entire wedding fee on a new lens. I just rented the lens for the weekend. When I needed a lens wider than my kit lense for a reception, I didn't go out and buy a 35mm f/1.4 lens. I just rented one.

While it may be tempting to use every penny you earn from photography to buy gear, I wouldn’t. Spend the money on other things like education, mentoring, workshops, business tools, or yourself.

I highly recommend using Borrow Lenses for all of your rental needs. I’ve always had great experiences with them.

Updated Costs
Post-processing Software $9.99/month
Beginner's Camera Kit $329
G Suite $4.80/month
Wix Website Builder $17/month
Blue Host Hosting $6.92/month
Books & Podcasts $0
Rentals $0*
Total First Month Cost $368

*I’m putting zero since it’s not a necessity.

Social Media

Facebook and Instagram are free publicity that should be leveraged as much as possible!

This is one of the most cost-effective ways to get yourself out there.

Post on your personal page and business page.

Post your best shots! Of course, make sure to get your client’s permission first! A contract will help with that, but we’ll get to that in a minute.

Post your photo shoot ideas and ask if anyone is interested. Make sure to follow up on them with a price for the session and see if they want to go for it.

Post anything that will help grow awareness that you are a photographer taking on new clients!

Photography facebook groups, like the Improve Your Photography Community, are invaluable to photographers trying to start a business. 

They are free to join and give you access to the wealth of knowledge that other photographers have gained over decades! If you have a photography question, one of the best places to ask it is the Improve Your Photography Community!

If used correctly, Instagram can be really valuable to your business! Post your best photos. Make your account a showcase for your photography.

Once you start posting photos, you need to get people to see your account. Follow your friends and others in your community. Bond with them by commenting truly meaningful things on their photos.

Also, make sure to respond to every single comment on your posts. Ideally within an hour. Don’t just post an emoji. Make your comments as thoughtful as you can!

Not only is this genuine, but it also gives you a massive boost in Instagram’s algorithm. Instagram values true, genuine engagement.

Updated Costs
Post-processing Software $9.99/month
Beginner's Camera Kit $329
G Suite $4.80/month
Wix Website Builder $17/month
Blue Host Hosting $6.92/month
Books & Podcasts $0
Rentals $0*
Social Media $0
Total First Month Cost $368

Contracts

High quality, professionally written photography contracts are vital to your business. Trust me. They will save you hours of potential headache!

Lucky for us, Jim Harmer, who is both a licensed attorney and professional photographer, has blessed us with this amazing contract package. It includes all of the following contracts:

Long-form General Photography Contract

Suitable for baby, senior portrait, engagement, and family shoots. It covers all your bases in explicit detail.

Short-form General Photography Contract

The shortened version of the general contract for simple photography shoots where a huge contract isn't necessary.

Model Release Contract

Typical model releases are ridiculously long and unnecessary unless you are shooting a celebrity or another high-risk client. This one covers everything you need for nearly every model!

Real Estate Photography Contract

Similar to the general photography contract but made specifically for real estate photography.


Wedding Photography Contract

Since weddings are usually a higher-dollar shoot and involve many more complicated parts,  wedding photography needs its own special contract.

Photo Licensing Agreement

Few photographers bother with this contract, but is critical to have!  When you sell a photo to a company for use on a website, or you allow a photo to be used commercially, a good photo license agreement is necessary to spell out exactly how you're allowing the company or individual to use your photo.

Second Shooter Contract

If you ever have a photo assistant, you absolutely must be clear as to what photos they own and how they can use the photos from the shoot.  You also need to be clear about how much you pay them, what they can and can't do, and how they should deliver the photos to you.

Electronic Contracts and Signatures

As my business grew, I got really tired of printing and scanning contracts. I searched through many digital signature platforms and ended up choosing SignNow.

The software is very simple to use. I simply upload a PDF file of each contract, add various fields for the client to address (signature, date, initials, address, phone number, etc.), and then use SignNow to email the contract to my clients. SignNow also archives your contracts and can resend the email if your client forgets to sign.

I have been using SignNow since August of 2016 and I still love it! Clients have found it simple to use and I no longer waste unnecessary time printing, scanning, and hunting down contracts.

Updated Costs
Post-processing Software $9.99/month
Beginner's Camera Kit $329
G Suite $4.80/month
Wix Website Builder $17/month
Blue Host Hosting $6.92/month
Books & Podcasts $0
Rentals $0*
Social Media $0
Photography Contracts Package $15
Electronic Signature Software $8
Total First Month Cost $391

LLC Registration

Most people think that their business isn’t an official business until they become and LLC or Corporation. This is not true. By default, once you start conducting business you are a sole proprietor. 

The reason you most likely want to become an LLC at some point is to protect yourself from liability. To learn everything you need to know with this article about Setting up a Photography Business Legally.

Banking

I recommend waiting to set up your LLC. You don’t want to spend money on things like this right away. You want your budget to be focused on gear necessities and learning.

You still are going to need a bank account though. As we mentioned before, by default, you are a sole proprietorship. A sole prop is still a business, which means it needs its own bank account, but since you aren’t an LLC with an EIN number, you can’t get an actual business bank account.

Your best option is to open a personal account and use it solely for business purposes. It’s vital to keep your expenses separate. When you accounts are separate, it’s very easy to distinguish business expenses from personal expenses.

This ensures everything that should be an expense is factored in as an expense. Every expense is a tax deduction and no one wants to pay more tax than they owe!

My favorite bank account to use is BBVA’s Online Checking Account with No monthly Service Charge. No ATM Fees on 55k+ ATMs Worldwide. Member FDIC.

It has a really amazing app! Among other things, my favorite feature is the ability to deposit checks without having to visit the branch! 

This makes it perfect for photographers that are often paid by check!


Click the link above to learn more!

Once you are an officially LLC, then you should open up a business bank account.

Credit Cards

Credit cards are sometimes a polarizing topic. When used responsibly, they can be extremely useful. When used incorrectly, they can be detrimental.

I always focus on credit cards with the highest percent cash back on every purchase with no limits. Some cards boast 5% cash back only to find that you get that on rotating categories. Many of the categories you won’t be spending much in.

The cash back benefit really adds up! It’s always nice to see that cash back reward in your account.

Another occasional perk is 0% Intro APR. This means that for a promotional period of time, typically, 12 or 18 months, you will pay zero interest on your balances. You will still have to make monthly payments, but if you keep a balance, you won’t pay interest.

This can be extremely helpful when you are just starting out. Think about it. If you were to purchase everything we’ve mentioned so far, your total would be $391. If you paid that over 12 months, you would only be paying $33 per month!

Keep in mind, you should never charge your card with anything that you are not 100% you can pay off before the promotional period ends. If you do, you are likely to be charged an exorbitant 20%+ interest rate on the balance.

Just like the bank account, start with a personal credit card, then we you become an LLC, get a business credit card.

Accounting & Invoicing

QuickBooks. Remember the name because it is going to become one of your new best friends! QuickBooks is a software that makes a plethora of things easy for you as a business owner.

First and foremost, you must keep your finances organized. You can connect your bank accounts and credit cards to QuickBooks. All of your transactions are automatically imported.

QuickBooks automatically creates financial reports so you can easily analyze how much money is coming in and how much is going out. Of course, that also allows us to easily calculate profit.

On top of that, QuickBooks helps you with other aspects of your business. You can easily send professional invoices via email to your clients and they can prepay for your services.This is so much easier than waiting to collect a check the day of! Don’t worry though. You can still accept checks from clients that prefer to pay that way.

As a bonus, QuickBooks has a feature that helps you track your miles driven! This can be a huge tax deduction and should not be overlooked. With the QuickBooks app on your phone, it can automatically track your drives using GPS. All you do is swipe left or right depending on if it was a business drive or not. If you are driving for any business reason, it counts! For example, driving to a session or driving to the local photo store.

Taxes

No Photographer enjoys this aspect of business, but it’s important to have a baseline knowledge. Since you are not getting a paycheck like a typical employee, taxes are not coming out every time you pay yourself. That doesn’t mean they don’t have to be paid.

When you file your taxes, you will owe money for the taxes you haven’t paid on your photography businesses profit. To figure out how much you will owe at tax time. You can use Turbo Tax’s Income Tax Calculator to figure out how much you may owe.

Every month, check QuickBooks to see your profit. Make sure you put the appropriate percent of that profit away to pay taxes later.

My favorite savings account is the Savings Builder Account by CIT Bank. They offer very competitive interest rates. Instead of your money earning nothing sitting in a checking account, you money can work for you while you are waiting to pay taxes.

Learn More

After the new year, it’s time to pay your taxes. This may sound overwhelming, but it’s not at all as long as you are properly prepared. If you already have an accountant that you have been working with, simply share your QuickBooks account with them. QuickBooks has a feature to make this really easy!

If you don’t have an accountant already, I highly recommend TurboTax. You will be absolutely shocked at how easy it is! The software will walk you through a series of questions so they can properly fill out your tax forms.

When it gets to your business income and expenses, it actually connects directly with your QuickBooks account to automatically fill out your business information! It doesn’t get easier than that!

Updated Costs
Post-processing Software $9.99/month
Beginner's Camera Kit $329
G Suite $4.80/month
Wix Website Builder $17/month
Blue Host Hosting $6.92/month
Books & Podcasts $0
Rentals $0*
Social Media $0
Photography Contracts Package $15
Electronic Signature Software $8
QuickBooks Accounting Software $8/month
Total First Month Cost $391

*I’m putting zero since it’s not a necessity.

Improve Photography

My last suggestion is to start where I started.

improvephotographhy.com

I discovered Improve Photography during the winter of 2015. The amount of free and inexpensive content available on Improve Photography is mind-boggling. The articles, podcasts, and video courses were instrumental in getting me to where I am today.

If I had to limit myself to two paid IP features, it would be the Complete Business Bundle and Improve Photography Plus.

Improve Photography Plus

The amount of value IP+ provides for such a low monthly price is mind blowing. There are over 200 video tutorials, 340+ lightroom presets, and much more. It’s truly an amazing value.
14 Day Free Trial

Finally, go back and listen to the old podcasts. I do not know where I would be without the amazing weekly advice from Jim, Nick, Jeff, Erica, Connor, Brian, and all of the other amazing podcast hosts.

Start with Portrait Session and listen from the beginning. I would not be the photographer I am today without Portrait Session.

Updated Costs
Post-processing Software $9.99/month
Beginner's Camera Kit $329
G Suite $4.80/month
Wix Website Builder $17/month
Blue Host Hosting $6.92/month
Books & Podcasts $0
Rentals $0*
Social Media $0
Complete Business Bundle $29
Electronic Signature Software $8
QuickBooks Accounting Software $8/month
Total First Month Cost $413

In what other business can you begin for such a small amount of money? To give you some perspective, I made almost $7,000.00 during my first year. That means very little of my photography income went to start-up and business costs. Not too bad, I'd say. I’ve only gone up from there!

The best time to start your business is always NOW! Every day you wait is a day wasted. If you are truly passionate about starting a photography business you will always wish you started sooner!

Disclaimers

Improve Photography is a participant affiliate advertising programs designed to provide a means for sites to earn advertising fees by advertising and linking to other websites. We may earn a commission if you purchase through any of the links in this guide.

The author is not a financial professional or accountant. Improve Photography is not a financial advisory or accountant firm.  Please seek the advice of a professional before making business decisions. The content of this guide is strictly our opinion.

The author is not an attorney. Improve Photography is not a law firm.  Please seek the advice of a licensed attorney in your own jurisdiction before making business decisions. This is strictly legal education.

12 thoughts on “The Ultimate Guide to Starting a Photography Business with Little Start-Up Money”

  1. This article couldn’t have come at a better time for me. There are some ideas here I can implement. Thanks!!

  2. Aaron, Loved the article. I also started my business in a similar fashion, as a private school teacher who needed to supplement my income and a child on the way (my third). I would say that your article is very well organized, and a boon for someone first beginning.

    While all of your points are well-said, I’d say that some of them are definitely more centered towards how you did things. For instance, I began my business with a refurbished Canon 30D and a 50mm 1.8 lens (and then eventually the 50 1.4. I borrowed and rented gear for my first couple of weddings, and leveraged the trading of services with other vendors to finance my website construction and logo design. I think that trading services is a good way to leverage work for work without spending a dime. Perhaps that suggestion might be useful for those starting out, if that option is available? Just a thought. Keep up the great work! -Al

    1. Thanks, Al! Here’s the funny thing about my 50mm f/1.4: I had no idea what I was doing when I bought it. I just listened to the camera store guy who said, “Everyone who buys the f/1.8 eventually comes back for the f/1.4.” What a line, right? There’s no way that’s true. I just didn’t know what I was doing with that first purchase.

      And you’re spot on with the advice of trading services. I have traded sessions with other photographers so that I could get family photos (and so could they). Working with other creatives to trade services is a great way to build community and to show that it’s not all about competition but supporting each other along the way. Thanks for reading!

  3. Another tip for those starting out… You don’t have to go totally into debt setting up a studio. There are professional studios that have everything that you would need to shoot portraits. I’ve used one in Columbus OH that I basically just walked in with my camera and all the lighting, backdrops and props are there for you. Just had to put the flash transmitter on my camera and then setup my lighting the way I wanted it.

    Also find a good local camera shop that deals in used gear, new to you is still good. I’ve bought backdrops, studio lighting, books and DVD’s as well as renting lenses from them; plus great customer service.

    1. Was it someones studio that they use for their photography business? Did you have to pay a fee? (I’m assuming you had to pay something.)

  4. Hi!

    Can I tell you how much I love this article? It came out just as I was seriously considering turning my hobby into a business, but I didn’t know what to do or where to start. This has helped SO MUCH.

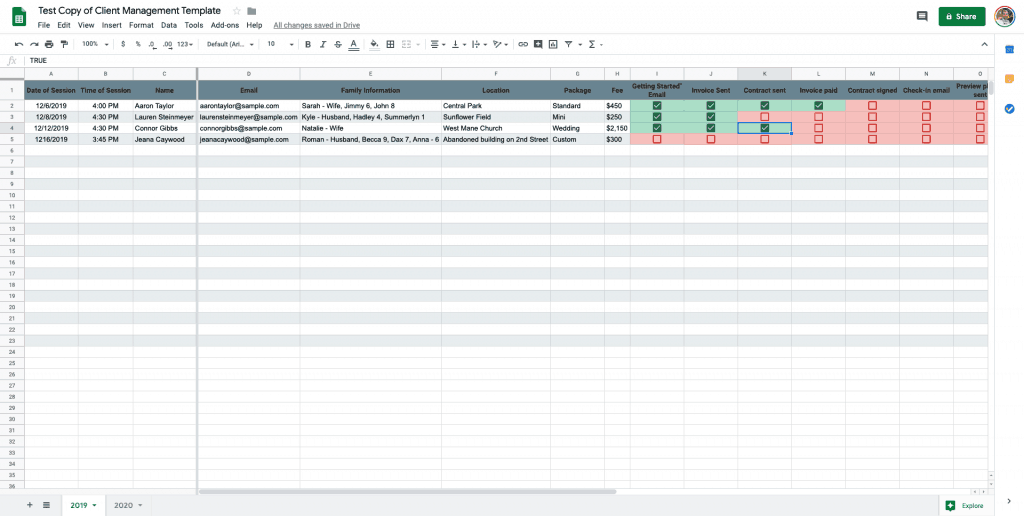
    Question about your electronic contracts and signatures. Why were you doing so much scanning? Were you scanning already signed contracts into your computer?

    And while I’m asking, about how long do you think this whole process takes? Did you do this over the course of a year? Or six months? Or did you do it all as fast as you could?

    Thanks so much!

    1. Hi Grace–sorry for the six-month delay in answering your questions. 1. I was scanning already signed contracts to simply have a digital copy. 2. I developed much of this over the course of a year, but the foundation was in place from the start. I had already done bookkeeping and planning when I was a drama director for a high school, so much of this was already in my head.

  5. Hi, I would like to share my experience with you guys on how I got a loan to pay the duty tax of my bank draft and to start up a new business. I was at the verge of loosing all my belongings due to the bank draft I took to offset some bills and some personal needs. I became so desperate and began to seek for funds at all means. Luckily for me I heard a colleague of mine talking about this company, I got interested. Although I was scared of being scammed, I was compelled by my situation and then I began to look online and ran into their email at: ([email protected] ) where I was given a loan within 72hrs without knowing what it feels like to be scammed. So I promised myself that I was going to make this known to as many that are in financial stress to contact them and not fall victim of online scam in the name of getting a loan.

  6. I was searching for loan to sort out my bills & debts, then I saw comments about Premier Lending Company. I doubted thus but decided to give it a try by contacting there email website https://www.goo.gl/VsLuod they responded with their loan terms and conditions on how it works. i’was assured that the loan $50,000 instant will be credited into my account so I applied for a loan & paid the processing fee to obtain the loan. 72 hrs later, I was shock to see that my account has been credited} I got my mortgage and I paid for my husband surgery and my daughter fees and thank God today is good and he can walk now and is working and the burden is no longer so much on me more and we can feed well and my family is happy today, I said to myself that I will mourn aloud in the world of the wonders of God to me through Premier Lending Company I advise anyone in genuine and serious need of finance should contact the on there website https://www.goo.gl/VsLuod for more info on how to obtain a loan from them.

Comments are closed.

Scroll to Top