
You have your first speedlight and you think two things: 1. I am so excited to make awesome photos, and 2. I have no idea how to use this thing. I was in that place about a year ago. With a year’s worth of experience, trust me when I say that learning to use a speedlight is totally worth it–not to mention that it’s actually really easy. Not only will your images improve, but now your lighting possibilities will be endless. No longer do you need to solely rely on the sun or other ambient light. Now you can make your own light.
This article will help you bypass some of the initial frustrations and confusions of photography with your new speedlight. Don’t let your new speedlight sit in your camera bag. Tighten it on your hotshoe and start learning!
I will write this article using the Yongnuo 560IV speedlight as the reference. If you’re reading this website, chances are you have taken the buying advice of Jim and some of the other hosts. This website’s recommendation is why I bought Yongnuo speedlights. However, even if you don’t have the Yongnuo speedlights, the concepts will remain applicable.
1. The buttons and settings
This will be the first big hurdle you jump over. In fact, once you understand the buttons on the flash and the basic settings for both your flash and your camera, you know just about all you need. Beyond the settings is just experimentation and practice.
But before I get to the buttons, you need to know how to attach the speedlight to your camera. On top of your camera is a hot shoe, which is a mount on top of the camera with some tiny silver circles in it. On the bottom of your flash is a metal mount that fits nicely into the hot shoe. Slide the speedlight into the hotshoe so that the side with display screen and the buttons faces the back of the camera. The speedlight will have a little plastic wheel above its mount–turn it to secure the speedlight to the camera. Make sure the speedlight is pushed in all the way and tightened securely. A poor connection can trick you into thinking that something is wrong with your speedlight or camera.
As we move onto the buttons, use the following diagram as you follow along:
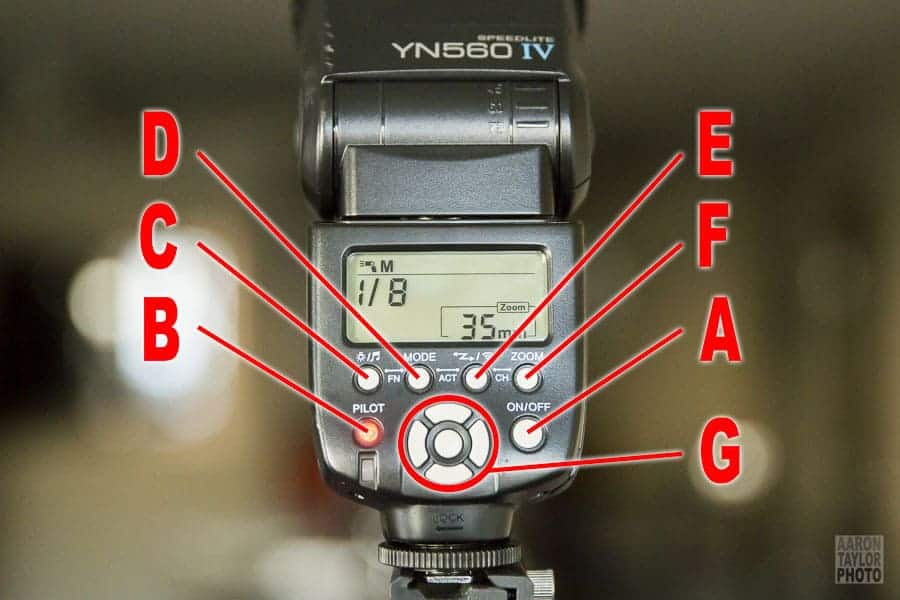
A. The On/Off button. You have to hold it for two seconds or so to turn on your YN560IV. At first, I thought this was annoying. Then I realized that it’s a good feature to prevent accidentally turning on your speedlight at the slightest touch of a button.
B. The Pilot light/button. The color of this button tells you whether or not the flash is ready to fire. Green means that it’s charging, Red means that it’s ready to go. (To me, this is backwards. I wish it matched traffic light colors–green means go, red means stop–but oh well.) You can also press this button to fire the flash manually.
Now the top row:
C. The adjustment button for the screen’s light and buttons' sounds. Press the button to illuminate the screen. Hold the button to turn the sounds on and off. When sounds are on, a little music note appears in the top right of the screen. My advice: turn the sounds off. (No music note will be displayed.)
D. The MODE button. This button allows you to switch between M firing mode and MULTI firing mode. This does not control how the flash is triggered; rather, this controls how many times the flash goes off when triggered. M firing mode means the flash will only go off once. MULTI firing mode means the flash will go off multiple times during one triggered exposure, depending on how you set the speedlight. For now, just stick with M mode. No need to get confused by MULTI mode.

E. The Trigger button. The Trigger button is how you change what triggers the flash to be fired. A speedlight can be triggered by the camera itself, a remote trigger, and other speedlights. The trigger mode is displayed above the solid line at the top of the display. When you are just starting out, you’ll want the trigger mode to be set to just a speedlight icon all the way to the left accompanied by a capital M. (My diagram above shows this trigger mode.) That’s just standard manual mode, which requires the flash to be connected to the camera’s hot shoe to be fired.
If you start in standard manual mode and press the Trigger button, each of these modes will display in this order:
i. TX mode, which allows you to use the YN560IV as a trigger for other speedlights. You can ignore this mode for now. And if you only have one speedlight, this mode is useless anyway.
ii. RX mode, which allows you to put the YN560IV on a light stand and trigger it remotely. You can ignore this mode for now, too.
iii. S1 mode, which allows the YN560IV to be triggered by another flash. In S1 mode, the YN560IV is triggered by the first flash it sees. You can also ignore this mode.
iv. S2 mode, which also allows the YN560IV to be triggered by another flash. In S2 mode, the YN560IV is triggered by the main flash it sees, not any pre-flashes that occur with a TTL flash. If that last sentence didn’t make sense, don’t worry. You can also ignore S2 mode for now.
Essentially, you should only be working with the standard manual trigger mode that I mentioned at the beginning of this section. The other trigger modes are great and allow for some amazing creativity, but let’s learn in baby steps here. Stick with your basic manual trigger mode.
F. The ZOOM button. This allows you to change the spread of the flash itself. At 24mm, the flash spreads as wide as it can; at 105mm, the flash is as narrow as it can be. For now, keep the zoom set to 24mm, which is as wide as it can be.
A quick note: if you’re reading and playing along with your YN560IV, the screen might start to flash “SE”. If you don’t use your flash for about three minutes, the YN560IV goes into standby, an inactive mode to save your batteries. Just press the On/Off button to resume using your flash.

Now onto the last buttons you need to know:
G. The Arrows and OK buttons. When working in Manual mode, you will use the arrow buttons to adjust the power of the flash. (The middle OK button does nothing in Manual mode.) Using the left and right arrows adjusts the power by “full stops,” which means that you either double or halve the power.
1/1 is full power, which drains your batteries quickly. 1/2 is one full-stop less light than 1/1 because it is one-half of full power. 1/4 is one full-stop less than 1/2, 1/8 is one full-stop less than 1/4 and so on down to 1/128.
You can fine tune your power even further by adjusting in one-third-stops by using the up and down arrows. Say you have your power set to 1/4. By pressing up once, you’ll see “+ 0.3” show up on the screen. That means you are now set to 1/4-power plus one-third of a stop towards 1/2. Press up again and you’ll see “+ 0.7,” which means you are now set to 1/4-power plus two-thirds of a stop towards 1/2.
If all of the “stop” talk is confusing, just know that the closer you are to 1/1, the more powerful your flash. The closer to 1/128 you are, the less powerful your flash. Also remember that full power drains batteries, and 1/128 power won’t drain batteries nearly as fast.
Wow, that’s a lot of information for just a few simple buttons on a speedlight. Essentially, if your flash looks like the picture in the diagram, then you’re ready to play. If not, chances are that you need to press either the Trigger or Mode button. Re-read the descriptions above and play a bit just to get comfortable with the speedlight’s buttons.
Finally, a quick note about your camera. Your camera's shutter curtain cannot function with your speedlight to fully illuminate the sensor at shutter speeds faster than 1/200. For now, keep your shutter at 1/200. If you set it to 1/250, 1/320, or any faster, then a portion of your image will be dark. That's something I experienced when I first bought a speedlight, and I was worried that something was broken! Fear not, nothing is broken. Your camera and speedlight simply can't work together properly at shutter speeds faster than 1/200. (Unless, of course, you're playing with high-speed sync, but let's not even go there yet.)
Of course there is more to consider with slower shutters speeds, but let’s not deal with that yet. For now, make sure that you are set in manual trigger mode, M firing mode, 24mm zoom, perhaps 1/4 power, and 1/200 shutter speed on your camera.
Better yet, set your ISO to 100 and your aperture to f/8. If you can shoot in manual mode on your camera, then you’ll know how to adjust your ISO or aperture to adjust your exposure once you start to experiment.
Phew. That’s the most difficult part of this article. If you know the YN560IV buttons, how the YN560IV buttons work, and the necessary shutter speed restrictions, you are well on your way to making amazing images with a speedlight.

2. Bounce flash
Bouncing your flash means to aim the speedlight at something other than your subject–often a wall or ceiling. The swiveling head–one of your new speedlight’s greatest assets–allows you to bounce your light. Why do this? By aiming your light at a wall or ceiling, you turn the wall or ceiling into a huge light modifier. What was a small, hard light source just became a huge, soft one. The softer light is flattering for just about everything and will bring you closer to a studio-look for portraits.
Before you try to bounce your flash, it’s worth just aiming your speedlight right at your subject. This will produce even, near shadow-less light. This type of light is popular with product photography–especially food–as well as fashion and advertising.
When you first attempt to bounce your flash, you need to consider the angle at which your light will return to your subject. If you aim straight up, then your light will come straight down. If you aim up, behind, and to the left, then your light will return from above and illuminate one side of your subject more than the other. Test a few angles out and see if you like what is illuminated and what is in shadow. Some angles are better than others, but it all depends on your subject and style.
You also need to consider the surface onto which you’re bouncing your flash. A white or neutral-toned wall or ceiling is best; that’ll reflect the most light. A black wall will swallow all of your light, making bounce flash really tough. Bright colored walls, like red or blue or green, will reflect some of that color back on your subject. And consider the texture, too. A mirror will act differently than a thick, luxurious curtain.
While bouncing your flash will certainly yield great portraits and product images, I have found that being able to bounce your flash at indoor events really can turn average photos into something better. If you look at my event examples, you won’t be blown away by anything artistic or creative. What you’ll see, though, are solid photos of people having fun and smiling. Reception and event photography requires these kinds of photos, and bounce flash can be an easy way to do it.

You’ll also notice that the top two photos are better lit than the bottom photo. The top two photos had light that was bounced off of a reflective surface behind the venue’s bar. The bottom photo had light that was bounced off of a black canvas awning, which didn’t reflect as well back to the subject.
Experiment and find what works for you. Get bouncing!
3. Off-Camera without a Remote Trigger
While a flash trigger like this will make off-camera flash much easier, you can do off-camera flash without a remote trigger. You simply need to set your camera on a tripod (or any stable, flat surface) and adjust for a long enough exposure to give your fingers time to react to the shutter click in order to press the “Pilot” button to fire the flash. Remember from earlier: pressing the “Pilot” button allows you to manually fire your flash.
You'll want to set your ISO as low as possible. Depending on the ambient light around you, you'll need to adjust your aperture to something small, maybe f/11 or f/16. You should be able to use a slower shutter speed now, perhaps 0.5 seconds or 1 second inside during the day. At night, you can go with an even longer shutter speed, giving you time to perhaps walk around and fire your speedlight multiple times.
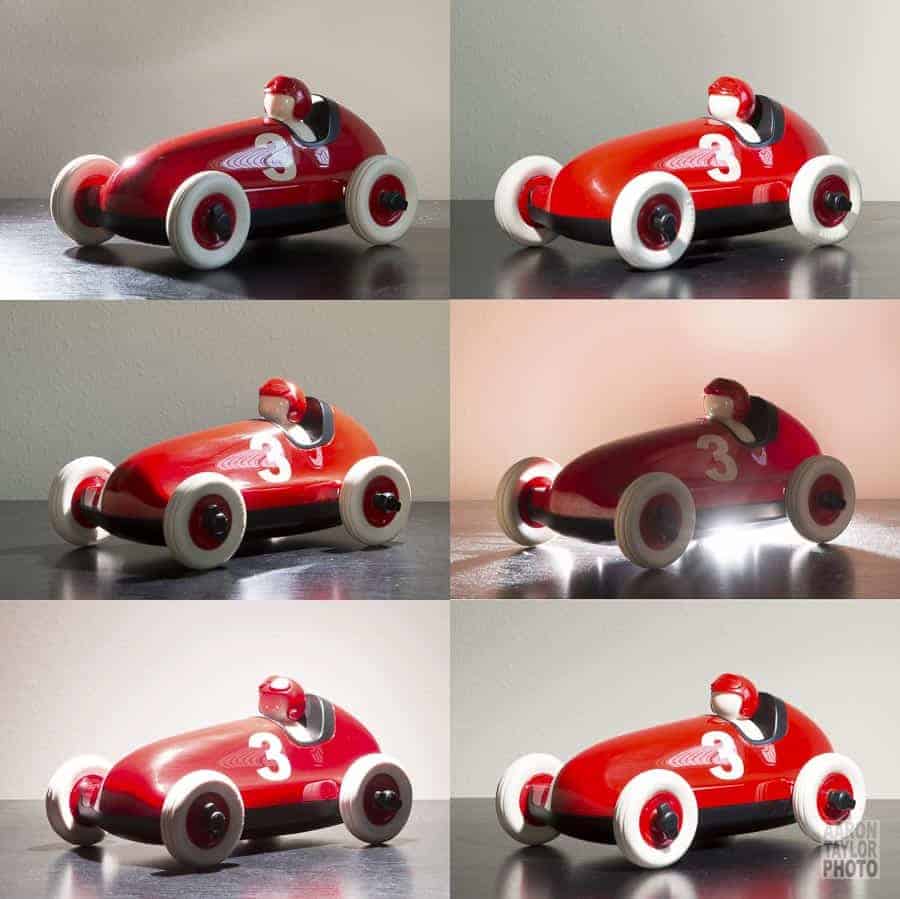
In my example, I had my Canon 6D with a Canon 24-70mm f/2.8 propped on a chair. The lens was zoomed to 70mm, my aperture was f/11, my ISO was 100, and my shutter speed varied between 0.5 seconds and 1 second.
I didn’t do any exposure or color correction so that you could see how the position of the light changes things depending on what it reflects off of. The biggest color change happened when the flash was behind the toy car–it turned the beige wall to red because the red color of the car reflected back to the wall.
Take a look at each example closely and see if you can figure out where I stood with my flash. Looking for shadows can help determine where the flash was held. In some, you can even see the bright flash reflected in the toy itself.
This technique is basically light painting, except instead of the constant light of a flashlight (and the control that comes with it), you essentially have the burst, spray, and accuracy of a shotgun. This method takes some experimentation, but you can still achieve good results despite less-than-ideal conditions. You could also combine this technique with the bounce technique and get softer light.
As you experiment with this technique, you will quickly find yourself wishing for a remote trigger. With a remote trigger and your flash propped on a table or a light stand, things just get so much easier! I’ll get into off-camera flash with a remote trigger in my next post.
Now you have the basic knowledge and skills to use your new speedlight. With time and practice, you will see just how much you can do to create amazing images with just your camera and a speed light. Looking for more? Check out Part 2, and don't forget Jim's “Lighting in a Flash” video course!
Super helpful article – most are based on light technique and a simple explanation of how to use each button is very helpful, thank you so much! Do you happen to have something similar or know any any easy to understand user guides for the YN685 unit? I cannot figure it out and the user manual is not very helpful. Thank you so much!!
Sorry! I don’t have experience with the YN685 unit.
Aaron, thank you for the article.
I have two YN560 IV. One works well, but the other one has stop firing. It turns on and I can perform the different functions like zoom and modes, but it will not fire. I press the pilot light and the red light turns to blue for a second and back to red. Is there anything else I can try? Amazon would not take it back and the manufacturer said I could return to them for repairs. Paul C.
I wish I knew the answer, Paul. Jim has written an article about trouble-shooting with your flash. However, if it won’t fire when you hit the test button, it’s probably defective. I’m surprised that Amazon won’t take it back. I’m always able to return to Amazon, even if I take a penalty to pay for shipping. While I have had my YN560ivs for over a year and have had no problems, I do hear from time to time that there are defective units. Sorry that I don’t know the answer!
I have been looking for an article like this for ages! I bought a second hand Youngnuo 560 online and it didn’t come with any instructions. Thanks to this article I now have a proper understanding of this equipment and how to use it as well as what it’s capable of, appreciate the tips, thanks very much, your description of the functions is particularly useful and I didn’t even know what half of the buttons did until I read this!
Thanks for the article, so many great points, great read. Along with the flash functions, I loved your points on the bounce flash, I have been experimenting with this technique recently myself but I couldn’t seem to really get the right settings on my Youngnuo 560 to get the effect you describe but I will give what you suggest a try this afternoon and let you know how it goes!
Thanks for the Article, very helpful with the points explained. I just got one speedlight and am tutored by your article.
Thankyou Aaron, this article was so helpful, I felt overwhelmed but now I feel much more relaxed about using my speedlite now.
Looking forward for your review on the suitable speedlight power on different situation! ;D
Thanks Aaron, God bless you for the info about speedlight flash
my camera is D5200 and just bought the 560iv , mostly I use d manual setting on my camera but when I switched to Auto on the camera I discovered the inbuilt flash pop up with d speedlight on with d camera which is unlike oloong 690ii which got damaged and I just got 560iv.
pls is there a way out or what could be d reason
Thank you so much for this article, Aaron! It was extremely helpful. Especially the part about keeping it at 1/200 otherwise half the picture is flash. I was having that issue and didn’t know what was wrong. You saved me a lot of grief! Great post.
Such a good quick guide, thank you!!
Hello,
I am struggling to sync the 560IV unit as a slave with my canon transmitter, ST E3 RT. Is it compatible?
Thanks,
Daniela
I’ve been keeping my 560 IV in my drawer for 4 years now until i came across your wonderful article..but i still don’t know how to use it correctly..will it synchronise with my Nikon D3300 so that i can rely on it to make gorgeous snaps or i can only use manual settings on my camera..thanks for replying
Awesome article. Really well written. My flash will only fire in the multi mode. Don’t know why
Merci pour ce tutoriel très clair !