
As a follow-up to my first “Learn Your Flash” article, this post will move beyond the basics of the buttons and bounce flash. We’ll explore how to use MULTI mode, using a remote trigger for off-camera flash, and how the exposure triangle works with flash. You don't need tons of gear for the tips here: this article includes scenarios with only one speedlight.
I will again write this article using the Yongnuo 560IV speedlight as the reference. I’ll also now include basic instructions for the Yongnuo 560-TX remote trigger. Just like many of you, I took the buying advice of Jim and some of the other podcast hosts. However, even if you don’t have the Yongnuo speedlights, the concepts should help with your flash photography.
1. MULTI Mode
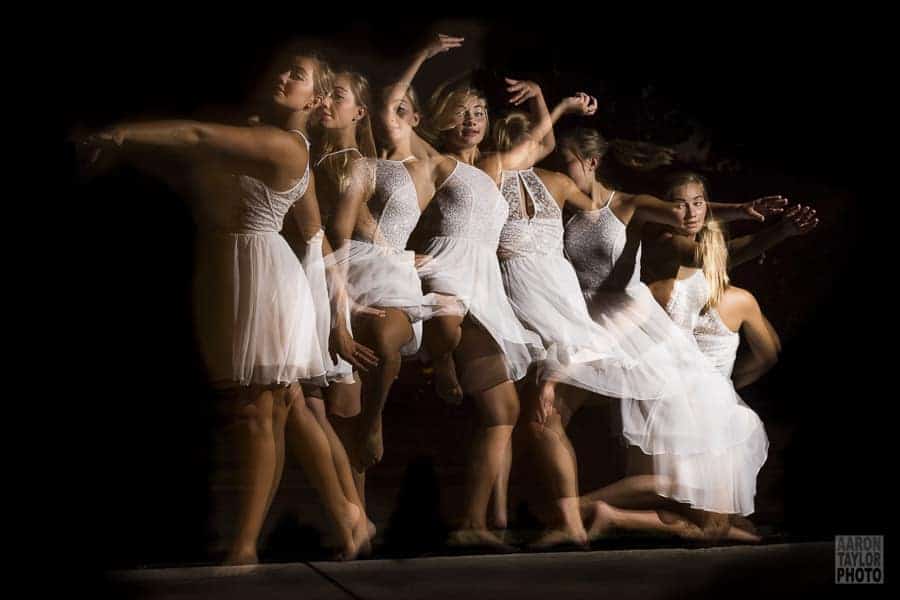
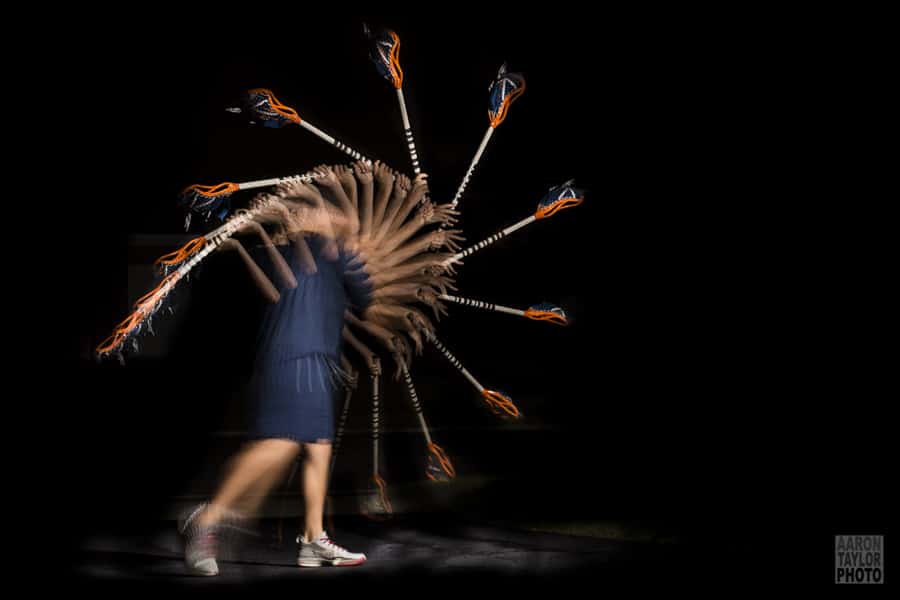
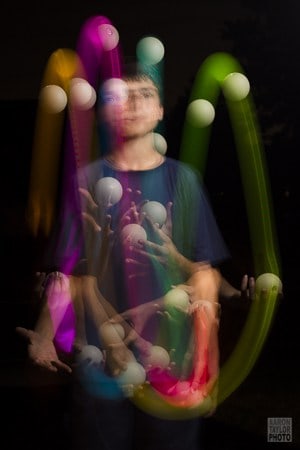
MULTI mode has nothing to do with multiple speedlights. MULTI mode is a setting that allows the flash to go off multiple times per shutter click. You can set how many times it will fire and at what time interval those flashes will go off. With MULTI mode, you can uniquely capture movement in one exposure.
MULTI mode takes advantage of the flash’s ability to freeze the action of an exposure. To understand the concept of “freezing action,” I sometimes compare the camera’s sensor to our eyes. You know when you stare at something long enough that when look away you still see the imprint of what you were staring at? When a flash goes off, whatever the light hits instantly imprints your sensor in the same way. So if your flash goes off multiple times in one exposure, what the light touches will imprint the sensor multiple times.
In MULTI mode, you still have to consider your flash power and zoom. Now you have two more numbers to consider: the number of flashes per exposure and the Hz, or hertz, which is the number of times per second the flash will fire.
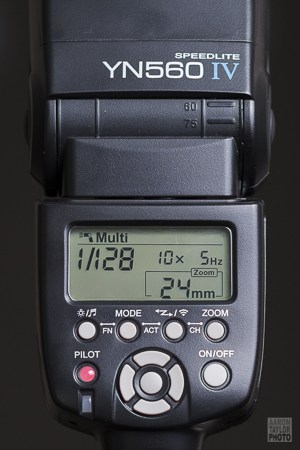
In the photo of my YN560IV, my speedlight is set to fire ten times and at an interval of five times per second. If my camera is set to a shutter speed of two seconds, then all ten flashes will freeze action in the exposure. If my shutter speed is only set one second, then only five of the ten flashes will freeze action–the remaining five would fire after the shutter has already closed.
That's where MULTI mode begins to get complicated: there’s a little math you need to do to figure out how many times your flash will fire during your exposure. And depending on your flash power setting, the number of flashes will be automatically limited due to the flash’s inability to recharge fast enough.
Even if you have the math right, you might not like the look of your image when you take it. Perhaps you froze the subject too many times and as result lose the focus of the image. Or maybe you froze things too quickly, so there’s not enough separation between each instance of the subject. To that, I say, “Oh well!” That’s the fun of MULTI mode, experimenting and seeing what works for your vision.
Here’s one important tip for MULTI mode: make sure your subject is far away from a dark background. Remember, your flash will freeze whatever it hits, so if the light hits anything in the background, then it will illuminate it multiple times. An open field at night or a darkened auditorium stage would be ideal, but any space where you can really separate your subject from the surroundings can work. You want to decrease the chances that your flash hits anything besides the subject.
Finally, you might have been wondering this all along: couldn’t I just combine multiple exposures in Photoshop and get the same effect? For the most part, yes. But there’s something satisfying about setting your camera and flash perfectly to capture the image in one shutter click.
2. Remote Trigger for Off-Camera Flash
Using a speedlight with a remote trigger is where so much experimentation and fun can happen. By putting your flash somewhere other than your camera’s hot shoe, the possibilities for unique light are endless.
Gear
Before we talk skills, let’s talk gear. You need a few extra pieces of equipment. Most importantly, you’ll need a remote trigger. I use the YN560TX because it’s built for the Yongnuo system. This will allow you to control the settings of your flash from your camera. You won’t need to walk over to your flash to change anything. The only thing you can’t do with this particular trigger is turn off the flash. You can disable its ability to flash, but you can’t power it down completely.
To make things even easier, you could purchase a lightstand and a flash bracket. These two links take you to low-quality items. They won’t take much abuse, but they will let you experiment. You could also get one of these, which is a much higher quality item. That clip is a beast of a piece of equipment–I highly recommend it. You can also consider how your light can be changed with modifiers, including soft boxes, shoot-through umbrellas, reflectors, gels, grids, and so much more.
RX Trigger Mode on the YN560IV
Before we look at the YN560TX, turn on your speedlight and set it to RX trigger mode. (Refer to my previous article for help with trigger modes.) Make sure that the speedlight says “Ch 1” and “Gr A1” on its display. These settings mean Channel 1, Group A1. If your speedlight isn’t set to Ch 1, Gr A1, then you can change it easily. To change the channel, press the trigger and the zoom button at the same time, then press left or right accordingly. To change the group, press the OK button, then press up/down to change the letter and left/right to change the number.
The channel allows multiple photographers to use a flash without triggering each other’s flashes. Chances are, you won’t run into a situation where multiple photographers are using off-camera flash in the Yongnuo system. The group setting allows you to control multiple speedlights with multiple settings, but let’s not get into that here. We’re only using a trigger and one flash, so don’t worry about channels or groups once you’ve set your flash to Ch 1, Gr A1.
The YN560TX Buttons
While the YN560TX is similar to the YN560IV speedlight, the buttons aren’t exactly the same, nor is the screen. Use the diagram below as you explore the YN560TX’s buttons:
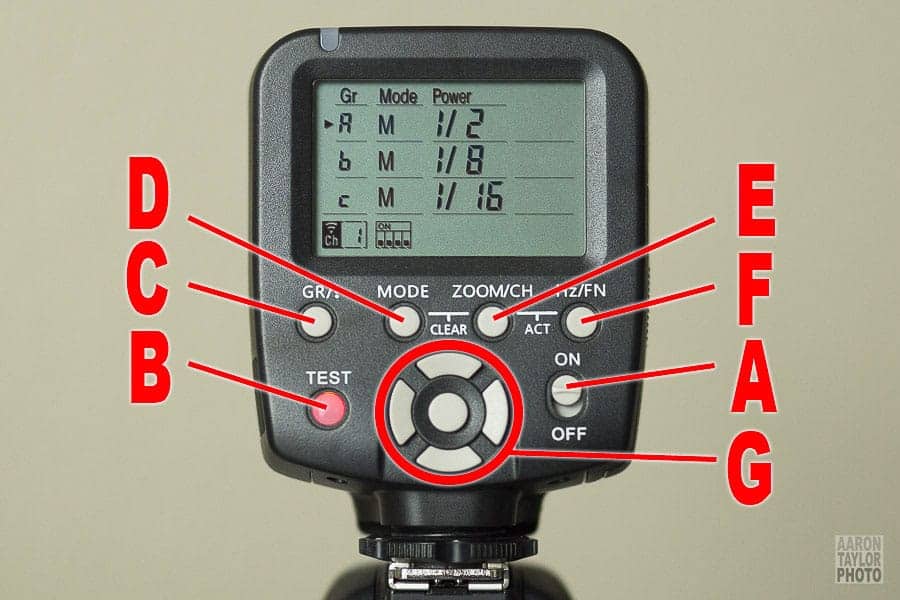
A. The On/Off button. Rather than holding the button like you do on the speedlight, this button is a simple switch. Click up for On and down for Off.
B. The TEST light/button. The is the same as the “PILOT” button on the flash. You press it to trigger your speedlight. The difference here is that the TEST button is always red. The trigger does not have to recycle its power like the flash does.
C. The GR button. GR stands for “group,” a function that allows you to change settings differently on multiple flashes. The screen shows your group in the left column. We’re only using one flash in group A, so you don’t need to press this button unless the little arrow isn’t point to group A. If your screen has groups A, B, and C on it, then just press the GR button to move the arrow to group A. If your screen has groups D, E, and F on it, then you need to hold the GR button to have A, B, and C show up. Then just press it as needed to move the arrow to A.
D. The MODE button. This functions just like the MODE button on your speedlight. M is for one flash, MULTI is for multiple flashes. You also have the ability to set the flash to not fire. You will see two hyphens ( – – ) under the “Power” column. This will allow you to disable the flash when desired. The screen shows each group’s mode in the center-left column.
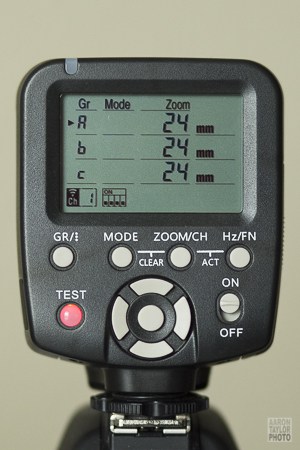
E. The ZOOM/CH button. Pressing the ZOOM/CH button switches the center-right column from flash “Power” to flash “Zoom.” Here’s where we see one downfall of this remote trigger: the flash power and the flash zoom settings are not displayed simultaneously. You have to press the ZOOM/CH button to switch the view back and forth. Oh well.
F. The Hz/FN button. When you have a flash set to MULTI mode, pressing the Hz/FN button allows you to adjust how many times the flash fires and at what interval. Remember, Hz stands for hertz, which is an interval of time related to one second. On the display, you’ll see the “Multi:” on the bottom right. The first number is how many times the flash will fire, the second number is how many times per second the flash will fire (the hertz). To change the settings, press the Hz/FN button to make the numbers flash. Press it accordingly to switch back and forth from the number of times and hertz. To change the number itself, press the left/right buttons. When finished, press OK. Holding the Hz/FN button brings you to a new screen that allows you to hook up much more Yongnuo equipment. We don’t need that here!
G. The Arrows and OK buttons. These function just the way they do on the YN560IV speedlight. If you can change the power, the zoom, etc., on your speedlight, then you’ll be just fine on the YN560TX.
That’s a lot of explanation for a relatively simple unit. Use my help above and practice–you’ll be an expert in no time.
Once you have the unit mastered, you can experiment with off-camera flash. Will you put your flash behind your subject to create a silhouette and rim light? Will you put your flash above your subject to create some drama? Will you put your flash at the classic forty-five degree angle out and up? The possibilities are endless.
3. The Exposure Triangle and Your Flash
As you begin to play with your flash, whether on camera or off, you’ll inevitably take a photo and think to yourself, “This isn’t exactly what I want. What settings should I change?” For this section, I’ll go over each part of the exposure triangle as it relates to flash photography.
First, you’ll need to understand that using a flash creates two different exposures to think about: the exposure of what the flash hits and the ambient exposure of whatever the flash doesn’t touch. For the rest of this article, I’ll call these the flash exposure and the ambient exposure. Certain settings in the exposure triangle change each exposure differently. What you’re used to considering without flash just got a little more complicated–not too complicated, but just enough to make you think a little more when adjusting your settings.
The two different exposures can be tough to imagine at first. Think about it this way: you are a rockstar on stage holding a bucket of water. You’re in front of thousands of people, and it’s a hot day. To help them cool down, you toss that water into the crowd. You can only hit so many people, right? It’s impossible to hit everyone. That’s how you can think about your flash exposure. The light from your flash is like the water from the bucket. Whatever the water hits gets wet. Whatever the light hits is illuminated in the flash exposure. Whatever isn’t hit is the ambient exposure.
Remember when we talked about a flash’s ability to “freeze action”? That’s the flash exposure: the frozen action. I previously described the “frozen action” as the imprint on your eye when you stare at something for a long time and then look away yet still see it. The water, the imprint, the flash exposure: they’re all the same concept.
Put simply: 1. The flash exposure is what the light from the flash touches, and 2. The ambient exposure is whatever the light from the flash doesn’t touch.
Aperture
When you adjust the aperture, you adjust both the flash exposure and the ambient exposure. Widening your aperture to a small f-number like f/1.4 and f/2 will let more light hit the sensor, thus brightening both the flash and ambient exposure. Narrowing your aperture to a large f-number like f/8 or f/11 will darken the image, lowering both the flash and ambient exposure.

Don’t forget that adjusting your aperture also changes your depth of field, so be careful how you adjust things. Pay attention to both your exposure and your depth of field when adjusting aperture.
Let’s say you want to keep your flash power and your ISO setting the same. This would be the case perhaps when you want to keep your flash power low–perhaps 1/8–in order to conserve power and have a fast recycle time and when you want your ISO to be as low as possible–ISO 100 maybe–for image quality. Okay, so what if your image isn’t exposed how you’d like it to be? You should change your aperture accordingly to over- or underexpose the image. Again, be careful to consider your depth of field.
ISO
Changing your ISO will do exactly the same thing as changing your aperture in terms of exposure. When you adjust ISO, you adjust both the flash exposure and the ambient exposure. Of course, ISO won’t change the depth of field; instead, it will change your image quality and how much potential noise your final image may have.
One instance when you’d want to change only your ISO is when you want a specific depth of field and a specific flash power. For example, if you need to keep your aperture at f/2.8 and flash power at 1/4, but your image is underexposed, then you need to raise your ISO higher. That will increase the overall exposure, both for the flash and the ambient.
Shutter Speed
Shutter speed is where the fun begins. Now you have to separately consider the flash exposure and the ambient exposure. Here’s why: the flash actually fires tremendously fast, perhaps 1/1000 of a second, maybe even faster.
That means that changing your shutter speed will have no effect on the flash exposure. No matter your shutter speed, the exposure of whatever is touched by the light of the flash will not change. Whether you take an image at 1/200 of a second or at three-seconds, the flash exposure–the relative brightness of what the speedlight hits–will remain the same.
However, adjusting your shutter speed will change the ambient exposure, both its brightness and how much motion blur you’ll see. Don’t forget the normal rules for shutter speed: a fast shutter speed means less ambient light and less motion blur; a slow shutter speed means more ambient light and more motion blur.
So how do you increase the flash exposure without changing your aperture or ISO? Easy: increase the power on the speedlight itself. Whether your shutter speed is fast or slow, increasing the flash power will increase the flash exposure.
Essentially, you can have the most fun by adjusting your shutter speed. ISO does what it always does, as does aperture. But shutter speed can allow you to freeze action with flash while also showing motion with ambient exposure.
One more thing: say you like the flash exposure but you don’t like your depth of field. You’re shooting at f/8, but you’d really like to shoot at f/2. An aperture of f/2 is four stops wider than f/8, which means much more light will hit your camera’s sensor. To maintain the same flash exposure, you’d need to decrease your power by four stops to compensate for the four-stop increase in aperture. For example, you’d need to go from 1/2 power to 1/32 power. That would keep your flash exposure the same while allowing you to widen your aperture. The same is true for ISO–compensating flash power for changes in ISO will keep the flash exposure the same. The ambient exposure will differ accordingly, though.
In the end, here’s what you need to know:
- Flash photography creates two exposures in one image, the flash and the ambient.
- The flash exposure happens really quickly, 1/1000 of a second or faster.
- Adjusting your aperture will change both the flash and ambient exposure.
- Adjusting your ISO will change both the flash and ambient exposure.
- Adjusting your shutter speed will change only the ambient exposure.
- Adjusting your flash power will change the flash exposure.
- When making aperture or ISO adjustments, you can keep the flash exposure the same by adjusting the flash power in equal stops in comparison to your aperture or ISO adjustment.
- This may all sound complicated, but a little practice will go a long way. Now go practice!
Brilliant article! Recently got my first flash unit. A Yongnuo 660TX and I started practicing it after reading your first article on flash photography. Now I’m feeling quite comfortable with the unit. This article is very informative and to the point too. Really encourages to go out there and shoot. Will now delve into the multi mode! Thanks a ton Aaron.
If you can please cover more flash photography tutorials, such as using flash with light stands, shoot through umbrellas and soft boxes etc., That will be great!
Great article. I have been using 3 of these Yongnuo flashes and the YN560TX for about 8 months and they work flawlessly every time. I have used other Yongnuo triggers and receivers that were very inconsistent. The combination in this article are cheap and effective.
great points altogether, you just oakley holbrook baratas gained a logo new reader.
The more I learn here, the more I’m able to understand the settings listed under each picture! What a great article, THANKS FOR WRITING IT IN PLAIN ENGLISH!
Was having trouble getting to know this flash right out of the box. Found a few tutorials that just frustrated me…..finally an article I understand. I always think of Denzel Washington in some movie where he says ” Talk to me like I’m 5″ (something like that.) I’m not saying you dumbed it down but I definitely felt like a student in my favorite teacher’s classroom; where I get it and feel smart. And now I have a grasp on the mechanics of my speed light. So I give you an A+.
Thank you for your kind words. Your comment means a lot to me. A writer’s primary goal should be clarity for the sake of the reader. I try to do that with everything I write, especially something technical like this article. I’ve also been a high school teacher for the last ten years, so your comment about being in a favorite teacher’s classroom and ‘getting it’ is a high compliment to me. Thank you again.
Great stuff – thanks
Great information! I just bought the 560 TX and stumbled across your article. Thanks for the straight forward approach to a complicated subject.
Aaron, I cant thank you enough. I bought the YN560III paired with the YN560-TX and like other folks have said was and still am really frustrated because the instructions they come with are useless, I have watched numerous you tubes and I belong to a couple of ocf sites on fb but have been feeling like that kid at the back of the class with the glazed over look in his eyes (just for the record that was me lol). I will be printing this out and studying it from here on. Thank you for making it simple and easy to relate with. For what its worth I shoot with a Canon Rebel t6i and I’m looking for some decent portraits.
If I am wanting the ability to use say 3 of these YN560IV flashes, what receivers do I need? I’ve had these flashes for 2 years and have never touched them bc I couldn’t figure it out. 2 yrs later and I’ve upgraded my gear to a D750, but my triggers and receivers don’t sync with this model. What would you recommend I purchase of I want to fire 3 or 4 speedlights at a time. Can I add speedlights and alien need?! I’m just venturing into playing with lighting further beyond just the basics!
Thanks so much
Thank you so much for your easier explanations for using the Yongnuo flash, I’m very new at this type of photography and still get confused but your guide is easy to follow,.
I have one question and seek some camera and flash settings to shoot my brothers wedding photos next year. I like to present them with some brilliant pictures , can you suggest some settings that will help . i.e bride on her own before wedding and the venue, in the day time and evening were it will be darker with lots of dancing.
Wonderfully clear; clarity is a talent and you clearly have it. Many thanks.
wonderful tutorial!! I have a hodgepodge of gear: (In order of purchase) Nikon D5500; Phottix StratoTTL transmitter and receiver; YN568EX: and just recently a YN968n. I am not sure how BEST to use them together. Any suggestions? I purchased the D5500 in early 2015 (my research); Phottix in mid 2015(Houston camera store recommendation); and the YN958N in March 2018 (again my research). Maybe some choices were flawed but it is done for now. Must I use the 568 wired only if I want to use both flashes. I think I jumped in the deep end without floaters wearing my boots!
You write with great clarity. Thanks