
You have your first speedlight and you think two things: 1. I am so excited to make awesome photos, and 2. I have no idea how to use this thing. I was in that place about a year ago. With a year’s worth of experience, trust me when I say that learning to use a speedlight is totally worth it–not to mention that it’s actually really easy. Not only will your images improve, but now your lighting possibilities will be endless. No longer do you need to solely rely on the sun or other ambient light. Now you can make your own light.
This article will help you bypass some of the initial frustrations and confusions of photography with your new speedlight. Don’t let your new speedlight sit in your camera bag. Tighten it on your hotshoe and start learning!
I will write this article using the Yongnuo 560IV speedlight as the reference. If you’re reading this website, chances are you have taken the buying advice of Jim and some of the other hosts. This website’s recommendation is why I bought Yongnuo speedlights. However, even if you don’t have the Yongnuo speedlights, the concepts will remain applicable.
1. The buttons and settings
This will be the first big hurdle you jump over. In fact, once you understand the buttons on the flash and the basic settings for both your flash and your camera, you know just about all you need. Beyond the settings is just experimentation and practice.
But before I get to the buttons, you need to know how to attach the speedlight to your camera. On top of your camera is a hot shoe, which is a mount on top of the camera with some tiny silver circles in it. On the bottom of your flash is a metal mount that fits nicely into the hot shoe. Slide the speedlight into the hotshoe so that the side with display screen and the buttons faces the back of the camera. The speedlight will have a little plastic wheel above its mount–turn it to secure the speedlight to the camera. Make sure the speedlight is pushed in all the way and tightened securely. A poor connection can trick you into thinking that something is wrong with your speedlight or camera.
As we move onto the buttons, use the following diagram as you follow along:
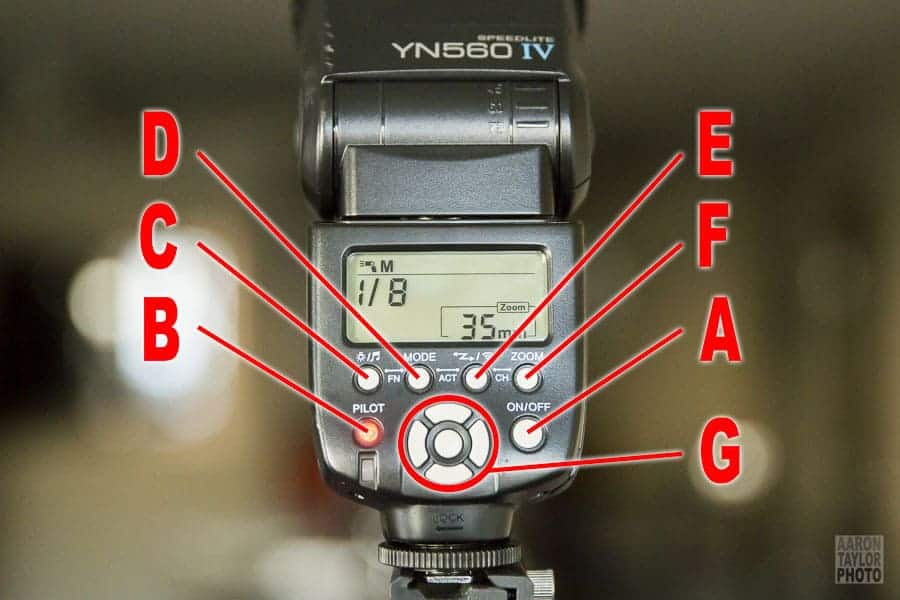
A. The On/Off button. You have to hold it for two seconds or so to turn on your YN560IV. At first, I thought this was annoying. Then I realized that it’s a good feature to prevent accidentally turning on your speedlight at the slightest touch of a button.
B. The Pilot light/button. The color of this button tells you whether or not the flash is ready to fire. Green means that it’s charging, Red means that it’s ready to go. (To me, this is backwards. I wish it matched traffic light colors–green means go, red means stop–but oh well.) You can also press this button to fire the flash manually.
Now the top row:
C. The adjustment button for the screen’s light and buttons' sounds. Press the button to illuminate the screen. Hold the button to turn the sounds on and off. When sounds are on, a little music note appears in the top right of the screen. My advice: turn the sounds off. (No music note will be displayed.)
D. The MODE button. This button allows you to switch between M firing mode and MULTI firing mode. This does not control how the flash is triggered; rather, this controls how many times the flash goes off when triggered. M firing mode means the flash will only go off once. MULTI firing mode means the flash will go off multiple times during one triggered exposure, depending on how you set the speedlight. For now, just stick with M mode. No need to get confused by MULTI mode.

E. The Trigger button. The Trigger button is how you change what triggers the flash to be fired. A speedlight can be triggered by the camera itself, a remote trigger, and other speedlights. The trigger mode is displayed above the solid line at the top of the display. When you are just starting out, you’ll want the trigger mode to be set to just a speedlight icon all the way to the left accompanied by a capital M. (My diagram above shows this trigger mode.) That’s just standard manual mode, which requires the flash to be connected to the camera’s hot shoe to be fired.
If you start in standard manual mode and press the Trigger button, each of these modes will display in this order:
i. TX mode, which allows you to use the YN560IV as a trigger for other speedlights. You can ignore this mode for now. And if you only have one speedlight, this mode is useless anyway.
ii. RX mode, which allows you to put the YN560IV on a light stand and trigger it remotely. You can ignore this mode for now, too.
iii. S1 mode, which allows the YN560IV to be triggered by another flash. In S1 mode, the YN560IV is triggered by the first flash it sees. You can also ignore this mode.
iv. S2 mode, which also allows the YN560IV to be triggered by another flash. In S2 mode, the YN560IV is triggered by the main flash it sees, not any pre-flashes that occur with a TTL flash. If that last sentence didn’t make sense, don’t worry. You can also ignore S2 mode for now.
Essentially, you should only be working with the standard manual trigger mode that I mentioned at the beginning of this section. The other trigger modes are great and allow for some amazing creativity, but let’s learn in baby steps here. Stick with your basic manual trigger mode.
F. The ZOOM button. This allows you to change the spread of the flash itself. At 24mm, the flash spreads as wide as it can; at 105mm, the flash is as narrow as it can be. For now, keep the zoom set to 24mm, which is as wide as it can be.
A quick note: if you’re reading and playing along with your YN560IV, the screen might start to flash “SE”. If you don’t use your flash for about three minutes, the YN560IV goes into standby, an inactive mode to save your batteries. Just press the On/Off button to resume using your flash.

Now onto the last buttons you need to know:
G. The Arrows and OK buttons. When working in Manual mode, you will use the arrow buttons to adjust the power of the flash. (The middle OK button does nothing in Manual mode.) Using the left and right arrows adjusts the power by “full stops,” which means that you either double or halve the power.
1/1 is full power, which drains your batteries quickly. 1/2 is one full-stop less light than 1/1 because it is one-half of full power. 1/4 is one full-stop less than 1/2, 1/8 is one full-stop less than 1/4 and so on down to 1/128.
You can fine tune your power even further by adjusting in one-third-stops by using the up and down arrows. Say you have your power set to 1/4. By pressing up once, you’ll see “+ 0.3” show up on the screen. That means you are now set to 1/4-power plus one-third of a stop towards 1/2. Press up again and you’ll see “+ 0.7,” which means you are now set to 1/4-power plus two-thirds of a stop towards 1/2.
If all of the “stop” talk is confusing, just know that the closer you are to 1/1, the more powerful your flash. The closer to 1/128 you are, the less powerful your flash. Also remember that full power drains batteries, and 1/128 power won’t drain batteries nearly as fast.
Wow, that’s a lot of information for just a few simple buttons on a speedlight. Essentially, if your flash looks like the picture in the diagram, then you’re ready to play. If not, chances are that you need to press either the Trigger or Mode button. Re-read the descriptions above and play a bit just to get comfortable with the speedlight’s buttons.
Finally, a quick note about your camera. Your camera's shutter curtain cannot function with your speedlight to fully illuminate the sensor at shutter speeds faster than 1/200. For now, keep your shutter at 1/200. If you set it to 1/250, 1/320, or any faster, then a portion of your image will be dark. That's something I experienced when I first bought a speedlight, and I was worried that something was broken! Fear not, nothing is broken. Your camera and speedlight simply can't work together properly at shutter speeds faster than 1/200. (Unless, of course, you're playing with high-speed sync, but let's not even go there yet.)
Of course there is more to consider with slower shutters speeds, but let’s not deal with that yet. For now, make sure that you are set in manual trigger mode, M firing mode, 24mm zoom, perhaps 1/4 power, and 1/200 shutter speed on your camera.
Better yet, set your ISO to 100 and your aperture to f/8. If you can shoot in manual mode on your camera, then you’ll know how to adjust your ISO or aperture to adjust your exposure once you start to experiment.
Phew. That’s the most difficult part of this article. If you know the YN560IV buttons, how the YN560IV buttons work, and the necessary shutter speed restrictions, you are well on your way to making amazing images with a speedlight.

2. Bounce flash
Bouncing your flash means to aim the speedlight at something other than your subject–often a wall or ceiling. The swiveling head–one of your new speedlight’s greatest assets–allows you to bounce your light. Why do this? By aiming your light at a wall or ceiling, you turn the wall or ceiling into a huge light modifier. What was a small, hard light source just became a huge, soft one. The softer light is flattering for just about everything and will bring you closer to a studio-look for portraits.
Before you try to bounce your flash, it’s worth just aiming your speedlight right at your subject. This will produce even, near shadow-less light. This type of light is popular with product photography–especially food–as well as fashion and advertising.
When you first attempt to bounce your flash, you need to consider the angle at which your light will return to your subject. If you aim straight up, then your light will come straight down. If you aim up, behind, and to the left, then your light will return from above and illuminate one side of your subject more than the other. Test a few angles out and see if you like what is illuminated and what is in shadow. Some angles are better than others, but it all depends on your subject and style.
You also need to consider the surface onto which you’re bouncing your flash. A white or neutral-toned wall or ceiling is best; that’ll reflect the most light. A black wall will swallow all of your light, making bounce flash really tough. Bright colored walls, like red or blue or green, will reflect some of that color back on your subject. And consider the texture, too. A mirror will act differently than a thick, luxurious curtain.
While bouncing your flash will certainly yield great portraits and product images, I have found that being able to bounce your flash at indoor events really can turn average photos into something better. If you look at my event examples, you won’t be blown away by anything artistic or creative. What you’ll see, though, are solid photos of people having fun and smiling. Reception and event photography requires these kinds of photos, and bounce flash can be an easy way to do it.

You’ll also notice that the top two photos are better lit than the bottom photo. The top two photos had light that was bounced off of a reflective surface behind the venue’s bar. The bottom photo had light that was bounced off of a black canvas awning, which didn’t reflect as well back to the subject.
Experiment and find what works for you. Get bouncing!
3. Off-Camera without a Remote Trigger
While a flash trigger like this will make off-camera flash much easier, you can do off-camera flash without a remote trigger. You simply need to set your camera on a tripod (or any stable, flat surface) and adjust for a long enough exposure to give your fingers time to react to the shutter click in order to press the “Pilot” button to fire the flash. Remember from earlier: pressing the “Pilot” button allows you to manually fire your flash.
You'll want to set your ISO as low as possible. Depending on the ambient light around you, you'll need to adjust your aperture to something small, maybe f/11 or f/16. You should be able to use a slower shutter speed now, perhaps 0.5 seconds or 1 second inside during the day. At night, you can go with an even longer shutter speed, giving you time to perhaps walk around and fire your speedlight multiple times.
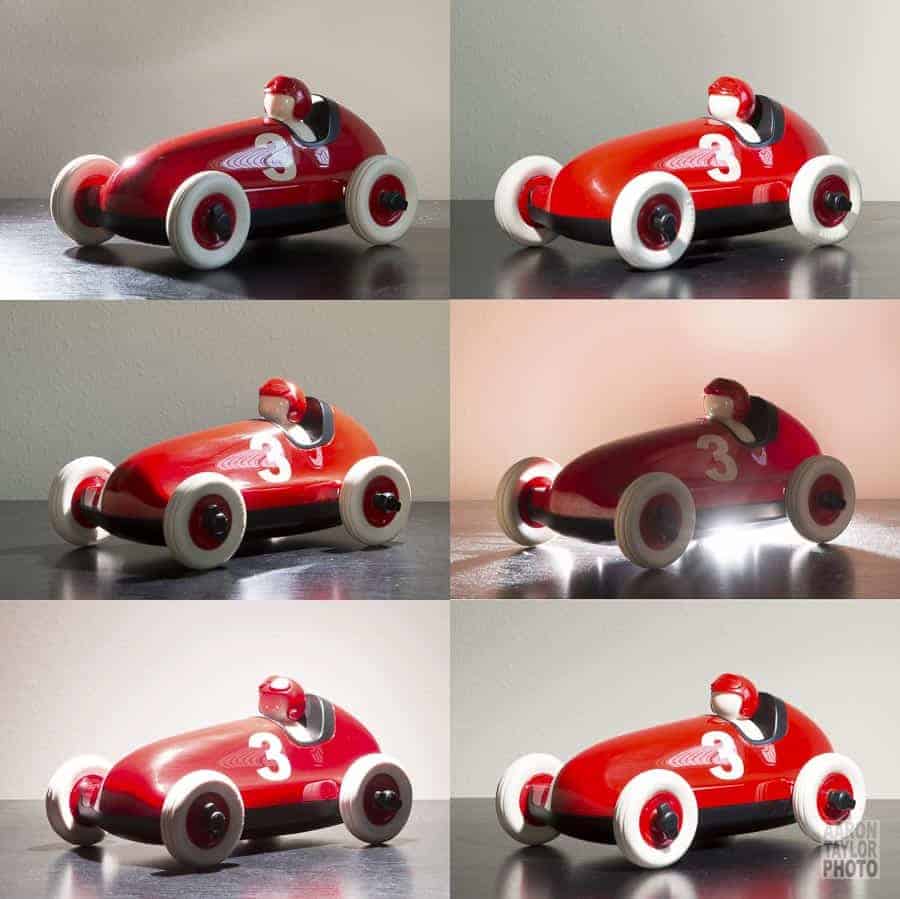
In my example, I had my Canon 6D with a Canon 24-70mm f/2.8 propped on a chair. The lens was zoomed to 70mm, my aperture was f/11, my ISO was 100, and my shutter speed varied between 0.5 seconds and 1 second.
I didn’t do any exposure or color correction so that you could see how the position of the light changes things depending on what it reflects off of. The biggest color change happened when the flash was behind the toy car–it turned the beige wall to red because the red color of the car reflected back to the wall.
Take a look at each example closely and see if you can figure out where I stood with my flash. Looking for shadows can help determine where the flash was held. In some, you can even see the bright flash reflected in the toy itself.
This technique is basically light painting, except instead of the constant light of a flashlight (and the control that comes with it), you essentially have the burst, spray, and accuracy of a shotgun. This method takes some experimentation, but you can still achieve good results despite less-than-ideal conditions. You could also combine this technique with the bounce technique and get softer light.
As you experiment with this technique, you will quickly find yourself wishing for a remote trigger. With a remote trigger and your flash propped on a table or a light stand, things just get so much easier! I’ll get into off-camera flash with a remote trigger in my next post.
Now you have the basic knowledge and skills to use your new speedlight. With time and practice, you will see just how much you can do to create amazing images with just your camera and a speed light. Looking for more? Check out Part 2, and don't forget Jim's “Lighting in a Flash” video course!
Awesome tips…. if only I learned ALL of the buttons when I first got my flash. I spent years with the sound on!
The biggest problem I have is setting my exposure in my camera but then not knowing what settings to use on the flash. When would you typically use full power on a flash? When would you typically use 1/128? I would love the article to address this a little more. What flash settings and camera settings were used in the photos in the article?
Agree. So hard to gauge to where I put my camera settings so as not to blow out my photo or underexpose. Find my self doing a lot of test shots and then by then the moment is gone
Craig and Garett–
To answer the questions about full power versus 1/128, I only use full power when it’s pretty dark and when I don’t want to open my aperture to let more light in. The recycle time is just too slow at full power. I’m not even sure I can think of a time when I used 1/128, but I’d probably use it when I only want a touch of flash compared to the ambient light.
Here’s how I tend to think about settings:
I almost always keep shutter at 1/200. I begin with ISO at 100 (that way my image is as noise-free as possible). I then ask if I want a shallow depth-of-field or deep. Then I just play with the flash power. If I get an exposure I like, I stick with it for that situation. Also remember that if you shoot RAW and have a decent camera, you can make tremendous changes in post-processing.
One rule I’ve seen is that you set your exposure in-camera to one-stop underexposed and then balance with flash.
Just start playing and it’ll get much easier!
Thanks for the follow up! It seems like the only way to really learn is trial and error until you start getting a feel for what settings work for certain situations.
I’ve had a flash for a while now but I hardly ever use it because I didn’t have the confidence. This article has inspired me to get it out and start using it more. Can’t wait to read part 2!
Hi Aaron, I have just purchased a new 560 iv can you give me some basic flash settings for night time photography please I’m using a Nikon D3100.
Nice one, I wish I’d seen it a couple of days ago, it would have speeded my learning curve!
I was using the wireless trigger and hit the “Make sure the speedlight is pushed in all the way” gotcha. I spent nearly three hours searching the web for clues as to why I could fire the speedlight manually using the button on the wireless trigger, but not using the camera before I finally figured out that the trigger wasn’t pushed all the way onto the hotshoe!
Great article Aaron! Learning what all those different modes mean is key. I spent a long time just pushing the buttons and shooting to find which ones worked!
Thank you for this. Got my flash a couple months ago but know I’m not using it to the full. This is perfect short instructions. Please make more posts like this. Thanks everyone at improve for the tips everyday.
Thanks, Garrett. I will do an article that compares flash and camera settings over a series of photos, so readers can see the nitty-gritty changes that occur.
Fabulous info, have you made any articles or videos regarding this, flash & camera settings? Would love to know, would be very helpful!
Thanks 4 the teaching, you Rock!
Great article. Have you tried working with the multi mode? I own a bunch of YN560III and would like to see of the multi mode can get me to use higher synch speeds (i’m at 1/250s). Thanks!
Hi, I´ve seen that is possible trigger an external flash with the on-camera flash without the remote, but I can´t find how or whats the name of this process or maybe is my imagination?
I got a Yongnuo 685 and i can´t fin topics about.
Avi, you’re thinking of the S1 or S2 (often called “slave”) trigger modes that I mention in the article. Experiment with those if you’d like them to fire off camera simply by seeing the light of another flash.
When I set my YN560 IV to S1 it constantly fires the flash. What is happening? I also set it to S2 and I dnt seem to be able to get it to fire off camera from the main flash going off. Suggestions I wan to be able to put this flash on a camera frame or set on it stand off camera and be able to trigger it. How do I achieve this?
Loved my 560iii’s when they worked. One conked out in weeks and they can’t be repaired (officially or readily) in UK, so it was shipped to China and never returned. Be aware of the warranty if you buy. Other unit conked out after 8 months, just died. However, genuinely think I got my money’s worth and loved trying off camera flash with em and a camera mounted trigger.
i want to know about photograhy
Nice article about the Yongnuo speedlights. I have two and there’s some useful stuff here 🙂
Where was this article about a month ago! The darn manual is difficult to read & I know you guys know what I mean! Great write up! Thanks!
Great timing! I was handed a YN560IV with YN622-TX and 622C II as a gift. And I have no idea what to do with them. Good thing I read this, and have been able to use my flash. Only problem I have is using it with the TX. At first use it all went ok. I can change the flash power and trigger the flash remotely. But the next day I can still trigger the flash, but cannot change the flash power remotely. What am I doing wrong? Any advise?
Great article! However, when I tried to purchase a 560, none were available so since I needed a flash right away, I bought a 568EX. Will you be doing an article on this flash! Where the trigger button is located on the 560, it’s labeled CH/GRP on the 568EX and I can’t figure out what it does other than zoom. The manual that came with it isn’t very helpful. Thanks so much!
John, I tried to look at photos of the 568 to see how it compared to the 560, and I just can’t seem to figure it out. I wish I could help you! I hope by now you’ve find some help, though. Keep at it–mastering flash is so worth it.
I just received my speedlight thanks to Jim’s recommendation. This article is really helpful! Thank you very much. Great tips. Sharing with my team (we all use the same camera and speedlight).
Thank you! I’m glad this is helpful–I hope your team has benefitted from the article.
THANK YOU!! You have been so helpful to me with so many of your articles. Right when I think I am in way over my head, you push me to continue with your clear explanations and honest knowledge. Photography is extremely complicated in the beginning and some message boards are snooty and the “tech talk” gets me nowhere. When I bought this flash, the manual was useless to me. Sure it tells me what buttons do what. But it meant absolutely nothing! This article gave me the starting point to actually get started. I guess I will take it out of the bag.
Thank you for the kind words. Clarity and honesty are my writing goals, so I’m glad I’m succeeded for you! I try to take what seems complicated and show that it’s really not all that bad. It all just takes practice. I hope you’re finding some success with your flash!
That was waaaay more helpful than trying to read the manual. The speedlight looks simple enough to use but the manual doesn’t help at all.
Thanks so much for this article – you guys rock!
Amen to your comment about the manual being ridiculous. That’s one reason I wrote the article: to give a clear, easy set of instructions to the many readers and listeners taking the website’s advice to purchase a Yongnuo flash.
I’ve noticed that my flash doesn’t fire if I have live view on, making it way more difficult to focus and turning shooting into a bit of a pain. I’m shooting with a 70D and it always says that the flash is powered off, though it will usually fire anyway as long as I don’t have live view on. Expected or is there a problem or am I doing something wrong? Overall even when it’s off, I find the flash to be a bit unreliable and will often mess with different things before managing to get it to fire for whatever reason, so I think an article on trouble shooting would be good.
Overall, wish I would’ve read this before I got it. I learned the hard way about shutter speeds and thought something was seriously wrong when my photos were coming out half black!
Not having done any research to figure out why, I will say that I have experienced the same thing. The flash only fires when I shoot using the viewfinder, not live-view mode on the screen. I’m glad you’re having some success–keep practicing!
I am a professional photographer wedding photographer in kolkata and I just buy YN560IV for my professional use. It is very good flash like any branded professional flash, so if you forget brand name , I think you will be gainer. It is really good flash but price is very low.Thanks YONGNUO.
Hi Aron,
Thank you for the article, it helped me so much to understand my new 560IV. When I got omy 60D camera settings and serch for External flash setting, it always says that the flash is incompaitible of power switched off. However when I click, it works fine.
Could you please here, why does this message comes and is it my flash non-compatible with camera?
I have a couple of the 560IVs and the 560Tx. I’m having very low success rate in having the remote flashes trigger. If i hit the Pilot button the remote flashes will fire. But when I press the shutter button they usually will not fire. Ditto if I have a 560IV in the hot shoe instead of the the 560Tx. I’ve ensured that the it is seated well in the hot shoe, tightened properly, etc.
This is on a Canon 6D.
Any suggestions on how to make this work reliably?