
One of the biggest features of the latest release of Lightroom is faster native panorama stitching, something as mostly landscape photographer I do a lot of. The part of panorama work I don't like much is waiting for the computer to finish thinking with every move I make.
I was super-excited to try out this new feature in Lightroom and see if would speed up my workflow there like it has for so many other post-processing needs. Read on for my description of the Pano War where I put Lightroom CC (2016) up against Photoshop CC (2016) and a program most of you probably have never heard of before called Image Composition Editor (ICE) from Microsoft. Only one can survive.
What is Panorama?
Move to the next section if you could have written this one. Very briefly, in case you are a beginner or have been living under a rock, panorama shooting and processing is not just cropping an image down so that it is much wider than it is high. I have to admit, I have done that very thing and called it a panorama – mainly because my composition was so bad I had to nix a huge portion of the shot and only had a tiny bit left. No, panorama is taking a number of exposures, being careful to overlap them a good amount so that software can stitch them together into a single shot.
Smartphones have made this a much more common type of photography as well. Most current phones offer a feature where you hold your phone vertically, start taking a shot, and slowly move (called panning) across the scene in front of you. The phone is actually taking multiple exposures and then stitching them all together for you without having to bring them on your computer. What a cool feature! It is one that I use a lot on my iPhone 6+ when I don't have my DSLR with me, but for this article I want to focus on comparing the post-processing software you use on a computer to get this same effect.
Rules of Engagement
 To set the stage for my epic Pano war, I will determine the victor by evaluating the contestants in two categories: speed and projection.
Speed
I am sure speed makes sense right off. We photographers are sure whiners when it comes to speed, aren't we? Film guys have to just be shaking their heads at how much we digital photographers moan and complain about how long it takes to do things that are pretty amazing. Still, I am going to whine about the speed of panorama stitching. It mostly stinks. Really, we are asking the computer to do quite a lot here. I shoot my panorama shots in RAW format, and I usually take no fewer than 20 exposures. At roughly 25MB per RAW image, that means I am asking the computer to analyze at least 500MB of data and figure out how to glue them together so that it looks like a single shot. Still, nobody likes waiting for their computer to think about things and I want to see if Lightroom CC offers me a faster panorama workflow than the competition.
Projection
Without getting too far into the weeds, even if you know the very technical mechanism to find the no-parallax-point of the lens and aperture you are shooting, you are going to end up with at least a little distortion (cased by parallax) in the single image you get after the photos have been stitched together electronically. It is a little like the lens distortion you see a lot on single shots using a very wide-angle lens (which Lightroom helps you fix rather well), but magnified in intensity. Since I am far from an expert on finding the no-parallax-point, one of the features of panorama stitching software I desperately need is overcoming this distortion problem through a process most call projection. I want to see how Lightroom “projects” the final stitched shot to compensate for the massive distortion my pano shots have.
The Shots
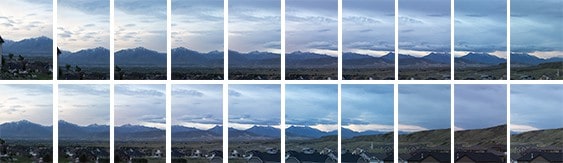
For this pano war, I used the same 23 RAW shots from my Canon 7D Mark II taken with my Tokina 11-16mm f/2.8 lens. As I already mentioned, knowing the software works much better when there is a large amount of overlap between them, I overlapped each shot by about 1/3 as I panned from left to right.
Pano Stitcher Incumbent #1 – Photoshop
Ever since I have been taking panorama photos, I have been using Photoshop to stitch them together. There haven't been a ton of software choices that do panorama stitching, but really the reason I have used Photoshop for this was because I already had paid my hard-earned moola to have it. I didn't want to lay down any more cash for software that was so specific to this type of post-processing – even if it did it better. Therefore, my first incumbent contestant as the program I have used more than any other to enter the battle is Photoshop.
I imported the RAW files into Photoshop for panorama stitching and set the “Layout” options (the settings for projection) to Auto. I checked the box to have Photoshop blend the image together, but left the check the boxes for vignette removal and geometric distortion correction empty. From the moment I pushed the OK button to the moment Photoshop let me have control again was 4 minutes and 32 seconds. Nearly …. 5 …. long …….. minutes. There I go with the whining again. That's the rather low bar set for the speed comparison that will partially determine the winner.
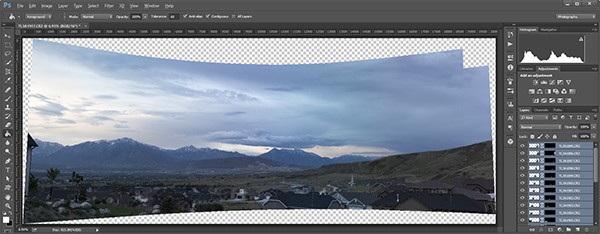 What about projection? You can compare for yourself with the other screen shots, but to the left here is what Photoshop ended up with. It is a usable image for sure, but I would have to crop a lot out. Or, I can do what I have learned to do after using going through this process a lot, and use transformation warping (Ctrl-T/Command-T, right click, warp) to move the edges until it looked to me like the distortion is better compensated for. It is a very subjective process, plus the speed issue comes back to bite me as moving the control points on transformation warping takes forever.
Before you comment about it, yes, I realize that I could try a Layout mode other than Auto and see if I get a better projection result. But I have done that in the past, and it has rarely made a positive improvement, plus there is a 5 minute cost every time I run it. Having used this process a lot over the years of doing pano images, this is exactly what I have come to expect from Photoshop. Which is why I came into this battle with high hopes Lightroom CC pano stitching does it all a lot better – automatically.
Pano Stitcher Incumbent #2 – ICE
ICE has been the Rocky Balboa of pano stitching for me. It is a program made by Microsoft that nobody has ever heard of. Due in part to the software being “experimental,” and in part to the fact that it only runs on a PC. Since I do a lot of panorama work, and I am a PC user (boo, hiss, yada, yada), I had to give this a go months ago when I ran across it. At version 2.0.3 as of early 2015, I have been playing with ICE and have felt that it offered a better panorama stitching experience over Photoshop for a while. However, I had never done an actual comparison between the two yet. I was excited to get some real numbers to back my limited use experience with the software with it being much better than Photoshop for this very specific purpose.
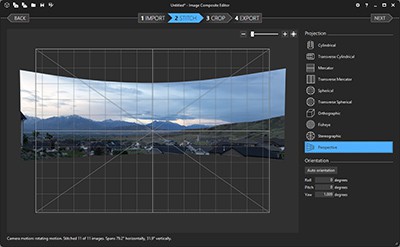 It is a little difficult to compare ICE with Photoshop pano stitching. The workflow is very different. First off, ICE doesn't have a RAW processor, so the first thing you have to do with your images is export them to a TIFF format. This took 20 seconds. Once you have the TIFF images, there are a lot more options available in ICE than there are in Photoshop (or Lightroom). Options I don't have the same level of experience with yet. To try and make these Pano Wars as fair as possible, I used the default configuration which included a lot of “Auto” settings. I pushed the button to have ICE stitch the shots together and make its best guess on a projection method to overcome the distortion, and 28 seconds later I got the result shown to the right.
Math is not always easy, but if mine is right that means that even if the 20 seconds to convert RAW to TIFF was included, the total was 48 seconds. That's roughly 6 times faster or only about 15% of the 5 minutes to do the same thing in Photoshop. That is huge! Still, our report card here for evaluating these programs in the great Pano Wars isn't only about speed. What about the results? What about how good a job ICE did with the projection? If you compare the two screen shots here I think they look fairly close to even. Neither really did a great job in correcting the distortion. I'd say that the “auto” from both Photoshop and ICE end in a draw when it comes to distortion correction.
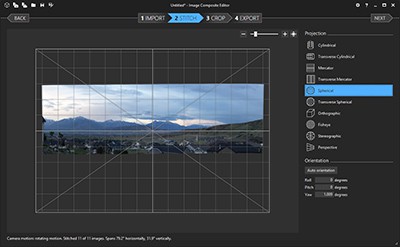 Ahh, but ICE offers up a secret weapon here. You'll notice in the screen shot above that there are options labeled “Projection” to the right of the screen. With Photoshop my choices to correct the distortion problems in the stitched image were to do a very slow and imperfect warp transformation or gamble that selecting a different Layout option may produce a better result (which would take 5 more minutes). With ICE I can change the Projection INSTANTLY and decide which is the best for the specific pano shots being used. When I say instantly, I mean there wasn't any loading message or cursor change (hourglass, beach ball, spinning icon, etc). I clicked on “Spherical” and in less time than I could reasonably measure (milliseconds), I was instantly shown the image to the left. I am sure you will agree is a much better correction for the distortion of the shots. NOTE: I went back and picked Spherical in the Layout options of Photoshop since that was a better choice here, and after another painful 5 mintues, the distortion correction was actually worse than “Auto” had produced originally.
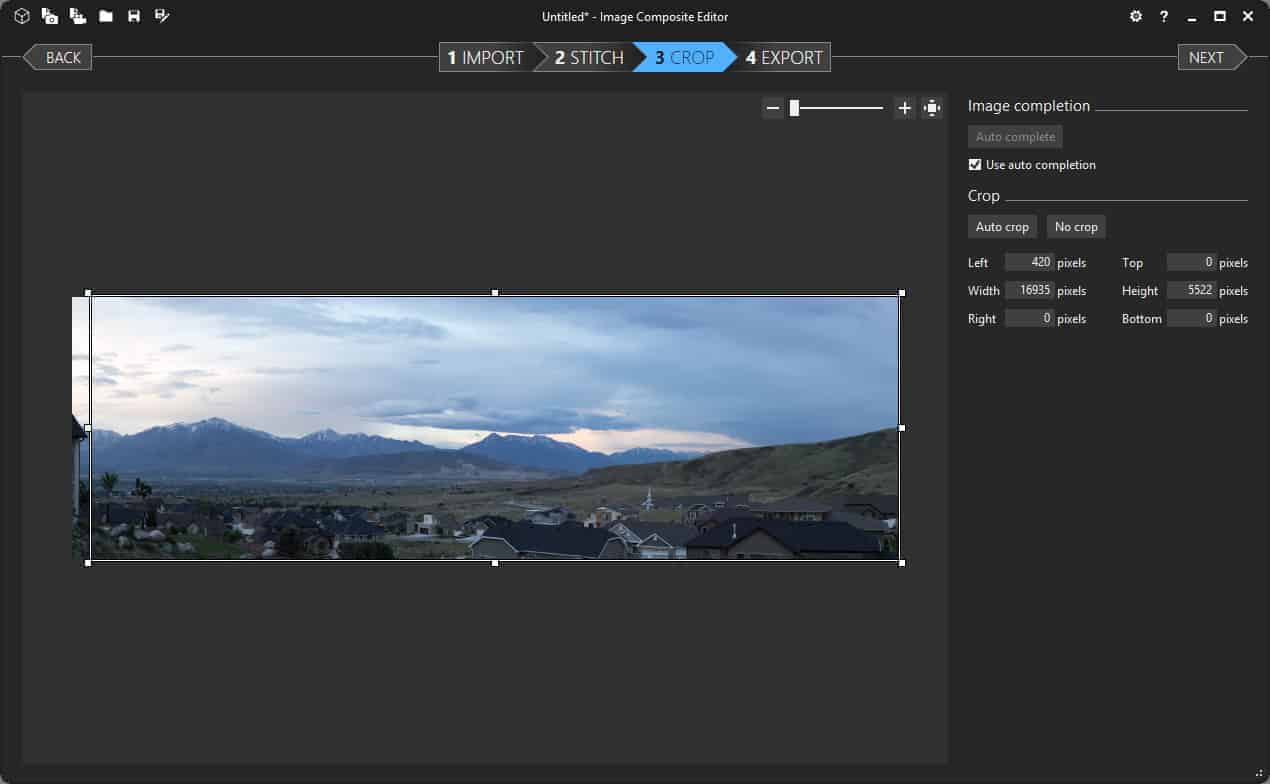 Turns out that isn't all that ICE has to offer in the way of an improved experience for pano processing. Once I found the projection I wanted, I clicked next in the upper right and another set of options were shown to me for further perfecting the pano. Step 3 in the workflow ICE takes you through allows you to crop the shot. Even though the distortion was almost completely corrected by picking the spherical type of projection, there was still some there. So in this ICE screen I could choose to crop into the image to get rid of the uneven parts of the picture left by the distortion, or I could push the “Auto complete” button. Auto sounds good. So, I hit that button, and after a brief 1 second process the parts of the image that needed to be fixed with some context aware fill kind of magic was done and I had a REALLY good image with nice straight lines (click on the image to see a bigger version).
With ICE you have one final step, number 4, to export the stitched photo. Here again there is pretty unique set of options that I won't go into detail about here since it isn't any of the criteria for our epic battle, but if you do pano processing you should check out the PhotoSynth options for export. I just chose the easy option of TIFF here and saved it out to the same location on the hard drive where the original shots were stored.
Is ICE the winner? We haven't evaluated Lightroom CC 2015 yet, but this ICE is a pretty compelling panorama processing program for sure. Not enough that I have used it for many of my panos so far, but only because I haven't spent that much time with it yet. I also want to mention here, that in fairness, it is a huge disadvantage that I have to leave Lightroom so completely in order to use ICE. Having to export the images to TIFF and manage them completely outside of Lightroom manually to do this processing is not how I want this to work. I haven't used ICE enough to take a view yet on how the image quality itself goes either. I am betting that it likely suffers some as a TIFF conversion from RAW is pretty good, but it isn't RAW. So it isn't all rainbows and unicorns with ICE.
Pano Stitcher Contender – Lightroom CC 2015
Since Lightroom CC 2015 has only been available to me for a short couple of weeks, I have even less experience here than with ICE. As we have talked about in the IP Roundtable podcast episode 121 and have written in articles here and here, the launch of the latest update from Adobe for the Lightroom line has been far from smooth. It is plagued with performance issues and was even crashing for a lot of people on startup. Not the beginning any of hoped it would have. Let's put those issues aside for the purposes of this review and just focus on one of the new features that got me really excited when I looked down the bullet list Adobe put in their release notes, native panorama stitching.
I was really excited at this new feature because Lightroom is where I spend 99% of my time when processing my photos – except when it came to processing panoramas. Even though the round-tripping from Lightroom, to Photoshop, and back again has been made as seamless as possible by Adobe, I really just don't want to leave Lightroom unless I absolutely have to. It slows down my workflow to break away from Lightroom into Photoshop. It is also more of a “destructive” process that you do in Photoshop, making it so that if you really want to go and change what you did in Photoshop you have to break away from Lightroom yet again. The idea that I could stay in Lightroom and stitch my pano shots together was so enticing, I just hoped it would live up to my expectations.
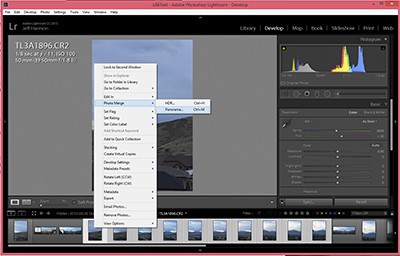 The process to start the “Photo Merge” to panorama is just like I expected it to be as an avid Lightroom user. In either the Library or Develop modules you select all of the images you want to stitch together, right click, and under the new “Photo Merge” menu you choose Panorama. HDR is there too by the way, but we will save that for another article. Lightroom has a RAW processor built in, so no need to convert my RAW files to TIFF before attempting to stitch them together. I selected my RAW images that I wanted to make into a pano, and then chose in the menus to have Lightroom do just that.
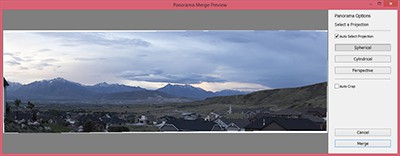 Immediately after selecting the Panorama menu option, Lightroom showed a window with a status bar as it processed through the RAW files and attempted to automatically decide on a projection type that would best correct the distortion from the shots. Dying to know how long it took? On the edge of your seat? It took 14 seconds! Yes! Yes! Yes! Photoshop took 5 minutes to do this and ICE took 48 seconds (since I had to export to TIFF first). Not only did I have a really great preview of the stitched photo in just 14 quick seconds, it correctly chose the “Spherical” type of projection to compensate for the distortion in my stitched shot. Again, yes!
I was very happy with the projection that resulted, but just to see what it took to change the projection, I clicked on Cylindrical. I got a loading message for less than 2 seconds, and the preview of the projection updated. Fantastic! Still need to do some more testing, throw more images at it and see how it handles things, but I am extremely encouraged by what I saw here. However, we aren't done yet!
RAW Result
The very dated pano processing capability in Photoshop is showing it's age and isn't the right tool for the job for either criteria. ICE is fast, does a good job with projection, and has some interesting export options that I would love to see Microsoft continue to research in order to build more immersive panos. It is a very nice tool for pano processing and the price (free) is right, but it is sure hard to get over the lack of RAW processing. TIFF is much better to work with than JPEG for processing images, but it still isn't RAW and although I don't have any examples to point to I have to believe that the requirement to convert RAW to TIFF for import into ICE means at least a little of that original image quality is lost. It is tempting to call it a draw between Lightroom and ICE, but there is one additional feature of Lightroom that I think makes it the winner – RAW results.
In saying RAW results, I am talking about the final format of the stitched pano when merged using Lightroom. With both Photoshop and ICE the best format of the image you can get back into Lightroom is TIFF. Next to RAW, TIFF would be my second choice, but Lightroom delivers a 32-bit DNG file as a result of doing the pano stitching natively. As a format established and championed by Adobe, the DNG format may be a little controversial, but it should have a distinct advantage compared with what is possible importing a TIFF of the fully stitched pano back into Lightroom. It should offer all of the advantages with regard to white balance, exposure, highlights, shadow that we all love with the RAW files coming from our cameras. I expect I will be able to do more with the final stitched photo than I really could using either Photoshop or ICE.
Conclusion
Lightroom CC 2015 has proven itself on a couple of pano stitches and is probably going to be my go-to processor for them going forward. I think I will do a few more comparisons, but it excels in all of the important aspects I expect. It gives you a preview of the stitched photos fast enough you can try different processing modes. It does a great job in “auto” mode to compensate for the distortion I get when shooting panoramas. Best of all to me, it produces a RAW DNG formatted file for me to play with after the stitch. I think it is going to be a huge time-save for me AND provide superior results. My only complaint is that the rest of Lightroom CC 2015 is so slow, but I think Adobe will be addressing that given all of the feedback I have seen there.
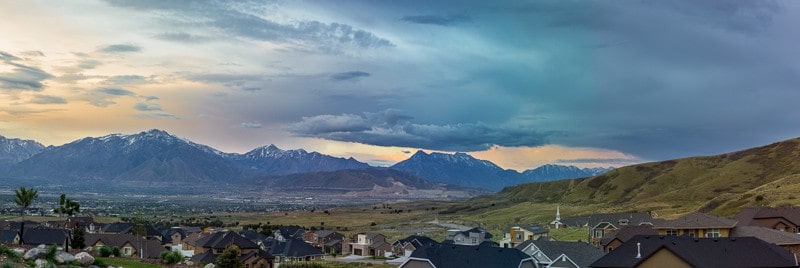
Just to wrap it up nicely, below are the final images I got from the 3 pano processing tools from the same set of photos. They end up pretty close, but the process for getting there is very different. Let us know what you think in the comments.

Great review! Lately I start with Lightroom because I love having the DNG pano result… but it fails with a useless error message about 1/3 of the time, so I end up bringing the pictures into Microsoft ICE, which never fails.
Thanks Tony! Always good to hear from you on the site. I’ll have to throw a lot more pano shots at it I guess and see if I run into any problems.
I’ve had many error issues as well. It will frequently say “unable to merge” or something like that (I don’t recall the exact message at the moment) however in other programs the series will merge just fine.
Hi Jeff
Great article on this new feature. Another cool thing is that if you create HDR pano’s the end result is still a DNG pano (although a two step process)
I know that you can’t review every program out there and right now it is hard to beat LR’s DNG pano option but if you do a lot of pano’s you might want to check out a program called PTGUI. I think it does a better job combining images and gives you a bigger image after combining (less area to crop). Down side (which wasn’t one a few weeks ago) is the output is TIFF like PS and ICE. It isn’t cheap either at $100 but they have a 30 day trip. You should give it a try if you have time
@Darrell,
One of the other hosts, Nick Page, also recommended I take a look at PTGUI. I’ll have to give it the 30 day trial and see what I think. Thanks for the suggestion and for reading the article!
Hi Jeff,
Great article, clear method and explanation. I am not quite decided whether to go for Lr6, but this is really making me interested again!
I was wondering if you noticed any difference in resolution and/or detail in the final images? My common method is Photoshop, but I often notice an ‘unreasonable’ loss in number of pixels compared to manual overlap and blend of the images. In effect this may mean that re sampling may be done differently, and I was wondering if you see any difference between programs typically?
Thanks, awesome job!
J
@Joost,
Yes, because the image is stitched together as a DNG file, it has all of the detail and flexibility of a RAW file compared to what you get with TIFF. I haven’t done enough of them in Lightroom CC yet to know if it will always work better than Photoshop, but it is very promising with the results I have had so far.
I also use PTGui but a recent large pano input set of 68 photos (.cr2) has basically slowed it to a crawl. I have a brand new maxed out MBP so HW shouldnt be a problem. PTGui has been a staple for me for many years though, giving a lot of functionality to tweaking individual photos in the pano once merged. I use LR so keen to try this feature and likely to upgrade to Adobe CC soon for access to PS so will try that version too. Cant bring myself to head over to windows just for Ice.
My primary problem at present is to find which program is best for solving the wavy horizon problem I often find in my handheld iPhone photos or even in one-click photos with 360×360 4π spherical panoramas like with my Nikon KeyMission 360 held above my head on a vertical selfie stick to catch the scene with little of me below. Any thoughts on which of these three is good for solving wavy horizons?
But overall very glad I found your post. I have been using panorama tools since last century, and have all three you mention above. ICE is clunky and terrible at one of my favorite subjects, panoramas at the beach, where clouds are the only way for a program to sense where images overlap. ICE almost always fails on those, and PhotoShop gets about 90% right. Ironically, a 99 cents iPhone app AutoStitch gets more right than even PhotoShop but the files are much smaller hence not as good on large displays. I have LightRoom as part of my CC subscription, but still being married to iPhoto (with my meta data, social media posting records and comment, etc), I did not even move to Photos much less LightRoom.
Just a note on ICE. After painstakingly manually stitching shots using some free software that came with an old Canon camera, I switched over to ICE a few years ago and now use it exclusively for panos. (As a fellow Utahn, yeah, the price is what initially drew me in…) Anyway, before doing any manual cropping I click “auto crop” just to see, and while it’s usually nearly the crop I’d’ve made, or will make, once in a while it results in a truly bizarre slice of the pano with really surreal or “step-through-the-frame” perspective and depth. It’s worth the millisecond workflow pause, again, just to see.
Thanks for the great comparison!