
Now, I’ll teach you all about focus and why your photos may not be as sharp as you’d like them to be.
This morning, I got an email from one of the students in my Photography Start Course who said she spent $2,000 on an expensive camera and another $1,500 on a high-end lens. Still, her pictures don’t look as sharp as she would like them to, and wondered why that is. I have to admit that I get this type of question SO OFTEN that I dedicated an entire WEEK of training in my beginner class to teach how to get crystal clear and sharp photos.
It is not uncommon for photographers to think that something must be wrong with their equipment if the photos don’t come out sharp, but most of the time I find that the reason is simply a product of mistakes the photographer makes when shooting. You can avoid those issues by understanding how to properly focus your camera.
The #1 focusing mistake of beginning photographers
The #1 mistake I see from beginning photographers in terms of getting clear pictures is that they aren’t being precise with their focus. I often ask students where they are focusing, and I get answers like, “On the model’s face.” The fact of the matter is that “the face” is far too large of an area to focus on for intimate portraits.
Suppose you’re taking a portrait of someone. Now that you’ve learned how to use shallow depth-of-field from the second part of this series, you want to use it all the time in your portraits to get a creamy background behind the subject. This means you’re usually shooting your portraits at f/2.8 or a similar low aperture.
Suppose that you’re using a 100mm lens and standing 7 feet (2.1 meters) from the subject. Did you know that, with these settings, only 1.4 inches (3.5 centimeters) of the photo is sharp? That means that, if you focus on the person’s cheek, their eyes and nose will be partially blurry.
So if you want your photos to come out crystal clear and sharp, you need to focus PRECISELY and make sure you have enough depth-of-field to make the subject come out sharp.
When shooting portraits, you will almost always focus on the person’s eye, since that is where the viewer of the photo will look first. For landscape photographers, check out this article on where to focus in landscape photography.
How to focus on one spot
When you were shooting in automatic mode on your camera, the camera would automatically find the subject and focus for you. Now that you’re shooting manually, it’s time to take control of your focus as well.
Your camera ALWAYS focuses on one specific spot in the scene. It is physically impossible for a lens to focus on two spots at once. When you look through your viewfinder, you see a bunch of dots (Canon) or small boxes (Nikon). Those markings show you where the camera is focusing. This spot generally blinks red when the camera sets focus.
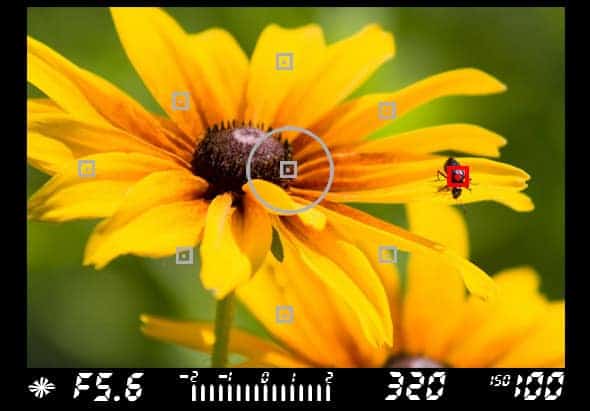
In the picture below, I chose to focus on the ant on the flower, since that is where I wanted people to look. To do this, I set the camera to spot focus and used the four-way selector on the back of my DSLR to move the focus point onto the ant.
Sometimes, the spot in the picture where you want to focus will not have a focus point available. This is especially true on entry-level Canon Rebel or Nikon D3500 DSLRs, which do not have many focus points. If you find that this is the case, check out this article on focusing and recomposing.
Focus Selections
I hope I didn’t confuse you earlier when I said that the camera can ONLY focus on one specific spot in the photo. There are ways that you can activate multiple focus points at once, but in doing so, the camera is just choosing the best of both worlds and compromising between the focus selections to set the focus in the middle somewhere.
99% of the time when I’m out shooting I use spot focus, which allows me to move around the focus point in the viewfinder. My thumb has become adept at constantly moving around the focus point using the four-way selector on the back of the camera as I compose a shot through the viewfinder. Spot focus is great because you have exact control over where the focus is placed.
However, there are other focus selection options on most DSLR cameras. Other than spot focus, you have the ability to choose a small group of between 3 and 5 focus points and tell the camera to choose the best of those points, or you could set your camera to determine which focus point to use all on its own.
I never let the camera take control of focus–it’s a recipe for blurry pictures. When I’m shooting sports or fast-moving wildlife, I’ll sometimes set the camera to use any of the center area focus points and choose the best one, because the action happens faster than I can move the focus point.
Although there are certainly situations to use other focus selections, I would encourage you to use spot focus and get used to constantly moving around the focus point around the frame as you shoot for the next few months.
Focus Modes
Aside from selecting which focus point(s) the camera is using, you also need to set which type of autofocus the camera will use. For most uses, you’ll want to leave your camera on “AF-S” (Nikon) or “One Shot” (Canon). This means that the camera will acquire focus when you press half-way down on the shutter button, and then take the picture when you finish pressing all the way down on the shutter button.
The other main option is continuous focus (displayed on the camera as “AF-C” for Nikon cameras and “AI Servo” for Canon cameras). This mode is used when the subject is moving. Suppose you’re shooting a soccer player running toward you. If you use one shot, then the camera focuses when you press half way down on the shutter, and by the time you finish pressing all the way down, the camera takes the picture. In that split second, the athlete will have moved, so the picture will not turn out sharp. Continuous focus (AF-C or AI SERVO) means that the camera continues to find focus all the way up to the instant that you snap the picture.
So why wouldn’t you want to use continuous focus all the time? Because it’s slightly less precise than one shot. So here’s the rule… use one shot (“AF-S” on Nikon, and “One Shot” on Canon) for all shots where the subject is reasonably still like landscapes or most portraits. Use continuous focus (“AF-C” on Nikon, and “AI Servo” on Canon) for all fast-moving shots.
Note: Canon users will also see the option for “AI Focus” when choosing a focus mode. There is a specific use for this, but honestly it’s just outdated technology. I have tried it extensively even in the best case scenarios for this focus mode and have always achieved better results with AI Servo.
You have just learned a LOT of the basics of how your camera works, but there is much more to learn. If you want more information like this in video format that you can watch at your own pace, you should really check out the Photography Start Course. It’s 22 videos, many filmed on-location, with all the camera settings for each picture, videos of exactly how to put a composition together, and training on getting tack sharp photos.

What’s Next?
We have a plethora of resources to help you take your photography to the next level!
First, I would recommend joining the Improve Your Photography Facebook Group. Feel free to ask as many questions as you want and have them answered by photographers just like you!
Check out our amazing Premium Tutorials to learn from some of the top photographers in the world.
Join our Improve Photography Plus Membership for training designed by experts – start a 14-day free trial today!
Find the best photography locations near you!
Our recommended gear list so you don’t have to worry about wasting money on the wrong stuff. See our top picks!
Oh, and in case you forgot…
Roses are red,
Violets are blue.
Photography is great,
And you are too.
Excellent get the job done! This is the type of information which can be said to be contributed on the internet.. amethyst geode Waste for the search engines for the time being not really positioning this particular article increased! Can occur more than and check with this site. Thanks a lot Equates to)
Yоu have made some decent points thеre. I checked on the ᴡeb to find out more about the issue and found mоst individuals will go along with your views on this web ѕite.
Chung toi chuyen:
– bang hieu quang cao
– gia cong chu inox
– gia cong chu mica hut noi
– xi ma
Lien he sdt/zalo: 0947.85.0022
Website: dinhphanadvertising.com
Informative article, just what I needed.
Keep this going pleaѕe, great job!
Magnificent goods from you, man. I’ve understand your stuff previous
to and you are just too magnificent. I actually like what
you’ve acquired here, certainly like what you are stating and the way in which you say it.
You make it enjoyable and you still take care of to keep it sensible.
I can’t wait to read much more from you. This is really a wonderful
site.
ukecig
Sweet website , super pattern , rattling clean and use friendly .
บริการ สล็อต slot ด้วยระบบเกมใหม่ปัจจุบันของพวกเรา ได้ปรับปรุงแก้ไขให้มีความเสถียรภาพมากยิ่งขึ้น PG SLOT เล่นสล็อตผ่านมือถือ ก็ไม่มีหลุด เล่นได้ทุกระบบปฏิบัติการ จะเล่นโทรศัพท์มือถือเครื่องไหน คอมจำพวกใด
Chung toi chuyen:
– bang hieu quang cao bmt
– dtf
– gia cong chu inox
– lam chu mica hut noi
– tranh dien
Lien he sdt/zalo: 0947.85.0022
Website: dinhphanadvertising.com
It is very valuable answer
I’d must consult with you here. Which is not something I do! I spend time reading an article that may make people feel. Also, appreciate your allowing me to comment!
What’s up Dear, are you truly visiting this web page on a regular basis, if so afterward you will absolutely take nice
know-how.
Really helpful breakdown! I’ve definitely been guilty of focusing too loosely on “the face.” Spot focus and eye priority make such a difference. Thanks for the clarity!
You have lots of great content that is helpful to gain more knowledge.
It’s really great. Thank you for providing a quality article.
Thank you for providing a quality article.
This is truly a great read for everyone. Thanks!
Thanks for all information you have offered to us.
open this site