
Now, I’ll teach you all about focus and why your photos may not be as sharp as you’d like them to be.
This morning, I got an email from one of the students in my Photography Start Course who said she spent $2,000 on an expensive camera and another $1,500 on a high-end lens. Still, her pictures don’t look as sharp as she would like them to, and wondered why that is. I have to admit that I get this type of question SO OFTEN that I dedicated an entire WEEK of training in my beginner class to teach how to get crystal clear and sharp photos.
It is not uncommon for photographers to think that something must be wrong with their equipment if the photos don’t come out sharp, but most of the time I find that the reason is simply a product of mistakes the photographer makes when shooting. You can avoid those issues by understanding how to properly focus your camera.
The #1 focusing mistake of beginning photographers
The #1 mistake I see from beginning photographers in terms of getting clear pictures is that they aren’t being precise with their focus. I often ask students where they are focusing, and I get answers like, “On the model’s face.” The fact of the matter is that “the face” is far too large of an area to focus on for intimate portraits.
Suppose you’re taking a portrait of someone. Now that you’ve learned how to use shallow depth-of-field from the second part of this series, you want to use it all the time in your portraits to get a creamy background behind the subject. This means you’re usually shooting your portraits at f/2.8 or a similar low aperture.
Suppose that you’re using a 100mm lens and standing 7 feet (2.1 meters) from the subject. Did you know that, with these settings, only 1.4 inches (3.5 centimeters) of the photo is sharp? That means that, if you focus on the person’s cheek, their eyes and nose will be partially blurry.
So if you want your photos to come out crystal clear and sharp, you need to focus PRECISELY and make sure you have enough depth-of-field to make the subject come out sharp.
When shooting portraits, you will almost always focus on the person’s eye, since that is where the viewer of the photo will look first. For landscape photographers, check out this article on where to focus in landscape photography.
How to focus on one spot
When you were shooting in automatic mode on your camera, the camera would automatically find the subject and focus for you. Now that you’re shooting manually, it’s time to take control of your focus as well.
Your camera ALWAYS focuses on one specific spot in the scene. It is physically impossible for a lens to focus on two spots at once. When you look through your viewfinder, you see a bunch of dots (Canon) or small boxes (Nikon). Those markings show you where the camera is focusing. This spot generally blinks red when the camera sets focus.
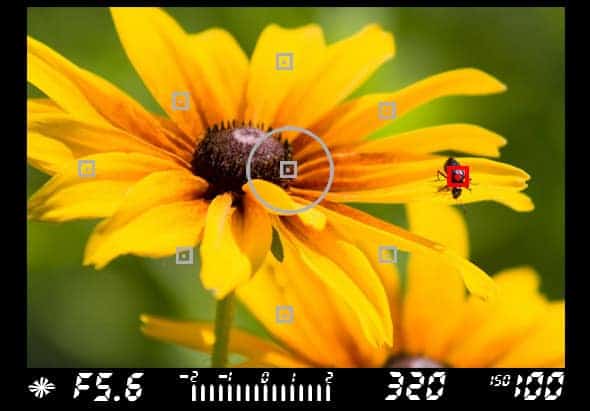
In the picture below, I chose to focus on the ant on the flower, since that is where I wanted people to look. To do this, I set the camera to spot focus and used the four-way selector on the back of my DSLR to move the focus point onto the ant.
Sometimes, the spot in the picture where you want to focus will not have a focus point available. This is especially true on entry-level Canon Rebel or Nikon D3500 DSLRs, which do not have many focus points. If you find that this is the case, check out this article on focusing and recomposing.
Focus Selections
I hope I didn’t confuse you earlier when I said that the camera can ONLY focus on one specific spot in the photo. There are ways that you can activate multiple focus points at once, but in doing so, the camera is just choosing the best of both worlds and compromising between the focus selections to set the focus in the middle somewhere.
99% of the time when I’m out shooting I use spot focus, which allows me to move around the focus point in the viewfinder. My thumb has become adept at constantly moving around the focus point using the four-way selector on the back of the camera as I compose a shot through the viewfinder. Spot focus is great because you have exact control over where the focus is placed.
However, there are other focus selection options on most DSLR cameras. Other than spot focus, you have the ability to choose a small group of between 3 and 5 focus points and tell the camera to choose the best of those points, or you could set your camera to determine which focus point to use all on its own.
I never let the camera take control of focus–it’s a recipe for blurry pictures. When I’m shooting sports or fast-moving wildlife, I’ll sometimes set the camera to use any of the center area focus points and choose the best one, because the action happens faster than I can move the focus point.
Although there are certainly situations to use other focus selections, I would encourage you to use spot focus and get used to constantly moving around the focus point around the frame as you shoot for the next few months.
Focus Modes
Aside from selecting which focus point(s) the camera is using, you also need to set which type of autofocus the camera will use. For most uses, you’ll want to leave your camera on “AF-S” (Nikon) or “One Shot” (Canon). This means that the camera will acquire focus when you press half-way down on the shutter button, and then take the picture when you finish pressing all the way down on the shutter button.
The other main option is continuous focus (displayed on the camera as “AF-C” for Nikon cameras and “AI Servo” for Canon cameras). This mode is used when the subject is moving. Suppose you’re shooting a soccer player running toward you. If you use one shot, then the camera focuses when you press half way down on the shutter, and by the time you finish pressing all the way down, the camera takes the picture. In that split second, the athlete will have moved, so the picture will not turn out sharp. Continuous focus (AF-C or AI SERVO) means that the camera continues to find focus all the way up to the instant that you snap the picture.
So why wouldn’t you want to use continuous focus all the time? Because it’s slightly less precise than one shot. So here’s the rule… use one shot (“AF-S” on Nikon, and “One Shot” on Canon) for all shots where the subject is reasonably still like landscapes or most portraits. Use continuous focus (“AF-C” on Nikon, and “AI Servo” on Canon) for all fast-moving shots.
Note: Canon users will also see the option for “AI Focus” when choosing a focus mode. There is a specific use for this, but honestly it’s just outdated technology. I have tried it extensively even in the best case scenarios for this focus mode and have always achieved better results with AI Servo.
You have just learned a LOT of the basics of how your camera works, but there is much more to learn. If you want more information like this in video format that you can watch at your own pace, you should really check out the Photography Start Course. It’s 22 videos, many filmed on-location, with all the camera settings for each picture, videos of exactly how to put a composition together, and training on getting tack sharp photos.

What’s Next?
We have a plethora of resources to help you take your photography to the next level!
First, I would recommend joining the Improve Your Photography Facebook Group. Feel free to ask as many questions as you want and have them answered by photographers just like you!
Check out our amazing Premium Tutorials to learn from some of the top photographers in the world.
Join our Improve Photography Plus Membership for training designed by experts – start a 14-day free trial today!
Find the best photography locations near you!
Our recommended gear list so you don’t have to worry about wasting money on the wrong stuff. See our top picks!
Oh, and in case you forgot…
Roses are red,
Violets are blue.
Photography is great,
And you are too.
Thank You!
This helped me so much!!
This is the best article I’ve read (all 5 parts). You’ve explained everthing so it’s easy to understand and gave clear examples. I’ll be referring too it again as I get to know my camera.
Thanks again for sharing your knowledge.
Hi,
I have signed up today for the Improvephotography.com/downloadstart and given the validation code LIGHT290___.
However, couldn’t activate the link and access the video lessons.
Please advise.
Thank you.
Choo
I found this article really helpful. Thank you! You are saved on my favourites bar 🙂
Hi Guys;
Im new to photography. I just purchased DSLR entry level camera, Canon EOS 1300D. It was accompanied with EFS 18 – 55 IS lens which is a kit lense. I would like to go for EFS 55 – 250 IS lens as my next lens so that i can cover 18 – 55 – 250 zooming range using both lenses. My questions are as follows;
1. Do i need need a tripod to shoot sharp pics with EFS 55 – 250 IS lens in higher zooming levels? or is it possible to take hand held shots with with higher zooming?
2. What is the advantage of buying EFS 18 – 135 IS over EFS 55 – 250 IS apart from interchanging lenses according to zooming range?
you have explained in a very simple way for any beginner to understand. thank you so much
Hi i want to take pics of the moonless night sky. Please guide me how to take good pics of the night sky. Rgds
Hi! Nice article! I would recommend a very similar kit to a beginner, maybe with some tweaks here and there, and also with a “take it slow” advice. I think UV filters should worth mentioning to beginners, it’s important to protect the lens, and they also add some extra dollars on the bills.
Some savings could be done on the software side when buying Canon. Their DDP software is free and does a very nice job a getting the best out of RAW files… But anyway I don’t want to start the debate about these two, anyway I’m shooting Fuji now and I’m not looking back. An X-T10 with the kit 18-55 could also be a very nice starting equipement, this kit lens is actually very good.
Thank you so much. These were extremely helpful (and clear!). Could you also talk about how to correctly set the whitebalance? My photos usually turn out super yellow or blue!:(
Nicely done. Teaching my 16 year old photography. Love photography, but teaching technical things isn’t always my strong suit. You put it all very easy to understand. I’m looking forward to the wonderful photos she’ll be getting. Thank you!
Creativity is much MORE important than gear. If you like Sony, shoot Sony. Don’t feel shamed into buying Canon or Nikon. All three brands have pros and cons. Albert Tom’s comment seems to come from someone who wants to LOOK professional, rather than BE professional. If you enjoy photography, willing to put in a ton of work, and always strive to learn more, you will be on the right track.
This site has really changed my photography!! Thank you so much for all the easy breakdowns!!!
thanks bro all the way from Nigeria.
Better article for Photographers
Thank you! This was very helpful!
I have had my camera for years. In the last two nights reading your information it has taught me so much. I am extremely interested in your beginners classes. But must say thankyou where are you based i am in Australia
very good and interesting program, thank you. Where are the 22 video, do they come by mail or can they be taken online?
This is by far the most detail and comprehensive guide I have come across. I did go for a crash course for Beginners but that didnt help as much as you did. Thank you very much!
Love your work and the way you have articulated the basics of photography. I am a recent graduate (2 days!!) to a Sony Mirrorless format (Alpha a6000), and am just finding out all the settings and adjustments you need to do for the perfect photo, which my point-and-shoot used to do for me automatically! Nonetheless, I am determined to excel, and your work gives me the perfect beginner’s boost!
thank you very informative sir !
Thank you. I learned many new things. Appreciate your sharing.