
From the sunset picture example, you have learned the importance of taking full control over the exposure on your camera. Now, it’s time to dig into your camera and learn the three most basic tools available to you in controlling the exposure.
Those tools are shutter speed, aperture, and ISO. After I explain what each one does, I’ll explain why we need three separate tools to control the brightness or darkness of the photo.
Aperture

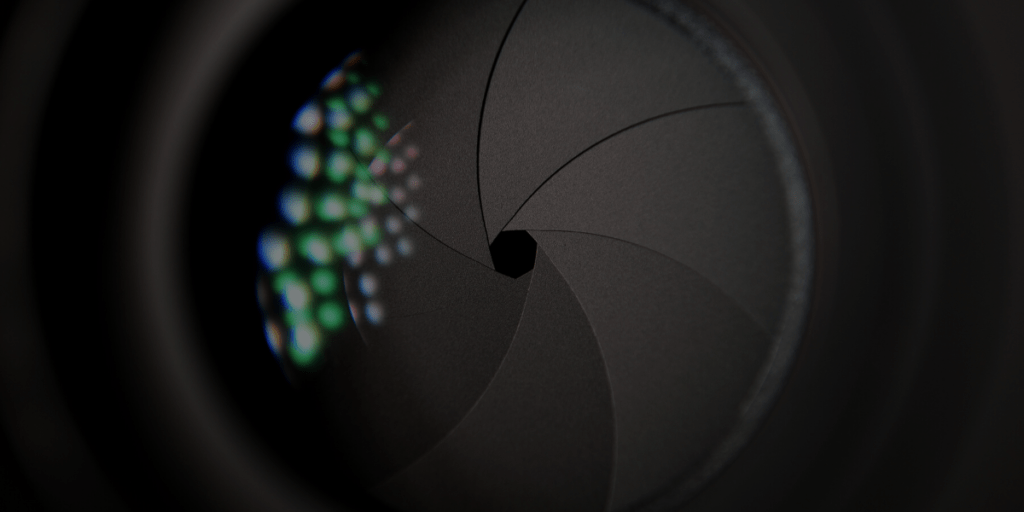
The aperture is a small set of blades in the lens that controls how much light will enter the camera. The blades create a octagonal shape that can be widened (we photogs call it shooting “wide open”), or closed down to a small hole. Obviously, if you shoot with the aperture wide open, then more light is allowed into the camera than if the aperture is closed down to only allow a tiny hole of light to enter the camera.
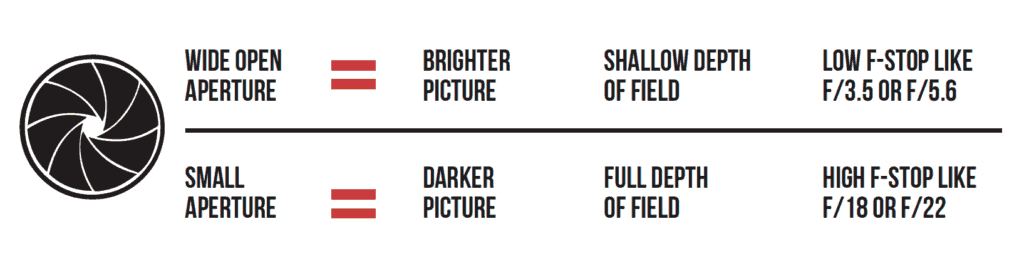
So suppose you take a picture that is too bright. How do you fix it? Simply choose a smaller aperture. Simple! Aperture sizes are measured by f-stops. A high f-stop like f-22 means that the aperture hole is quite small, and a low f-stop like f/3.5 means that the aperture is wide open.
Let’s test your knowledge to make sure you have it down. If you take a picture and it’s too dark at f/5.6, would you choose a lower f-stop number or a higher one? Yep! You’d choose a lower f-stop number, which opens up the aperture to let in more light. The size of the aperture controls more than the brightness or darkness of the picture, though.
The aperture also controls the depth-of-field. Depth-of-field is how much of the picture is sharp, and how much is blurry. If you want to take a picture of a person with a blurry background, you’d use shallow depth of field. If you want to take a picture of a sweeping mountain vista, you’d want to use a small aperture size (high f-stop number) so that the entire scene is in sharp focus. If you, like me, are more of a visual learner, then I think this graphic will help solidify the information about aperture. Take a minute and make sure you understand this info before moving on.
Shutter Speed
The shutter is a small “curtain” in the camera that quickly rolls over the image sensor (the digital version of film) and allows light to shine onto the imaging sensor for a fraction of a second. The longer the shutter allows light to shine onto the image sensor, the brighter the picture since more light is gathered. A darker picture is produced when the shutter moves very quickly and only allows light to touch the imaging sensor for a tiny fraction of a second. The duration that the shutter allows light onto the image sensor is called the shutter speed, and is measured in fractions of a second. So a shutter speed of 1/2 of a second will allow more light to touch the image sensor and will produce a brighter picture than a shutter speed of 1/200 of a second. So if you’re taking a picture and it is too dark, you could use a slower shutter speed to allow the camera to gather more light.
Just as the aperture affects the exposure as well as the depth-of field, the shutter affects more than just the exposure. The shutter speed is also principally responsible for controlling the amount of blur in a picture. If you think about it, it makes sense that the shutter speed controls how much blur is in the picture.
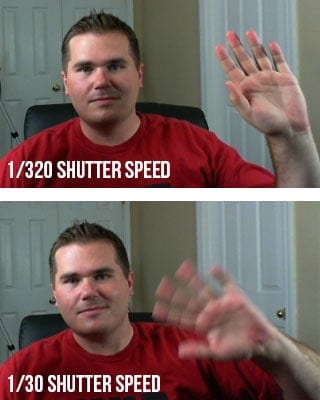
Imagine me sitting here at my computer desk waving to you (you don’t have to imagine very hard if you just look at the picture on the right). If you take a picture of me with a shutter speed of 1/30th of a second, then my hand will have moved in the time that the camera is recording the picture. To get rid of the blur, you need to increase the shutter speed to around 1/320th of a second. At this speed, my hand is still moving, but the camera takes the picture so fast that my hand travels only such a small distance that it is not noticeable in the picture.
The next question that most people ask is, how slow of a shutter speed can you use and still get a sharp picture? My blog post on Minimum Shutter Speeds will answer your question!

ISO
The funny thing about ISO is that it is an acronym, but nobody really knows what it stands for. It is always just called ISO even though it really stands for International Organization for Standardization. Every once in a while, you’ll hear an older photographer pronounce it “I-so”, but almost everyone pronounces it “I.S.O.” The ISO controls the exposure by using software in the camera to make it extra sensitive to light.
A high ISO such as ISO 1,600 will produce a brighter picture than a lower ISO such as ISO 100. The drawback to increasing the ISO is that it makes the picture noisier. Digital noise is apparent when a photo looks grainy. Have you ever taken a picture at night with your cell phone or your pocket camera, and noticed that it looks really grainy? That is because the camera tried to compensate for the dark scene by choosing a high ISO, which causes more grain.
What constitutes a “high” ISO is constantly changing. Camera companies are constantly improving the ability of cameras to use high ISOs without as much grain. A few years ago, only the highest-end pro DSLR cameras could achieve 2,000 ISO, and now even entry-level DSLR cameras can shoot at this level. Since each camera is different, you would do well to do a few tests with your camera to see how high of an ISO you can shoot at without making the image overly grainy.
Right now, you will commonly find new DSLRs that advertise expandable ISO ranges.

Putting It All Together
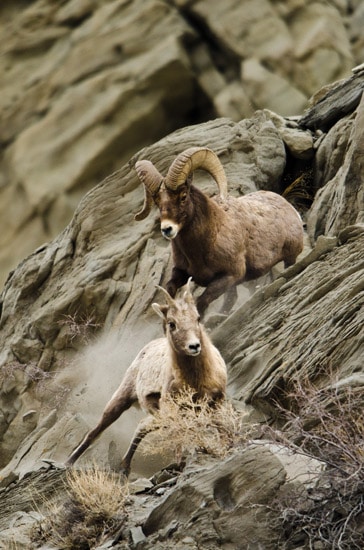
I know exactly what you’re thinking. “Why do I need three tools to control the exposure? Wouldn’t one suffice?” The answer is no, and I’ll explain why with an example. In January, I took a trip to my favorite place on the planet to take pictures–Yellowstone National Park. My guide informed us that the bighorn sheep in the park were dying off very quickly due to whooping cough, so I worked hard that week to capture pictures of the last few sheep in that area of the park.
Around 9AM on a cloudy day, I found a small group of bighorn sheep and started photographing them with a long 600mm lens. The early hour and clouded sky made the situation quite dark for shooting.
Let me help you out. The lens I was working with cost around $12,000, but don’t worry. You can get really good results with a much more affordable 600mm lens. I’m considering selling my expensive lens.
Anyway, it had a maximum aperture size of f/4. So I set my aperture at f/4 to gather as much light as possible. This also impacted the depth-of field to blur out the rocks behind the bighorn sheep. Next, I set my shutter speed. I wanted to capture action in the photo, so I set my camera to 1/1000th of a second shutter speed. I knew that this fast of a shutter speed would prevent any motion blur from the sheep running on the mountain side. Then, I took a picture. WAAAY too dark! I couldn’t compromise my shutter speed or aperture, so I knew I needed to use the third player in the exposure triangle–the ISO.
I played around with my ISO and found that if I increased it to ISO 640, it made the picture bright enough to take the picture without making it overly grainy. This combination of shutter speed, aperture, and ISO worked out perfectly. It feels so good to hone in the camera settings!
Now can you see why you need to know how to shutter, aperture, AND ISO, and know how to set them independently on your camera!
If you’re a visual learner and want to really learn your camera, then be sure to check out my Photography Start Course. Just a reminder, it’s a series of 22 videos where I take you on location to shoot waterfalls, landscapes, people, kids, and macro photos. You can look over my shoulder and see exactly how I set up my camera to take professional photos.

Now, you need to learn how to apply these settings on your camera to take advantage of your new-found nuggets of knowledge.
I?d should examine with you here. Which isn’t something I normally do! I enjoy studying a submit that may make individuals think. Additionally, thanks for permitting me to remark!
Having read this I thought it was extremely informative. I appreciate you taking the time and energy to put this information together. I once again find myself spending a lot of time both reading and leaving comments. But so what, it was still worthwhile!
[color=#ccc]Доверьте свое выздоровление профессионалам! Наша [url=https://kislovodsk.anoncenter.ru/]наркологическая клиника в Барнауле[/url] предлагает широкий спектр услуг, включая диагностику, лечение и реабилитацию. Начните свой путь к здоровой жизни прямо сейчас.[/color]
[color=#ccc]Хотите жить без алкогольной зависимости? Обратитесь в наш современный центр [url=https://stavropol.anoncenter.ru/]лечения алкоголизма в Барнауле[/url]. Мы поможем вам избавиться от этой проблемы, обеспечивая комфорт и безопасность на каждом этапе лечения.[/color]
[color=#ccc]Не нужно терять время на поездки в клинику! Наша наркологическая клиника предлагает услугу [url=https://ivanovo.anoncenter.ru/]капельницы на дом в Барнауле[/url]. Получайте качественное лечение удобно и без стресса прямо у себя дома![/color]
Very good write-up. I certainly appreciate this website. Thanks!
It is truly a nice and useful piece of information. I
am glad that you shared this useful info with us. Please stay us informed like
this. Thank you for sharing.
I was able to find good advice from your content.
Before writing to disk, data is encoded in the “8 in 14” standard and stored in the form of land and pits. In the embossed plates, the recesses are 1/4 wavelength deep in the material of the reading laser plate (about 125 nm), as a result of the interference of light reflected from the environment and the recesses, the wave is extinguished. The pits are 500 nm wide and the track spacing is 1.6 mm. The differences in light reflection are used by the lens servo to guide the beam along the path and focus it.
The rotational speed of the plate is varied such that the linear speed of the read head with respect to the track is constant and for the reading speed x1 it is in the range of 1.2 to 1.4 ms. The disc is read from the center to the outside, and the rotational speed decreases as you move away from the center of the disc.
Structure of the medium, data recording Micrograph of recesses and fields Diagram of a cross-section of a pressed plate A standard compact disc, often referred to as an audio CD, stores the digital audio record in a “red book” standard to distinguish it from later variants. Compact discs are made of a 1.2 mm thick polycarbonate plate with a diameter of 12 cm, covered with a thin layer of aluminum (aluminum), in which information is contained (in the form of a combination of micro-grooves and places without them). They are read with a semiconductor laser (AlGaAs) with a wavelength of about 780 nm. The recording creates a spiral path from the center to the edge of the record.
The rotational speed of the plate is varied such that the linear speed of the read head with respect to the track is constant and for the reading speed x1 it is in the range of 1.2 to 1.4 ms. The disc is read from the center to the outside, and the rotational speed decreases as you move away from the center of the disc.
RepairCdDvD is a tool that recovers data from unreadable CD/DVD. It can help you retrieve the files from damaged CD DVD and save them to disk, the clipboard, or even the hard disk. No accumulated cost if you need more than one type media or file system supported. RepairCdDvD is a highly specialized yet easy to use media data recovery tool. It supports all disc formats and all common file systems. Insert a disc, start up RepairCdDvD and select the drive or media (if not selected already) and let RepairCdDvD mount the media. RepairCdDvD immediately shows you all the partitions or tracks and sessions located on the media, combined with all file systems that are present.
You made some really good points there. I checked on the net for additional information about the issue and found most individuals will go along with your views on this web site.
After that, you may choose to utilize the Repair function, which is the bread and butter feature of the software. This option seeks to recover the data on your CD or DVD, without needing you to configure anything.
Structure of the medium, data recording Micrograph of recesses and fields Diagram of a cross-section of a pressed plate A standard compact disc, often referred to as an audio CD, stores the digital audio record in a “red book” standard to distinguish it from later variants. Compact discs are made of a 1.2 mm thick polycarbonate plate with a diameter of 12 cm, covered with a thin layer of aluminum (aluminum), in which information is contained (in the form of a combination of micro-grooves and places without them). They are read with a semiconductor laser (AlGaAs) with a wavelength of about 780 nm. The recording creates a spiral path from the center to the edge of the record.
After that, you may choose to utilize the Repair function, which is the bread and butter feature of the software. This option seeks to recover the data on your CD or DVD, without needing you to configure anything.
I’m very happy to discover this website. I wanted to thank you for ones time for this fantastic read!! I definitely liked every part of it and I have you book-marked to see new things in your site.
It’s nearly impossible to find knowledgeable people for this topic, but you sound like you know what you’re talking about! Thanks
Thank you for this article. I will also like to mention that it can always be hard if you are in school and just starting out to initiate a long history of credit. There are many students who are simply just trying to survive and have a protracted or beneficial credit history can often be a difficult thing to have.