
From the sunset picture example, you have learned the importance of taking full control over the exposure on your camera. Now, it’s time to dig into your camera and learn the three most basic tools available to you in controlling the exposure.
Those tools are shutter speed, aperture, and ISO. After I explain what each one does, I’ll explain why we need three separate tools to control the brightness or darkness of the photo.
Aperture
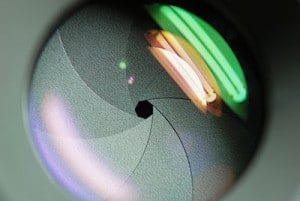
The aperture is a small set of blades in the lens that controls how much light will enter the camera. The blades create a octagonal shape that can be widened (we photogs call it shooting “wide open”), or closed down to a small hole. Obviously, if you shoot with the aperture wide open, then more light is allowed into the camera than if the aperture is closed down to only allow a tiny hole of light to enter the camera.
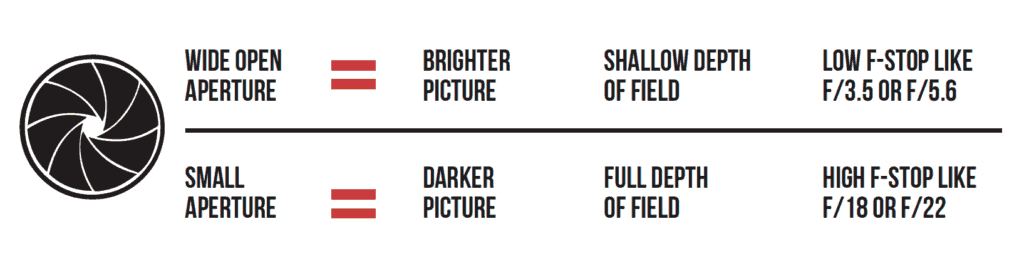
So suppose you take a picture that is too bright. How do you fix it? Simply choose a smaller aperture. Simple! Aperture sizes are measured by f-stops. A high f-stop like f-22 means that the aperture hole is quite small, and a low f-stop like f/3.5 means that the aperture is wide open.
Let’s test your knowledge to make sure you have it down. If you take a picture and it’s too dark at f/5.6, would you choose a lower f-stop number or a higher one? Yep! You’d choose a lower f-stop number, which opens up the aperture to let in more light. The size of the aperture controls more than the brightness or darkness of the picture, though.
The aperture also controls the depth-of-field. Depth-of-field is how much of the picture is sharp, and how much is blurry. If you want to take a picture of a person with a blurry background, you’d use shallow depth of field. If you want to take a picture of a sweeping mountain vista, you’d want to use a small aperture size (high f-stop number) so that the entire scene is in sharp focus. If you, like me, are more of a visual learner, then I think this graphic will help solidify the information about aperture. Take a minute and make sure you understand this info before moving on.
Shutter Speed
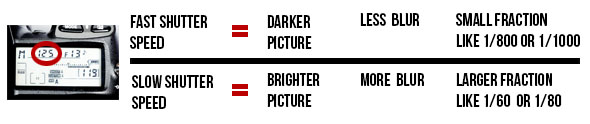
The shutter is a small “curtain” in the camera that quickly rolls over the image sensor (the digital version of film) and allows light to shine onto the imaging sensor for a fraction of a second. The longer the shutter allows light to shine onto the image sensor, the brighter the picture since more light is gathered. A darker picture is produced when the shutter moves very quickly and only allows light to touch the imaging sensor for a tiny fraction of a second. The duration that the shutter allows light onto the image sensor is called the shutter speed, and is measured in fractions of a second. So a shutter speed of 1/2 of a second will allow more light to touch the image sensor and will produce a brighter picture than a shutter speed of 1/200 of a second. So if you’re taking a picture and it is too dark, you could use a slower shutter speed to allow the camera to gather more light.
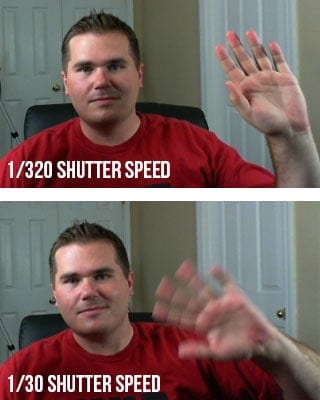
Just as the aperture affects the exposure as well as the depth-of field, the shutter affects more than just the exposure. The shutter speed is also principally responsible for controlling the amount of blur in a picture. If you think about it, it makes sense that the shutter speed controls how much blur is in the picture.
Imagine me sitting here at my computer desk waving to you (you don’t have to imagine very hard if you just look at the picture on the right). If you take a picture of me with a shutter speed of 1/30th of a second, then my hand will have moved in the time that the camera is recording the picture. To get rid of the blur, you need to increase the shutter speed to around 1/320th of a second. At this speed, my hand is still moving, but the camera takes the picture so fast that my hand travels only such a small distance that it is not noticeable in the picture.
The next question that most people ask is, how slow of a shutter speed can you use and still get a sharp picture? My blog post on Minimum Shutter Speeds will answer your question!
ISO
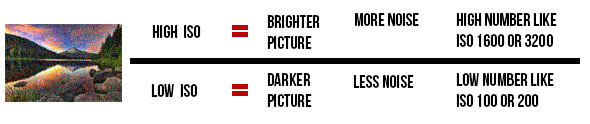
The funny thing about ISO is that it is an acronym, but nobody really knows what it stands for. It is always just called ISO even though it really stands for International Organization for Standardization. Every once in a while, you’ll hear an older photographer pronounce it “I-so”, but almost everyone pronounces it “I.S.O.” The ISO controls the exposure by using software in the camera to make it extra sensitive to light.
A high ISO such as ISO 1,600 will produce a brighter picture than a lower ISO such as ISO 100. The drawback to increasing the ISO is that it makes the picture noisier. Digital noise is apparent when a photo looks grainy. Have you ever taken a picture at night with your cell phone or your pocket camera, and noticed that it looks really grainy? That is because the camera tried to compensate for the dark scene by choosing a high ISO, which causes more grain.
What constitutes a “high” ISO is constantly changing. Camera companies are constantly improving the ability of cameras to use high ISOs without as much grain. A few years ago, only the highest-end pro DSLR cameras could achieve 2,000 ISO, and now even entry-level DSLR cameras can shoot at this level. Since each camera is different, you would do well to do a few tests with your camera to see how high of an ISO you can shoot at without making the image overly grainy.
Right now, you will commonly find new DSLRs that advertise expandable ISO ranges.
Putting It All Together
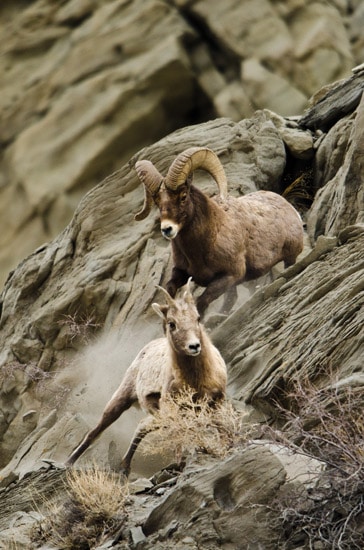
I know exactly what you’re thinking. “Why do I need three tools to control the exposure? Wouldn’t one suffice?” The answer is no, and I’ll explain why with an example. In January, I took a trip to my favorite place on the planet to take pictures–Yellowstone National Park. My guide informed us that the bighorn sheep in the park were dying off very quickly due to whooping cough, so I worked hard that week to capture pictures of the last few sheep in that area of the park.
Around 9AM on a cloudy day, I found a small group of bighorn sheep and started photographing them with a long 600mm lens. The early hour and clouded sky made the situation quite dark for shooting.
Let me help you out. The lens I was working with cost around $12,000, but don’t worry. You can get really good results with a much more affordable 600mm lens. I’m considering selling my expensive lens.
Anyway, it had a maximum aperture size of f/4. So I set my aperture at f/4 to gather as much light as possible. This also impacted the depth-of field to blur out the rocks behind the bighorn sheep. Next, I set my shutter speed. I wanted to capture action in the photo, so I set my camera to 1/1000th of a second shutter speed. I knew that this fast of a shutter speed would prevent any motion blur from the sheep running on the mountain side. Then, I took a picture. WAAAY too dark! I couldn’t compromise my shutter speed or aperture, so I knew I needed to use the third player in the exposure triangle–the ISO.
I played around with my ISO and found that if I increased it to ISO 640, it made the picture bright enough to take the picture without making it overly grainy. This combination of shutter speed, aperture, and ISO worked out perfectly. It feels so good to hone in the camera settings!
Now can you see why you need to know how to shutter, aperture, AND ISO, and know how to set them independently on your camera!
If you’re a visual learner and want to really learn your camera, then be sure to check out my Photography Start Course. Just a reminder, it’s a series of 22 videos where I take you on location to shoot waterfalls, landscapes, people, kids, and macro photos. You can look over my shoulder and see exactly how I set up my camera to take professional photos.

Now, you need to learn how to apply these settings on your camera to take advantage of your new-found nuggets of knowledge.
Your webpage won’t render correctly on my droid – you may want to try and repair that
Looking for the Best Drive School of Motoring? Get expert driving lessons at best driving school for affordable and quality driving instruction.
Looking for the Best Drive School of Motoring? Get expert driving lessons at best driving school for affordable and quality driving instruction.
Looking for the Best Drive School of Motoring? Get expert driving lessons at best driving school for affordable and quality driving instruction.
Looking for the Best Drive School of Motoring? Get expert driving lessons at best driving school for affordable and quality driving instruction.
Looking for the Best Drive School of Motoring? Get expert driving lessons at best driving school for affordable and quality driving instruction.
Looking for the Best Drive School of Motoring? Get expert driving lessons at best driving school for affordable and quality driving instruction.
Looking for the Best Drive School of Motoring? Get expert driving lessons at best driving school for affordable and quality driving instruction.
Looking for the Best Drive School of Motoring? Get expert driving lessons at best driving school for affordable and quality driving instruction.
Looking for the Best Drive School of Motoring? Get expert driving lessons at best driving school for affordable and quality driving instruction.
Looking for the Best Drive School of Motoring? Get expert driving lessons at best driving school for affordable and quality driving instruction.
Thanks for the tips you have discussed here. On top of that, I believe there are many factors which keep your automobile insurance premium decrease. One is, to contemplate buying cars that are within the good listing of car insurance firms. Cars which have been expensive are more at risk of being snatched. Aside from that insurance is also using the value of your truck, so the costlier it is, then the higher this premium you only pay.
Good ? I should certainly pronounce, impressed with your website. I had no trouble navigating through all tabs and related information ended up being truly simple to do to access. I recently found what I hoped for before you know it at all. Reasonably unusual. Is likely to appreciate it for those who add forums or anything, web site theme . a tones way for your client to communicate. Excellent task..
I’m in awe of the author’s capability to make intricate concepts understandable to readers of all backgrounds. This article is a testament to her expertise and dedication to providing valuable insights. Thank you, author, for creating such an captivating and insightful piece. It has been an incredible joy to read!
I have seen many useful things on your web site about desktops. However, I’ve the judgment that netbooks are still more or less not powerful more than enough to be a option if you generally do projects that require lots of power, such as video editing and enhancing. But for world-wide-web surfing, word processing, and a lot other prevalent computer functions they are just fine, provided you do not mind the small screen size. Thanks for sharing your thinking.
One more thing. I believe that there are numerous travel insurance web pages of trustworthy companies that let you enter your holiday details and obtain you the insurance quotes. You can also purchase the international travel insurance policy on-line by using your credit card. Everything you need to do is to enter your own travel details and you can be aware of the plans side-by-side. Only find the system that suits your capacity to pay and needs and use your bank credit card to buy the item. Travel insurance on the web is a good way to check for a trustworthy company for international holiday insurance. Thanks for giving your ideas.
The root of your writing whilst sounding reasonable in the beginning, did not settle well with me personally after some time. Somewhere within the paragraphs you actually managed to make me a believer unfortunately only for a very short while. I however have got a problem with your leaps in assumptions and one might do nicely to fill in those breaks. If you actually can accomplish that, I will definitely end up being impressed.
Thanks for another fantastic article. Where else could anyone get that kind of information in such a perfect way of writing? I’ve a presentation next week, and I’m on the look for such info.
It?s really a nice and helpful piece of information. I am glad that you shared this helpful info with us. Please keep us up to date like this. Thank you for sharing.
I have realized that over the course of developing a relationship with real estate managers, you’ll be able to get them to understand that, in each and every real estate financial transaction, a commission is paid. Ultimately, FSBO sellers do not “save” the payment. Rather, they fight to earn the commission by means of doing a good agent’s work. In the process, they commit their money and time to execute, as best they are able to, the jobs of an representative. Those responsibilities include displaying the home by way of marketing, showing the home to willing buyers, building a sense of buyer emergency in order to make prompt an offer, organizing home inspections, handling qualification assessments with the bank, supervising maintenance, and facilitating the closing.