From the sunset picture example, you have learned the importance of taking full control over the exposure on your camera. Now, it’s time to dig into your camera and learn the three most basic tools available to you in controlling the exposure.
Those tools are shutter speed, aperture, and ISO. After I explain what each one does, I’ll explain why we need three separate tools to control the brightness or darkness of the photo.
Aperture
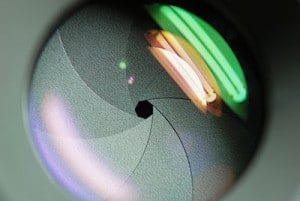
The aperture is a small set of blades in the lens that controls how much light will enter the camera. The blades create a octagonal shape that can be widened (we photogs call it shooting “wide open”), or closed down to a small hole. Obviously, if you shoot with the aperture wide open, then more light is allowed into the camera than if the aperture is closed down to only allow a tiny hole of light to enter the camera.
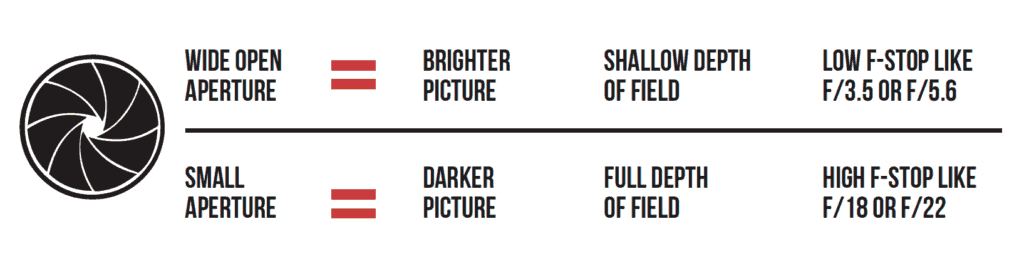
So suppose you take a picture that is too bright. How do you fix it? Simply choose a smaller aperture. Simple! Aperture sizes are measured by f-stops. A high f-stop like f-22 means that the aperture hole is quite small, and a low f-stop like f/3.5 means that the aperture is wide open.
Let’s test your knowledge to make sure you have it down. If you take a picture and it’s too dark at f/5.6, would you choose a lower f-stop number or a higher one? Yep! You’d choose a lower f-stop number, which opens up the aperture to let in more light. The size of the aperture controls more than the brightness or darkness of the picture, though.
The aperture also controls the depth-of-field. Depth-of-field is how much of the picture is sharp, and how much is blurry. If you want to take a picture of a person with a blurry background, you’d use shallow depth of field. If you want to take a picture of a sweeping mountain vista, you’d want to use a small aperture size (high f-stop number) so that the entire scene is in sharp focus. If you, like me, are more of a visual learner, then I think this graphic will help solidify the information about aperture. Take a minute and make sure you understand this info before moving on.
Shutter Speed
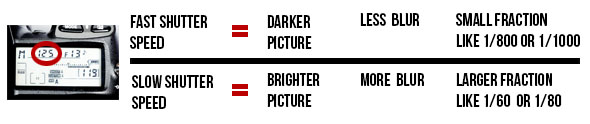
The shutter is a small “curtain” in the camera that quickly rolls over the image sensor (the digital version of film) and allows light to shine onto the imaging sensor for a fraction of a second. The longer the shutter allows light to shine onto the image sensor, the brighter the picture since more light is gathered. A darker picture is produced when the shutter moves very quickly and only allows light to touch the imaging sensor for a tiny fraction of a second. The duration that the shutter allows light onto the image sensor is called the shutter speed, and is measured in fractions of a second. So a shutter speed of 1/2 of a second will allow more light to touch the image sensor and will produce a brighter picture than a shutter speed of 1/200 of a second. So if you’re taking a picture and it is too dark, you could use a slower shutter speed to allow the camera to gather more light.
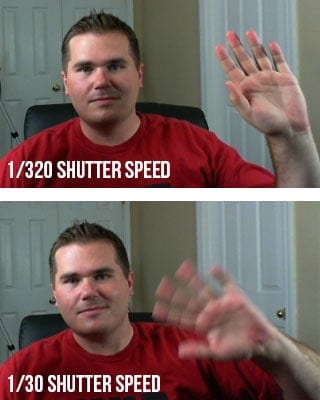
Just as the aperture affects the exposure as well as the depth-of field, the shutter affects more than just the exposure. The shutter speed is also principally responsible for controlling the amount of blur in a picture. If you think about it, it makes sense that the shutter speed controls how much blur is in the picture.
Imagine me sitting here at my computer desk waving to you (you don’t have to imagine very hard if you just look at the picture on the right). If you take a picture of me with a shutter speed of 1/30th of a second, then my hand will have moved in the time that the camera is recording the picture. To get rid of the blur, you need to increase the shutter speed to around 1/320th of a second. At this speed, my hand is still moving, but the camera takes the picture so fast that my hand travels only such a small distance that it is not noticeable in the picture.
The next question that most people ask is, how slow of a shutter speed can you use and still get a sharp picture? My blog post on Minimum Shutter Speeds will answer your question!
ISO
The funny thing about ISO is that it is an acronym, but nobody really knows what it stands for. It is always just called ISO even though it really stands for International Organization for Standardization. Every once in a while, you’ll hear an older photographer pronounce it “I-so”, but almost everyone pronounces it “I.S.O.” The ISO controls the exposure by using software in the camera to make it extra sensitive to light.
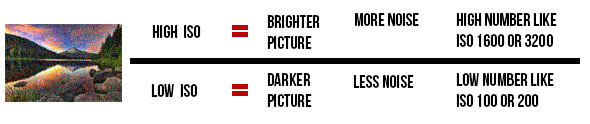
A high ISO such as ISO 1,600 will produce a brighter picture than a lower ISO such as ISO 100. The drawback to increasing the ISO is that it makes the picture noisier. Digital noise is apparent when a photo looks grainy. Have you ever taken a picture at night with your cell phone or your pocket camera, and noticed that it looks really grainy? That is because the camera tried to compensate for the dark scene by choosing a high ISO, which causes more grain.
What constitutes a “high” ISO is constantly changing. Camera companies are constantly improving the ability of cameras to use high ISOs without as much grain. A few years ago, only the highest-end pro DSLR cameras could achieve 2,000 ISO, and now even entry-level DSLR cameras can shoot at this level. Since each camera is different, you would do well to do a few tests with your camera to see how high of an ISO you can shoot at without making the image overly grainy.
Right now, you will commonly find new DSLRs that advertise expandable ISO ranges.
Putting It All Together
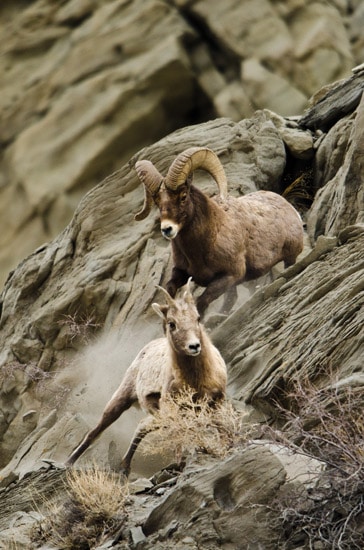
I know exactly what you’re thinking. “Why do I need three tools to control the exposure? Wouldn’t one suffice?” The answer is no, and I’ll explain why with an example. In January, I took a trip to my favorite place on the planet to take pictures–Yellowstone National Park. My guide informed us that the bighorn sheep in the park were dying off very quickly due to whooping cough, so I worked hard that week to capture pictures of the last few sheep in that area of the park.
Around 9AM on a cloudy day, I found a small group of bighorn sheep and started photographing them with a long 600mm lens. The early hour and clouded sky made the situation quite dark for shooting.
Let me help you out. The lens I was working with cost around $12,000, but don’t worry. You can get really good results with a much more affordable 600mm lens. I’m considering selling my expensive lens.
Anyway, it had a maximum aperture size of f/4. So I set my aperture at f/4 to gather as much light as possible. This also impacted the depth-of field to blur out the rocks behind the bighorn sheep. Next, I set my shutter speed. I wanted to capture action in the photo, so I set my camera to 1/1000th of a second shutter speed. I knew that this fast of a shutter speed would prevent any motion blur from the sheep running on the mountain side. Then, I took a picture. WAAAY too dark! I couldn’t compromise my shutter speed or aperture, so I knew I needed to use the third player in the exposure triangle–the ISO.
I played around with my ISO and found that if I increased it to ISO 640, it made the picture bright enough to take the picture without making it overly grainy. This combination of shutter speed, aperture, and ISO worked out perfectly. It feels so good to hone in the camera settings!
Now can you see why you need to know how to shutter, aperture, AND ISO, and know how to set them independently on your camera!
If you’re a visual learner and want to really learn your camera, then be sure to check out my Photography Start Course. Just a reminder, it’s a series of 22 videos where I take you on location to shoot waterfalls, landscapes, people, kids, and macro photos. You can look over my shoulder and see exactly how I set up my camera to take professional photos.

Now, you need to learn how to apply these settings on your camera to take advantage of your new-found nuggets of knowledge.
What i do not understood is in reality how you are no longer actually much more smartly-appreciated than you might be right now. You’re very intelligent. You recognize thus considerably in the case of this topic, made me personally consider it from a lot of varied angles. Its like men and women aren’t involved until it is something to accomplish with Woman gaga! Your individual stuffs outstanding. All the time handle it up!
I can’t express how much I appreciate the effort the author has put into writing this remarkable piece of content. The clarity of the writing, the depth of analysis, and the plethora of information offered are simply astonishing. His zeal for the subject is apparent, and it has definitely made an impact with me. Thank you, author, for providing your insights and enhancing our lives with this extraordinary article!
hi!,I really like your writing so so much! proportion we keep in touch more approximately your article on AOL? I need a specialist in this house to resolve my problem. May be that’s you! Having a look ahead to look you.
Thank you, I’ve recently been hunting for information about this topic for ages and yours is the best I have discovered so far.
What?s Happening i’m new to this, I stumbled upon this I’ve found It absolutely useful and it has aided me out loads. I hope to contribute & help other users like its helped me. Good job.
Hi there, You’ve performed a fantastic job. I will certainly digg it and in my opinion suggest to my friends. I’m confident they’ll be benefited from this site.
Caan I just say what a comfort to discover a
person that really understands what they’re talking about
on the internet. You certainly realize how to bring
an issue to light and make it important. More and
more people have to check this out and understand this side of your
story. I was suyrprised you aren’t more popular given that you definitely
have the gift.
Definitely believe that which you stated. Your favorite reason appeared to be on the web the simplest thing to be aware of. I say to you, I certainly get annoyed while people think about worries that they just do not know about. You managed to hit the nail upon the top as well as defined out the whole thing without having side effect , people can take a signal. Will likely be back to get more. Thanks
I think this is among the most significant information for me. And i am glad reading your article. But wanna remark on some general things, The site style is perfect, the articles is really nice : D. Good job, cheers
A lot of of whatever you claim is supprisingly accurate and that makes me wonder why I had not looked at this in this light before. This article really did turn the light on for me as far as this subject matter goes. However at this time there is one particular factor I am not too comfy with so while I attempt to reconcile that with the central theme of the issue, permit me see exactly what the rest of your readers have to say.Very well done.
Furthermore, i believe that mesothelioma cancer is a rare form of most cancers that is often found in those people previously exposed to asbestos. Cancerous cellular material form from the mesothelium, which is a protective lining which covers a lot of the body’s body organs. These cells ordinarily form in the lining of the lungs, stomach, or the sac that really encircles one’s heart. Thanks for expressing your ideas.
I am not sure where you’re getting your info, but good topic. I needs to spend some time learning more or understanding more. Thanks for magnificent info I was looking for this info for my mission.
This actually answered my downside, thanks!
Thanks for your writing. I would also love to say that a health insurance broker also works best for the benefit of the coordinators of any group insurance cover. The health insurance agent is given an index of benefits desired by anyone or a group coordinator. What a broker does indeed is seek out individuals or maybe coordinators which often best go with those desires. Then he provides his recommendations and if all parties agree, the actual broker formulates a legal contract between the two parties.
I think other website proprietors should take this website as an model, very clean and magnificent user genial style and design, as well as the content. You are an expert in this topic!
Heya i am for the first time here. I came across this board and I find It really useful & it helped me out much. I hope to give something back and help others like you aided me.
I believe one of your advertisements caused my browser to resize, you might want to put that on your blacklist.
What finally worked was this fat burner my cravings disappeared. My jeans fit again.
What helped me was Renew I felt better overall. Highly recommend.
What makes this wealth program money started showing up from unexpected places. So simple, even a skeptic like me can do it.