
Anyone who has read Improve Photography for a while knows that I'm not a real estate photographer, but this week I had the chance to do a real estate photography shoot and I learned a lot of tips and tricks that I hope to share.
My parents are selling their home, and I couldn't bear to let the real estate agent take the photos of the home I grew up in. I am firmly convinced that real estate agents intentionally make houses look terrible in MLS listings. Terrible, and terribly small.
When I purchased a home a year ago, I wasted a tremendous amount of time looking at homes that I would have known weren't a fit for me if the photos had done a better job of showing the layout of the home. Also, the home we eventually bought wasn't even on our short list of homes we saw online because the photos made it look very small.
I set out to accomplish three things in this shoot: (1) I wanted the home to look large. It is a large 5 bedroom home, but the layout is not open. (2) I wanted to capture photos that were unique from what most real estate photos look like so as to grab attention of potential buyers, and (3) I wanted the home to look bright and clean. This home has many large windows, so I wanted to show off the lighting in the home.
If you need to figure out your own real estate photography pricing, I actually sell a real estate photography pricing template for just $15 in my Real Estate Photographer's Starter Pack. In the bundle, you also get a legal contract to use between you and the real estate agent, and 10 Lightroom presets for real estate photography to make your photos look polished and professional right from the get-go. Check out the Real Estate Photographer Starter Pack here.
The following are some of the photos I took in the shoot and a step-by-step guide of how I made the photos. I don't claim that any of them are perfect–after all this was the very first time I shot real estate–but hopefully it will provide you with helpful pointers if you are asked to do real estate photos at some point.
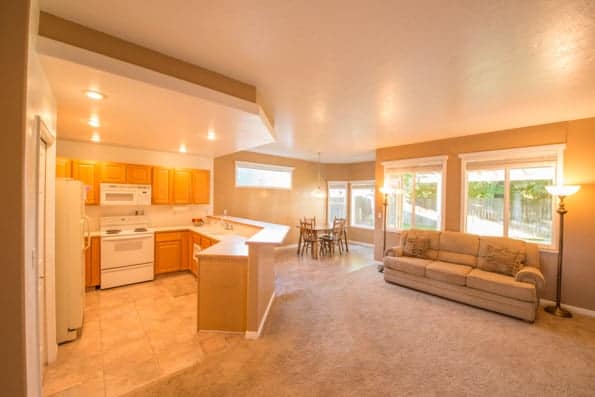
Photo of the Main Living Area
The living room photo is probably the most important photo in a real estate listing. This is where people spend most of their time in the home, so they want to see that it is open, attractive, and functional.
I walked around the room for a few minutes looking through the viewfinder until I found the best angle for making the room look as large as possible.
TIP: I found that placing an area of carpet closest to the camera (instead of furniture, a wall, etc) made the room look extremely large because the super wide angle lens distorts distances to make things closest to the camera look larger than they appear in real life.
To avoid distortion from the wide angle lens, I avoided putting the intersection of the vertical walls and the ceiling anywhere near the edge of the frame. On wide angle lenses, the areas nearest the edges of the frame distort far more than the center of the frame.
Last, the lighting. I opened all of the windows to let in bright clean light. Since the light bulbs in the room were warm incandescent lights, it produced ugly competing color temperatures in the areas further away from the windows. To fix this problem, I used a YN-560 flash pointed at the ceiling that matched the daylight from the windows. This illuminated the darker areas of the room and made the room lights look like small warm accent lights while still leaving the room with a neutral daylight color temperature.
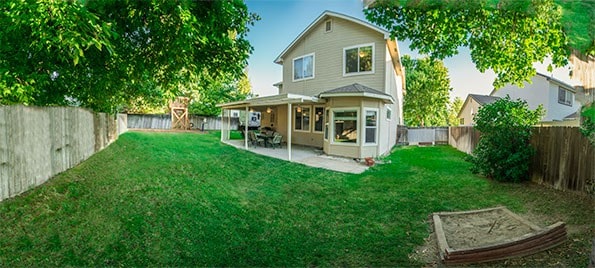
Photo of the Yard
To make this photo, I used the typical real estate photography recipe: Smash yourself up into the corner so as to take advantage of every inch of the space, set your lens to the widest possible focal length, and fire the shutter.
The area in this photo was a bit too wide even for the real estate recipe, so I shot three photos in vertical orientation overlapping them by about 30% and later stitched them together in Photoshop. The wider the lens you shoot, the more overlap you need to overcome the distortion.
The sky was quite overexposed in the original photo, so I used the HSL tool in Lightroom to bring down the luminance of only the blue colors in the photo. This brought down the exposure of the sky to bring out more color and more closely match the exposure of the rest of the scene.

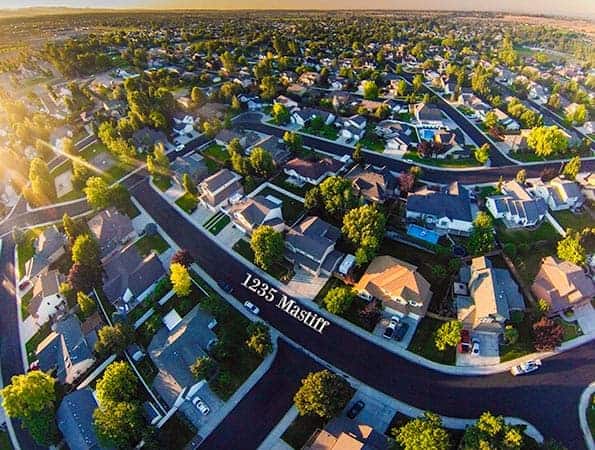
Photos of the Neighborhood
One of the main selling points of this home is that it is in an established neighborhood with large mature trees, a park, and wide streets.
I chose to capture this selling point in a photo using the DJI Phantom, an RC helicopter that is strong enough to lift a GoPro Hero 3 camera. In the United States, the FAA prohibits the use of RC helicopters for commercial purposes, but this shoot was not a paid shoot. I only use the helicopter for aerial photography when doing non-commercial projects.
I shot this photo early in the morning so that it would benefit from the sunrise lighting. I set the GoPro to time lapse mode so that it would take a photo every two seconds. Then, I simply flew around at different heights and distances from the house until I got the shot I wanted.
The GoPro has a lot of distortion, so I usually try to point the camera up so the horizon is in the middle of the photo. This is terrible for composition, but it minimizes distortion. I reduced the distortion in this photo using Photoshop, but I didn't completely straighten the horizon because I actually like the “small world” look in this shot.
Last, I put text on the photo to show which house was the one in the listing.
Conclusion
Shooting real estate or architectural photography is a real skill. I learned quite a few tips, but I'd like to do a few more shoots before I could call myself proficient in this area of photography. I don't have any interest in pursuing it as part of my business, but it was a fun challenge.
To see the MLS listing with more photos from this shoot, check it out here.
Gear I Used for this Real Estate Shoot
 Nikon D800 – Honestly, any DSLR or camera with manual exposure controls would capture photos of excellent quality for a real estate listing, but I'm most comfortable with this camera so that is what I used. View my camera recommendations here.
 Nikon 14-24mm f/2.8 Lens – This lens is extremely wide on a full frame sensor, but it definitely distorts the edges of the frame. Still, it did well and the resulting photos were acceptable. View my lens recommendations here.
 DJI Phantom – I used this RC helicopter to capture the aerial photos of the home. The DJI Phantom has GPS in it, so if it loses contact with the controller or goes out of range, it goes to the initial GPS location where it took off and then lands itself. It's an amazing innovation in aerial photography. Read my review of the DJI Phantom.
 GoPro Hero 3 Camera – This camera was used for photos from the aerial rig. The GoPro Hero 3 is very lightweight and good for mounting in small locations to get some footage. It had a lot of bugs in the camera when it was first released, but a recent firmware update made it much more stable.
 Induro AT-313 Tripod – This is an extremely sturdy tripod that has extra long legs for achieving a high perspective in some of the photos. Induro Tripods are incredibly sturdy and very fairly priced. View my tripod recommendations here.
 Vanguard SBH-300 Ballhead – This ballhead costs about $99 and is strong and durable. This one has lasted me many years and still does the job. View my ballhead recommendations here.
 YN560 II Flash – This is my favorite flash. It only costs $60, is simple to use, and in my opinion is just as good as the expensive Canon or Nikon brand flashes. There is a new version of this flash available now (YN560III) that has a built in radio receiver. View my inexpensive flash gear list here.
I have to agree with the few that these real estate photos. When I look at the very first photo I thought to myself he is showing what not to do. Exterior washed out too much floor not a lot of detail….ho exterior washed out too much floor not a lot of detail….Horrible!
I sell and shoot high end real estate. I would not have the clients I do if I was to produce shots such as these.
You really should not be advising people who would like to get into real estate photography as these shots show…
Sorry, not trying to hurt feelings just trying to state facts…
When it comes to something that you love, I find it that it doesn’t matter how good you are at it, but rather that your heart is there. Expecially if it comes to photography, because it can very on style so much. You can truly show somebody how you see something and show them your point of view.
Nice tips. I’m surprised that no one on here has mentioned the absolute best pieces of gear for to have is the Canon 17mm PC-E lens with a full frame camera (Either a Canon full frame or a Sony Alpha full frame (with canon to sony lens converter)). Now I’m not a gear junkie or a Canon fan, I am actually a Nikon enthusiast if I had to choose a side…But the Canon 6d with Canon 17mm PC-E lens is perfect for real estate photography. And to put the icing on the cake when used with the Canon 600EX-RT and the ST-E3 command unit. This Flash gives you the ability to wireless trigger your camera from the flash. This great for being able to hold your flash wherever you want and get your shutter to release on the flash itself.
This would be the dream equipment, and almost darn right necessary for pro real estate pics.
-Canon 17mm PC-E for perspective control (Minimal less lens distortion)
-Canon 6D or greater to take full advantage of the 17mm wide lens
-Canon 600EX-RT and the ST-E3 for wireless Shutter release built into the flash unit.
My 2 cents
Nice blog! the content which is mention in this blog is really understandable and informative. I really like this blog and thanks for sharing.
Any idea on what settings I have to enter (megapixels sizes, etc) in lightroom in order to export the photo for the Real Estate MLS Listing requirements? Thanks!
Professional photo is must and the only tool to make customer interested in first round befor he picks phone and calls Nice Article Thanks For share.
Good information! If I could add one more item to your checklist, I would suggest a tilt shift wide angle lens that allows for perspective controls.
Real estate aerial photography and videography will be best for exterior shots. Use a steady cam rig to create beautiful smooth interior videos. You might even consider the Go Pro Karma, a solution for aerial photography and stable ground video. There are a ton of solutions out there so make sure you research what you want to do and how versatile your equipment will be. Your equipment is only a tool but make sure your creativity shines!
Real estate aerial videography and ground videography are going to the standard in real estate production and marketing. You and your equipment will need to keep up with the ever growing technology.
If photos of all areas of the house are captured properly, then these make everything clear to buyer and he can see the whole house with the help of pictures.
That is a good guide. To make really great photos that will attract a lot of tenants is much more harder then it seems. If order to manage it you need to have special equipment. This article https://rentberry.com/blog/real-estate-photography-tips decides what equipment is necessary. And one more point, before you take any photos, make sure the property is staged and clutter-free. That way, potential renters will be able to envision themselves living there.
I shoot a lot of real estate photography and even though this post seems like it’s probably a little old here’s a few notes I would mention. (here’s what I’ve shot ( http://www.kahunadrewphotography.com )
1.)The front exterior photo is the most important shot! – Almost every MLS will require that the first photo of the listing be a straight on exterior photo. So that’s were you’ll allocate most of your time and for exteriors a good rule of thumb is:
East facing – Morning
West facing – Afternoons (usually 2pm -ish)
North facing – pretty much anytime from late am to early afternoon is perfect.
South facing – Either early am or late in the day.
2.) Never use a fish eye or ultra wide lens – just use a 10-20 or maybe 10-24 range and ALWAYS fix it in post edit!
3.) For drone use – take the time and get your drone positioned for the best shot – shoot in raw and jpeg. I’ve had to learn this constantly and I’m getting better at it everyday.
4.) Have a style of your own but create your own templates that can accommodate different looks that the agents may want.
Andrew, do they make anything rectilinear (non-fisheye) that is wider than 10mm? You say never to use an ultra-wide angle lens, but then specifically list UWA lens focal lengths. Totally contradicting yourself in point 2.
THANK YOU! Great info! I am trying to do a little more real estate photography! Loved this article!