
Anyone who has read Improve Photography for a while knows that I'm not a real estate photographer, but this week I had the chance to do a real estate photography shoot and I learned a lot of tips and tricks that I hope to share.
My parents are selling their home, and I couldn't bear to let the real estate agent take the photos of the home I grew up in. I am firmly convinced that real estate agents intentionally make houses look terrible in MLS listings. Terrible, and terribly small.
When I purchased a home a year ago, I wasted a tremendous amount of time looking at homes that I would have known weren't a fit for me if the photos had done a better job of showing the layout of the home. Also, the home we eventually bought wasn't even on our short list of homes we saw online because the photos made it look very small.
I set out to accomplish three things in this shoot: (1) I wanted the home to look large. It is a large 5 bedroom home, but the layout is not open. (2) I wanted to capture photos that were unique from what most real estate photos look like so as to grab attention of potential buyers, and (3) I wanted the home to look bright and clean. This home has many large windows, so I wanted to show off the lighting in the home.
If you need to figure out your own real estate photography pricing, I actually sell a real estate photography pricing template for just $15 in my Real Estate Photographer's Starter Pack. In the bundle, you also get a legal contract to use between you and the real estate agent, and 10 Lightroom presets for real estate photography to make your photos look polished and professional right from the get-go. Check out the Real Estate Photographer Starter Pack here.
The following are some of the photos I took in the shoot and a step-by-step guide of how I made the photos. I don't claim that any of them are perfect–after all this was the very first time I shot real estate–but hopefully it will provide you with helpful pointers if you are asked to do real estate photos at some point.
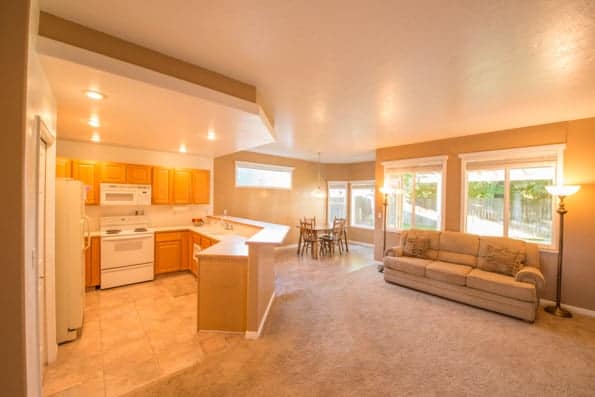
Photo of the Main Living Area
The living room photo is probably the most important photo in a real estate listing. This is where people spend most of their time in the home, so they want to see that it is open, attractive, and functional.
I walked around the room for a few minutes looking through the viewfinder until I found the best angle for making the room look as large as possible.
TIP: I found that placing an area of carpet closest to the camera (instead of furniture, a wall, etc) made the room look extremely large because the super wide angle lens distorts distances to make things closest to the camera look larger than they appear in real life.
To avoid distortion from the wide angle lens, I avoided putting the intersection of the vertical walls and the ceiling anywhere near the edge of the frame. On wide angle lenses, the areas nearest the edges of the frame distort far more than the center of the frame.
Last, the lighting. I opened all of the windows to let in bright clean light. Since the light bulbs in the room were warm incandescent lights, it produced ugly competing color temperatures in the areas further away from the windows. To fix this problem, I used a YN-560 flash pointed at the ceiling that matched the daylight from the windows. This illuminated the darker areas of the room and made the room lights look like small warm accent lights while still leaving the room with a neutral daylight color temperature.
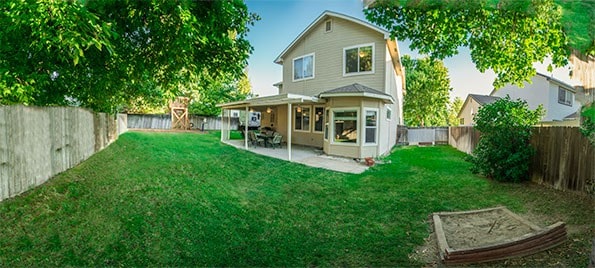
Photo of the Yard
To make this photo, I used the typical real estate photography recipe: Smash yourself up into the corner so as to take advantage of every inch of the space, set your lens to the widest possible focal length, and fire the shutter.
The area in this photo was a bit too wide even for the real estate recipe, so I shot three photos in vertical orientation overlapping them by about 30% and later stitched them together in Photoshop. The wider the lens you shoot, the more overlap you need to overcome the distortion.
The sky was quite overexposed in the original photo, so I used the HSL tool in Lightroom to bring down the luminance of only the blue colors in the photo. This brought down the exposure of the sky to bring out more color and more closely match the exposure of the rest of the scene.

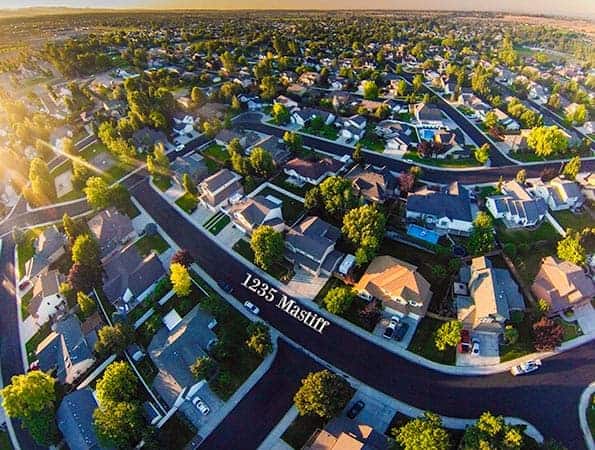
Photos of the Neighborhood
One of the main selling points of this home is that it is in an established neighborhood with large mature trees, a park, and wide streets.
I chose to capture this selling point in a photo using the DJI Phantom, an RC helicopter that is strong enough to lift a GoPro Hero 3 camera. In the United States, the FAA prohibits the use of RC helicopters for commercial purposes, but this shoot was not a paid shoot. I only use the helicopter for aerial photography when doing non-commercial projects.
I shot this photo early in the morning so that it would benefit from the sunrise lighting. I set the GoPro to time lapse mode so that it would take a photo every two seconds. Then, I simply flew around at different heights and distances from the house until I got the shot I wanted.
The GoPro has a lot of distortion, so I usually try to point the camera up so the horizon is in the middle of the photo. This is terrible for composition, but it minimizes distortion. I reduced the distortion in this photo using Photoshop, but I didn't completely straighten the horizon because I actually like the “small world” look in this shot.
Last, I put text on the photo to show which house was the one in the listing.
Conclusion
Shooting real estate or architectural photography is a real skill. I learned quite a few tips, but I'd like to do a few more shoots before I could call myself proficient in this area of photography. I don't have any interest in pursuing it as part of my business, but it was a fun challenge.
To see the MLS listing with more photos from this shoot, check it out here.
Gear I Used for this Real Estate Shoot
 Nikon D800 – Honestly, any DSLR or camera with manual exposure controls would capture photos of excellent quality for a real estate listing, but I'm most comfortable with this camera so that is what I used. View my camera recommendations here.
 Nikon 14-24mm f/2.8 Lens – This lens is extremely wide on a full frame sensor, but it definitely distorts the edges of the frame. Still, it did well and the resulting photos were acceptable. View my lens recommendations here.
 DJI Phantom – I used this RC helicopter to capture the aerial photos of the home. The DJI Phantom has GPS in it, so if it loses contact with the controller or goes out of range, it goes to the initial GPS location where it took off and then lands itself. It's an amazing innovation in aerial photography. Read my review of the DJI Phantom.
 GoPro Hero 3 Camera – This camera was used for photos from the aerial rig. The GoPro Hero 3 is very lightweight and good for mounting in small locations to get some footage. It had a lot of bugs in the camera when it was first released, but a recent firmware update made it much more stable.
 Induro AT-313 Tripod – This is an extremely sturdy tripod that has extra long legs for achieving a high perspective in some of the photos. Induro Tripods are incredibly sturdy and very fairly priced. View my tripod recommendations here.
 Vanguard SBH-300 Ballhead – This ballhead costs about $99 and is strong and durable. This one has lasted me many years and still does the job. View my ballhead recommendations here.
 YN560 II Flash – This is my favorite flash. It only costs $60, is simple to use, and in my opinion is just as good as the expensive Canon or Nikon brand flashes. There is a new version of this flash available now (YN560III) that has a built in radio receiver. View my inexpensive flash gear list here.
It’s funny how many realtors and such have such poor poor photos in their listings and websites. Something so simple as good lightning can make a big difference but a lot of people end up shooting without some of the factors needed to real spruce up a photo.
Im no expert but I appreciate all the suggestions in the comments here and hopefully will be able to put them into practice the next time I shoot some real estate photos.
Good photos sell! But with real estate properties, one has to be as realistic as possible so buyers aren’t turned off during the actual visit.
Thank you for these tips. Just came in time for a rush photo requirement of a real estate seller. Any tips on taking real estate shots taken from a mobile phone camera?
Thank you for the photo pointers. We use video extensively and a lot of the same principles apply with real full motion, natural capture sound productions.
Very cool. Your blog is great. Thank you for sharing your knowledge!
Looking to become a real estate photographer. Have any pointers to start out with and how much to charge?
Thanks
I just read your tips and they’re great! They were just what I have been looking for! My only question is: Since your comments are a few years old by now, would you still recommend the same equipment? I am going to be buying a camera set-up in order to take real estate photos for our business and I wondered if there’s a “latest and greatest” set-up that I should be getting. Thanks so much!
These tips are really awesome. I am a real estate agent and I couldn’t agree with you more that real estate photography is essential to effectively sell the properties in my free property listings. More real estate property sellers would definitely want to list a property for free with my company if they are confident that I can sell their properties fast using the art of photography.
Great Article!!!
Really great technical tips! But it is just as important for a real estate photographer to work on his business skills as well.
Great tips here. What seems simple needs attention to detail. I like the site and will be back to check on more tips.
OMG!!! It hurt me to look at these. I’ve been a RE photographer for over 4 yrs now (sports and event photographer for longer) and my agents would stop blowing up my phone if I sent them images like these. White balance off, poor composition, horrible distortion. RE photography IS a skill in it’s own. Making the room look larger is not what it’s about. Making it look accurate so as not to trick the buyer into something they aren’t expecting IS what it’s about. Correct color balance very important!! Knowledge of angles that will make a room look more accurate and less distorted is very important.
RE photography tips:
1. Don’t stand in a corner and shoot to the other corner. Try shooting from quarter marks across to opposite quarter mark.
2. Line up your shots with something. You don’t want to make a room look cut off so try to compose accordingly.
3. Living room are important yes but biggies are also kitchen, master bedroom, master bath.
4. Good camera, wide angle, flash and a monopod (tripod for twilight shots) are all you need. Oh and don’t forget rechargable batteries for flash and plenty extra batteries for your camera.
5. HDR exteriors but avoid halos around your houses and that nasty shadow look around things.
6. Shoot about a foot above counter tops (not too low, not too high). Goal is not to shoot high in interiors but you do want to get higher on exteriors (except creative shots of course).
7. post production is important. You want to bring down highlights and lighten up shadows but you don’t want the image to be dark. Add some contrast. Sharpen your images and then size to fit HAR.
They have nice camera’s now days that takes a lot of the work out of it. I personally use a Canon 7D mark II with 10-22mm wide angle lens. The 7d has a level (very important to have a level to cut down on distortion), it has a box that you can move around to adjust your lighting. I use it to adjust for window lighting and then use my flash to take care of the inside. Another external flash works wonders for adjoining rooms that are dark. In camera HDR (FABULOUS).
There’s a lot more to it of course but some general tips I can think of at the moment. RE photography isn’t something you can just jump into and make agents happy. Practice with it first. You don’t want to ruin your name before you’ve had a chance to get started good!
Great tips, but where i live it IS important to make the interiors look bigger. I guess some things are depending on local preferences.
About the ‘RE photography isn’t something you can just jump into and make agents happy’ thing: there is a giant leap between high level RE photography and the mobile-phone-quick-shoot the majority of RE agents often use. This ‘grey area’ CAN easily be filled in by any serious photographer. Although paying attention to general advice like above remains important.
What i mean to say is, i think the stuff like what Jim created is allways better then what you’d get from an agents mobile.
It is amazing how photograph can be changed from simple tools. It keeps the original quality but increase the beauty.All I can say is the power of real estate photo retouching or photo editing.
I would advise against using such a wide focal length for exteriors. Yes it shows the whole yard, but the distortion in that shot is horrendous. You lose any sense of appropriate scale or angles and everything looks like it’s falling over. Worse still when shooting with wide angle, objects in the distance recede quickly and become small, so you’ve made the house look significantly smaller than it is. On top of that, when the buyer visits the home, that yard will not look anything like that in person. If they were inexperienced with these kinds of lenses, they may have been fooled into thinking the yard was massive, and then when they get there they will feel deceived. All of the above negative aspects are your payment for receiving a little bit more yard in the shot. Not worth it!
You are better off showing the property with more appropriate scale by using a lens closer to standard focal length (even if it means you have to crop out part of the yard) or even a telephoto lens if you have the space for it. The house will look large or at least it’s actual size, it will look balanced and stable, and the property will actually look familiar to anyone who visits it. You’ll gain all of these things at the expense of cropping out part of the yard. It’s a no-brainer if you ask me.
Bottom line: Don’t sacrifice accuracy for peripheral vision.
Source: 12 years as a full-time professional architectural photographer
great info for all RE agents . Profesional photo is must and the only tool to make customer interested in first round befor he picks phone and calls
THANK YOU for writing this. I am neither a real estate agent, nor am I a photographer. But I can say, as a millennial buyer, the #1 reason a house ends up on our “reject” list, is that the photos were HORRIBLE online. Too dark, pictures of mostly furniture instead of the actual room, blurry, too small, people or things in them that are distracting, too few photos of the home/yard/neighborhood. I wish more agents would read this. I have house fever so bad right now, but don’t like 90% of what I’m seeing. Agents could really benefit from some basic photography tips and skills. This is a fast way to get someone in the door for a tour.
I would also add to what you’ve written: make sure you post pictures of the whole room. If you can’t get it in one shot, then take photos from different points in the room. Nothing frustrates a buyer than having to guess what the house layout is (is that a door? I can’t tell, maybe it’s an archway…) Please, take pictures of all important rooms: living room, kitchen, bathrooms, laundry rooms. Bedrooms are ok (to show the closet style and an approximation of the size), but knowing if the laundry room is nothing more than a closet is important to buyers. Agents should take the time to make sure they pick the best shots of each room. Blurry shots only make the buyer think that the agents are in a rush to sell the home (maybe something’s wrong with it, they must be trying to offload it quickly…)
I’ve been thinking about getting into real estate home photography, Thank You all for your information & comments. I’m not sure on how to approach the agent or a real estate office about doing this. I have loved photography for years friends have told me I take great photos & I should get into the business. If anyone could send me some more pointers and some idea on how to price myself that would be Great. Thank You.
George
I am a Real Estate agent in a small mountain town and we don’t have professional Real Estate photographers. Photography also happens to be one of my interests, although I am still very much a beginner. I really appreciated this article as I am always trying to improve my skills. One quick question that I can’t seem to find an answer to re: YN560III…what setting do you use? I have 2 external YN560III speedlites but I’m not sure what setting to use. I found a YouTube video that suggested M, 1/8, 50MM. Any suggestion would be greatly appreciated.
Not going to lie… you aren’t very good at shooting real estate and you shouldn’t be advising people.
I am a long time Realtor with over 30 years experience, and I can say taking photos of a home can be challenging. Getting a seller to clear clutter, remove furniture, pictures off walls, and tiding up the yard, all within a day or two is unlikely and typical. Also getting the weather to cooperate, and having the home empty of people and pets, I could go on and on. It’s true there are some bad photos out there and there are some homeowners who don’t want too pay for the cost of pro photos.
I work for my ex-wife here in Brisbane, an area where everybody uses pro photographers. I use my trusty Canon 60d and Canon 10 -22 . I shoot in raw and use lightroom to eliminate the wide angle distortions and color and light corrections. I always aim to show size and use my eye for attractive shots. The biggest complaint from buyers is that some properties are so photoshopped that they do not look like the same property on inspection. A buyer will not buy a property that they are disappointed in. Also we produce an 8 to 10 page brochure on each property so the usual 6 to 12 photo’s on a pro shoot will not work for us. I usually shoot 60 -70 photos on a average size property. Does this take time, sure. Does processing take time sure. But we are able to offer free photography to our clients without taking a financial hit which is an incentive to getting the listing. Everything is staying ahead of the competition so my Phantom 3 Standard arrives on Wednesday. I need to get overhead shots of our properties as most of the pro’s in the area are using them. So as long as I don’t shoot the Phantom into the bay and learn how to improve my interior lighting technique I might still be ahead of the game. Will keep you updated!