
Using flash is very frightening for a lot of photographers. Many have learned to use on-camera flash and bounce it off the ceiling and walls. Others have taken it a step farther and learned how to use off-camera flash. This is really when you're free. You’re free to work in basically any situation (midday sun, strange colored lighting, dark rooms), and you’re free to create different looks that just aren’t possible with natural light or bounce flash. Today I'm going to run through my process of Using Off-Camera Flash to Save Photos and Be Creative.
Equipment
One of the main reasons people avoid using flash and especially off-camera flash is because it requires purchasing more pieces of equipment and can be expensive. There are tons of options out there for what is needed, so you can go with one of the main brands or you can find cheaper versions. There are also options for the amount of equipment. Some will want the most basic setup while others will want several flashes and all of the gadgets. Here are some general guidelines for what you’ll need and the costs, but feel free to research and look for other options.
Flashes
To do off-camera flash, you’ll need at least one flash, of course, but the more flashes you have, the more you can do, and it’s always nice to have a backup. In general, I would recommend 2 flashes, but there are plenty of situations where you might need up to 4.
The big decision will really be what flash to buy. The great news is that the flash world has exploded with options, but that does make things confusing. If you want to make it simple, buy the flashes from your brand (Nikon, Canon, Sony). This is the most expensive option, but the flashes are made for your equipment, so things should work smoothly. This route’s going to cost you roughly $300-$600 per flash. If you go with an off-brand, it’s roughly $60-$200 per flash. There are also more powerful non-speedlight strobes out there, but those can’t be used on-camera and those can range from $200-$1000.
I can’t really get into the details of what to buy because that would be an article all by itself. I personally use the Flashpoint brand (also sold as Godox): Zoom Li-on, eVOLVE 200, and XPLOR 600. You might also read these articles if you need help deciding:
Best Speedlight Flash Options for Fuji Cameras
Other Equipment
Technically, one flash is all you might need, but realistically, you’re going to need several other things to make things work. First, you’ll want something to hold your flash. You’ll need a light stand of some form and a stand adapter to attach the flash to the light stand. Second, you might need some kind of trigger system. Some flashes have the receiver built-in and the camera can trigger them. Even in those cases, I’d still recommend buying and using another system. Most of the built-in systems work based on line of sight, so if your flash is far away or hidden it won’t work. Instead, look for a radio-based system. This allows you to be further away, hide flashes, and have better overall reliability. I’ve used Radiopopper, Pocketwizard, and now the Flashpoint R2 with great success. Last, you’ll want some modifiers. This could be softboxes, grids, barn doors, gels, or a variety of things. I’m a big fan of the MagMod system and the Wescott Rapid Box Octa.
Setting up your flashes and triggers will vary depending on what you buy, so I really can only give you a general explanation of how to get them to work. The general idea is that there’s a transmitter on the camera and a receiver on the flash. The transmitter sends a signal to the receiver which then tells the flash what to do. The most common issues with this not working would be a loose connection, having a flash on the wrong channel, or low batteries. If none of these is the issue, you might try turning everything off and then back on again.
Using Off-Camera Flash to Save Photos and Be Creative
There are plenty of different situations where you can use off-camera flash, but I'm going to share the most common situations for me and the ones I think are the most useful.
Using Flash to Overpower the Sun
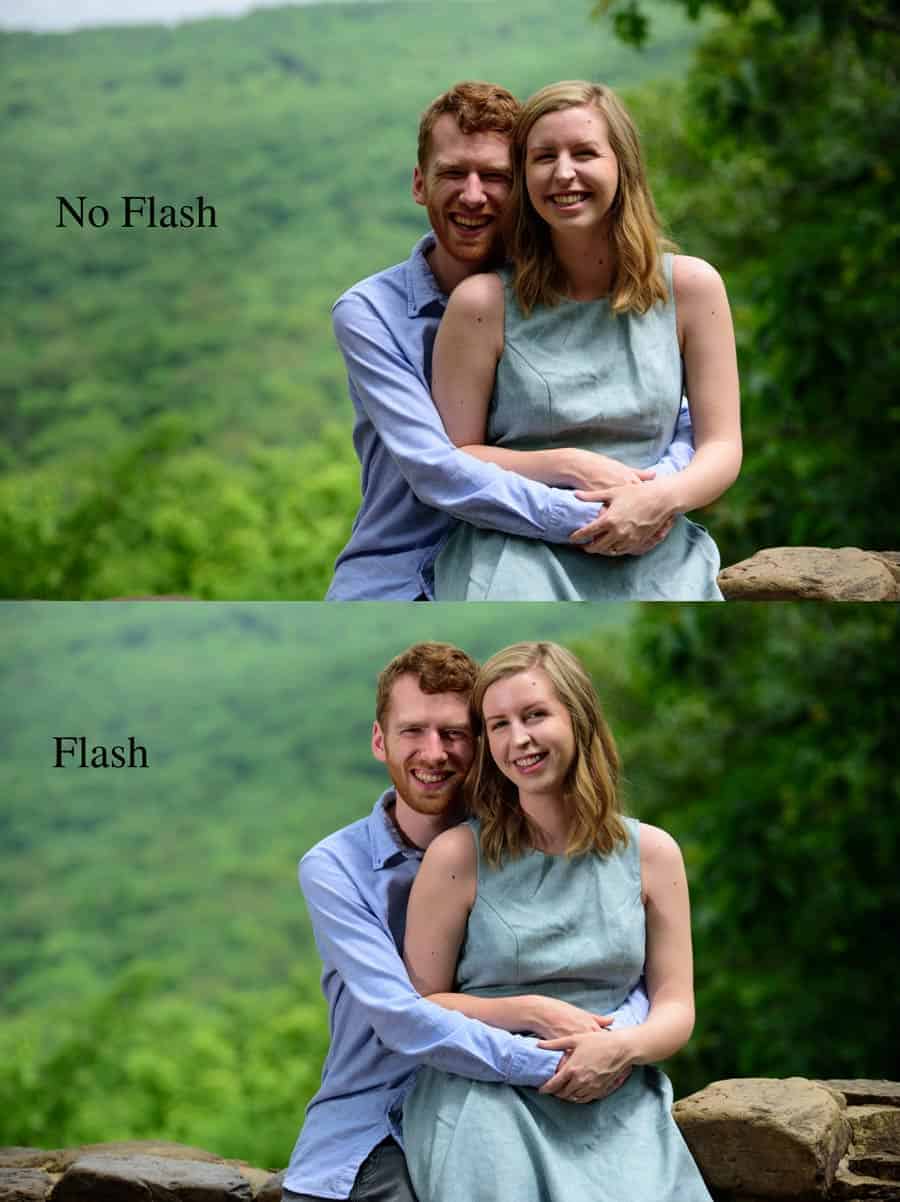
I remember when I first started taking portraits. I could only work at certain times of the day, and I was always looking for shade because I was afraid of working in the sun. A while ago I was doing video at a wedding and the photographer was doing the same thing. She was very restricted on where they could do photos because it was a very bright day. Once you start learning off-camera flash, you can conquer your fear of the sun.
When working outside, many photographers will put the sun at the back of the subject. This is a good way to avoid squinting and harsh shadows, but in most cases, the background is blown out. To fix this, you need to match the exposure of the background with the exposure on the subjects, and we can do this with flash.
There are two things that can make this difficult. First, direct flash can look harsh and leave strong highlights on the skin. To fix this, I usually use an umbrella or a softbox to diffuse the light and make it softer. The other issue is the amount of power required to match the sun. Most flashes can do it, but you’ll need to have the flash close to the subject and at a higher power.
Once you’ve got everything positioned, you want to start by setting the exposure for the background. Leave the flash off and keep adjusting things until the background looks exactly how you want it. If your flashes can’t do High Speed Sync, you’ll need to keep your shutter speed around 1/200th or lower and just change your ISO and aperture. Next, turn on the flash to light the subject. You can try using TTL, but I often find myself going to manual mode because I have more control and don't have to worry about the flash power changing from shot to shot.
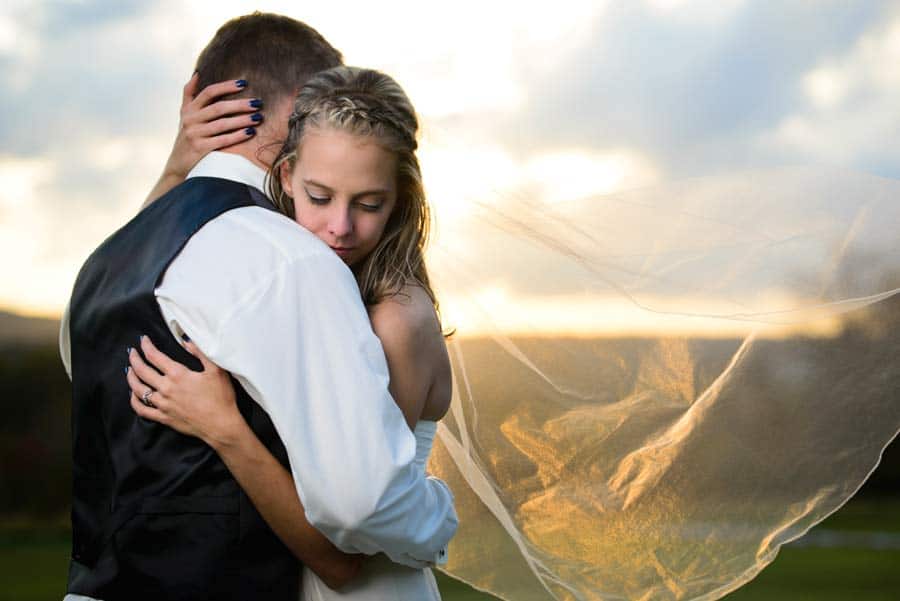
For this photo, I wanted to capture the sun setting and the light hitting the vail. Without flash, the vail wouldn’t have any detail and there wouldn’t be any color in the sky. I used the Flashpoint XPLOR 600 and a Westcott Rapid Octa camera left about 45 degrees. On a side note, make sure you secure your light stand with sandbags or something heavy because it will get blown over. I was lucky to have a groomsman there to hold it for me.
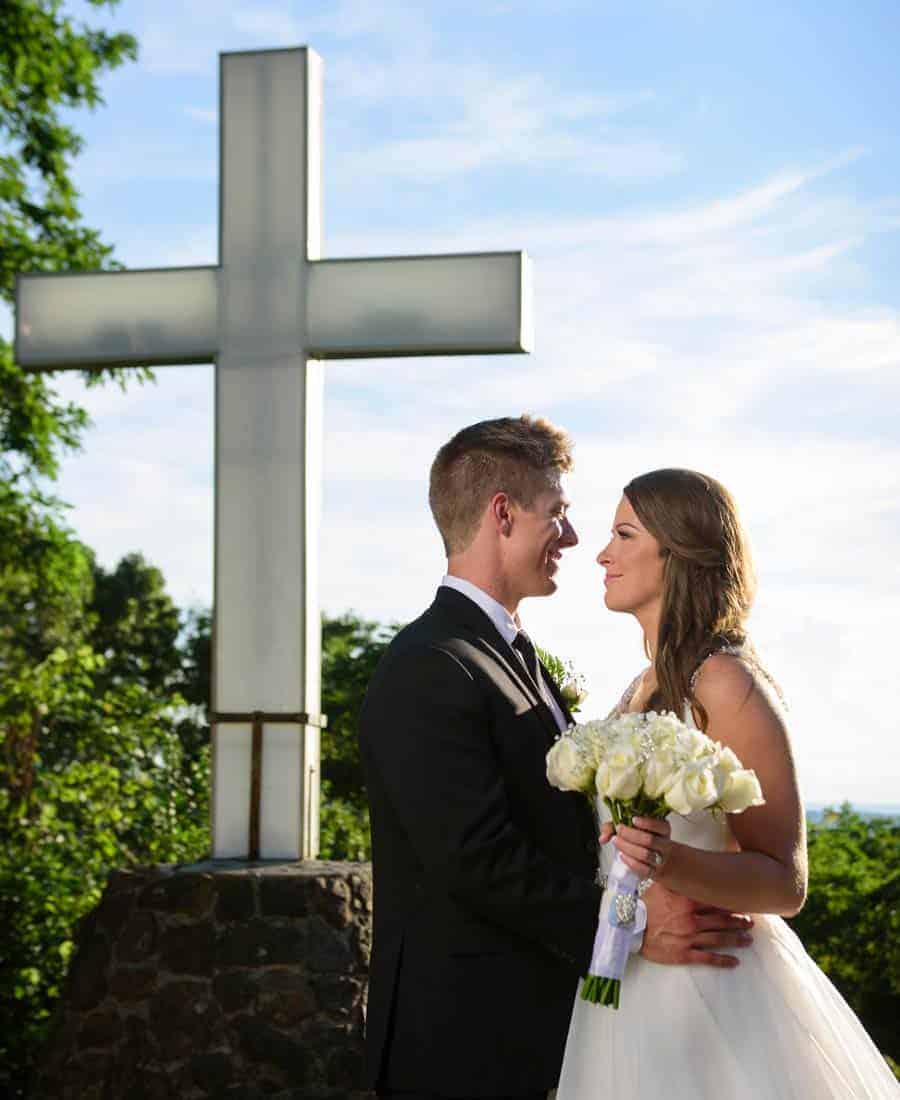
Sometimes you can’t put the sun behind your subject. Maybe you really want to use a background and it’s just not facing the right direction. This might mean you’re getting weird shadows or light hitting the subject at a weird angle. In these situations, you can use flash to either fill in the shadows or overpower the light to make things look evenly lit.
I actually had this situation a few days ago. We were at a park and there was a spot that overlooked a valley and a bunch of trees. The problem is the sun was coming from above and to the side, which created shadows around the eyes and lit part of their faces. This was the only place with that view, so we couldn’t really move. I could have somewhat fixed the photos in post, but I knew I could fix it with flash.
The process is pretty much the same as the previous. I worked on getting the background and the highlight on the face right before I did anything with the flash. Once that exposure was set, I added the flash and adjusted the power.
In this case I knew we’d be walking a lot, so I didn’t want to bring a giant flash and softbox, and I didn’t want to have to worry about my flash getting flipped by the wind and falling off a cliff. I used the Flashpoint eVOLVE 200 because it’s powerful and much lighter than the XPLOR 600.
Bad Lighting Situations
As I mentioned earlier, there are times when bounce flash doesn’t work. There are plenty of wedding venues I’ve worked at that either had high ceilings or dark ceilings and walls. You can use the built-in bounce card or some devices like the MagBounce, but I tend to use two flashes to light a large area instead.
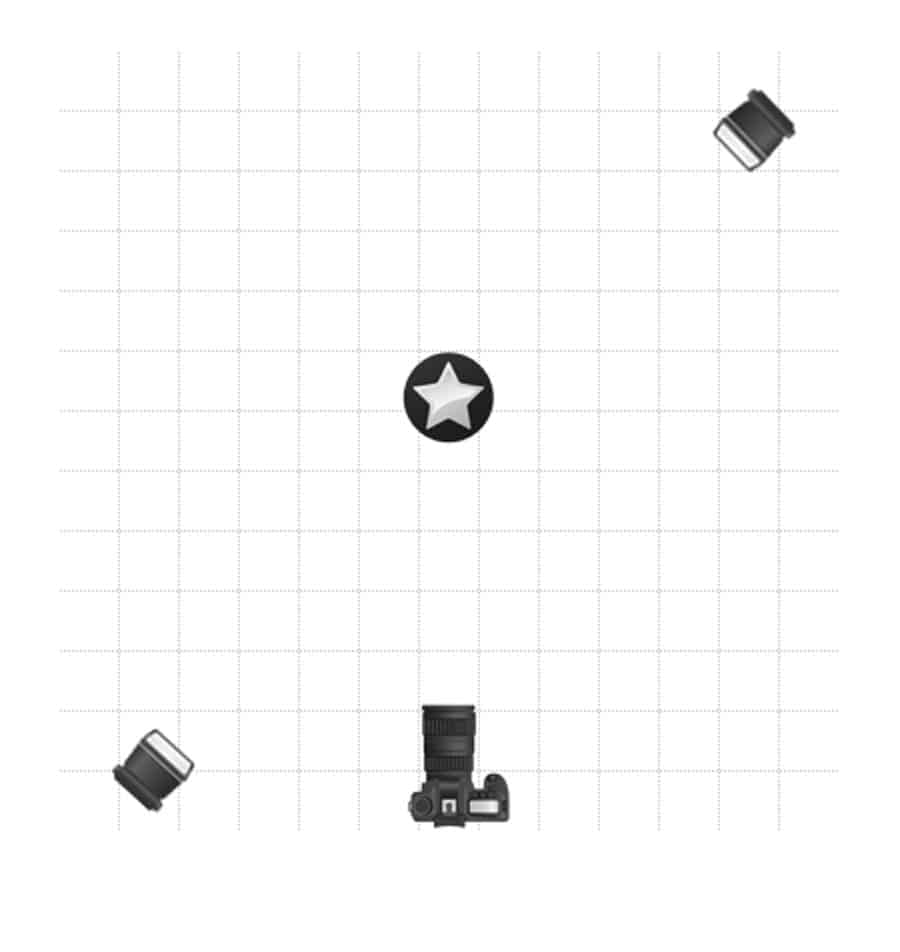
This lighting setup is pretty easy. Basically, you have two flashes opposite each other, high and aimed downward. With this setup, one of the lights will be your main light, and the opposite light will be a kicker light. The nice thing about this setup is you can move around and still have one light on the front and the other is on the back. The only place you don’t really want to be is right beside a light because then it would be shooting straight at the subject.

There are a few variations to this setup depending on the look and situation. If you are wanting something darker and moodier, like a spotlight, you can put grids on the flashes or narrow the beam with barn doors. This keeps the background dark and will put the emphasis on the subject. I use this for first dances. If you’re finding, though, that there are shadows on people, you might add some fill light. I add an on-camera flash and will use a bounce card. It’s not a ton of light, but it can open up shadows. I find myself doing this a lot when the dance floor is full. When there’s a lot of people, you’re more likely to have shadows going all over the place.

Off-Camera Flash for Creative Photos
Besides dealing with bad lighting situations, I really love using off-camera flash creatively. There is so much you can do, and the majority of this isn’t possible with natural light or on-camera flash. These are just a few of the options.
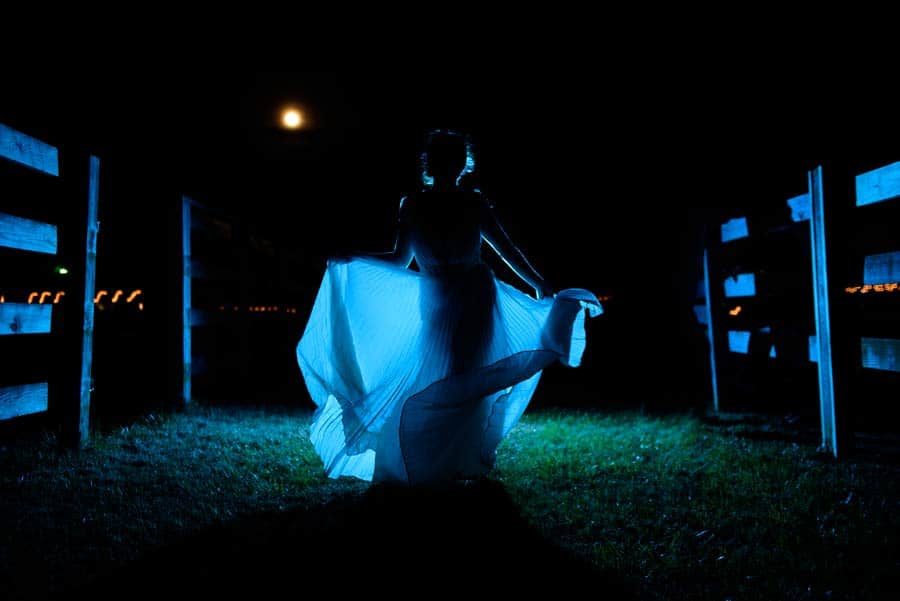
Silhouette
I’ve always found silhouette’s interesting, but it’s not always possible with natural light. To create a silhouette you need a strong backlight and usually a clear background so the subjects don’t blend into everything. With flash, I can create one whenever and wherever I want because I’m creating and controlling the light.
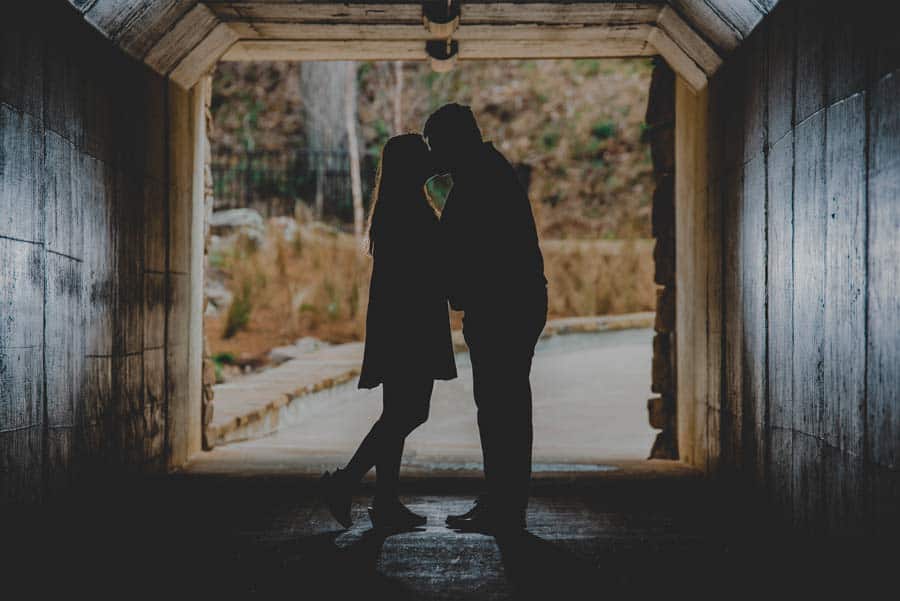
The concept is simple. You put the light behind the subject to create a strong backlight so the front of the subject is underexposed. There are two ways to position the flash. The first way is to aim the flash at the back of the subjects. This works well, but you’ll need to make sure the flash is hidden or you’ll get lens flare. You also want to make sure there’s nothing in front of them or the flash will bounce off of it and light the front of them. The second way is to aim the flash away from them and bounce it back. This reduces the chances of flare and also creates a neat gradient on the background.

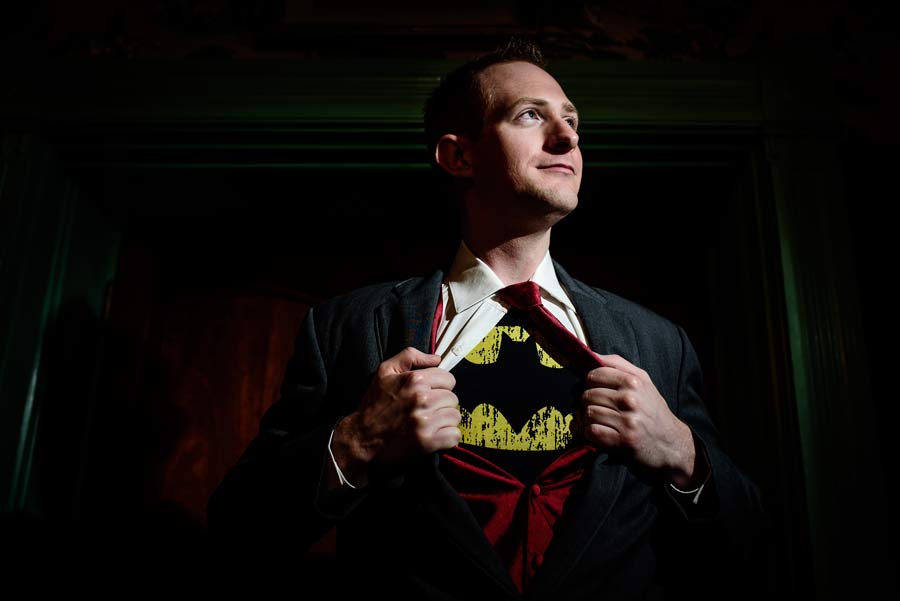
Spotlight/Low key
One of the issues I have with bounce flash is that it lights everything. This does create some good looking photos, but it doesn’t really create drama. Dramatic photos have dark areas and light areas. There has to be shadows. Off-camera flash allows you to put the light exactly where you want it and control the shadows.
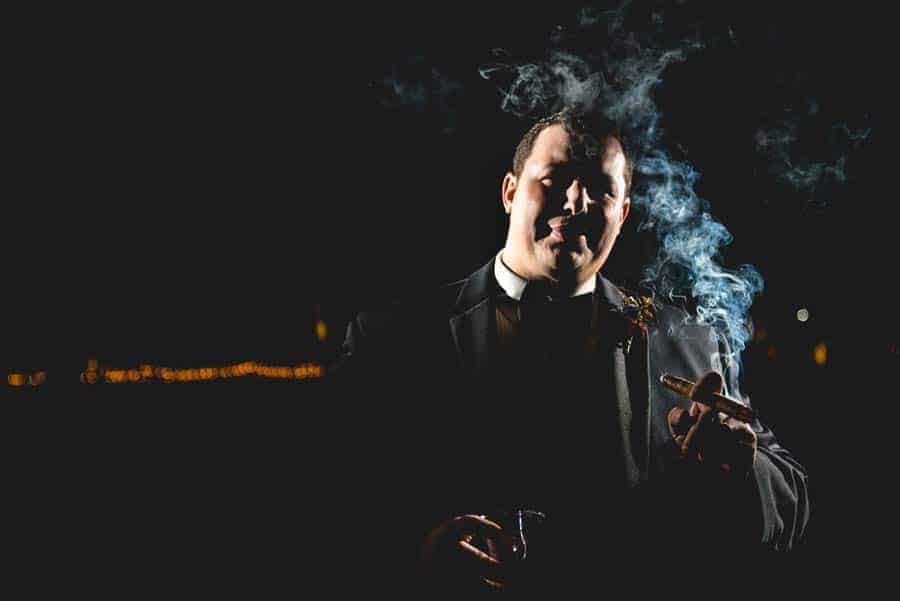
Just like I do for my first dances, for portraits I use grids or barn doors to keep the light from spreading and going everywhere. This will create shadows and also lead the viewer to the main focus, the subject.
You can create so many different looks with just one gridded flash. The easiest thing to do is to move the flash around. You can be at 45 degrees for standard portrait, above and aimed down, or to the side to create split lighting.
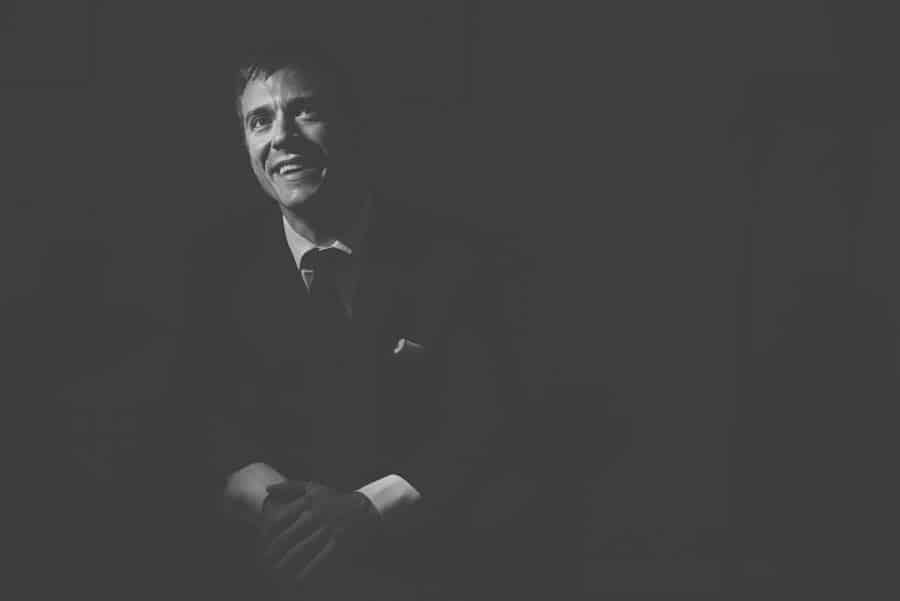
Another great benefit of this setup is you can use this to remove distractions. Often I find myself in really messy rooms while people get ready for a wedding. In this shot, we were in a small house with about 20 guys, and there were clothes and cans everywhere. I took the groom over to a couch and set my exposure where the room was dark. Then, I just added in the light so he was the only thing showing.
Lighting a Background
I’m amazed at how a room can be transformed. I’ve seen planners take boring rooms and completely transform them. A lot of the time this has to do with the lighting. There might be lights on the floor shooting onto the walls or a light in the ceiling that displays a design on the floor. I’m usually not as creative as the planners, but I have used flashes to light backgrounds.

One of the big things I do is create portraits at night. It’s how I try to separate myself from the majority of the wedding photographers in my area. The problem is that many of the times the backgrounds are all dark. I’ve been able to fix this by adding another flash and aiming it at the background.
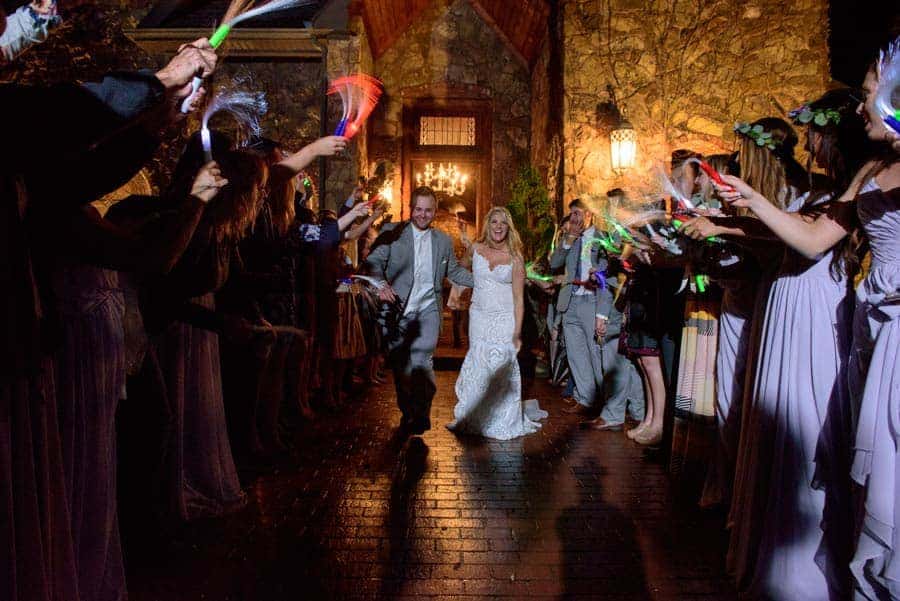
There are a few different ways you can do this. The simplest way is to do it all in camera, in one shot. That means you might have a flash aimed at the subject and then a flash or two aimed at the background. I did this recently with a sparkler exit. I had a flash backlighting the people and another filling in the couple. The problem was that the rest of the venue was dark. I put a third flash off to the side to light the venue as well.

If you only have one flash, you can still pull this off. I first saw this technique from Ryan Brenizer several years ago. The way it works is you go into the shot knowing you are going to put several photos together in post. Put the camera on a tripod so every shot is framed the same. Then, you take the flash and light the subject. Once your happy with that shot, you move the flash to the background. Take a photo and light that spot. If you need to light something else, move the flash again. The more complex the background, the more times you might move the flash.
Add Color with a Gel
So far we’ve talked about a lot of different ways you can use off-camera flash. If you really want to get interesting, you can add a gel to your flash to change the color of the light. MagMod has an awesome system where you just put the gel into a holder and then it snaps on like all the other MagMod gear. You can also always just buy sheets of colored gels. They’re like thin pieces of paper and you just attach them to the front of the flash.
As far as when to use gels, you really can use them in all the setups we’ve already discussed. I’ve used them to light the front of someone, create a silhouette, and to add color to a background. When I use a gel, I always make sure to do a few shots without the gel as well, just in case the subject doesn’t like the funky color. So far, though, everyone has loved them.
Conclusion
Off-camera Flash can be scary and overwhelming at first, but like anything new, it will get easier with time and is well worth the effort. My suggestion is to start off small. Get used to setting up the flash and getting it to work first. That’s probably the scariest thing. From there, start practicing the setups. Start with one setup and keep practicing until you can do it without any effort. Then, move to another setup and perfect that one. After a while, you’ll have an arsenal of setups to use, and you’ll love using flash and you’ll be able to create amazing photos in any situation.
Great article.
Thank you! I hope it was helpful
Thank you for article! It is really interesting. Photos with flash are nice. Especially if you have good focus.
Thanks! I agree, you need to control the light from the flash, not just let it go everywhere.
Thank you for this article. verry usefull
Through this function you will know that how it get easy to know that how you can find the password in the windows if you are set and this is the newly function will be added so you have to must seen this all the new function.