
You’re looking forward to going to a workshop and coming back with lots more photography knowledge and some killer images. Doing a few, pretty simple things before you leave can dramatically increase your enjoyment during the workshop, and the amount of knowledge, skills and great photos you’ll come back with.
There’s no shortage of choices for photo workshops, from conferences to location workshops to walkabouts. These can last from a couple of hours to a week or more. The Create Photography Retreat, for example, includes classes, demonstrations, photo shoots with models and at cool locations, along with great networking opportunities with a terrific group of people. Improve Photography Plus members get first dibs on occasional photo meetups at great locations and several of the podcast hosts offer portrait, landscape and other types of workshops. I’m also a fan of the location workshops offered by Rocky Mountain School of Photography and Photographers’ Breakthrough, but open the back pages of any photo magazine and you’ll find a lot of options.
Jennie Harless has some good tips on choosing the conference that’s right for you. Whatever you decide, you’re devoting your precious time and hard-earned money to participate. Why not take a little time before you leave home to make sure you get the most out of your experience?
As I write, I’m preparing for the Create Photography Retreat in Charleston, SC, in March 2018. In coming months, I’ll be going on workshops in Arches and Canyonlands and in Yellowstone and the Grand Tetons with Slonina Photography Tours. I’ve gone on at least one location workshop every year since 2010 and, along the way, have picked up some tips that have helped me make the very best use of my time in these fantastic places and with expert instructors.
1) Check Your Gear
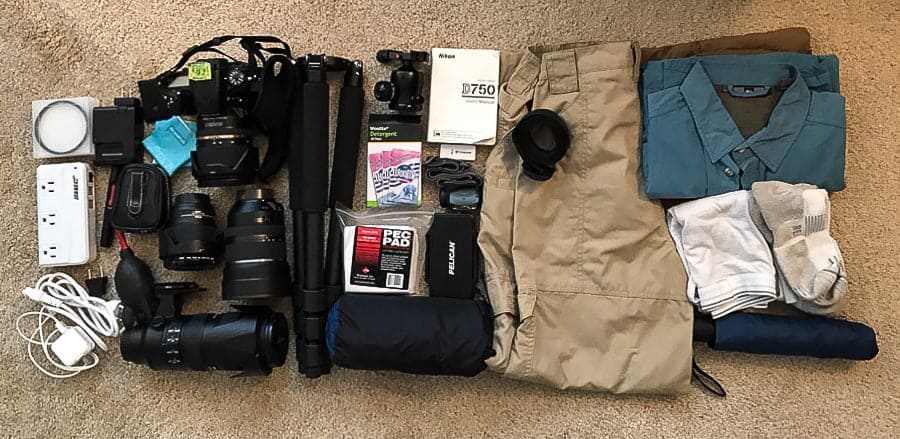
Take out everything you’re planning to bring with you to your conference or workshop: gear, clothes, etc. Check each item to make sure it’s in perfect working order. Is it clean? Are the batteries charged? (You do have a packing list, right? If your instructor hasn’t sent one, and even if he has, make your own packing list. Don’t want to forget your belt, a medication, or a key piece of equipment, do you?)
I’ll carefully inspect and clean, if necessary, each filter and lens I’m bringing. I’ll check my camera’s sensor for dust, cleaning it if necessary (see Brent Bergherm’s tutorial on gear cleaning on Improve Photography Plus). I’ll set up my tripod and ball head and make sure they’re operating smoothly and check the charge on my camera batteries. Run into a tripod problem? See my article on repairing tripods. Do you have the right Allen wrench to tighten your tripod or head? Don’t forget to check batteries for your speed lights and a flashlight or headlamp!
Make sure your clothes and, especially, shoes, fit comfortably. I have some quick dry clothes I only use for hiking and on trips, so they can sit in the closet for a while during which time I might expand or contract, depending on the season. You don’t want to be breaking in a new pair of hiking boots or get out in the wilderness and find that your shoes or pants are uncomfortably tight or your zipper is broken. You don’t want anything interfering with your photography experience!
Pack your gear into your backpack, messenger bag, or however else you transport it. I’ll wear my camera backpack around at home for a while to make sure it’s balanced, comfortable and in working order.
The last thing you want is to arrive at a once-in-a-lifetime location and find something doesn’t work. The second-to-the-last thing you want is to have a backpack that’s 20 pounds heavier than it needs to be. Do you really need to take every piece of photographic equipment you own? What do you really need and what will you really use?
I have a Nikon 200-500 mm f5.6 lens that’s almost a foot long and weighs nearly 5 pounds. Do I need it in Arches National Park, where there isn’t much wildlife? I think not. But in Yellowstone, with its abundant wildlife? Absolutely!
2) Read your camera manual
Yes, I know. Nobody reads manuals. Do it anyway. Reread if it’s been a while. And don’t forget to bring it with you to the workshop.
Sometimes you’ll find something in there that sounds really intriguing but that you don’t quite understand. You can ask the workshop leader about it. Often, an instructor will introduce a new technique you’ve never heard of and you’ll need the manual to find out how to do that with your model of camera. That’s how I learned about back button focus. Now I can’t imagine how I managed without it!
3) Do some homework
Learn a bit about the place and the planned activities.
If you’re going to a workshop on portraits and lighting, read up on the topic. Experiment a little, even if you’ve never shot a portrait before. Look at some examples, perhaps in a local art museum. Or go online and look at the work of portrait photographers you admire. Check out your instructor’s portfolio. That way you’ll go in with some understanding of what you’ll hear and see, along with a set of questions about what you don’t yet grasp. Maybe you’ll want to ask the instructor how she lit a particular shot on her website, or how Richard Avedon or Dorothea Lange got a specific look.
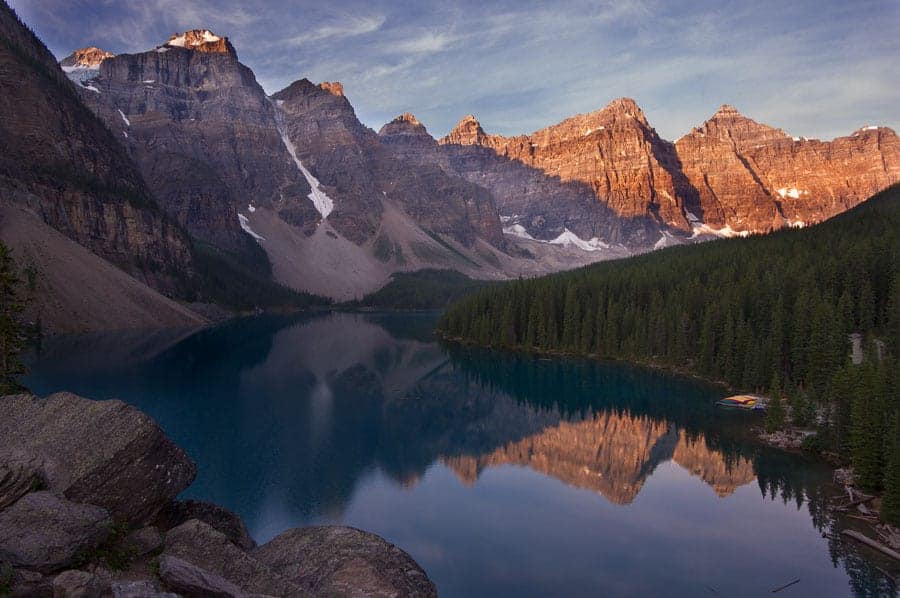
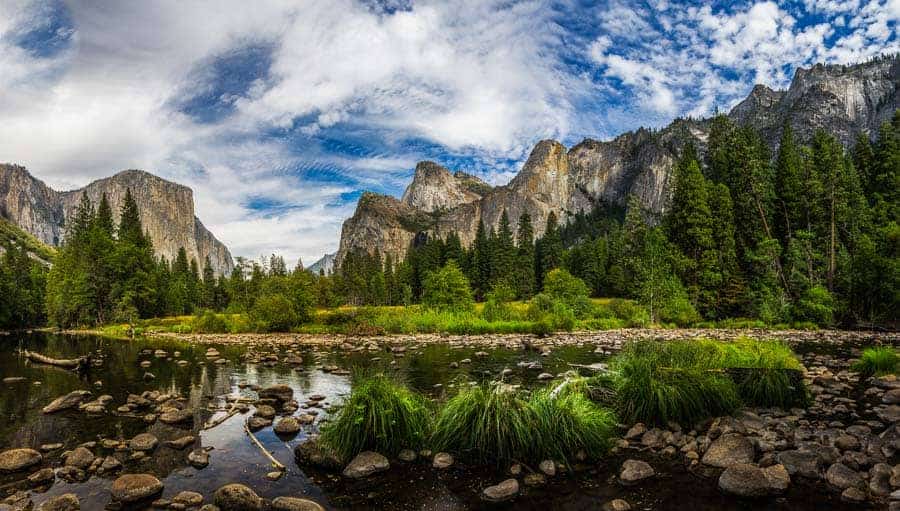
On the other hand, if you’re going to a location workshop in Yosemite, do an image search on Google, Flickr, or 500px. Take a look at what other photographers have shot. This will give you an idea of what kinds of photographic opportunities you might have. If you’ve never been to a place like Yosemite before, it’s really easy to be overwhelmed by the grandeur of the valley. So much so that it’s hard to start finding compositions. Knowing what to expect can help you get into image-making mode faster. You’ll still be awed by the location—it’s famous for a reason! But you’ll be better able to take advantage of your short time there.
You’ll also get some insight on what conditions might be like. If you’re going to Yellowstone in the winter (or even the early spring) you’re likely to encounter snow. How will you handle exposure? What in the world will you meter when your composition is a dark, shaggy buffalo in a field of pristine white snow? What will your settings need to be? If you’re going to the Oregon Coast, how will you expose for sunlight on wet sand? Or the sand dunes in Death Valley? Think these things through before you get there, or ask the instructor before you’re on location. That way you won’t waste time floundering around with exposure compensation and miss that critical moment.
What’s the typical weather during the month of your workshop? Will you need layers? Rain gear? Sunscreen? Bug spray? A hat? (Many years ago, I learned that my hair was thinning when I spent a Spring day in Joshua Tree National Park without a hat. My scalp was peeling from sunburn for weeks afterward!)
Finally, knowing something about what you’ll encounter once you are there can help you decide what gear you really need, so you won’t be lugging around a five pound telephoto that never gets used.
4) Know what you want
Why did you sign up for a conference or a location workshop? If you don’t know what you want, how will you know if your trip was successful and worth the money?
At the beginning of several location workshops, I’ve heard instructors ask each attendee what they want to get out of the workshop. Many answers are pretty vague. “I want to get better at landscapes,” for example.
If I don’t know what I want to learn, how is an instructor going to help me? They may assume I know what I’m doing when we’re out shooting, while I may be making major mistakes. If they know what I need, they can give me tips and check my work in the field, where I can make adjustments and get that magic image for my portfolio.
Before a Photographers Breakthrough workshop a couple of years ago, I had to send the instructors a selection of my images that I liked and some images by others that I really liked. From that, the instructors recorded a short video laying out what they saw as my strengths and weaknesses and they gave me (and each other attendee) a task. Mine was “meaningful foregrounds.” Others had assignments like “find the hero” (what’s the central element of this photo) or “light my fire” (using light and shadow effectively). Throughout the workshop, I had to look for foreground elements that (a) led the eye into the frame in a pleasing way, (b) were appropriately sized (how close my camera was to the element and how that affected relative size) and (c) added context and interest to the photo. I learned soooo much!
At the Create Photography Retreat, I’ll be taking Connor Hibbs’ post-conference workshop on lighting for portraiture. He sent attendees a document about controlling light. Reading it gives me some ideas that I want to work on and understand better.
Each of these examples really got me thinking about what I most wanted to get out of a workshop. Now I’ll know before I go. Maybe you’ll want to learn how to use Manual mode on your camera, or want to learn how to use your telephoto lens to isolate subjects and compress distance. You might want to practice some focus stacking, or work on leading lines. You could want to get better at depth of field and finding the right focus point, or to use color more effectively and understand complementary colors and how to use them. Perhaps you want to use Rembrandt lighting in portraits, or to learn how to pose women in portraits.
What do you want to learn?
5) Plan a practice shoot
If you’re an occasional photographer whose gear may sit in a closet for weeks at a time, it’s going to take you a while to get comfortable shooting again. Do you really want to waste the first few hours or even the first day of your workshop getting reacquainted with your gear?
That happened to me a couple of times. I’d get to a great location and spend the first day of the trip fumbling with my camera and having a hard time getting into the flow. Then I got smarter and started to plan to go out shooting the weekend or even the day before leaving home. I’d get familiar with my gear again. My eye would get used to seeking out compositions. I’d feel more at home and at ease taking photos. (And I’d get a chance to test out everything!)
It’s like getting on a bicycle again, after you haven’t ridden in years. Those first rides are going to be wobbly and you’ll be overly concerned with keeping your balance and alignment. You won’t be fluid in your mechanics or able to enjoy the ride and the feeling of the wind in your hair (something this balding writer has lacked for a few years).
So, go out to that nearby park or waterfall. Set up your lights and do a self-portrait (or impose on a spouse or friend) or a product shoot. You’ll be glad you did!
Bonus Tip: Get plenty of rest NOW!
Sleep a little extra or work in a nap or two in the days before your conference or workshop. If possible, plan your travel to the conference to avoid crack-of-dawn departures or red eye flights. Consider arriving a day early, especially if there is a major time zone difference. You want to be rested and relaxed when the conference starts. Once it begins, you'll probably be out before sunrise and well after sunset. Sometimes there'll be significant travel time involved getting to that sunrise site or back from that sunset vista. If you start a workshop exhausted, you're going to have a hard time keeping up. If you start well rested, then the adrenaline from shooting will help keep you going as the days go on.
Now you’re ready to pack up and head out. You’ll arrive at your workshop prepared and at ease. I’ll bet you come back with more knowledge and better photos than you ever expected!
What do you do to prepare for a workshop or conference? What are your top tips?
Now, excuse me please. I have to go take a nap!
I appreciate your suggestion to do some homework before the photography tour. I’m a budding photographer, and I’d really like to go on a tour to improve my skills and get some practice in. I want to be successful, so maybe I can try some out before I go to warm up.
Photography is one of the best work to do if you loves it then you should loves to read the article and visit our homepage to play the checkers board game it is the multiplayer board game playing by people all over the world.