

If you're like most people, you always have your smart phone ready to go at a moment's notice. If you're like me, you probably also have at least one DSLR, mirrorless or other dedicated “serious” camera system that you can access whenever the time comes. However, there are times when it just makes more sense to utilize the camera system built into your mobile device and if you want to be able to leverage every drop of quality out of said device then this article is for you.
The purpose of this article is to outline several options for iOS camera replacements that can help you to get the most out of the iSight camera built into the iPhone. Yes, there are multiple Android based devices that can handle RAW imaging. Delving into every option available in that arena would be a herculean task, so I've decided to run with iOS for now.
Full disclosure: I am an avid iPhone user and have been for nearly a decade.
Capabilities
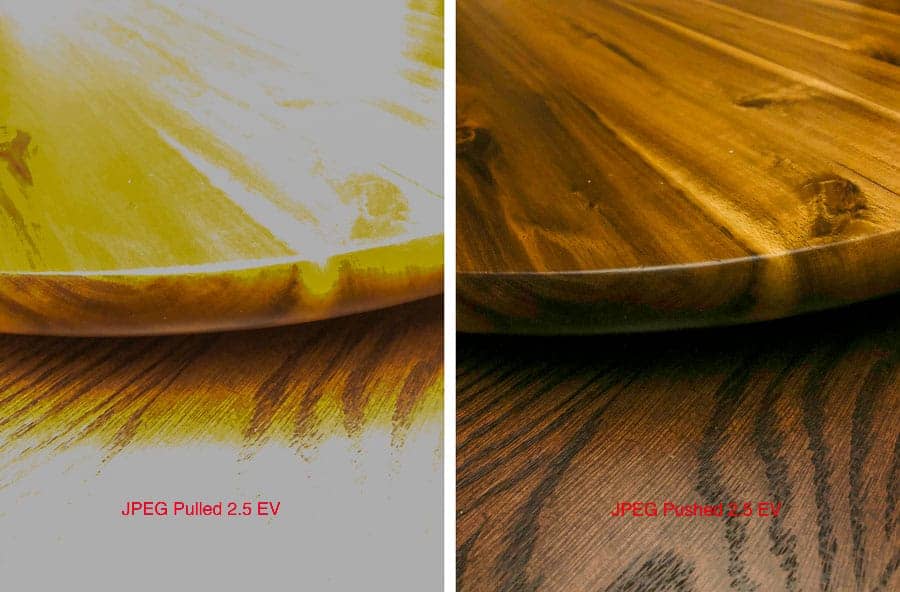
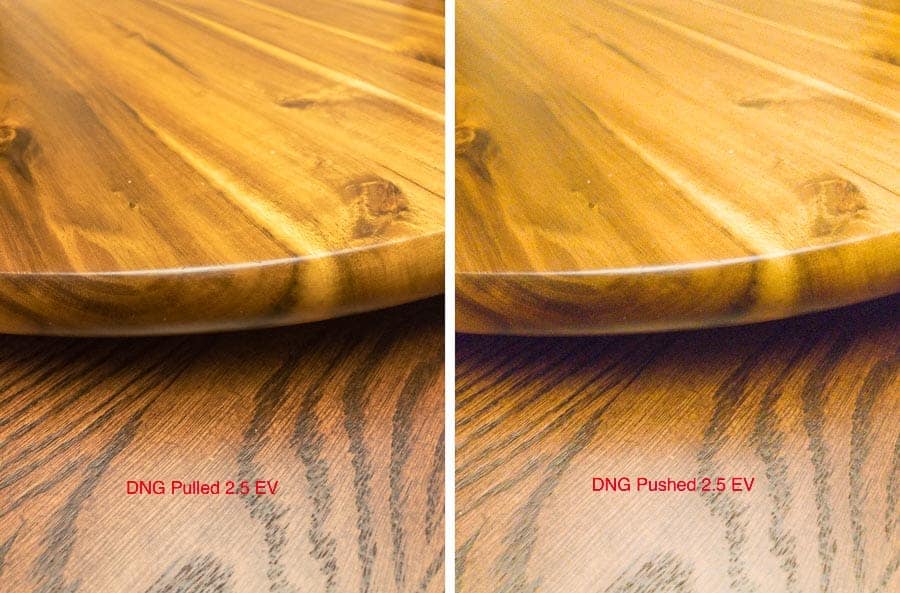
RAW: The main capability of each application reviewed here is the ability to capture images in RAW format. The RAW format that is utilized by the iPhone is the Adobe DNG file. The DNG file offers a tremendous advantage over highly compressed JPEG files and even over the new HEIF format.
Apple opened up the ability to leverage the DNG file format with the release of iOS 10 on certain devices in September of 2016. It is important to note that not all iOS devices are capable of supporting RAW. The shortest way of saying it is that you iSight camera must be 12 megapixels (6s or later, iPad PRO 9.7, PRO 10.5, PRO 12 Gen 2).
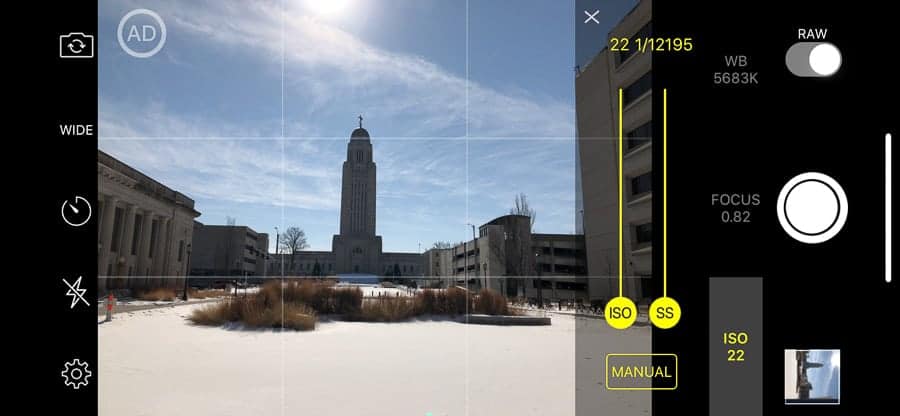
Manual Control: The other capability that all reviewed apps had to have to be included here was the ability to go “full manual”. That is, as full manual as the iPhone is capable of going. This means being able to control shutter speed and ISO settings as well as white balance to varying degrees. Some go beyond this with settings that include things like bracketing, file types/sizes, etc.
For reference, I am running an iPhone X with iOS 11.2.2 for all testing of these apps.
A Special Note on RAW on iPhone
Something to keep in mind when working with the DNG file format on the iPhone is that it doesn’t play well with certain apps. Some apps are looking for JPEG or HEIF files. Embedded within the DNG file is a very low-resolution JPEG preview which the app will pull if it can’t work with a DNG. The photos app built into the iPhone is an example. If you take a RAW only photo with any of the following apps, then view it in your camera roll through Photos, you will notice that it looks bad.
Many of these apps are now allowing for the option of pairing a full-size JPEG with the RAW photo. This will generally appear as one photo in your apps but will look much better in an app not optimized for DNG files. Some apps may even allow for the option of creating two separate files from one photo. In either case, these options will take up a lot more space on your device. Just as in other forms of photography, your RAW files will require processing in order to look their best and be ready for sharing.
One final note on shooting RAW…There are limitations set by Apple on what the developers can make the device do while capturing RAW. From what I was able to gather (I'm no app developer), you will be limited to the following: Shutter speed will be between 1/3″ at the longest to 1/50,000″ (wow) at the shortest. ISO will range from 22-2112. Apps developers may set their limits elsewhere within this range (many seem to utilize 1/4″ as the longest shutter speed for example). If you have an app that can venture outside this range, be aware that you have wandered beyond the limits of RAW on the iPhone.
The Case for RAW

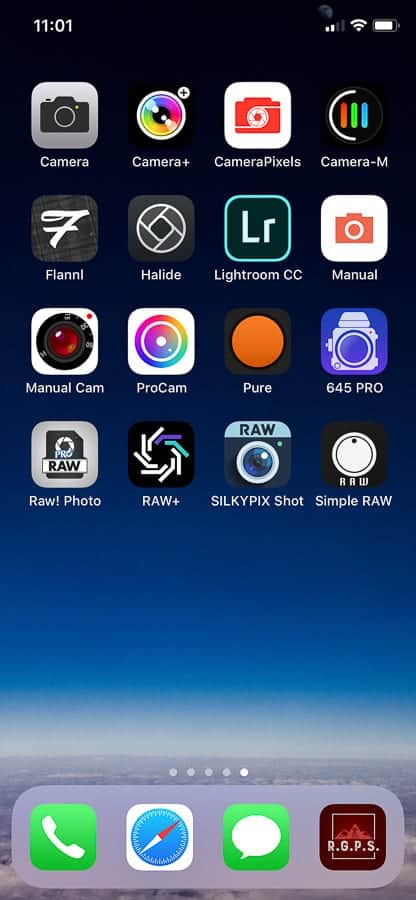
The List
I ended up selecting 14 apps to focus on specifically. There are MANY more apps that exist that shoot in full manual and support
RAW capture, but for various reasons, these are the ones I selected. If you have a favorite app that you use that’s not on this list, I’d sure like to hear about it! Each app is listed with the specific version I tested along with the price in the App Store as of the time of writing.
The order of presentation is not meant to be significant, it is merely alphabetical.
Camera + (10.10.12) $2.99 USD
Camera+ has been a popular 3rd party iPhone camera app for quite some time. It was the first app I ever downloaded for the purposes of extending the usability of my iPhone as a camera. Camera+ is packed with usefulness and stands on its own as an extremely attractive native camera replacement.
One of my favorite highlights is the built-in Lightbox raw processor. This is a fully capable photo editing app built into the camera app. Camera+ can be configured to place photos into Lightbox, the Camera Roll or both.
Another feature that stands out to me is the way that the app informs you if you have exceeded the limitations of shooting RAW on the iPhone. For example, if you try to zoom digitally, it will let you but you will see that RAW has been disabled as that action is not supported in RAW. You shouldn’t zoom digitally anyway as all you are really doing is throwing away pixels. For more on that and other great iPhone photography tips check out this article in Improve Photography!
The app also features a cool simulated macro mode, portrait mode, (both of which venture outside RAW), burst mode, smile detection, stabilizer and self-timer.
Finally, a feature not available in all of the tested apps but one I used specifically for this article was the option to have the app output both a processed JPEG/HEIF as well as an unprocessed DNG as separate files. Useful for making meaningful comparisons.
Camera+ on iTunes
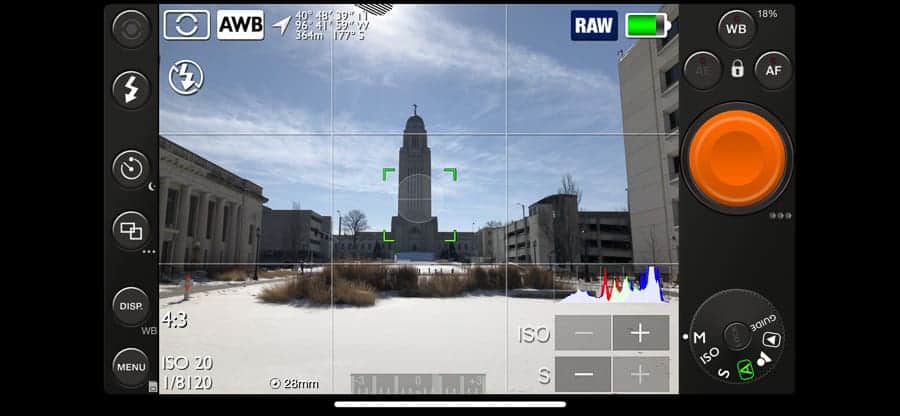
CameraPixels (5.1.2) $3.99 USD
Camera Pixels is another wonderfully full featured app. On my list, it is the first to incorporate a live histogram onto the screen during capture which can really help to manage the dynamic range of the iPhone camera system. If you find yourself in a position where that histogram is stretched out and you can’t capture all the dynamic range, Camera Pixels has a great bracketing function. Simply select any odd number from 3 to 15, your EV steps between shots and the app will take all of the shots for you in rapid succession in RAW! The camera will also bracket focus so that you can bring the images into Photoshop and focus stack them later.
Exposure adjustment- In the camera, adjusting the exposure does require tapping on separate icons for ISO and for Shutter Speed, but it’s pretty quick to make the adjustments. General exposure bias is the default but just tap ISO or S (shutter speed) and you’re in full manual.
Manual focus uses a zoom method for checking focus with no focus peaking present. Full screen zoom works pretty well for this, but focus peaking sure would be a nice add.
The overall UI experience is very good and everything is easy to find. It was a quick app to get the hang of.
I should note that it was not uncommon for the app to crash on my phone. These apps are all pretty hungry for processing power/ram, so if you experience this make sure you aren’t running several camera apps (or other apps in general) to get the most reliability from the app.
UPDATE: After this article published, I received a note from the developers of CameraPixels noting that stability of the app should be improved with the recent release of version 5.1.3. They also noted that version 6.0.0 would incorporate focus peaking and a better histogram. Stay tuned…
CameraPixels on iTunes

Camera-M (1.3.3) $2.99 USD
From a user interface standpoint, I think Camera-M is my favorite on this list. Something about it just feels comfortable and polished to me. I especially enjoyed the histogram which I have configured to show each color channel.
For exposure control, simply tap the exposure icon and you start with a basic exposure bias slider along one side. Tap the ISO/Shutter Speed displays and you can adjust either one of the two and the camera will offset automatically. Then slide the other to adjust exposure. It sounds more complicated than it is and since multi-touch is supported, you can slide both simultaneously if you like…It’s just a lot of fun.
For focus, this is the first app I tested that had focus tracking. It’s not perfect but still useful when trying to keep up with kids that refuse to sit still. Just keep that shutter speed up to keep them sharp if they’re moving. Zoom and focus peaking are also used when in manual focus mode.
There are also a lot of other awesome features. Switching from one file type or shooting mode to another is a cinch. I’m not much for live photos, but they’re supported in the app (non-RAW) as well as depth mode (portrait) and dual camera use.
Camera-M comes in at $2.99 USD which is a great value! If they added zebra stripes or some other form of highlight alert, I’d call it near perfect.
Camera-M on iTunes

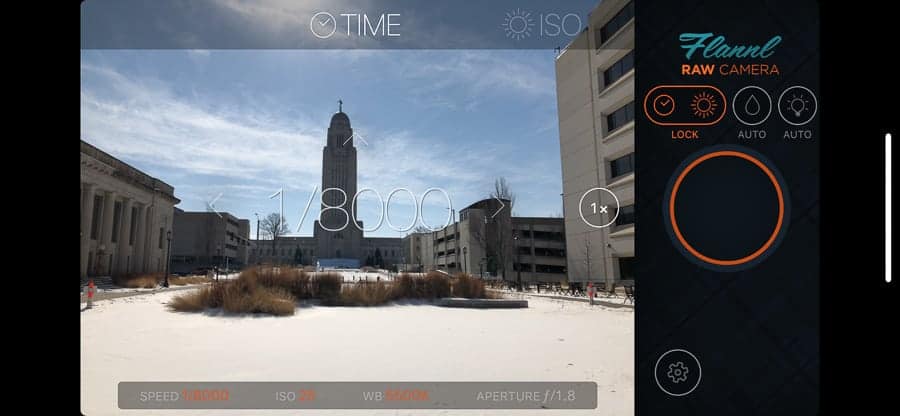
Flannl (1.1) FREE
Flannl does not have the deep feature set of most of the other apps on this list, but it does bear the distinct advantage of being FREE. That’s right, $0 USD! I do like free thus I do like the Flannl app.
It is also very easy to use. Just swipe up and down to change current setting and left and right to switch between settings (Shutter Speed, ISO, Focus, White Balance).
Flannl lacks the flash bang feature set found in many of the paid apps but again, FREE. So, there’s that.
Flannl on iTunes
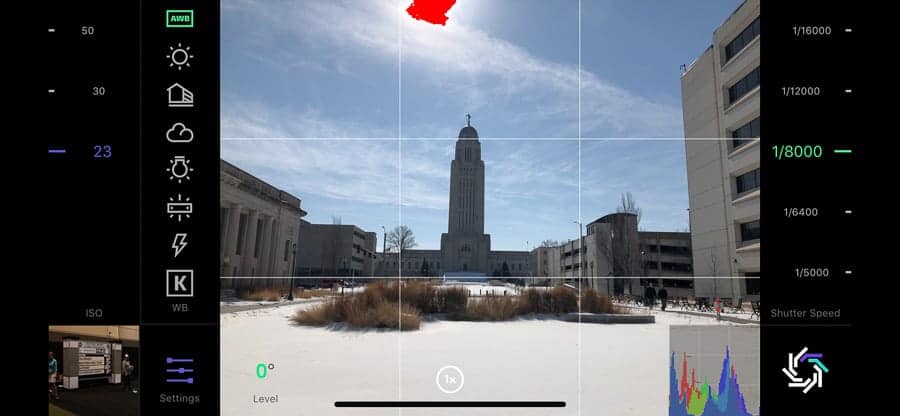
Halide (1.6.0) $4.99 USD
Halide is another app that has a very polished feel. An overall solidly built app in every regard. The app. The ability to control ISO an shutter speed independently without first tapping an icon is something that I value and Halide supplies that.
For controlling focus, the app does not zoom, but the focus peaking is my favorite out of any of the apps I tested. It has a cool alien green color that really stands out. This is a preference, but I really like it.
Halide recently added an update that allowed for RAW + non-RAW file capture with HEIF and JPEG both supported. They’re not the only app in this list to do that but it can be a huge time saver in some instances. Some apps (notably, the native iOS Photos app) are not designed to handle RAW images so they revert to a VERY low-resolution JPEG preview. It can be handy to have a full-size JPEG to fall back on rather than the horrible looking preview. Note that the RAW + file setting in all of these apps comes with added burden on the space in your device.
Halide on iTunes

Lr Mobile (3.1.0) $0+CC Subscription
That’s right, everyone’s favorite (or not so favorite) photo editing platform is also a fully RAW capable iOS camera replacement. It comes with its own benefits and drawbacks. Which features are benefits and which are drawbacks will depend on your views on the direction Adobe has taken their business model.
Whatever your views on Adobe happen to be, the RAW camera built into Lightroom Mobile is pretty solid. The chief complaint I have is that all photos taken with the device are fully synced to the cloud. This has the immediate benefit of keeping my iPhone clutter free but I must first export the original if I want to edit on my phone using something other than Lr. However, Lr Mobile is a solid editing platform making this a real non-issue for many.
My only other complaint is the number of taps it takes to get the camera running. Life can be fleeting and extra steps to get the camera going can cause you to miss the shot. Open Lr, select album (optional but recommended), tap the camera icon, camera is launched. It’s not unworkable but I’d recommend that this is not your only camera option if you want to be sure to catch fleeting candid moments.
All of that aside, the camera app is very intuitive and features focus peaking, zebra stripes and everything is easy to find on one screen. Best of all, it’s technically free, though if you want all the benefits of syncing between devices, etc. you’ll have to spring for one of the Creative Cloud subscriptions (insert cheers and jeers here).
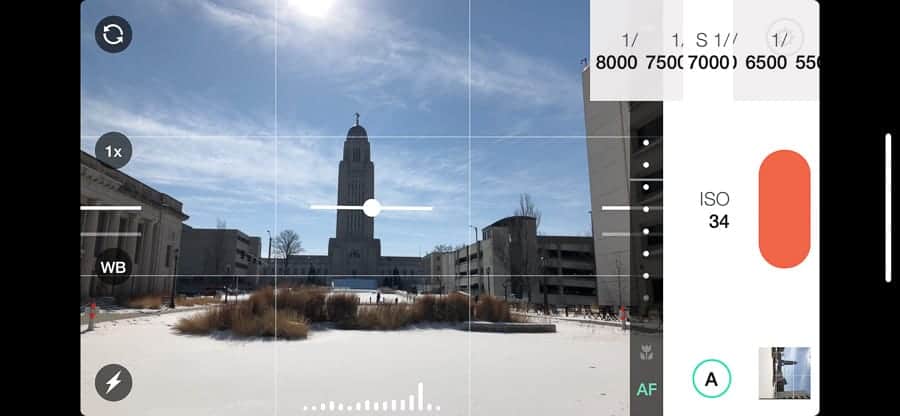
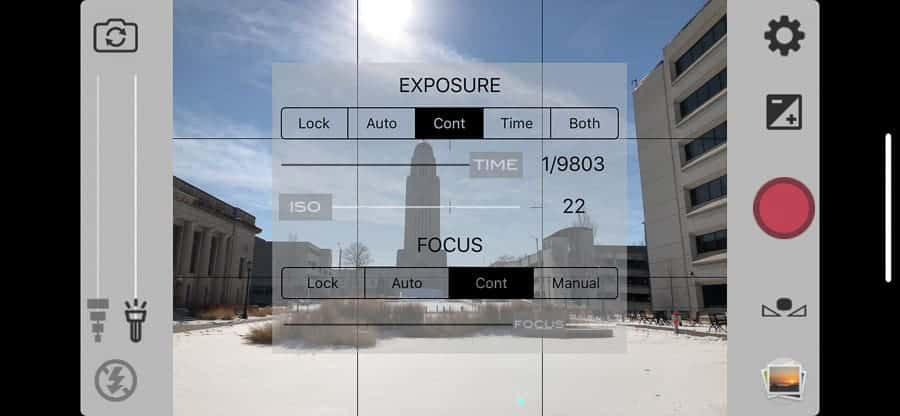
Manual (2.1) $3.99 USD
Manual is a great little no-nonsense camera app that does its job well. The UI is very appealing and if you want an app that doesn’t have mountains of settings to fumble through, this might be the one for you.
When you’re setting exposure if you want to change your ISO, just tap and drag. Want to change the shutter speed? No problem, same thing…Tap and drag. If you want to get back to auto, tap the “A”.
Any photos taken are swept off to your camera roll for further processing. Very easy to use and it works very well.
Manual on iTunes
Manual Cam (1.4) $3.99 USD
If you’re the type of photographer that likes a spinning dial to control your settings, you will like Manual Cam. It’s another simple app with only the essentials and no excess of bells and whistles. To change settings, just tap the desired setting (ISO, SS, WB or Focus) and the dial will transform to the scale that corresponds to that setting.
It’s a neat UI but I did find myself having to positon and reposition my finger as I worked the dial. It does work but it wasn’t my favorite for making quick changes. Still a very solid app with an easy to understand and use interface.
Manual Cam on iTunes

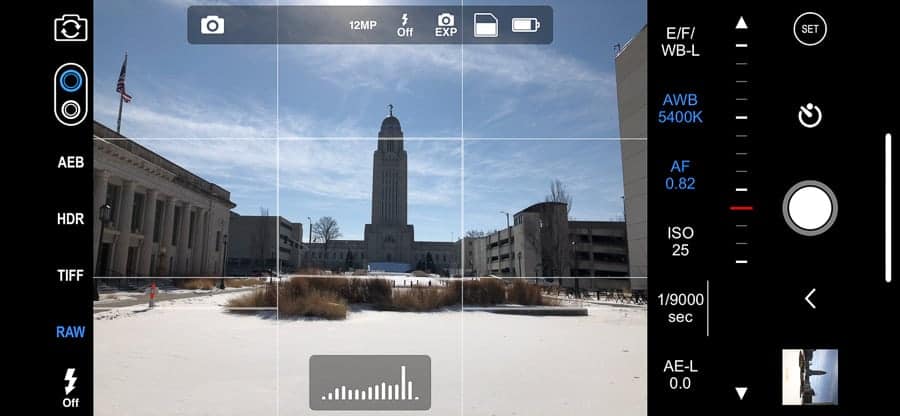
ProCam (10.3.2) $5.99 USD
ProCam brings back many of the extra bells and whistles that were missing from the previous two camera apps in this lineup. While many people might like the simple interfaces of those apps, many others will appreciate what is offered by ProCam.
It is the third camera in this list that features the ability to edit photos (RAW or otherwise) within the app itself. The capabilities of the editing portion of the app are decent if not fully baked. It's always nice to be able to make the basic, necessary edits within the app.
As for the camera user interface itself, I found it pretty easy to figure out, though there is a lot going on within the screen. Focus peaking with zoom (as an inset image) is handy. Furthermore, with focus, there is focus tracking built in. Just like with Camera-M it works but don’t expect anything near absolute pixel perfect tracking.
There is no need to go digging for any settings as they are all right there, but if you want to go and fine tune your experience just tap the “set” button in the bottom left and take some time to absorb all of the options that are at your disposal. You can even choose the color theme of your UI (I chose blue because I liked it).
There are other modes including Video (with many different options including enhanced 4K (4032×2268) which will cost you a little more if you want those), timelapse, burst, slow shutter (which emulates exposures longer than the iPhone is natively capable of), portait mode and 3D photos. 3D photos on this app was kind of cool and different than anything I found in the other apps. Basically, it takes photos with both cameras (you need a camera with dual lenses such as the 7+, 8+ or X) and then turns it into a video (or GIF) toggling back and forth between the two showing your image in a way that makes it look 3D. Kind of gimmicky…I had fun with it.
ProCam on iTunes
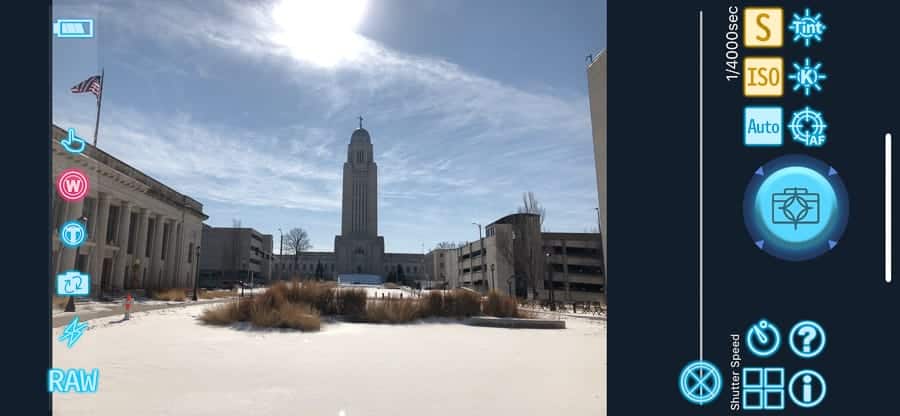
PureShot/(645 PRO MkIII) (5.14) $2.99/$3.99
There are really two separate apps here but they’re very similar and both are a lot of fun to use. When you use them, you feel as though you’re using a more traditional camera and not a phone.
The user interface looks like the back of some kind of fancy camera with buttons and dials that are fixed and a light meter and histogram and all the other info you could want with your camera. Not what I would call a simple interface but not super difficult to figure out either. I should note that the UI is setup to display in landscape orientation and when you move the phone into a portrait orientation, the graphics do not rotate. This is different than the other apps but helps to complete that feel of it being a dedicated camera and not a phone you’re holding.
There are plus/minus buttons to adjust the shutter speed and ISO. If you want to go into manual focus, just tap and drag on the screen. Focus peaking is present, along with highlight alerts for real time information. Also displayed is your GPS coordinates.
The above notes cover the PureShot app. The same developer also has an app called 645 PRO MkIII. This is a very similar app that adds the ability to capture images in RAW alongside a TIFF or JPEG file that has a baked in preset designed to emulate popular film stocks. If you’re a fan of film looks, 645 PRO MkIII is for you! The extra dollar is well worth the extra fun.
PureShot on iTunes
645 PRO MkIII on iTunes
RAW! Photo Pro (5.3) $19.99
The immediate reaction I had toward RAW! Photo Pro was one of sticker shock as it is so much more expensive than the others on the list. Their pricing structure is different than the other apps in other ways though. They offer a sort of à la carte approach to their offerings.
If you want the app fully functional with DNG RAW support that will run you $2.99, which is more in line with the others. From there, you can pick and choose what you want to add including, TIFF, HDR, PNG, Image Buffer, Exposure Bracketing, Time Lapse, Photo Adjustments and Burst Mode. All of these bought separately will run $25.91, so you get a decent break at $19.99 if you want everything. I can see the appeal of this approach, but it wasn’t exciting to me.
The controls are pretty straight forward and easy to use. You have an exposure +/- icon that brings up your exposure settings and a custom white balance icon that brings up temp and tint controls. I did not care for the way that these control dialogs show up over the image. I found them to be kind of distracting.
Overall a very functional app and it should be at $19.99 to get everything.
Note: This article has been revised to reflect the correct pricing on the app which was implemented right before the article was published. The original post noted a price of $24.99 for everything.
RAW! Photo Pro on iTunes
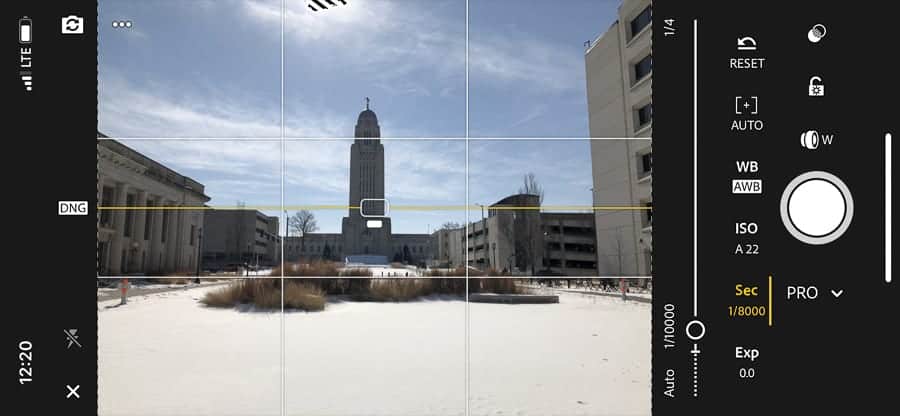
RAW+ (1.0) $4.99
When you open the RAW+ app there is one thing that is immediately apparent and unlike the other apps. There is no automatic mode here. It’s just you and your exposure dials.
Hop into the settings screen and you have a few more options for general settings on the app including another that I didn’t see in other tested apps: The ability to choose which side of the screen is home to your shutter button. VERY nice if you are left-handed (which I am not)
This makes adjusting the settings about as easy as it gets. Just change them. The highlight and shadow warnings as well as a solid histogram are very helpful for choosing your settings. The manual focus is achieved by touching the screen and dragging left and right to adjust. A very small (wish it was bigger) inset zoom shows focus detail. Focus peaking would be a nice touch as well.
This is the perfect app for the photographer that ALWAYS has their camera in M mode and wants their phone to be set up the same way. If you want to trial this one, the free option comes fully featured with a 100-shot limit so you can really get a feel for the full app. I do hear there is a version optimized for the iPhone X coming…
RAW+ on iTunes
SilkyPix Shot (1.1) FREE
If you like bright, neon colors, never digging through menus to set up your app and if you prefer FREE, SilkyPix Shot is the app for you.
Even with the overly flashy interface it is a fantastic app. Why offer it free? It seems as though it is a tool to help people discover their RAW development software for desktop computers. I have no problem with that and hey, perhaps you just found your Lightroom replacement.
The app is quite intuitive in terms of adjusting for maximum creativity. Overall, I really like it. It could command a couple of dollars pretty easily. Especially if they added things like focus peaking, histograms, highlight alert, etc.
SilkyPix Shot on iTunes
Simple RAWCamera (1.2.2) $3.99
Sitting quietly at the end of this list is an app that is exactly what it says it is. Simple RAW Camera is indeed very simple. But it does the job it says it will do. After looking at the other apps I have on this list it should be quite easy to figure this one out. The only thing really confusing in the main controls is the exposure adjustment button which brings up shutter speed and ISO dials is labeled “ISO” and it only displays the current ISO setting. It might leave you wondering where the shutter speed control is, but it’s there.
The main reason I wanted to include this app in this list is because it has a quick, easy switch for disabling RAW capture right next to the shutter button. There are times, especially with your phone, where RAW is pure overkill (e.g. taking a photo of which floor you’re parked on in the garage). These are times where I usually just swipe into the native iOS camera app but this is another option.
It is a very stable and functional app. The free version comes with advertisements every 10 shots and no HEIF support. For $3.99 you can fix this.
Simple RAW Camera on iTunes
Conclusions
Very honestly, any of these apps will serve quite well. It all comes down to which feature set do you need/not need and which app do you find most intuitive. Honestly, at this point, I’m not even sure which app I’ll use as my go-to for RAW capture on my iPhone. I’ve been using Halide for quite a while now and really like it but I also find myself drawn to Camera-M. Both of these just fit my style and seem to work well for my own iPhone photography.
Neither Halide nor Camera-M have video capabilities, but the native iOS camera app meets what I need in iPhone video pretty well. If you need an app that also does video then ProCam and CameraPixels will appeal to you. For longer exposures (Longer than 1/4 or 1/3 of a second disables RAW depending on app) then Camera+, CameraPixels and ProCam would suit you.
No matter which app you decide to install, you are sure to find any of these options extremely useful in helping you to harness the power of RAW in your iOS device.
Brad, How about highlighting some of the Apps for enhancing Android images? You don’t have to cover the waterfront, just a few that can further improve our “smart phone photography.
Thanks,
Robert
Hi Robert, Thanks for the input. I certainly grappled with the idea of trying to cover the Android market but just felt like I couldn’t do it justice. I just went through a search of each app I presented in the article and the only one that I can say for sure has a direct parallel Android version is Lightroom CC. I looked at reviewing the ProShot app (which has an Android version) but I couldn’t get my hands on a full version in time for the review so I left it out. It does look to be an appealing option though :). Please let me know what your experience is with any apps you find and I will work on either a section (or a whole separate article) on RAW apps for Android.
One thing I am aware of that may impact you is that the ability to capture RAW data depends entirely on which device you are using (some allow it and some don’t) and also which version of the operating system you are running. RAW requires Lollipop or later by my understanding.
Well, Lightroom Mobile can be opened directly to the camera just using 3d touch on your iPhone. Just press the icon a little more and that’s it… alternatively you can add the Lightroom Camera Widget to your Control Center and remove the Apple Camera default.
I just messed around with the 3D touch on Lr and that certainly helps!! Best I can tell, it defaults to storing the photos in the “All Photos” area. Do you know if there is a way to set a default collection in which to have the photos go when accessing the app this way? Thanks for the input!
Added note: 3D touch works on several of the apps listed, including: Camera+, CameraPixels, Camera-M, Halide, Manual, ProCam, Pure and 645 Pro.
Do you know which apps I can use that will allow me to edit with snapseed? I have light room but you must edit the raw photo in Lightroom only. RAW+ will do it but I’m not a fan.