
Layers are one of the most powerful features of Photoshop. If you’re not using them, you’re missing out on a lot of what Photoshop can do. And, even if you think you know layers, there always seems to be something new to learn. Layers let you precisely target adjustments, like dodging and burning, and apply masks (including Luminosity Masks) to your adjustments, all in a non-destructive way.
Once you are comfortable with layers, you'll want to explore blending modes and add them to your repertoire of tools, but that's a topic for a different article. You can learn more about them in An Introduction to Blending Modes in Photoshop. But, first, let's explore layers.
Lightroom vs Photoshop and Layers
Lightroom is a completely non-destructive program—the original image file from your camera is never altered. A series of adjustments are recorded and saved in a separate file and are applied to the image as it appears on screen or is sent to the printer. In Photoshop, if you’re not using layers properly, you can permanently alter the pixels in your image file. Even using layers, once you merge layers or flatten an image in Photohop, the pixels are permanently altered.
In Photoshop, you can go back to a previous state and make a correction by using the History panel. However, once you make that correction, you throw out everything you did subsequently. For example, you can go back ten steps to fine tune an adjustment, but then you lose the other 9 steps. Using layers, you can go back to earlier edits and adjust that specific layer at any time and retain all the other work you’d done.
In Lightroom (and Adobe Bridge), the adjustments you make are more global in nature, affecting the entire image. You have a few tools to make finer adjustments (brush, radial filter, gradient tool) but they are not nearly as finely tuned and precise as you can be in Photoshop using layers.
My typical workflow, and that of most of my photographer friends, is to make as many tweaks as I can in Lightroom first. Sometimes, that’s all an image needs. But, for many images, there are things you just can’t do in Lightroom, and that’s when I’ll edit in Photoshop and start using layers to target my adjustments. I also like the curves adjustment in Photoshop better than curves in Lightroom.
What Are Layers?
So, there are lots of advantage to using layers, but what exactly are they? The dictionary definition of a layer includes words like a sheet, coating, blanket or film. All of these are apt descriptions of
layers in Photoshop, as layers can do different things and have different properties. Sound complicated? It is! Layers are one of those things where you just have to dive in and work with them to really grasp what they can do. Once you have, you’ll wonder how you ever got along without using them!
Perhaps the easiest way to think of a layer is as a pane of glass. You can use different colors of glass. You can draw or write on the panes. Each pane of glass has a different piece of content, which could be an image, text, an adjustment, a mask or a combination of those. While they all begin transparent, you can apply shading and can adjust how much of any adjustment is being applied. When you stack the panes, all of those changes show, but changes at the top of the stack may obscure what’s underneath.
In Photoshop, layers appear in the Layers Panel. Here, you’ll find a number of icons that can make using layers easier. The first row, to the left of the Kind drop-down menu, let you filter a stack of layers by various criteria. I’ve never found a use for these but, for designers and for photographers doing complicated edits (which can result in dozens and dozens of layers) they can be helpful. For now, let’s ignore them.
The next row down has the Blending Mode drop down menu (the default is Normal) and Opacity. Blending modes are another powerful feature which I’ll be writing about at the end of November, so check back then. Opacity controls how much of the effect on a layer will be visible.
Below the Blending Modes are various locking options. In general, I don’t use these but you may find a time when you want to lock the position of an image on a layer. There’s also a place to control the amount of fill. That’s useful for designers; not so much for editing photos.
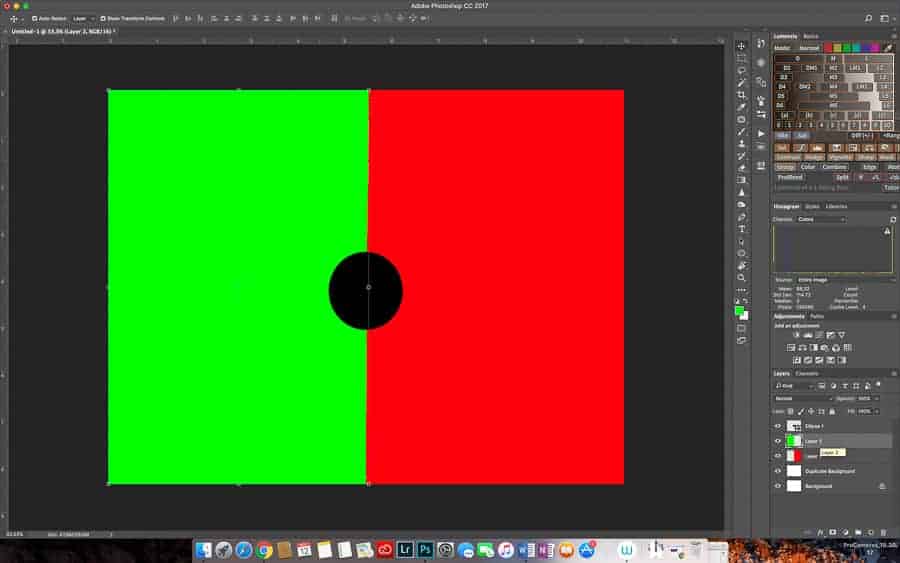
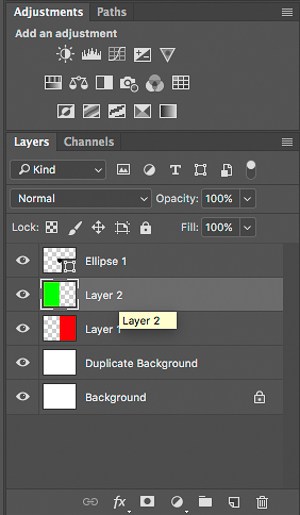
Next in the panel is an area where all of the layers are displayed. The eyeball to the left lets you toggle on or off the visibility of individual layers and their effects. That can be useful in making sure the adjustment you’re making on that layer is accomplishing what you want. Next to the eyeball is a rectangle representing the layer itself. That layer must be selected (click on it) to make any adjustments. In the example, Layer 2 is active. You can (and I recommend you do) change the name of the layer to reflect what you’re doing with it.
You’ll also note that the bottom layer is locked. This happens by default and is a handy thing to recognize. In a typical workflow, you’ll open an image in Photoshop and that will become the bottom, locked, layer. My next step is always to open a duplicate layer (CMD +J on a Mac or CTRL + J on a PC). It’s not important in this example, but does become important when working with your precious images.
Layers are stacked, one on top of the other, so the order in which things appear is important. Something on top of the stack can obscure or affect things under it. Let’s take the previous example.
The bottom layer is a solid white layer, followed by its unlocked duplicate. The next one up is transparent on the left and red on the right. The next layer in the stack is green on the left and transparent on the right. The top layer is transparent, with a black dot in the center.
You may need to change the order of your layers. To do so, click and hold the layer you want to move and slide it up or down to where you want it. A horizontal double line appears where you insert it, either above, below or in between other layers.
When they are all in a stack, and all layers are visible, this is what you get. You can make any layer invisible by clicking on the eyeball to the left of the layer name. In this example, Layer 1 was made invisible.
So far so good.
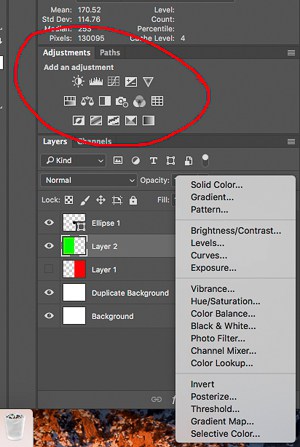
Just above the Layers Panel are Adjustments, represented by icons (circled in the example here). Scrolling your mouse over the icons reveals what each is. They include Brightness/Contrast, Levels, Curves, Exposure, Vibrance, Hue/Saturation and many more. Clicking on an icon creates a new adjustment layer. You can also create a new adjustment layer by clicking on the circle that’s half filled with white, half with black on the toolbar at the bottom of the layers panel, where a pop up menu allows you to choose which adjustment to apply, as in the illustration.
Layer Masks
You can apply a mask, which will limit and define the areas to which the adjustment will be applied. In this example, I’ll mask out part of the green on Layer 2. You’ll see that the green disappeared and the white of the background shows through. Create your mask by selecting the layer you want to mask, then clicking on the white rectangle with the black circle on the toolbar under the Layers Panel (circled in the example). The mask will appear as a rectangle to the right of the layer rectangle.
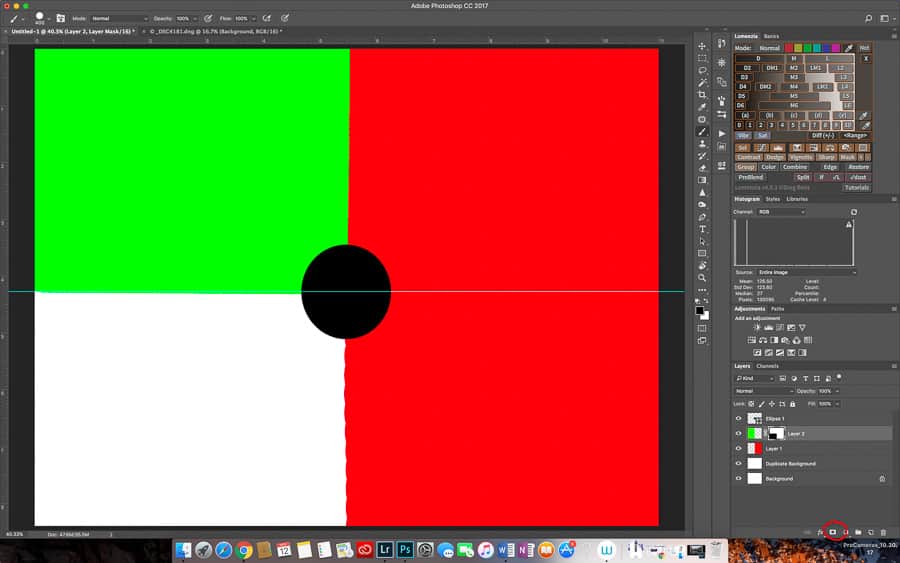
In a mask, white reveals, black conceals. In this example, you can see a black rectangle on the mask that is being applied to Layer 2. The mask is blocking that part of the green color that was added in that layer, letting what’s underneath show. Since Layer 1 is transparent there, the background white shows through. Note also that that the Ellipse 1 Layer, which contains the black dot is on top of Layer 2, so the black dot still sits over the image, even over the part that was masked.
Luminosity masks also work on Layers. You’ll notice I have Lumenzia installed (see upper right of my workspace). Luminosity masks are amazingly powerful, but beyond the scope of this article. Suffice it to say, you need to understand layers before you can begin to understand how luminosity masks work.
Just a couple more things to go and we can head into an example. You can delete a layer at any time by right-clicking and selecting Delete Layer or by clicking and holding a layer and dragging it onto the trashcan icon on the bottom toolbar of the Layers Panel.

It can occasionally be helpful to put some layers together in a group, which can make managing the Layers Panel easier. To do that, select the layers and then click on the folder icon on the bottom toolbar in the Layers Panel. In this example, I put all of my adjustment layers into a group. Toggle the arrow to the right of the group layer to show or hide the group contents.
Sample Workflow Using Layers
Let’s take a look at an example of using layers. This will be pretty basic, but will get the main points across.
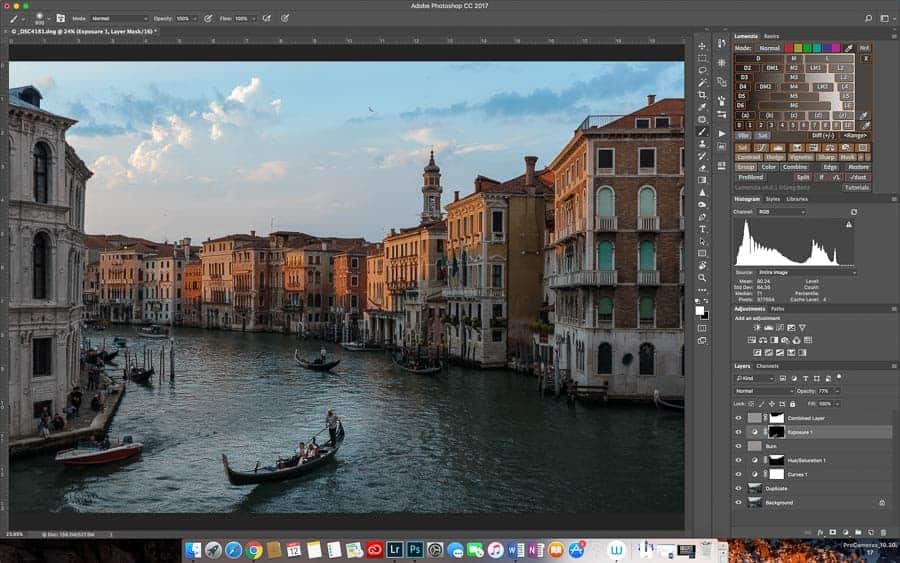
I opened my image and made a duplicate layer. At this point, if there were any dust spots or blemishes, I would remove them.
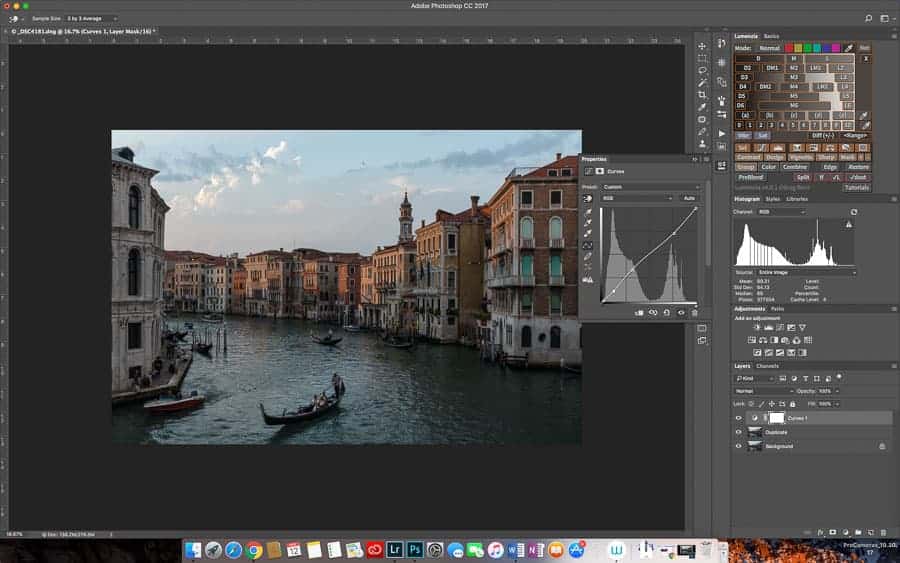
Next I applied a Curves layer to adjust the contrast and the sky. In the panel that shows the actual curve, note the pointing finger icon near the top left, just to the left of the RGB drop down menu. You can click on that to select specific tones you want to adjust. Just click on the finger icon to activate it and then click and drag on the tone in your image that you want to lighten or darken. In this instance, I clicked and dragged on the sky near the top center of the image.
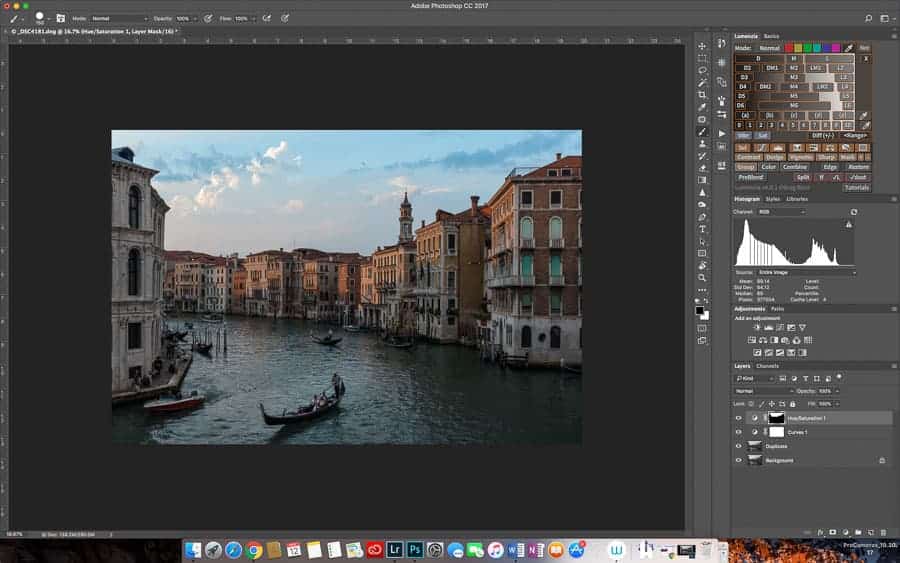
Then I applied a Hue/Saturation layer to bring a little more saturation to the blue in the sky. However, I did not want to intensify the blue in the rest of the image, so I masked the adjustment out of the rest of the image. You can see the black in the layer mask concealing the adjustment. You can create a layer mask and then use the brush tool, set to black, with the mask selected (as in example above) and just paint out the areas you want masked.
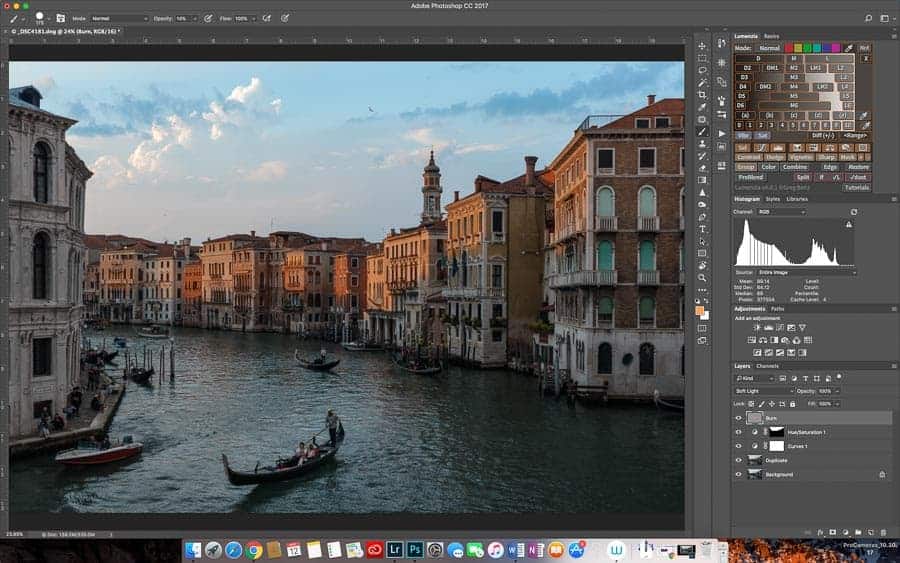
Next I wanted to intensify the golden light falling on the facades of the buildings. For this, I added a Dodge/Burn layer and renamed it Burn. I selected a color already in the building and painted over the buildings where the light was hitting, using a low opacity brush (see Opacity setting at the top toolbar.) Brian Pex has a nice article about Dodge/Burn layers in Photoshop here.
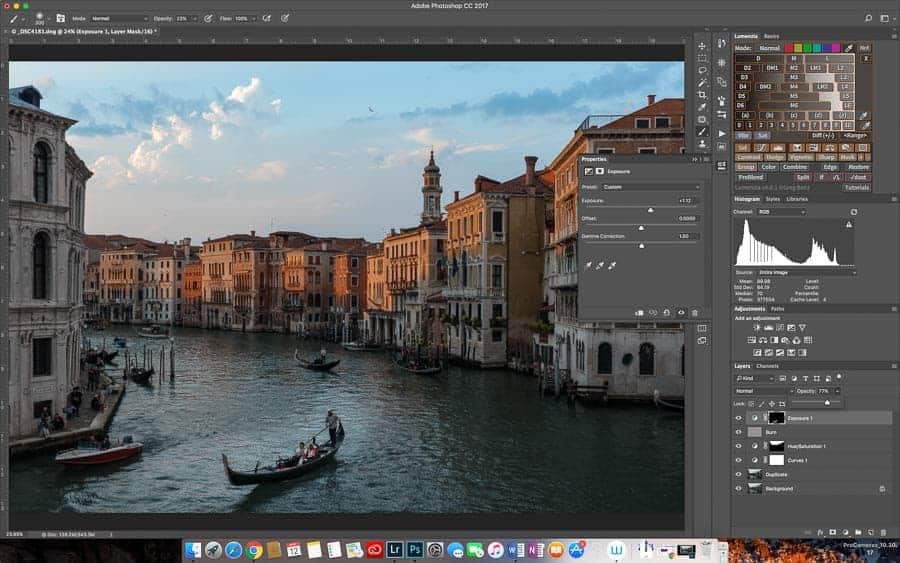
Then I wanted to bring some attention to the gondola towards the bottom by brightening it up a bit. I added an Exposure layer, where I increased exposure by a little over a stop. However, I didn’t want to brighten the entire image, so I added a mask and inverted it (CMD + I or CTRL + I) to make it black, which concealed the adjustment. Then I used a brush with white at a fairly low opacity to paint in the gondola. It still looked a little too bright, so I dropped the opacity in the Layers Panel to 77%, which I liked better.
At this point, for the sake of brevity, I’m going to say the image is almost done. In reality, I’d be using luminosity masks and making more adjustments, but this gives you an idea of what can be done. I’m going to create a combined layer that includes all adjustments (Shift + Option + CMD + E or Shift + ALT + CTRL + E) to which I’ll apply some sharpening. For this example, I’ll use the High Pass Filter, but you can use whichever method you find works best. I didn’t want to sharpen the sky, so I created a mask and masked out the sky (using a luminosity maks, but you could also paint it in using a brush with black).
As I mentioned, there are more adjustments that could be done on this image and many more layers could be created. I could add a layer with my business logo. I could add a layer with some text, if this were part of a presentation or for an advertisement. Even on a plain old image, everyone’s workflow and taste is going to be different, so there’s no right number, order or choice of layers and adjustments.
When you’re done, you can save your image. If you started in Lightroom and used the Edit in Photoshop command, saving the image returns it to Lightroom with all the layers intact. You can take the image back into Photoshop later and still have the layers to work on. Note, though, that saving all the layers can result in some pretty enormous files. In the Venice photo above, the layers quadrupled the file size from 138.2 MB to 527.5 MB, and that was some pretty simple edits!
Once you’re sure you’re done with the photo, some photographers will flatten the image (Layers > Flatten Image), which collapses all layers, incorporates all adjustments, and gives a much smaller file size. However, you’ve got to be sure you’re done. If you flatten and then save, there’s no going back to re-edit any of the layers.
As you get more practice, you’ll know when an image is done and feel much more comfortable in flattening and saving it. And who has time to keep going back to old images when you’re out shooting new ones!!
Exposure Blending
Another way layers can be extremely valuable in Photoshop is when you need to do exposure blending. Say you’re shooting a sunrise and the sky is super bright but the foreground landscape is quite dark. The dynamic range is more than your camera’s sensor can handle. You could shoot several exposures and use HDR in Lightroom, but sometimes that winds up looking a little fake. An option is to blend the perfect sky exposure into the perfect foreground exposure. There’s a great explanation of several ways to do that here. In essence, you are opening each exposure as its own layer in Photoshop. For example, the foreground layer is on the bottom, the sky layer on top. With the sky layer active, select the sky using the quick select tool or magic wand tool and use that to create a mask that masks out the foreground, allowing the foreground with the better exposure to show through. The link also explains how to do exposure blending using gradient filters, using the paintbrush tool and luminosity masks.
Smart Objects
In Photoshop, you can also use Smart Objects as layers. Like luminosity masking, that’s beyond the scope of this article, but you can read more about Smart Objects and the advantages of using them here.
Focus Blending
It can often be difficult to get perfect focus throughout an image. Your foreground may be tack sharp but the distant mountains are soft. You can work around the inherent limitations of your lens by taking multiple shots, each focused progressively deeper into the scene, and then bringing them into Photoshop as layers, aligning then and then blending them together. You wind up with an image that’s sharp front to back. Rusty Parkhurst has a piece explaining the focus blending process here.
Limitless Layers
As you can see, layers in Photoshop are incredibly powerful tools! They have an almost limitless number of uses and allow you to do some pretty amazing things with your images. Now that you’ve got a basic understanding of layers, go out and start experimenting and see what you can do!
What's your favorite use of layers?
Well done again Frank!
Thanks, Ed. Glad you’re enjoying the articles here.