

Blend modes may be one of the best kept secrets in Photoshop. It’s easy to miss them in the Photoshop workspace but, if you do, you’re missing out on some powerful editing options. The creative and thoughtful use of layers and blend modes gives free rein to your creativity and allows you to create an image that matches your vision when you took the shot.
To understand how blend modes work, you have to be familiar with how layers work in Photoshop. You can learn more about that here and in Photoshop 101 in Improve Photography Plus. Essentially, each layer allows you to make an adjustment to your image. The adjustment may be global, affecting the entire image, or local, targeted precisely to certain areas. Blend modes give you finer command of how those edits are applied. Blend modes accomplish this by controlling how the pixels in the active layer interact with the pixels on the layer below.
That may not sound like a big deal, until you start experimenting with blend modes and see for yourself just how big an impact your choice of mode has on an image.
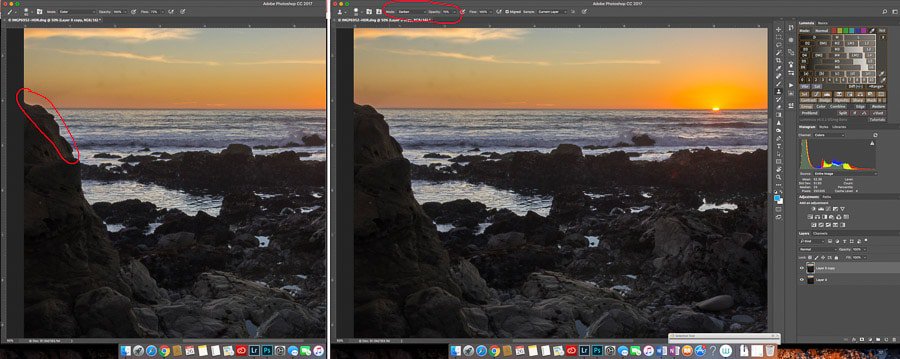
Blend modes are found in the pull-down menu just to the left of the Opacity slider in the Layers panel, as seen in the image above.
Blend modes are also available for select tools, such as the brush and clone stamp tools. Find their pull-down menus in the toolbar just above your image.
The Blend Mode pull-down menu is organized into six categories. We’ll look at them in sequence. Out of almost thirty blend modes, there are really only a few that I use regularly and a couple more that I've seen used here and there. So don't get intimidated!
Adobe describes the effect of blend modes using these terms, which are helpful in keeping the wording consistent between modes and examples. I'll be using these descriptions throughout this article.
- Base color is the original color of a pixel.
- Blend color is the color being applied to a pixel with an editing tool.
- Result color is the color of a pixel resulting from the blend.
Normal Blend Mode
By default, the blend mode is set to Normal, which means that whatever is in the base colors of the top layer will show. If there are transparent parts of the top layer, then the next lower layer’s base colors will show through. If you are applying an effect in the top layer, such as a curves or levels adjustment, that blend color will show for the entire image, unless it is masked out of certain areas, in which case the lower layer’s base colors will show through.
While you can decrease the intensity or transparency of a layer through adjusting the opacity slider, using blend modes can result in much finer adjustments and create effects that you just can’t get using the opacity slider alone.
Just below Normal is Dissolve. This blend mode makes each pixel the result color by randomly replacing pixels with the base color or blend color to create an effect that makes the top layer dissolve into the next layer. It is sometimes used to create noise in an image, which simulates grain in film. While Dissolve can be useful to designers, I don’t use it. There are better ways to simulate grain.
Darken Blend Modes
Unsurprisingly, darken blend modes will, to one extent or another, darken your image. The darken blend mode, surprisingly, has the least effect. Color burn and linear burn have much greater effects.
Darken blend mode looks at each pixel in the two layers and selects the darker pixel as the result color. Pixels that are lighter than the blend color are replaced while darker pixels do not change.
Darken blend mode can be useful if you run into halos when exposure blending. Often, there will be a bright halo around the edges of an object, especially where there is high contrast, like between a mountain and a blended-in sky. To get rid of the halos, select the Clone Stamp tool and set its blend mode to darken. Set the opacity around 70 – 80%, select an area to sample (Alt or Option + click) and paint along the edge. The halo disappears like magic!
Of the four darken blend modes, Multiply is the most useful. This blend mode takes the blend color of each pixel on the top layer and multiplies it by the base color of the pixel on the
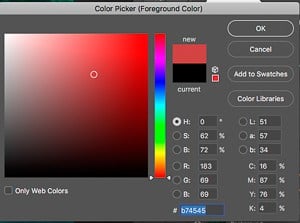
layer underneath and divides by 255, resulting in darker colors. (Recall that each RGB color varies in purity and saturation from 0, a lack of the color, to 255, which is that pure color. So, pure red is 255 in the red channel, and 0 in Green and Blue. Most colors are a mix of RGB values. In the image, the Color Picker tool selected a color that’s 183 in the Red channel and 69 in the Green and Blue channels.)
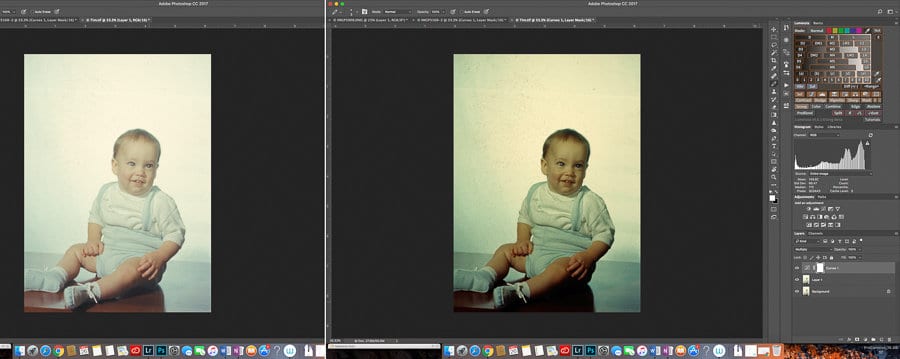
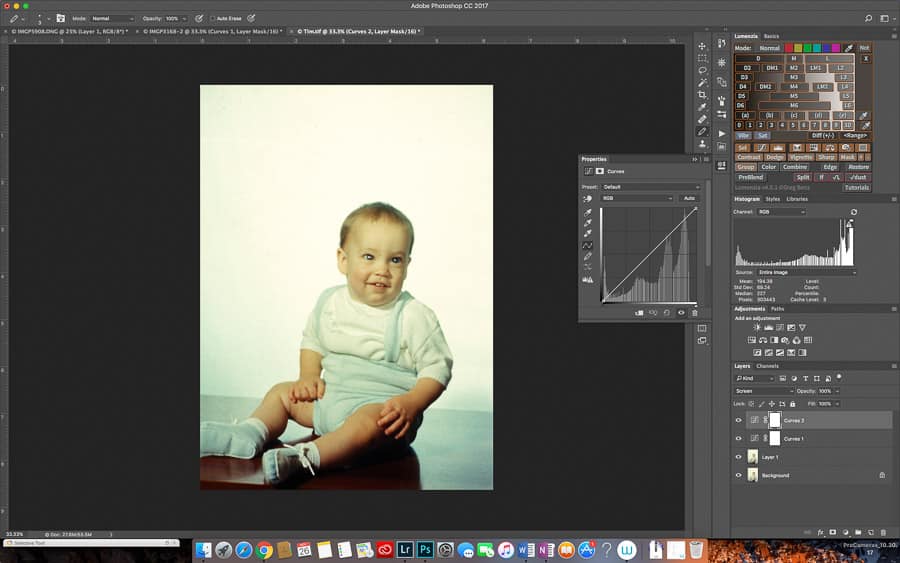
Using multiply blend mode can take an underexposed image, or one in which the colors are washed out, and bring back the colors and detail. It’s sometimes used to bring back detail and contrast in scans of old, faded family photos.
The baby photo has been scanned from an almost 50-year-old color slide. The colors are badly faded. Using curves helped a little, but changing the blend mode to multiply made a dramatic difference. So much so that I had to dial it back to about 75% opacity.
In a landscape photo, with dull, light or washed out colors, try adding a curves adjustment layer to bring down the highlights a bit. Then change the blend mode to multiply, which will appear to darken the image by about a stop of exposure. If the effect is too strong, dial it back by reducing opacity. If it’s not strong enough, you can apply another adjustment layer using multiply blend mode to intensify the effect.
Color Burn blend mode darkens the base color by increasing contrast between the base and blend colors.
Linear Burn blend mode darkens the base color by decreasing brightness. I don’t find much use for these last two modes.
Lighten Blend Modes
As you might expect, each of the lighten blend modes lightens some or all of the pixels of an image.
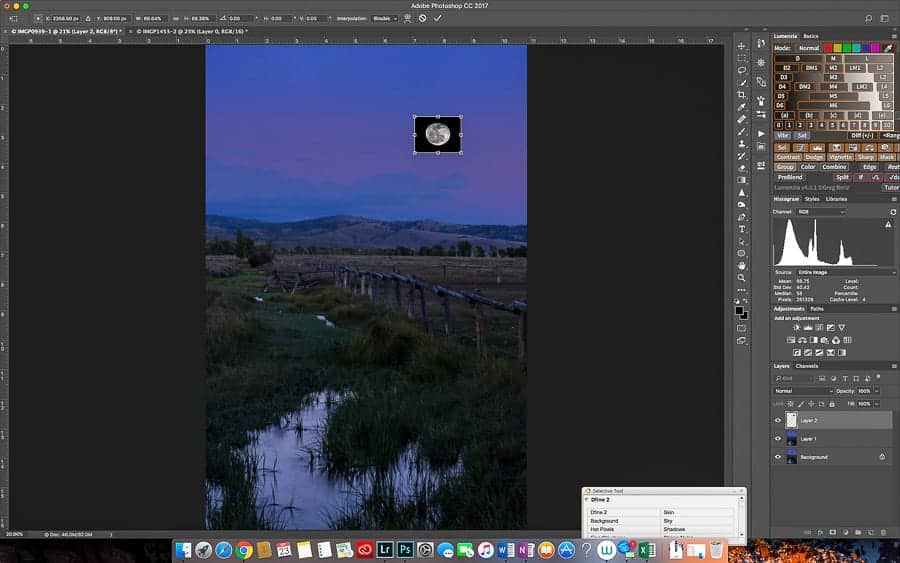
The Lighten blend mode selects the brighter of the base or blend colors, replacing any pixels darker than the blend color but leaving lighter pixels unchanged. This can be handy when blending images at different exposures. For example, you can add a moon to a night landscape. It might be impossible to correctly expose one image for both the land and the moon. However, if you crop your moon shot and place it on a layer above your cityscape and select Lighten as the blend mode, the bright pixels of the moon will remain visible but the black pixels of the sky around the moon will be replaced by the lighter sky in your landscape. Learn more about processing moon shots here.
If you have a couple of city images shot in the evening where one is lighter for the buildings and the second is darker to capture light trails from passing cars, you can blend in the light trails without affecting the buildings by using lighten blend mode.
Screen blend mode is the inverse of multiply and will always result in lighter pixels. Adobe describes the effect as similar to “projecting multiple photographic slides on top of each other.” This blend mode can brighten underexposed images and can brighten highlights without affecting shadows and darks, resulting in better contrast. As with multiply blend mode, if the effect is too strong, reduce the opacity and, if the effect isn’t strong enough, apply another adjustment layer with screen blend mode.
In the baby photo, using multiply blend mode brought back the colors but resulted in accentuating some smudges and spots that were on the white background. Applying a new curves layer with screen blend mode, brightened the highlights and brought up the background enough to virtually eliminate the smudges. It also lightened the baby’s face and increased apparent contrast.
Color Dodge blend mode brightens the base color by decreasing contrast between it and the blend color.
Linear Dodge (Add) blend mode brightens the base color by increasing brightness. One cool way to use this blend mode is in creating a glow around an object, such as a light. In the lighthouse image, the main light is illuminated and showing red. It was a misty evening and it feels like there ought to be some glow to the light. Using a brush, sampling the color of the bulb and lightening it a bit, I selected Linear Dodge as the brush blend mode and set the flow at 25% and then just clicked over the light to add the glow effect. Note that adjusting opacity won’t help make this look natural—you have to adjust flow!

Contrast Blend Modes
Contrast blend modes increase the contrast in an image in a variety of ways. I frequently use Overlay and Soft Light and never use the others.
Overlay is one of my most used blend modes. It is like a combination of the Multiply and Screen blend modes in that it multiplies dark areas and screens light areas while preserving highlights and shadows.
Overlay blend mode is often used when sharpening using the High Pass Filter, where it increases contrast along the edges and enhances perceived sharpness.

If you think your image is missing a little pop, try this little trick: Switch from the Layers tab to the Channels tab. Command/Control click on the RGB channel to create a luminosity selection. You will see marching ants. Go back to the Layers tab and create a duplicate layer (CMD/CTRL + J). It will appear in the Layers panel as a checkerboard. Change the blend mode of this new layer to Overlay and watch the image pop! Often, I find the effect is too strong and I drop the opacity of that layer to something like 50 – 60% to get a pleasing boost in contrast.
Soft Light combines the best of Color Dodge and Color Burn. If the blend color is lighter than 50% gray, the color is lightened. If darker than 50% gray, the color is darkened. Soft light is more subtle than overlay.
Dodging and burning often make use of the overlay and soft light blend modes. Creating a 50% gray layer in overlay blend mode for dodging. Select a lighter color (or white) and paint where you want to dodge. Create a new 50% gray layer using soft light for burning. Paint with a darker color or black to burn. Brian Pex has a great explanation of dodging and burning here.
Some photographers use a 50% gray layer with screen blending mode for dodging highlights and another 50% gray layer with multiply blend mode for burning shadows. Adobe often gives you multiple methods to accomplish the same task, each leading to slightly different results. Try them and see which you like better.
Hard Light is similar to overlay and soft light but much more extreme. I find it creates contrast that is much too harsh.
Vivid Light burns by increasing contrast and dodges by decreasing contrast. It results in large increases in saturation and dramatically increases contrast.
Linear Light burns by decreasing brightness and dodges by increasing brightness.
Pin Light can sometimes be useful for composites as it replaces base pixels with blend pixels. If the blend pixel is darker than 50% gray, the lighter base pixels are replaced while the darker base pixels are replaced if the blend is lighter than 50% gray. There’s a nifty trick using the pin light blend mode to reduce long-exposure noise in astro photography explained here.
Hard Mix makes all of the pixels in the adjustment completely red, green, blue, white or black with no gradations.
Comparative Blend Modes
The next batch of blending modes takes a look at the color in each channel of each pixel being affected and then subtracts or divides the blend and base colors. Frankly, I have no use for any of these.
Difference compares the base and the blend color of a pixel and subtracts the brighter of the two.
Exclusion does essentially the same thing as difference, but with a more subtle touch by using less contrast.
Subtract takes the blend color and subtracts it from the base color. A version of frequency separation I’ve seen for editing portraits uses the subtract blending mode, but I’ve never used it.
Divide takes the base color and divides it by the blend color.
Composite Blend Modes
The last category is composites, and has some useful tools. These are a little hard to imagine or describe, so I’ll basically follow Adobe’s descriptions.
Hue blend mode takes the saturation and luminance of the base color and the hue of the blend color to create the result color.
Saturation takes the luminance and hue of the base color and the saturation of the blend color to create the result color.
Color makes a result color with the saturation and hue of the blend color and the luminance of the base color. This can be useful if you want to take a black and white image and give it a sepia or cyanotype look. Add a new layer filled with cyan, for example, with a color blend mode and adjust the opacity to create a cyanotype-style image.
Luminosity is not related to luminosity masks. Rather, it creates a result color that with the luminance of the blend color and the saturation and hue of the base color. Using luminosity blend mode preserves the gray levels of an image and is useful for coloring black and white images or giving a tint to color images.
Luminosity can be particularly helpful if, when using a curves layer, the colors become too saturated. This often happens with vibrant colors and can make your image start to look cartoonish. Applying a luminosity blend mode to your curves layer stops the curves adjustment from affecting saturation. Presto! Problem solved.
Lighter Color takes the total value from all three channels of the base and blend colors and shows the higher value color.
Darker Color takes the total value from all three channels of the base and blend colors and shows the lower value color.
And those are Photoshop's blending modes explained and with a few examples. Give them a try. You'll be glad you did!
What's your favorite use of blending modes?
Frank, great job here! I notice that you said you had no use for the COMPARE blend modes but if you’re ever trying to line layers up manually using the move tool, use the difference mode. When the pixels turn black, that means you’re lined up perfectly! Sometimes Photoshop cannot auto align and when using smart objects, you can only align by hand! Just a thought! GREAT INFO!
Frank great article!
Gracias amigo!