
There are several reasons why you would want to move your photos to an external drive with Lightroom. You may be running out of space on your existing drive, or you may be using a laptop with limited internal drive space. You may want to use the external drive as your working drive, or you may want to just backup your photos. Moving your photos can be easily done, all while maintaining your Lightroom catalog and previews on your main drive.
There are two methods that you can use to move your photos. One is entirely within Lightroom, and the other is using Explorer (on Windows) or Finder (on Mac) and then re-linking your catalog within Lightroom. If you’re just moving a few photos, you can use the first option. If you’re moving a large number of photos, the second option may be a safer option, but has more steps to perform. This is because there have been reports of rare occasions of photo loss when moving them entirely within Lightroom. In a Photo Taco podcast, Jeff Harmon had a discussion with Lightroom Queen Victoria Bampton about Lightroom performance, tips on organization and more. It was mentioned that cancelling a move midway could cause photos to be lost. If you want to listen to this podcast, you can find it here.
The external drive options there are to choose from are quite broad, ranging from simple USB or Thunderbolt external drives, to more extensive needs such as a Drobo or other RAID system. These days, simple external drives are available with storage space as high as 5TB which gives a lot of flexibility without needing a more extensive (and more costly!) option like a RAID system. We wrote an article on our recommended hard drives for photographers.
Lightroom Medic
 Deciding to use an external drive for your photos is just one part of your overall post-processing workflow. If you need guidance on making your overall post-processing workflow more efficient, then Lightroom Medic is an incredible training video with over 100 minutes of tutorials on streamlining your Lightroom workflow. Lightroom Medic shows you Jim Harmer's preferred methods for storing, categorizing, backing up, and rating photos in Lightroom, plus so much more! Click here to learn more. Lightroom Medic is included with an Improve Photography Plus membership along with over 200 video tutorials, over 340 presets, and much more. Click here to get a 14 day free trial!
Moving Photos Using Lightroom’s Folders
In this first method, make sure you are in the Library panel in Lightroom to do these steps:
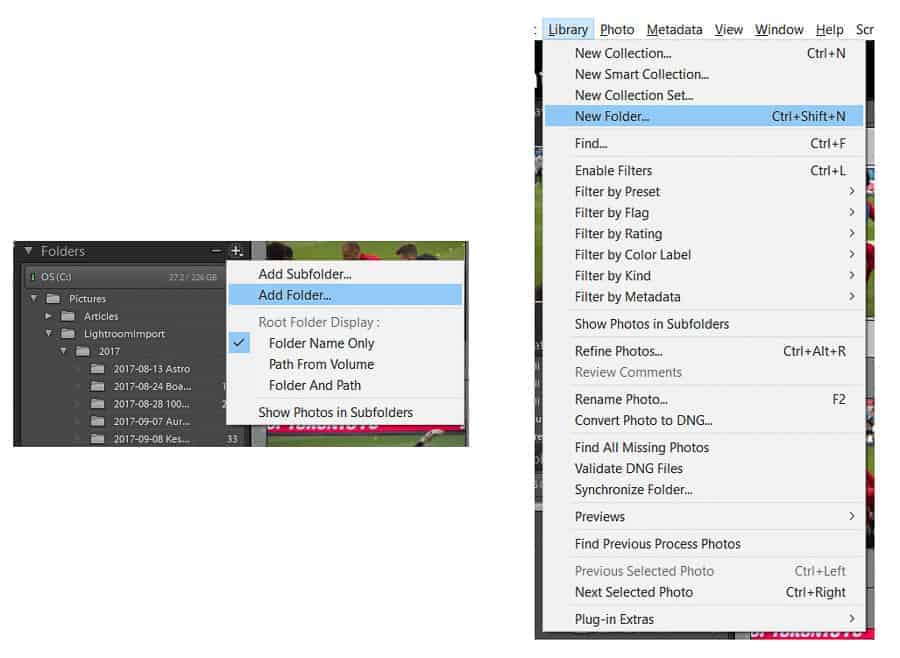
- Connect your external drive to your computer. Create the destination folder on your external drive by either clicking the “+” to the right of the Folders heading in the Folders panel and choose Add Folder, or go to: Library > New Folder. In the directory window that opens, navigate to the external drive location and create a new folder. If there’s already an empty folder on your external drive where you were planning to place the photos, select that folder.

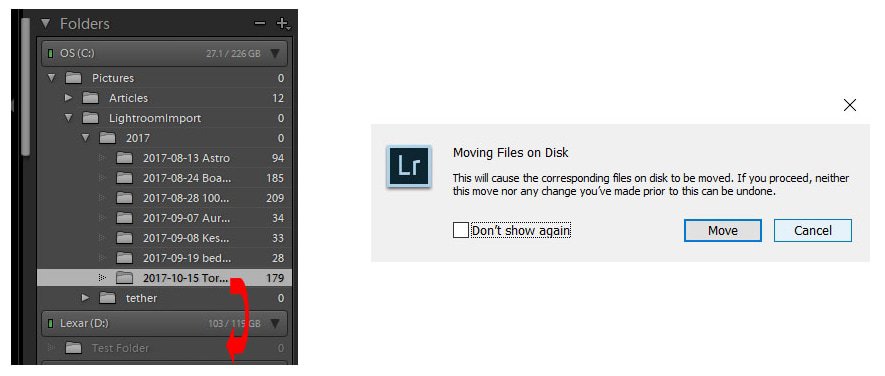
- In the Folders panel, click and drag the folders from the existing location to the new external drive location (the new folder you created above). You may receive a warning message about moving the files on your disk. This gives you the opportunity to cancel the request, or continue the process. Click on Move to continue the process. If you don't get the warning message, it may be because you did a folder or photo move in the past, and selected the tickbox to not show the warning message again. The move will begin as soon as you finish dragging the folder. While the move is happening, do not press the “x” to cancel the move. As mentioned before, cancelling in the middle of a move could cause lost images. You should let the move complete uninterrupted.

- After the move has completed, check that the folder contents have moved from the original location correctly. In some cases, individual photos may not have moved, so you may need to redo the move steps for any remaining photos by dragging them to the new location.
Moving Photos Using Explorer or Finder and re-link in Lightroom
In this second method, just like in the method above, make sure that you are in the Library panel to do these steps:
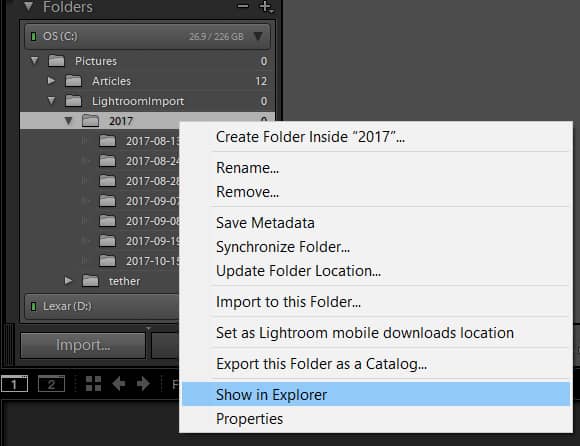
- The first thing you’ll need to know is where your images are located on your drive. In the Folder panel, right-click on the parent folder (the top-most folder in the hierarchy that you want to move) and select Show in Explorer (or Finder for Mac).

- Close Lightroom and use the Explorer/Finder window that opened in the step above to copy (not move…you'll see why in the following steps) the folders to the external drive.
- After the folders have finished copying to the new drive, rename the original folder (the one on the old drive) using Explorer/Finder. This will give you the opportunity to make sure that the photos copied over and are working correctly, before you delete them from the original location.
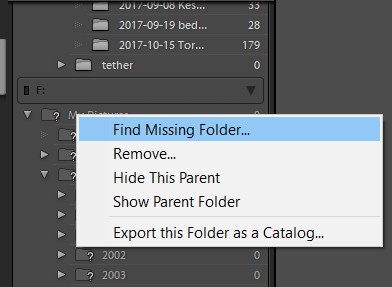
- Open Lightroom and you’ll see that the parent folder and all subfolders in the Folder panel are “missing” (the folders have question marks on them). To re-link the folders to your new external drive location, right-click on the parent folder and select Find Missing Folder. Navigate to the external drive location, choose the parent folder you just copied over, and press Select Folder (or Choose for Mac). The folder hierarchy will disappear from the old drive section in the Folders panel, and will reappear under the section for the new external drive.

- If you still have folders remaining that need to be re-linked, repeat the process until all the question marks have disappeared from all the folders.
- Confirm that all your photos are available for editing within Lightroom from the external drive. After you’re comfortable that they are working correctly, you can safely delete the files from the original location (the folder you renamed in the steps above) using Explorer (or Finder for Mac).
Editing Images on a Disconnected External Drive
If you are planning to use the external drive as a working drive, you may be wondering whether you can still edit the photos on your external drive when disconnected (and the folders have question marks on them). You can provided you create smart previews of your photos, and you enable the ability for Lightroom to edit using the smart previews.
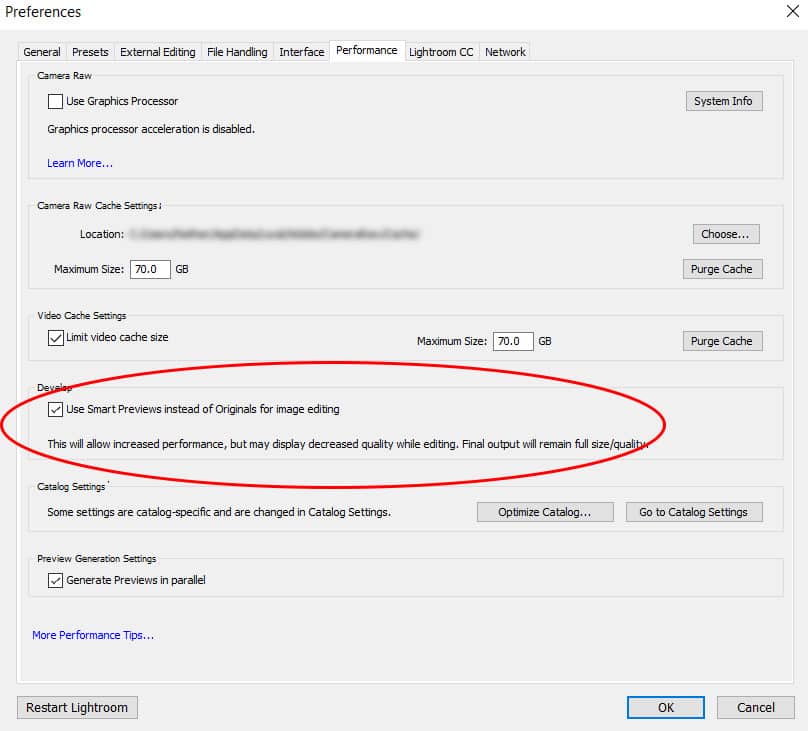
To enable this setting, go to the Performance tab within Lightroom Preferences. In the Develop section, make sure the tickbox for Use Smart Previews instead of Originals for image editing is selected.
When editing with the external drive disconnected, exporting images will have limitations. This is due to the smart preview's image size being smaller and lower resolution than the original image. If you export from the smart preview, assuming you are not resizing it in the export settings, your exported image will have the lower resolution size of the smart preview. To export using the full resolution of the original image, you will need to connect your external drive.
So there you go, with two straight forward methods of moving photos to an external drive. Even though there have been reports of photo loss in the first method, it seems isolated to cancelling the move process midway. In my experience, I've moved large quantities of photos on several occasions using the drag and drop method entirely in Lightroom without issues. Granted, I've never cancelled a move midway through. Even though there are more steps with the Explorer or Finder method, re-linking should work on the first attempt as long as the file structure is unchanged after copying. Feel free to leave any thoughts or questions you may have in the comment box below.
If you made it to the bottom of this post, that means you are serious about improving your lightroom skills. That makes you a perfect fit for the Improve Your Photography Facebook Group! Click here to join the community!
Nathan very well done and for me, very timely!
Thanks Ed! Glad to hear you found it to be helpful!
Hello I’m having trouble with my external hard drive. I moved several folders to my external hard drive last year using the first method you described for inside lightroom. Now all of a sudden, lightroom doesn’t recognize the external drive. I can see the photos from file explorer but not in lightroom. I wanted to clear some laptop hard drive space by moving more folders but I can’t find the drive in lightroom.Can you help?
Thanks for the info, but I really do feel this is something Adobe needs to address.
I’m just starting out with Lightroom and I am flabbergasted as to how difficult and apparently risky it is. I mean, even in your tutorial (a topic which shouldn’t even NEED a tutorial if it was done correctly) you state.
“In some cases, individual photos may not have moved”
“cancelling in the middle of a move could cause lost images”
“neither this move nor any change you’ve made prior to this can be undone” – this is the reason I started google searching because I had no idea what this warning actually meant (I’m not alone and people have been complaining about this since at least 2010).
I mean seriously, after so many years of development and the MASSIVE price tag, why isn’t LR able to intelligently maintain the link to files. There is enough unique information in the EXIF data to do it (specifically the date-time stamp). With this we could do all our file organising in windows explorer (Simple!) or at the very least be given an explorer type module to organise the files and folders.
I believe this is actually one of the main things that scares people off in using Lightroom, as they have to about-face in their thinking of photo management.
Just a rant – but I’m so surprised people who have been using it for years have put up with it.
Installed a 2nd drive for additional storage. When attempting to move a folder of edited raw files (from within Lightroom) the warning dialog states “If you proceed neither this move nor any change you’ve made prior to this can be undone”. That sounds spooky. What does it mean? Does … any change you’ve made made prior to this… refer to edits? I’d hate to lose the work done processing the images. And in actuality, can’t it all be undone simply by moving the folder back to it’s original location?
THANK YOU!
this was the simple solution i was looking for
not that i ever had any thoughts to store on external hard drive as i just dont want to carry one around but i became hopeless, the new lightroom cc is just horrible for pro photographers, so much limitation to export and work with plug ins
cheers
I want to get all past images off the Internal HD and move to the ExHd which is very easy with LR drag and drop but they stay on the Internal HD. Normally you hold the CMD down while moving a folder from one location to another on Mac and it removes it or totally transfers it to that new location and there is not a copy in the original location. This is not the case w the picture folder in LR. How do you do this as I will need to move the images on the In HD now to another ExHd. Suggest any software for doing it ?
I am moving internal files to an external drive using Folders. The progress bar seems stuck saying “23 operations in progress”. Help!