
![]() OK, maybe calling these“Lies” is a little strong.
OK, maybe calling these“Lies” is a little strong.
Yet skilled photographers with good intentions sometimes confuse new shooters and hinder their learning progress with too much information too soon. Sometimes photographers with a biased opinion can unintentionally plant seeds of misinformation.
So what are some of the “tales” you as a beginner might hear? Here are 12 to consider:
1. Manual Mode is what “Real Photographers” use. You need to learn that right away.
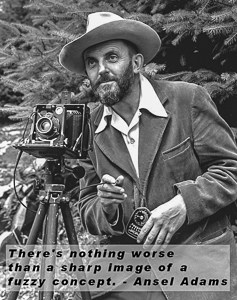
Sure, to take full control of your camera you will one day want to learn how to operate it in manual mode. New photographers however have much to think about, so why not take advantage of technology to help you get a good exposure while you concentrate on other things? When teaching new photographers, the first things I want them to learn are good composition and proper focusing techniques. Ansel Adams put it well:
There's nothing worse than a sharp image of a fuzzy concept.
As a “next step” in the learning process, I encourage new photographers to use the “P” (for Program), mode. It is like a young cyclist using training wheels. You have the ability to set either Aperture, Shutter Speed, or ISO and whichever you set the others will adjust to maintain exposure. You  will still have the ability to control depth-of-field, motion freezing or blurring, and deal with light intensity, but the camera will handle the other controls for you. Paying attention to the settings it chooses is a great way to begin to understand the concepts of the Exposure Triangle. It’s also a good starting point for settings when you are ready to try Manual Mode. Even as a more experienced photographer, when I put my camera back in the bag I set it to the “P” mode. That way, if I have to pull it out and grab a quick shot, I know it will be reasonably accurate.
The other basic I consider a must for new photographers is learning focus control. Adams spoke of a “fuzzy concept,” but how about a fuzzy image? Here’s my personal quote about that.
“There’s a button to be used when your capture is out of focus – The Delete Button.”
Only in rare cases when used for artistic purposes will you ever want an out-of-focus picture. Not so long ago there was no autofocus, photographers had to manually view and adjust focus. Now with autofocus, we can let the camera pick the focus point. The problem I often see with beginners is they use the default center autofocus point and though that spot may be in focus, the subject may not be. This is particularly true if they are practicing the “rule of thirds” when composing and their subject of interest is not in center frame. Another common mistake is they don’t understand that clicking the shutter is a two-step process; 1) A half-press to allow the camera to focus, holding that and 2) Pressing further to trip the shutter. Either a quick full-press, (which doesn’t allow the autofocus time to work) or a half-press, release, and a second press will lead to fuzzy pictures. It seems so simple, but believe me, so many new photographers struggle with getting sharp images. For subjects like landscapes where nothing is moving, often manual focus will be better.
2. Always shoot in RAW. Good photographers don’t shoot .jpg images.

Again, this is mostly true, but probably not for a new photographer. Raw images do allow much more to be done in editing, but there is that extra step – editing. I think it’s important that new photographers get the “instant gratification” of seeing their images ready for viewing.
It’s interesting we use the term “Raw,” as such images are just that – not ready for immediate consumption or even viewing outside special programs. The problem for beginners is this adds yet more learning to an already full plate. It’s also likely the new photographer trying to manage a raw image will not be as good a “cook” as the .jpg algorithm in the camera and the resulting photos will be “unappetizing.” To continue with the gastronomic analogies, you may have heard that to eat an elephant you must do it one bite at a time. Learning photography is the same, taking it one step at a time. Trying to immediately take on Raw editing along with all the other things you must learn may be “biting off more than you can chew.”
3. A new (camera, lens, etc.) will improve your photography.
Maybe, but only if it’s your gear that’s the limiting factor in your photographic advancement. For new photographers however, it’s rare that they have even begun to reach the capabilities of their equipment. The time to buy newer, better cameras, lenses, or other photo gear is when its limitations are what is preventing you from getting that “next level” in making better images. Until then, your money might be better invested in classes, workshops, or other opportunities where you can learn to use the gear you already have.
4. Buy a good heavy-duty tripod. The stouter the better.
I once heard that that “new photographers discuss cameras, intermediate photographers discuss lenses, and advanced photographers discuss tripods.” I think the point is that often a tripod is the last thing new photographers think about, not appreciating how a good stable platform can make their images sharper. It’s also hard as a new photographer to learn “tripod discipline,” that being the practice of using a tripod whenever practically possible. It’s so easy to just shoot handheld, right? Who wants to have to fool around with carrying and setting up a tripod? The fact is, a good tripod will make your images better and perhaps slow you down a bit, forcing you to think about your composition rather than simply “running and gunning.”

It’s also true that you should buy a good, well-made, stable tripod of the proper size to adequately support the weight of your camera and lens. A cheap, flimsy and unstable or undersized tripod is worse than none at all. It may also fail, dumping your expensive camera and lens to the ground. Consider a tripod as an investment that when well-chosen, will last you many years. Don’t waste your money on a $50 discount store tripod. That’s like handing your expensive camera to a toddler to hold. As they say, “buy nice or buy twice.”
Don’t buy the tripods that almost always have a video-type head with a panning handle. As a still photographer, you want a tripod with a ball-head. As for getting a “heavy-duty, stout” tripod, sure, you want something well-made but also think about how and where you will use it. If the size and weight are such that you often decide to just leave it in the car, well… why have it at all?
Also, consider what and where you usually shoot. Sports and action photographers usually don’t use tripods. Wedding photographers will likely use them for posed shots, but probably not during the ceremony. Maybe the kind of shooting you do lends itself more to a monopod. Suit the tripod to the job, buy the best you can afford, and then use the tripod whenever practically possible for the sharpest images.
5. Learn HDR right away. It will make your photos look so much better.

Often new photographers will hear of a technique or see a photo made with a technique and decide that’s what they need to do to make their photos look great. High-Dynamic-Range (HDR) is one of those techniques many new photographers seem to find exciting, yet often they lack the skills to know when and how to use it. It requires multiple exposures, the use of specialized processing tools, and most of all a bit of restraint when processing. Many of us have seen the grungy, “overcooked” images that result when a beginner using HDR goes a bit wild with the technique. In cooking, a bit of seasoning might make your dish tastier but too much will simply evoke an “ugh!” reaction. When dealing with scenes with extremes in darks and lights, HDR can be useful and make for beautiful images. As a new photographer though, you might be best to work on the basics rather than resorting to a “gimmick” you believe will improve your photos.
6. Don’t constantly “Chimp” your photos. It makes you look like an amateur.
“Chimping” is a term used to describe the constant looking at the LCD image on your camera after making a shot. I’d guess it comes from the chimp-like “ooh, ahh” sounds some people make when looking at their images. More skilled photographers often ridicule this practice, especially if their roots are in film photography where you never saw your shot after it was taken until much later.
So is looking at your screen after each shot a bad practice? My opinion is no, not as a beginner. I think one of the great advantages of digital photography is the “instant feedback” it gives, greatly accelerating the learning curve. Make a shot, check to see how you did, make any adjustments and make another shot. Probably more important than simply checking the image is looking at the histogram. Beginners should learn how to interpret this display and how it can ensure they are making good exposures.
As for the downside of chimping, consider the situation you are shooting. If the action is happening quickly and you need to stay on top of it, constantly looking at each shot may cause you to miss a key moment. As your skills and confidence build, you won’t need to check the display so often, more secure that you have things dialed in properly. Early on, I think chimping is a good thing. Far better to check than to get home and find you totally ruined an entire session because you had a setting in the wrong place, there was a smudge on your lens, or something else was amiss. As for the “ooh, ahh” sounds… Yeah, you might want to not make those out loud.
7. If you buy these presets for Lightroom, you can make great photos with just a click.
A Lightroom preset is like a recipe, someone has set all of the sliders and controls in Lightroom and saved those as a “preset,” a mean by which with one click, you can apply those same settings to your image. Those selling such presets sometimes would have you believe that by applying them to your images they will become instantly beautiful. Sometimes that happens, if you’re lucky. Sometimes they will really make your image look ugly. Most times they will give you ideas you may not have thought of on your own. If you decide to buy presets, that’s how you want to use them, as a way to explore new options. You can use them as a starting point and then further adjust the sliders from there. If they help you learn new things, great. Just don’t use them to become a “one-click-editor” and avoid learning how to do things on your own.
8. Photoshop is the editing program the pros use. That’s what you want.
![]() The first part of the statement is true, most pros probably do use Photoshop. They use other editing programs as well, but Photoshop is a de facto standard in the professional photo world. It’s the second part of the statement that may not be true, especially for beginners.
The first part of the statement is true, most pros probably do use Photoshop. They use other editing programs as well, but Photoshop is a de facto standard in the professional photo world. It’s the second part of the statement that may not be true, especially for beginners.
When I was first learning to edit photos in the early 90’s, Photoshop wasn’t an option, it was just too expensive for me as beginning hobbyist photographer. I learned with free editing programs like Irfanview, Picasa, and JASC Paintshop, (which has evolved into Corel Paintshop Pro). Fortunately for new photographers today, Adobe has a subscription plan which for under $10 a month, (at this writing), gives you both Lightroom and Photoshop. Cost isn’t as much a barrier as when Photoshop alone was around $600.00 as I recall.
The other reason I didn’t dive into Photoshop back then still exists today. Photoshop has a steep learning curve. Sure, if you are going to take classes, use online tutorials, or have a patient teacher you can get there in time. I think it important however that the new photographer have at least a few easy to use basic tools to adjust exposure, crop, straighten, adjust color, and maybe organize their images. I've seen a beginner’s jaws drop when you show them something so basic as brightening a dark image if all they’ve ever done is shoot and not edit.
There are many who will tell you that you need to “get your image right in the camera and then there is no need for editing.” Phooey, I say. Sure, do the best you can in camera, but then put the final polish on the image with editing, even if that's with just a few minor tweaks. After all, once you do decide you're going to shoot Raw you'll be editing every image to some extent.
It’s a little uncertain right now where Adobe is headed with their products, (and there are other Improve Photography writers devoting articles to all of this,) but I think if you want to go with a standard that has lots of support, scads of online tutorials and a reasonably easy learning curve, Lightroom is the way to go. If you are an absolute newbie to photography, shooting .jpg images, and want something you can dive right into, my pick is Picasa. I think it’s too bad that Google abandoned what is a very capable basic image organizer and editor. No matter, you can still download and use the program on either PC or Mac. I still use the program for quick .jpg editing when I just need something very basic. There are also some nice folks who call themselves “Geeks on Tour” with a package of learning tools to teach you how to use Picasa. I consider the program in some respects to be “Lightroom Lite” as it organizes your images and does its own form of non-destructive editing, never touching your original images.
9. Wedding photography is what you need to be doing. That’s where the money is.

Good wedding photographers often do make good money, true. They earn it. It’s hard, stressful, time-consuming work and it takes many hours of work and study to build the skills to do it well. It also takes great people skills and good business sense. The problem I often see is that as a new photographer begins to make some nice photos and acquire a decent camera and flash sooner or later someone will approach them and ask if they do weddings. If this describes you, deal with this question with fear and trembling.
You might be able to handle it and actually make some good shots. But what if you fail? Are you ready to tell the bride your shots didn’t turn out, your equipment failed, (and you didn’t bring a second camera??) or you missed that key moment? I could spend pages telling you about the horrors of wedding photography gone bad, but even if you manage as a new photographer to successfully shoot a wedding, did you take a job from a more skilled photographer who is trying to make a living doing wedding photography?
Here are my “two-bits” if you feel you really want to get into wedding photography – Find a good wedding photographer who is willing to let you accompany them as an assistant or perhaps a “second camera.” When learning, do it for free if you have to. You will learn the ropes and, in time, be ready to try a wedding on your own. Or, after seeing what is involved, you might decide landscapes may not be where the money is, but if you mess up the shot the mountains don’t care.
10. Forget trying to read the camera manual. It’s way too confusing.
Nobody I know likes reading manuals and when you’re a new photographer, trying to make sense of them may seem like learning rocket science. The reality is that if you really want to know how your camera works, that’s usually the best information source. That said, there are many initial alternatives to reading the manual. More popular cameras will often have other books written for them, usually in more easily understood terms. YouTube videos, online articles, blogs, or even classes are around for learning camera basics. Other more skilled photographers are often more than willing to answer questions or give you pointers.
After you’ve done all that, then read the manual. After you’ve had some hands-on and struggled a bit, the manufacturers manual can start to make sense. For more experienced photographers, I still recommend reading the manual occasionally. You will be surprised at what you may not have picked up along the way or perhaps could be doing more easily.
11. Always / Never use a UV filter on your lens
I could start a holy war with this one. There are indeed extremists in both the Never and Always camps. Some argue that it can only degrade your image by putting an inexpensive piece of glass in front of your expensive lens and that it’s just plain dumb to do that. They further say that a lens hood will do an adequate job of protecting your lens. Advocates of UV filters argue that it’s far cheaper to replace a UV filter should it become scratched or broken rather than a lens. They also say that if you repeatedly clean your lens you will eventually scratch it and when instead you wind up with a scratched filter you can toss it and get another. You will find passionate people on either side of the argument.
All I can offer is my approach. I buy the best UV filters I can afford and put them on my lenses the first day I buy them. I leave them in place and take most photos with them on, especially in harsh environments. I clean the filters frequently, working to keep them scrupulously clean. I always try to keep a lens hood on. Occasionally, when I have that absolutely killer shot in front of me I will take off the filter and make the image with a “naked” lens. Have I ever seen a shot where I think that made a difference? No, but then that’s me. I can’t afford to be damaging and replacing lenses.
I’d offer just one other piece of advice: When it comes to politics, religion, or the use of UV filters, be cautious of with whom you broach the subject.
 12. “Your camera takes great pictures!”

This is the biggest lie on the list and yet both new and experienced photographers hear it all the time coming from well-intentioned admirers. An equivalent might be if you had an excellent meal at someone’s house and decided to compliment the cook by saying, “That dinner was excellent! You must have a great stove!”
Silly, right? Sure, and you know why. It was the cook that created the great meal and it was you, the photographer, that made a great photograph. Notice I said “made,” not “took.” As a beginner seeking to create great photographs, you need to treat photography as a craft. Most anyone with an automatic camera can fire off a snapshot and “take” a picture. Occasionally, they will get lucky and get a nice shot. That’s good, but if you are serious about photography you will want to learn pre-visualize what you hope to photograph. You need to look for the light or create great light with artificial means. If working in portraiture you need to learn how to pose subjects and work with them to create compelling images. You need to master your camera and all of its controls, realizing it is simply a machine that you command, it cannot “take a picture” on its own.
I love photography because it is a journey, not a destination. Regardless of how much I learn, how many photos I make, and how many years I’ve spent doing it, there are always new things to learn and new photos to make. If you are a beginning photographer you will hear many things, some accurate, some “lies” because while true, they are for those further along in their journey than you are right now. There are ways to accelerate your learning. Coming to Improve Photography and places like it, working to further your knowledge and hone your skills, you grow that much faster. There will always be photos better than yours, tools and techniques you don’t yet understand, frustrations and hurdles to deal with. Yet as you grow, you will be able to proudly answer that last “lie” with, “No, I might have a great camera, but I’m the one that made that photo.”
Very good commentary. Nailed ’em on the head! (Especially #12!)
So nice
This article is well written & very helpful. It put the focus on the important stuff to make learning easier. And I agree, Rick Nailed It…
Pretty much right on…I love how you illustrated Corel Paint Shop Pro which basically I am using today along with Corel After Shot Pro because it does the fastest editing I’ve ever seen of a Fuji Raw file. Thank you for telling them not to do HDR’s…I’m to the point now that I can’t stand to look at one..The only thing I would differ on you is in Tripods…I love my old 1970’s slik aluminum tripod with the pan handle…I don’t use a tripod very much..but at least thisone I can easily just attach to my bag and it’s ready to go..
Nicely summarized. And I have heard many of these myself.
Great points made, Rick. I agree with most of them. The only ones I disagree with are the personal choices I have made, over time, in the process of my work flow and shooting style and habits. The one that sticks out the most is the preference of a “ball” head over a “pan” head. I use a pan head. I like the control it gives of each axis. I think I am in the minority of that preference, but I think it unfair to dismiss that option in one sentence. I will back you up on the wording you used in that the “tripod” shouldn’t have a “Panning handle”. If one buys a built in head on the tripod and it is a panning head, forget it. You bought a plastic piece of poo. Use a semi /pro head purchased separately from the tripod.
Keep the articles coming.
What??? You use a UV filter? Why, don’t you know . . . just kiddin’, Rick. Nice points that I wish I had known sooner rather than later. I might take issue with your tripod section, but only because I like you. 😉
Rick- Good advice for beginners as well as experienced shooters. I constantly chimp my histogram- thats what tells you what your image file is like. My teachers told me never to rely on the camera screen and they were right. I also ALWAYS have a UV filter or warming filter on my lenses. I would love to shoot with a 4×5 again as we had a dedicated large format class in our photography major. This time with a digital back. When I hit the lottery. Good stuff thanks