
This article is not an actual sky replacement in the truest of terms. When I think sky replacement, I think of removing an ugly sky and replacing it with a better one I photographed on a different day. This is not that article. Mind you, you can do this with what I will teach you. This is an article that helps a photographer who captured multiple exposures at a single moment or within minutes of each other and now have to blend them together in a cohesive manner that looks realistic.
With the lack of dynamic range in many cameras, this technique is extremely useful particularly for landscape photographers and real-estate photographers. After plunking around online I only see one or two styles of sky replacement at one time. This little tutorial (if you want to call it that) will show you four different ways that I use sky replacement in different occasions. I will also show you why I use them as well.
If you have been hitting a wall in your photography and you are not doing this yet, this will open a new door for your photography.
Basic Select and Mask
Pro Tip: layer images for different exposures in descending order. If you are working with a sky and ground, have your sky layer be above your ground layer. This keeps things in order.
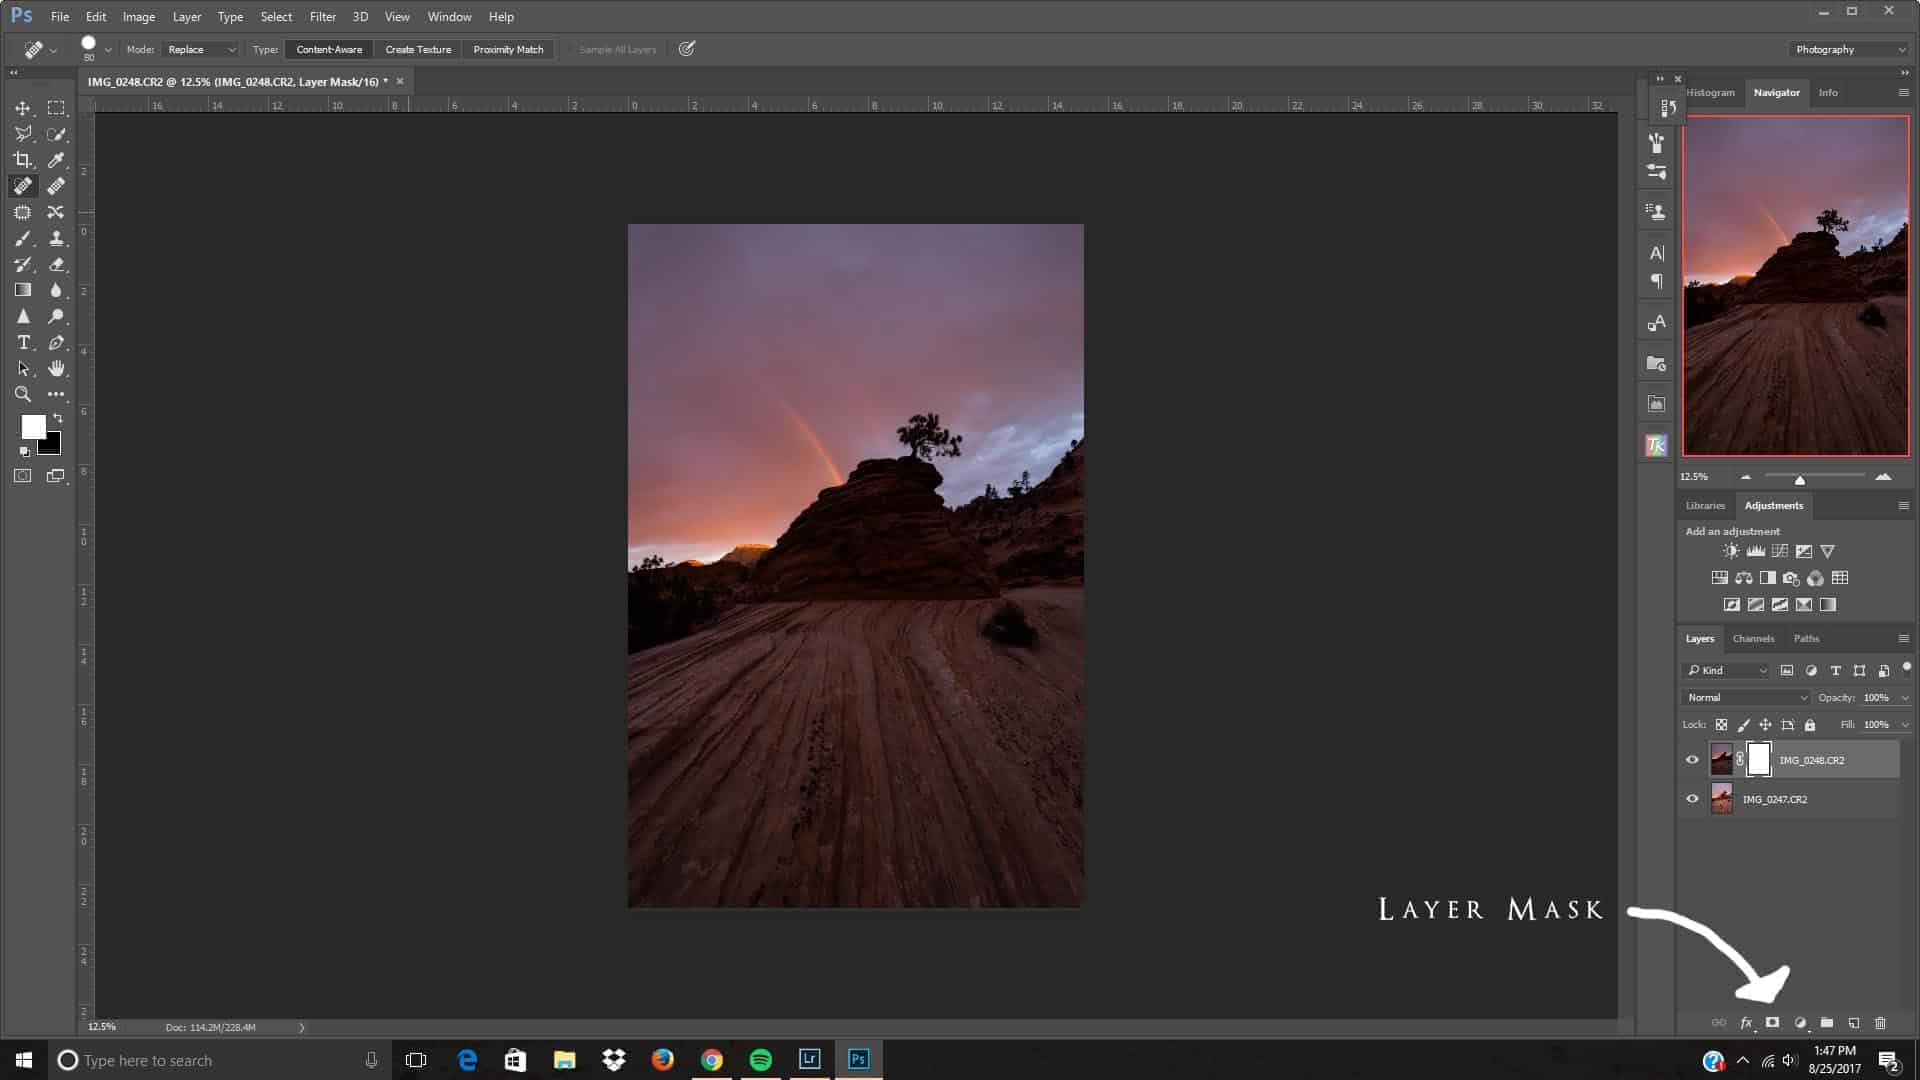
The most basic sky replacement trick is simply selecting the sky of an image and adding a layer mask.
This can be done by having both of your images in Photoshop on the same file. For this example I will be using these two images and combining them together in a few simple steps.

I chose these two images because they have a relatively simple horizon, the difference between exposures is not that great, probably only a stop. This technique works best with these types of exposure blends. So in order to do the edit I open them up in Photoshop and align them the way I like.

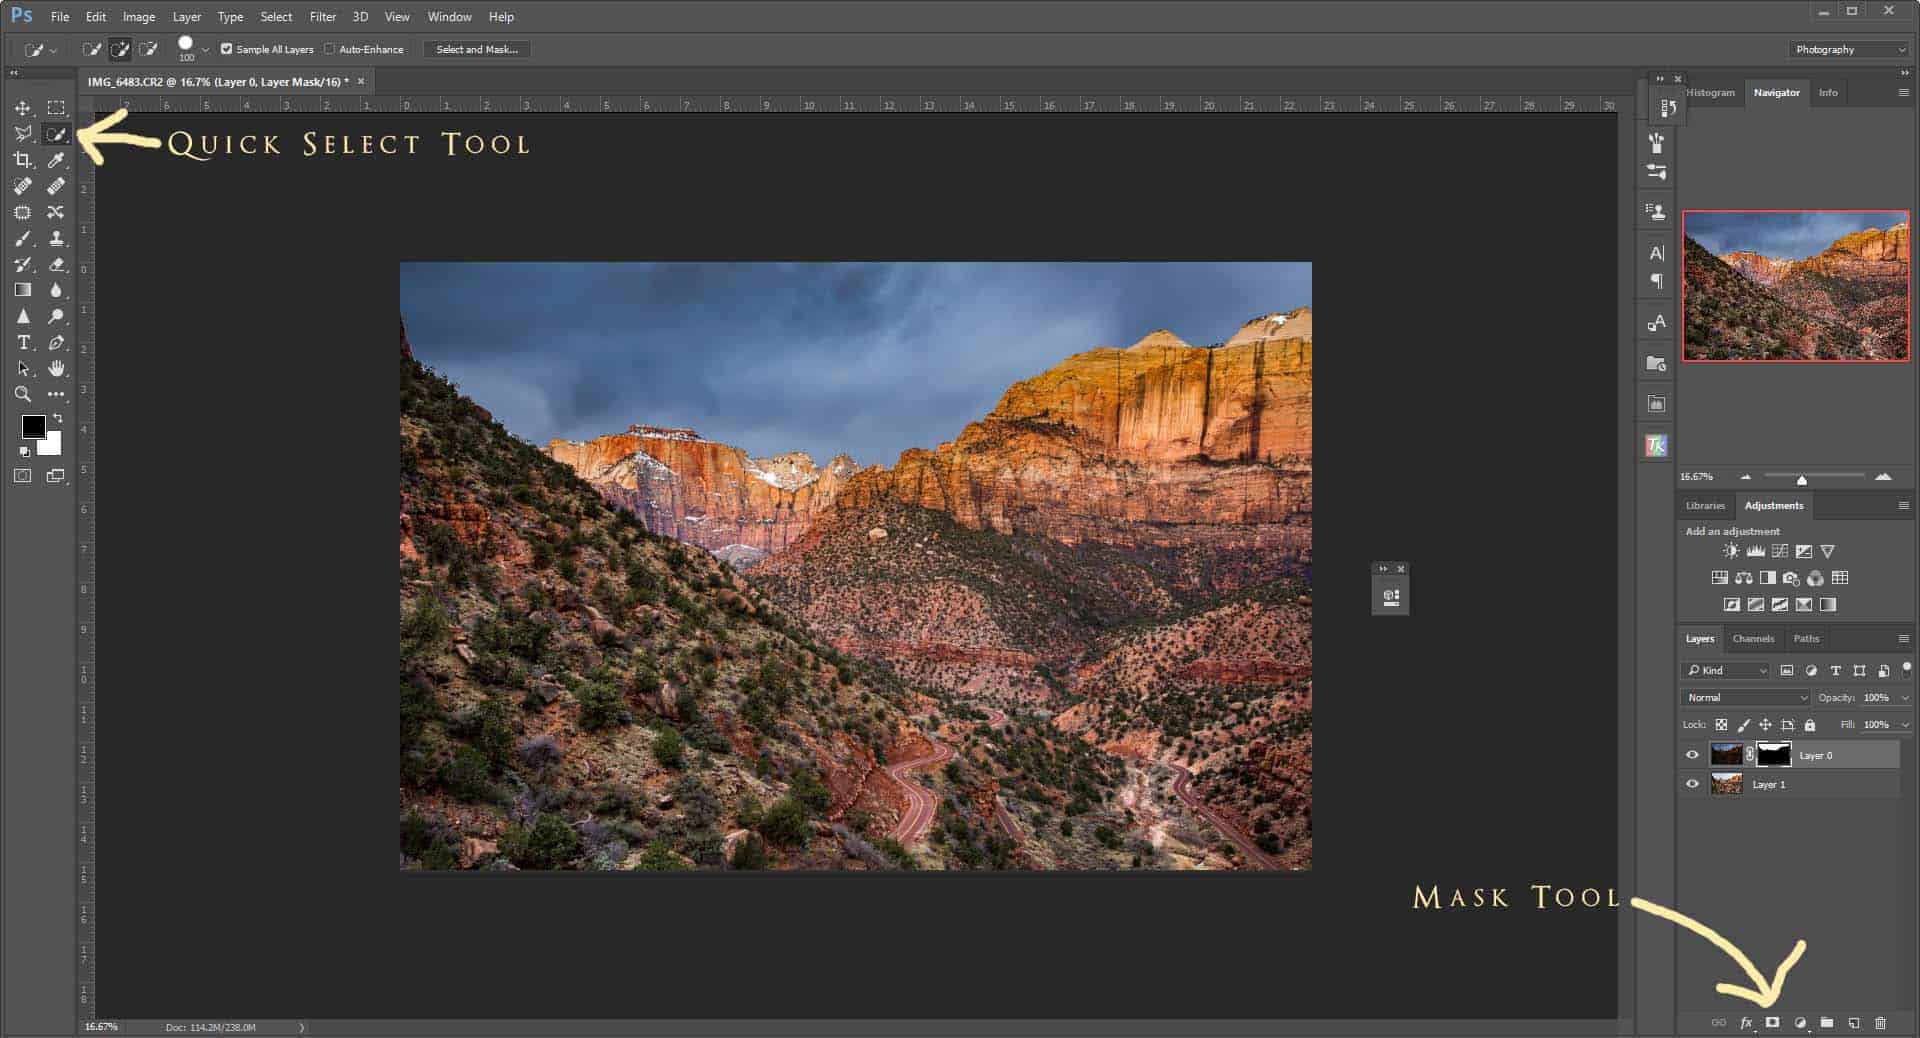
How To: See how I aligned the layers. Sky goes first. From here I select the sky using the quick select tool. First I select the quick select tool. Next I click anywhere on the sky and drag across. Photoshop will do a good job at just selecting the sky. Sometimes it will make mistakes and you can subtract a selection by using the alt key on the key board for PC or the option button on Macs. After the sky is selected, I push the masking bottom in the bottom right corner of Photoshop. Boom! The two exposures are blended. If you want to refine any more, click on the “Select and Mask” button up in the top left side of Photoshop. A new screen will pop up and on the left side will be a series of buttons. Select the “Refine Edges Brush Tool” from this series of buttons. It is the second button down in the list.
Note: Select and mask only shows up if you are clicking onto the quick select tool.
This basic selection works nicely but take these pros and cons into consideration.
Pros:
- Super easy
- Quick
- Works with most photographer's skill level.
- Easy refinement most of the time.
Cons:
- Not accurate
- Does not translate with all exposure blends. Particularly exposures that are really far from each other.
- Forget trees. This sucks with those things.
With this quick example, you can quickly see how awesome this can be especially for simple horizons and closely exposed images.
Gradient Filter Exposure Blend
Pro Tip: Layers masks work just like a mask. What is white is visible, while what is black can't be seen. Everything in-between just reveals the image partially underneath.
These are the two images I will use for this example. I have a few minimal photo edits to help bring them in line for the blend.
The gradient exposure blend is a simple method that is frequently used because it is quick and it allows for a smooth transition from earth to sky. It creates a very natural blend process that looks and appears to what you might see with your eyes. This is great when you do have trees that don't matter whether they have great detail and flat horizons on most occasions. This does not work well when you are trying to keep details in peaks of mountains as it often creates a dark gradient across the landscape.
How To: To do this simply stack you photos in photshop so that the sky is the top layer. After that place a mask on your top photo.
After you have created the mask select the gradient tool and then select the mask on your layer. Note: do not click on the image on the layer. If you do you will just paint over your image and all you will see will be a big gradient scale from black to white. Afterwards, take the gradient tool and select somewhere up in the sky and drag down. Do this until you are satisfied with the results.

Pros:
- Quick
- Works with many images
- Creates realistic results
- No special selection needed
Cons:
- On bright super contrasty images this create strange dark spots on your horizon.
- Does not usually work on mountain images.
- The opposite of fine selection, this is as general as it gets and can lead to terrible results.
Pro Tip: After you do the gradient tool and create your multiple exposure, use the brush tool to refine your gradient mask. Make your brush colors either black or white and adjust the opacity. If you are wondering what opacity you should do start at 25 and see what it does. There is no magic number for this. Just brush onto the mask to adjust your gradient effect.
Manually Paint in Sky
I try to avoid doing this too much, but depending on the situation you have to use this skill. The most recent example was from my grand canyon trip where the gradient wasn't quite giving me the results, nor was the quick select method. After trying a few different attempts I resulted in just manually painted in the ground and finally got the results. This is not the image I did it on, but it works well. No adjustments have been made to these images that's why they look… sub par. I guess the best examples of this is when you over expose the ground by a bit and if you paint over it using a mask and low opacity on the brush it work out well to bring it all together.
How To: This is as easy as creating a layer mask and selecting the paint brush tool and painting in the sky and ground as you see fit. Adjust the opacity of the paint brush until you get the results you are wanting.
This is the results after I manually painted in the ground.
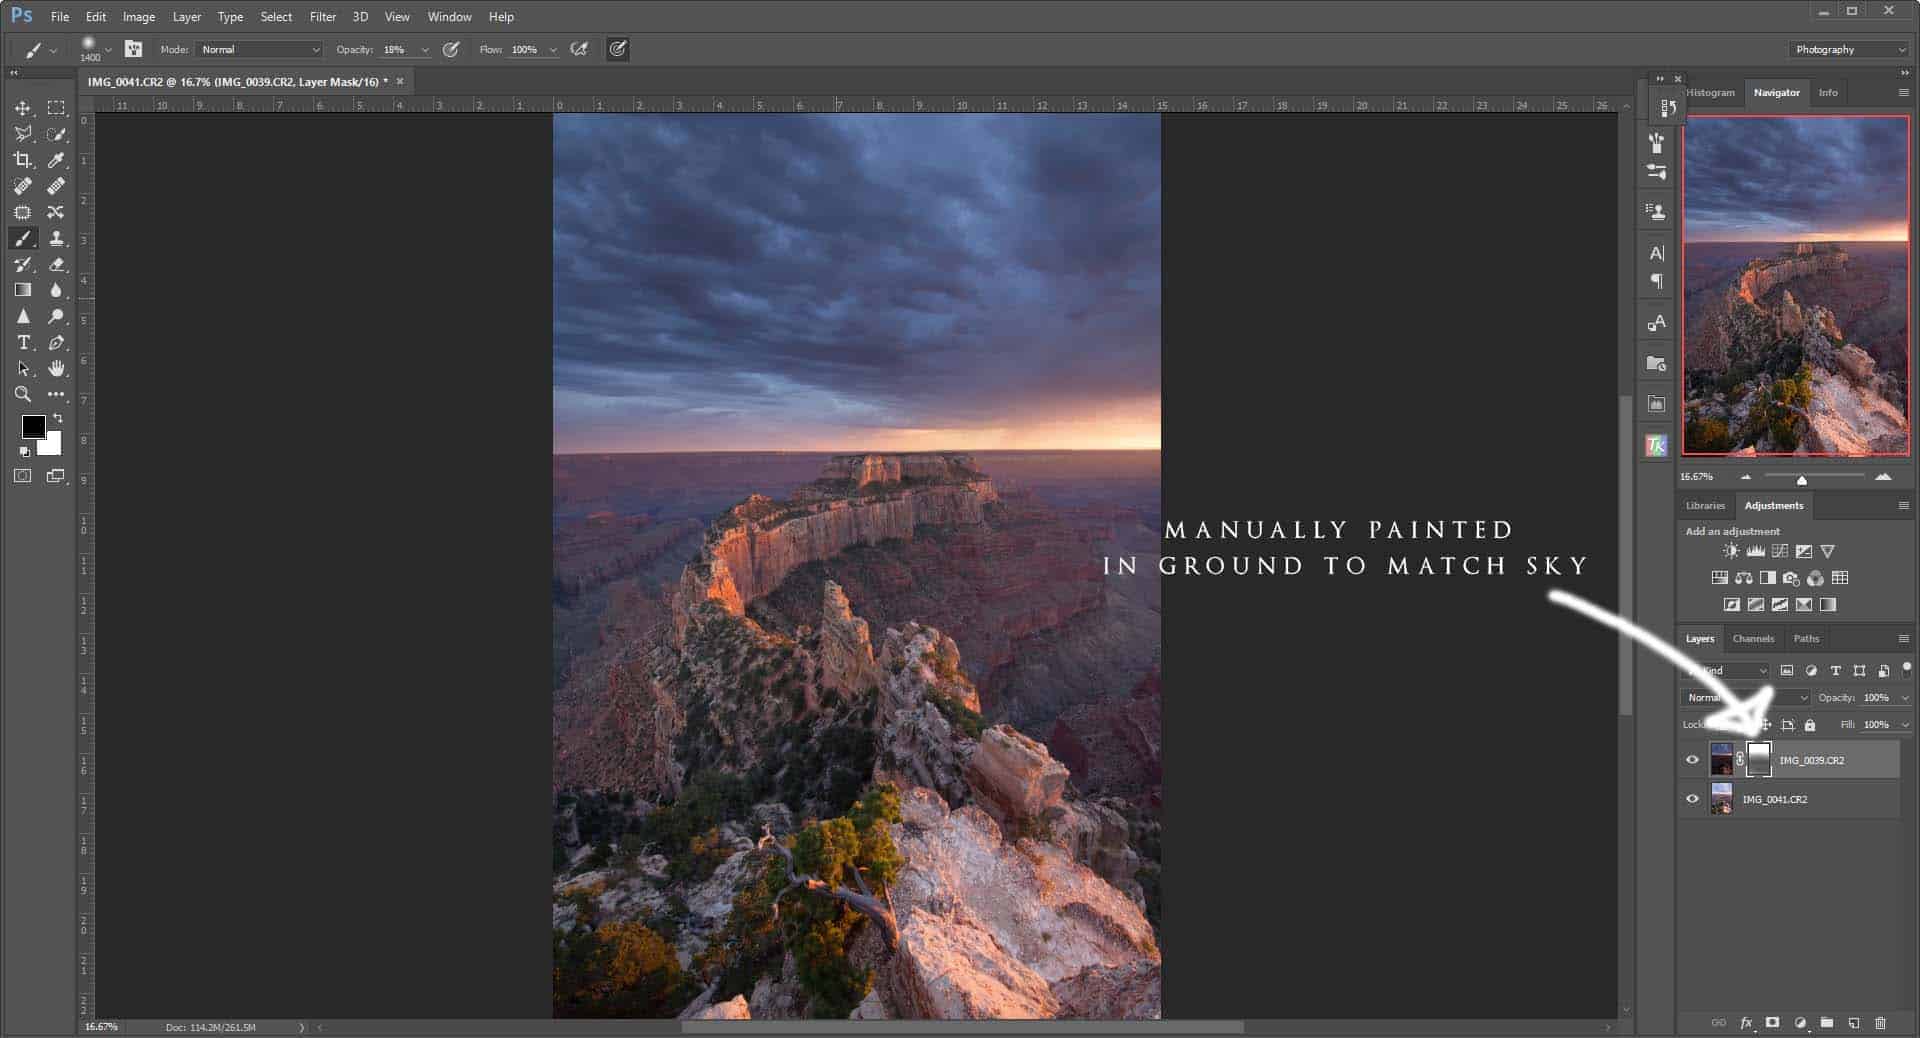
The nice thing about this technique, you can do a lot of really specific blending. You can make some spots darker and lighter really easily just by brushing over the masked area with different levels of strength using the brush tool.
Pros:
- You can get really specific on how things are brought together.
- Easily brighten and darken parts of the image as you will.
- Can create natural gradients on any part of your image.
Cons:
- Often ends with halos around mountains
- Does not work well with mountains… or trees.
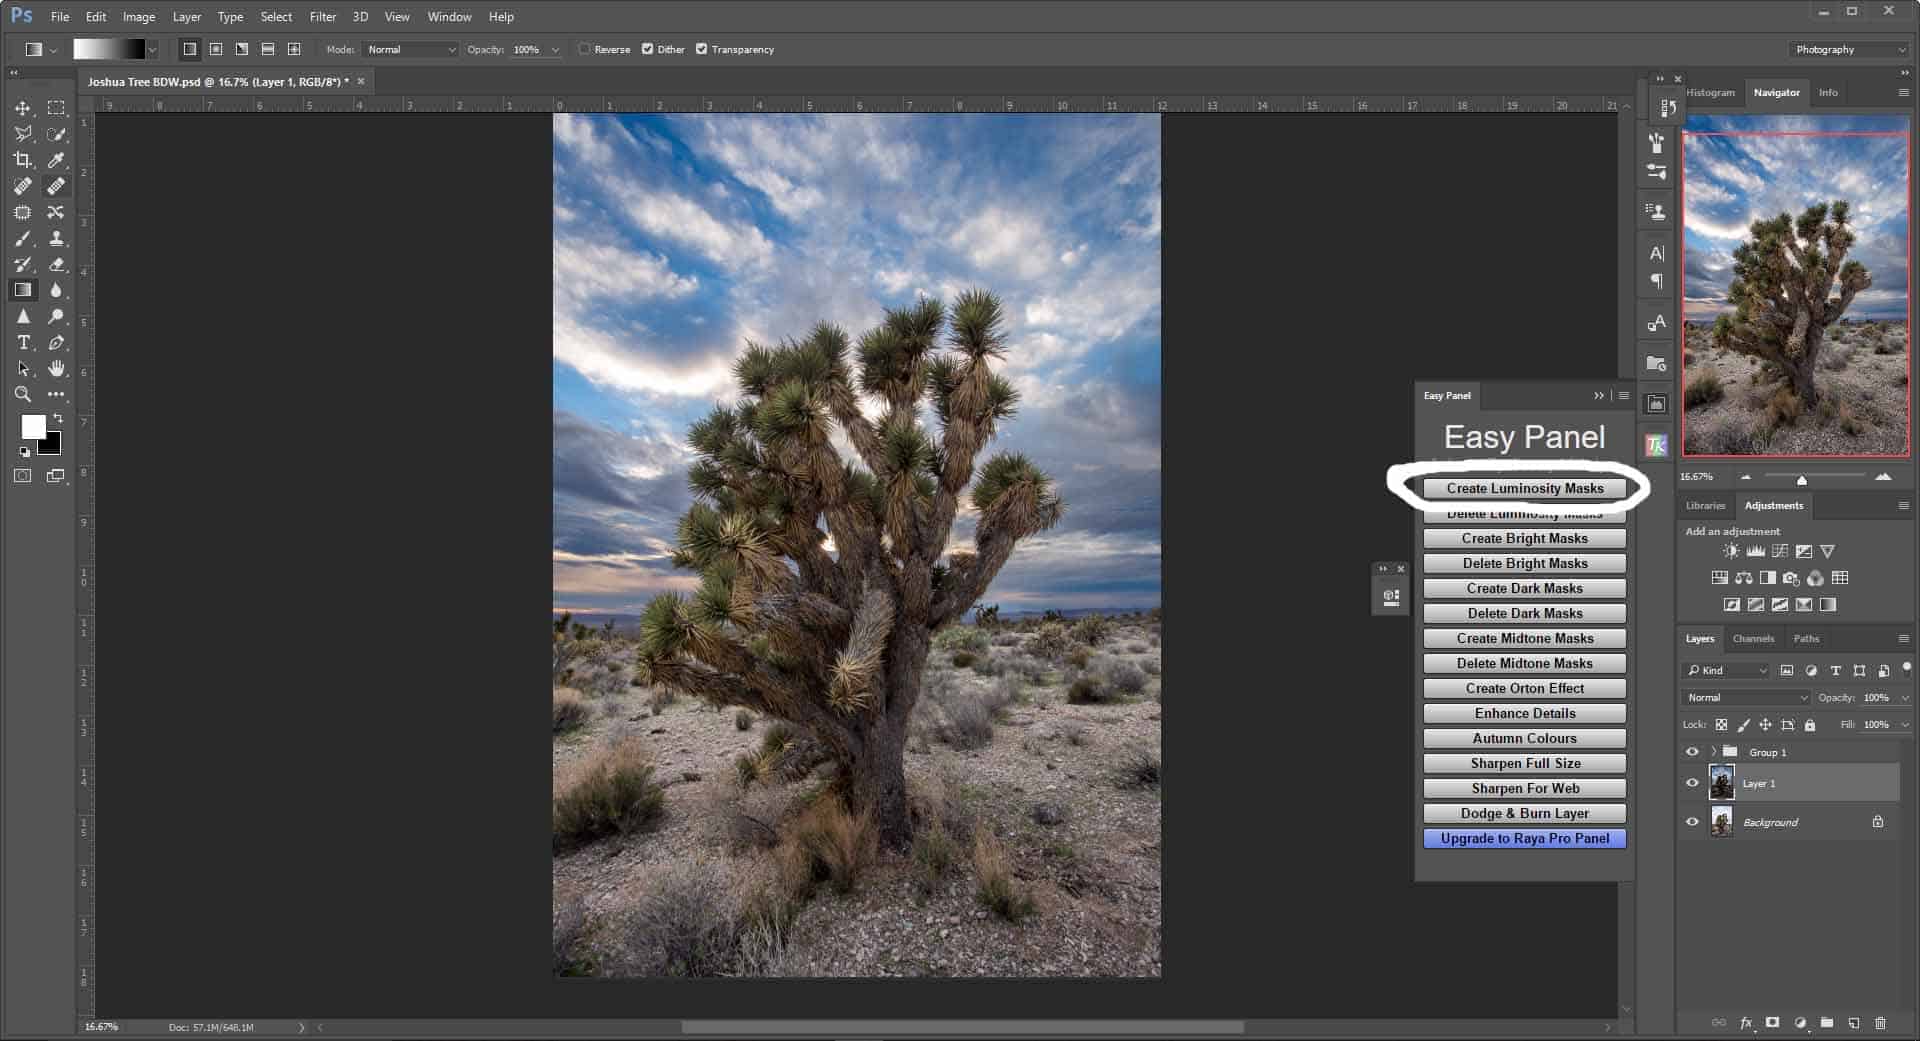
Using Luminosity Masks
This is the most complicated of all these. It can often fail in disaster or it can produce the best results of all of the blending styles. The best example of this that I have was on a Joshua tree multiple exposure blend that I did earlier this year. To this date it has been one of my most complicated selections I have ever made due to the fact that the tree is made up of spiny leaves that are jagged and have lots of opening within it to allow background light to come through.
How To: First you need a luminosity plug in on Photoshop. I use free ones because I am cheap like that and with enough effort you can accomplish almost anything. I did this with the free plug- in from Rya Pro.
I then had the program create the luminosity masks. I do this by opening the easy panel and clicking the Create Luminosty Masks button. If you use the TK action panel there will be a button that says “all masks as channels” and that will produce the same affects.
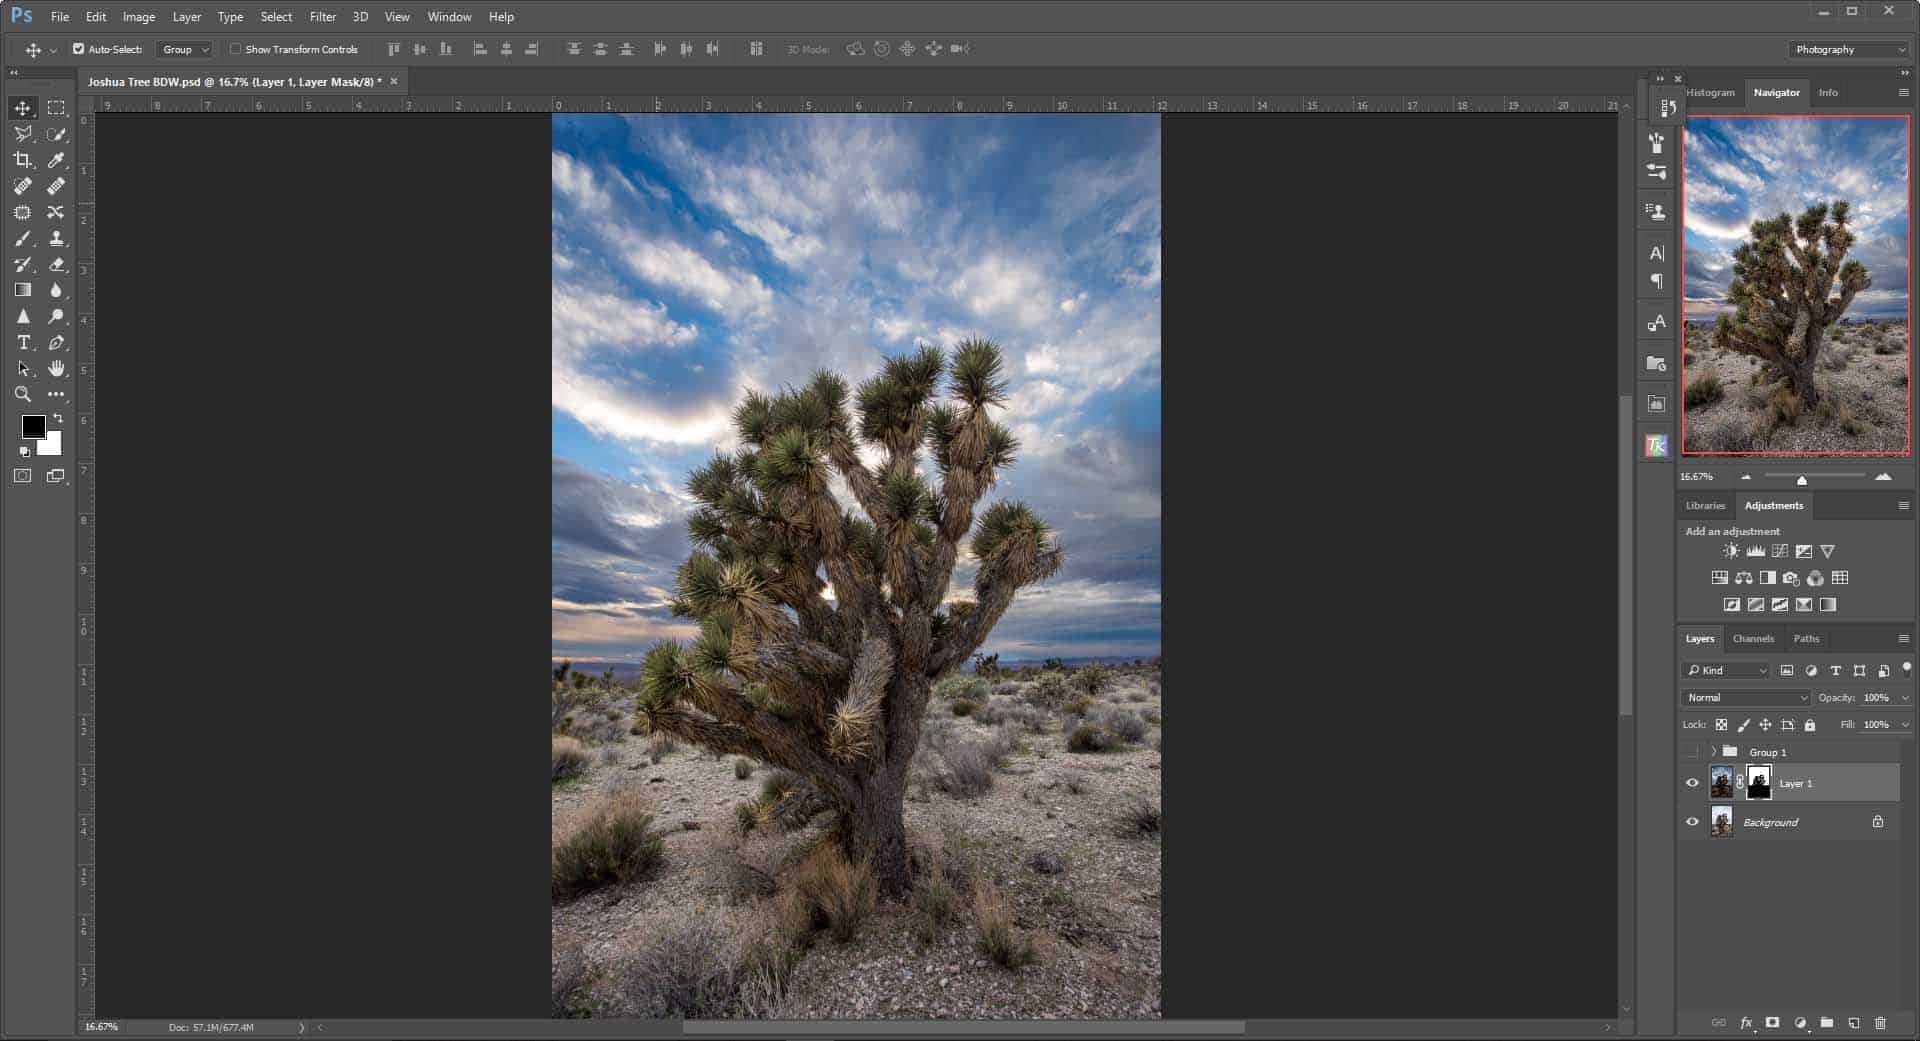
Luminosity masks live in your channels tab right next to your layers tab on your side panel. Select the channels tab and you will see a bunch of luminosity masks that had been created. From here go through and select the closest layer that has the sky, or ground to a solid black or white.

Pro Tip: Layer masks can be inverted once they are created by pushing Ctrl+I and that will invert the mask.
Once I have this selected I really want to refine this even more. I did this by selecting Darks 3 and dragging it down to the new layer tab on the bottom right. This creates a duplicate luminosity channel. Make sure you create the duplicate, you don't want to accidentally destroy your channel of brightness you are working on. Create a new one and mess with that one instead. After I have created a duplicate and selected it (still in the channels tab), I go to top menu bar and select Images>Adjustments>Levels. This allows for additional refinement as you slide the levels slider back and forth so that the image is adjusted even more. Mind you this technique is not perfect additional refinement has to be done from this point on as well.

Now that I have refined it a bit more, you will have to grab the paint brush and paint so the sky is black (for this example) and the ground and the tree are completely white. To do this select paint brush, make sure the brush hardness is 100 and opacity is selected to 100 and go through and start painting everything so that it is all black and white. It should look something like this when you are done.

In order to transfer the selection from your channels tab to your layers tab hold down Ctrl button on your key board and select your channel that you have been adjusting and then select back to layers and select the layer you want it on. Once you have done this push the mask button and the mask will be created. Look at your image and see how the transfer went and refine according to need.
Pros
- Extremely accurate selection
- Gives the best more natural transition from ground to sky.
Cons
- Still can fail even after you put a lot of work into it.
- Takes a long time
- Sometime the sky and the ground are too similar and the luminosity channels still can't save you.
Conclusion
No doubt there are other ways to do multiple exposure blending, but I don't know how to do them at the time. These are the four ways I do multiple exposure blending to do full sky blends. If you are only blending in just small pieces into the sky into your shot you might end up using two or three of these techniques.
If you are wanting additional training via video go to the Improve Photography Sky replacement tutorial here: Nicks Lessons
If you know of any other ways to do sky blending let people know if the comments below.
So it is a good thing for us to be at this website.
4 ways to replace the sky you give are very nice and useful to me. Thank you very much.
Great evaluation on blending – Tip for refining masks instead of using a brush for detailed refinements to mask, use the Burn and dodge tools in either highlight or shadow modes. Blending Techniques seem to be very image dependent as you have said to what will work. I have yet to find the magical do all plug in that does not require tweaking. The Joshua tree example is perfect. One important thing to consider and often overlooked is how the image will be viewed, this will determine how much work the image will need. We are all “soft” proofing on our monitors. I was awakened to the weaknesses in my processing when a client decided to turn a bunch of my images into 6 foot tall light boxes ( transparencies ) All of a sudden i had to reprocess all the then 12 bit raw source files to get rid of all sorts of artifacts. Great that cameras have move to mostly 14 bit.
I watched the adobe max vid and A.I. may help greatly in more intelligent selection methods in fact the Quick select tool seems to learn what i want, by adding and subtracting from the selection it makes. I will be upgrading to the subscription CC from CS6 – yea i know i should have done it already but i have been through allot of software and i am reallly conservative. Thanks for a great article