
Flash photography can be quite daunting but once learnt, can provide an edge to your photography and give amazing professional looking results. Shooting in TTL, S1 and S2 modes or using a trigger, once the basics of flash photography are understood, it can be very simple to really make a step change in your photography. It is one of the biggest improvements you can make and provides a level of versatility for challenging low light situations.
So what are S1 and S2 modes? These modes are simply optical Slave modes, hence the letter S. Still not sure? Then read on.
There is much to learn about flash photography. This article is not intended to describe how to get into flash photography or many of the basics of flash photography. There are many articles already published on flash photography on Improve Photography. You could try the Flash Photography Crash Course to get you started on this. Or if this is too basic you could try Jim Harmer's Lighting in a Flash video workshop which takes flash photography to the next level. This article is specifically aimed at explaining the optical slave flash modes called S1 and S2 and will not delve into any detail into other subjects relating to flash photography.
There are many ways to use a flash. You can stick it in your hot shoe of the camera and fire it off in TTL mode (stands for Through the Lens, if this is meaningless then I recommend one of the afore mentioned tutorials). You can bounce the flash by simply pointing it at ceilings, walls and other surfaces and off you go. You can also operate the flash in manual mode in this form where you have much more creative control over the flash, similarly to shooting in manual mode with your camera. In this mode, you can change the flash power, among other parameters, to light the scene to meet your needs. All of these modes are triggered by a direct signal from the camera, through the hot shoe and to the flash. You can use a light stand to get your flash off the camera for much more controlled and directional light. The flash can then be triggered by either a radio transmitter or using an optical slave mode.
The benefits of Off Camera Flash (or OCF as it is abbreviated) are well documented and I don't intend on covering them here but it is safe to say that if you haven't tried it then you definitely should, experimenting with OCF was one of my most enjoyable photography experiences and still love it today so I would definitely encourage you to have a go using slave modes as it is an easy way to start having a go. Slave modes work by triggering the flash when the sensor on the flash sees the light from another source, be it speedlight or studio strobe. This is useful for triggering multiple flashes around your image from just the flash of a single unit. The triggering flash can be from any source really, such as your pop up flash, a camera mounted flash or an OCF that is activated by a remote trigger. Any of these methods will activate the flash in optical slave mode.

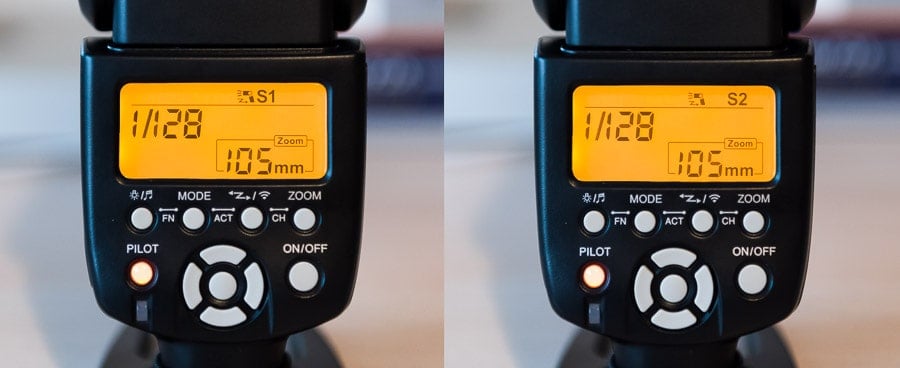
Where S1 and S2 modes differ is in which at what point the flash set to optical slave mode will be triggered. This can be different for the different models of
This can be different for the different models of speedlight you have so you will have to read the manual to yours but here I am trying to relay the principle of these slave modes.
Remember TTL (mentioned briefly in this article)?? When TTL is in operation, many flash units send an initial, almost invisible, flash to get the metering signal for TTL to operate and then a second flash light the scene for the actual exposure. This ensures the camera and flash unit get sufficient data and information from the scene to be able to calculate the correct exposure.
In many cases (again check the manual for your specific speedlight) S1 mode will trigger the slave flash unit as soon as it sees this initial flash. This result is similar to what you would get with a radio slave operated flash. To use this mode, the master flash should be set at manual flash and TTL should not be used in this case.
S2 is programmed to ignore this pre-flash required for TTL and operate on the second flash, which is the actual flash which will light the scene from the master flash unit. So if you want to use the TTL functionality of the flash, then your preferred slave mode is most likely to be S2.
Optical slave modes are great if you have a source flash to fire them with. As mentioned these would work with pop up flash, on camera speedlight flash or OCF. With OCF you would need a trigger to activate the speedlight for the master flash that would then trigger the flash units in S1 or S2 modes.
The downsides with using slave modes are that the flash output of the slave flash units cannot be controlled remotely. This means you have to physically alter the flash settings on each speedlight individually. This can become a little tedious when you have a flash set up at a wedding reception with a flash unit in each corner of a large room. This also means that changing lighting conditions cannot be reacted to quickly and make using OCF difficult in these situations and a remote trigger with the capability to change flash settings is more suitable. These modes are also not reliable outside in bright ambient light conditions are if the flash is modified which blocks the slave flash from seeing the pop of light from the master.
Slave modes work great with simple setups and shoots where conditions are more controlled. In a studio or at home for a family shoot would be ideal.
Slave modes are a great way to get into OCF and a simple way to add additional flash units into a scene. The main benefit is in its simplicity to throw another speedlight out and just get shooting. It has its detriments but it certainly has a place is flash photography and can be a very useful function.
So Go On! Give S1 and S2 modes a go and join the discussion at Improve Photography and let us know how this worked out for you!
Curious…. I’m teaching a little after school photography class for some elementary students at my school, and I’m wondering if my flash on slave mode can be triggered with the flash from an iPhone or small point & shoot- because that’s what my kiddos will be coming with. 🙂 I’ve never tried it before!
Thanks!
Sure will if it can see it…
Actually not. It’s a different type of flash they’re waiting for. Take the following exercise: Set some flashes in S1/S2 and then use another unit to flash a test charge (all of the units have a test button on them – that will emit a flash in the current config.). You will notice that the S1/S2 will NOT fire.
good article as i am looking to this article
Hi. Ive been familiar with s1 and s2 for a while, but what if you are using the pop up flash on a nikon for example snd you have say a couple of sb600 in ttl cmd mode. Now if you want to add an optical slave, then s2 setting is no good as there are four flashes in total. One camera preflash ‘1” to make the off cameras do their preflash’2’. Then the command flash ‘3’, then the final picture flash.’4′ So an S4 setting would be useful. The optical slave may manage to flash on 2 and 4 at low levels and if the recycle is amazingly fast, but apart from that you have no chance, ive tried it.