
Real estate, architectural, and interior photography draw a lot of their compositional guidelines from drawn art. Think back to your 7th grade art class where you learned about vanishing points. This is the point at which all parallel lines meet on the horizon. This stems from what we actually see in real life: things get smaller as they get further away. When it comes to using these perspectives or compositions in real estate photography, it's good to have an understanding of what they mean and when it is appropriate to use them.
Compositions were first explained to me by how many walls you can see in an image. While that is sometimes kind of true, it's not really that accurate. This comes from the basics of drawing a cube with different perspectives. In a 1 point perspective, you generally only see one side of the cube. 2 point, you see 2 sides, and so forth. However, a 1 point composition could have 3 walls, it just depends on how far you zoom in or out. Converging points are much more interesting than just how many walls you see, so let's take a look at how to use them in real estate photography.
1 Point Composition
These perspectives are, in my opinion, the hardest to master. You must be perfectly level, perfectly lined up or things just won't look quite right. Your camera must be completely perpendicular to the furthest wall you are shooting. And then there are things outside of your control that will affect the end result. Everything must be lined up perfectly. If the ceiling lamp is off center by a few inches it will ruin the entire shot. If the bed frame is off center by a few inches it will ruin the shot. Be judicious when using 1 point compositions.
As you can see in the photo above, all the parallel lines converge to the same point on the horizon. It looks as if the image is disappearing into the background.
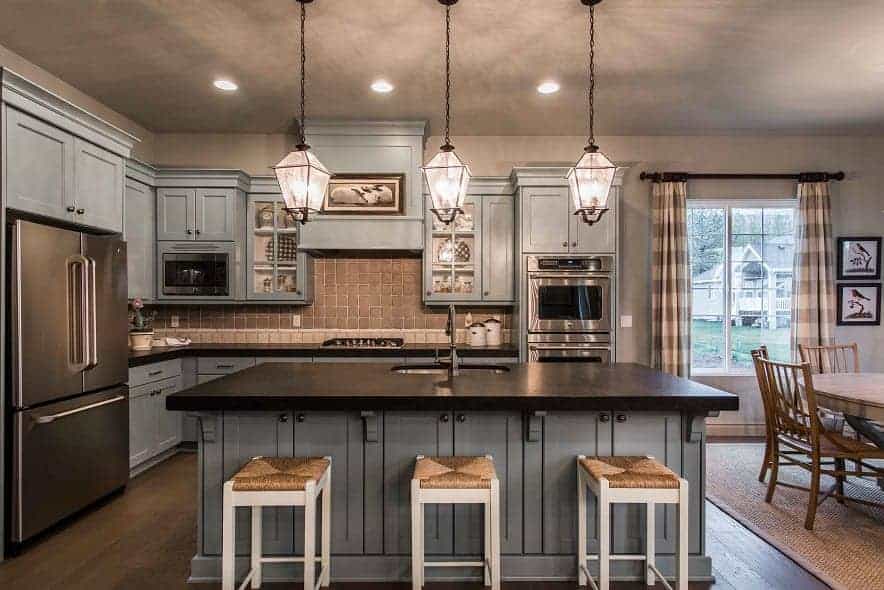
1 point compositions bring a regal feeling to your photographs. They feel very upscale and luxurious. Many images shot for interior designers use 1 point perspectives because of the clean lines and a sense that everything is very high end. 1 point compositions are useful for detail shots (especially with shallow depth of field), kitchens, bathrooms, and exteriors. Because sometimes the surrounding landscaping prevents 1 point compositions it's best not to try and force that from the image. Instead, use the landscaping as natural framing to enhance your image. Here are more examples of 1 point compositions.

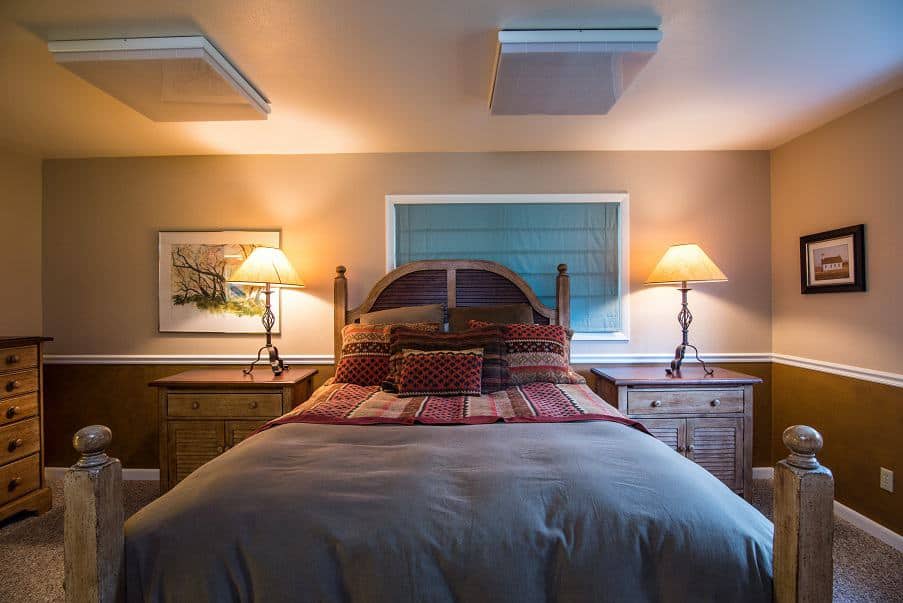
The hot mess you see above is an example of a 1 point composition that doesn't work because of the elements in the room. The window is off center, the bed is off center and the fluorescent light boxes on the ceiling are not centered to the room. I knew this composition wouldn't be very appealing because of all this so I chose to do a 2 point composition instead.
2 Point Compositions
These are the most common types of compositions you will see and use in real estate photography. They are easy to generate and very forgiving if you aren't lined up just so. 2 point compositions have 2 points along the horizon to which parallel lines will sink towards. Pretty much every time you aren't lined up exactly perpendicular to the rear wall, you will be shooting a variety of 2 point composition.

As you can see in the above example, the walls are fading to 2 points along the horizon. The reason they aren't equidistant from the center is because my camera was aimed more to the right than it was to the left. If I had put the rear corner in the exact center of the frame, these 2 points would be the same distance apart from the center line.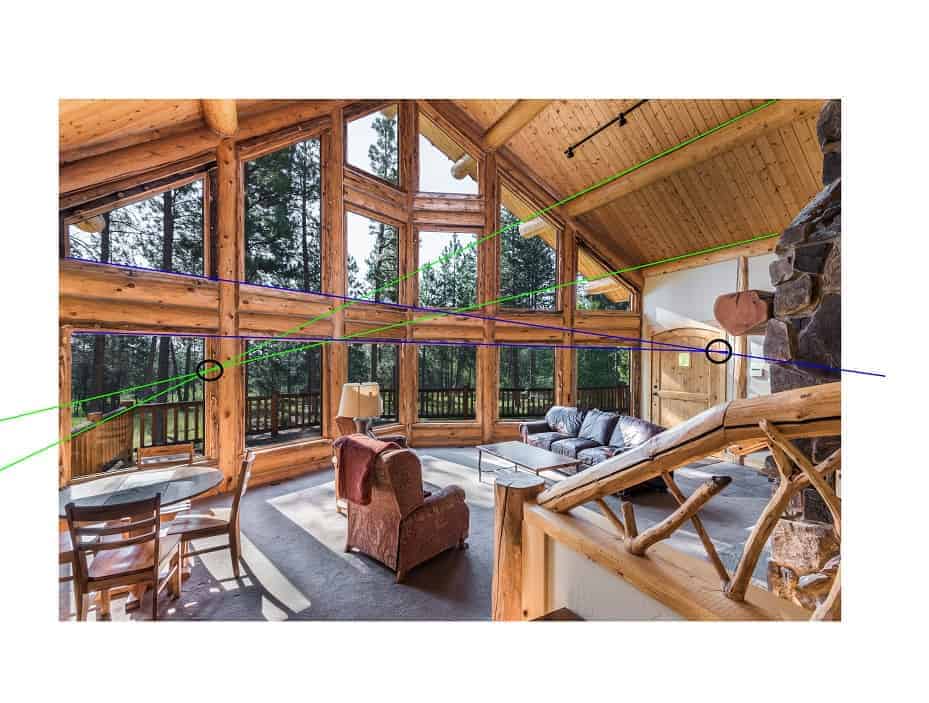
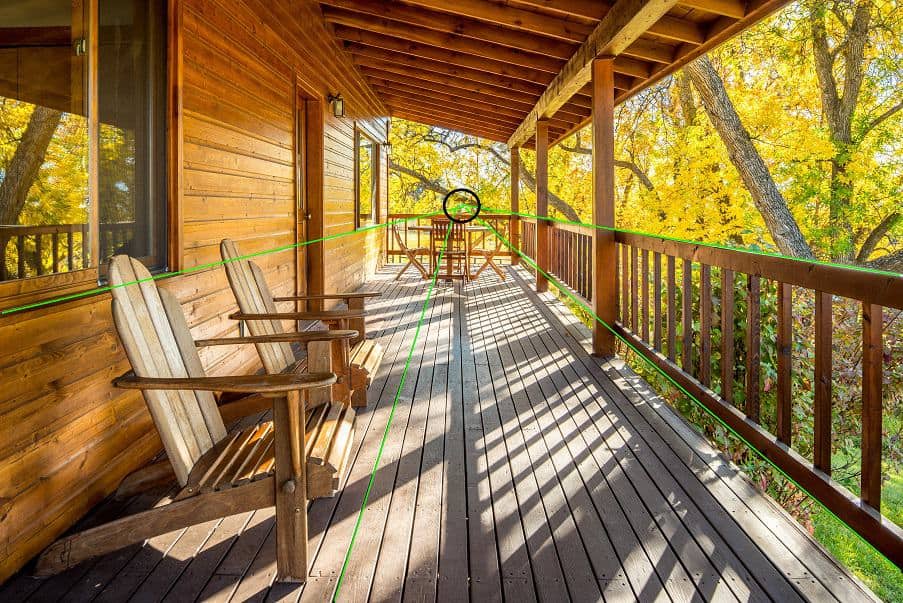
Here is another example of a 2 point composition. Because of the joint in the middle of the floor to ceiling windows, we have a little bit of an optical illusion, but I assure you the lines are perfectly straight. Just like in the 1 point composition, we take parallel horizontal lines and converge them to a point. All vertical lines should be straight up and down so they will never converge.
3 Point Compositions
These will almost never be good images. Even when you think you have a good case for a 3 point composition, you probably don't and should consider shooting it in another way. 3 point compositions break the first rule of real estate photography that all vertical lines should be vertical. Most images will look sloppy unless they have correct vertical lines. That is why it is such an important rule. It can be broken, however, just like any other rule in the Matrix photography.
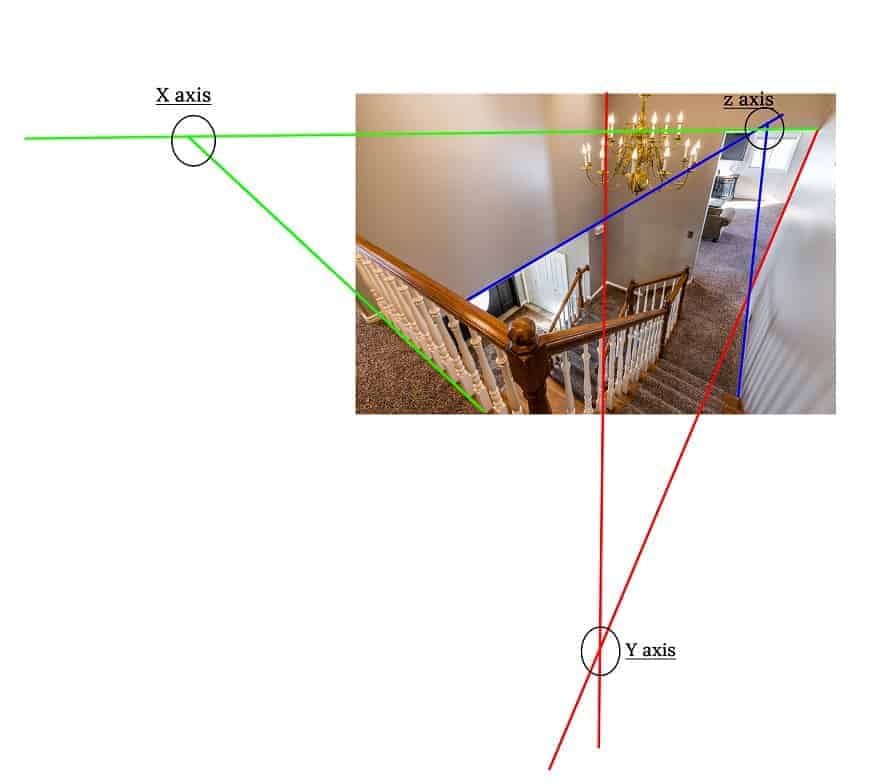
As you see in the image above, 3 point compositions are much busier than their siblings. There is a lot going on in this image and while I did deliver this photo to a client, I wasn't super happy with it. It was more of a personal experiment to shoot this vaulted entryway. 3 point compositions introduce the z-axis convergence to a point on the horizon. The idea is the same: you take all the parallel lines and converge them. This time, since the camera is not level, you get more converging lines.
I'm not a neuroscientist but I've read a few opinions that say 3 point compositions challenge our brain's normal way of interpreting 3D space. This makes them less appealing because we are forcing our brain to work harder trying to decode what we've placed before it. These kinds of images feel more abstact than informational. In some cases, this different way of shooting could be specifically requested by the client to give a certain feel or look to a photograph. Interior designers or architects that use creative lines may want a creative representation of their work.
Conclusion
Sadly we aren't advanced enough beings to render 4 point compositions which would allow us to see 4 sides of a cube. Maybe in a few million years we will develop the ability to perceive 3D structures in this way.
When you are shooting real estate, try to see the space in different ways to add to your compositional creativity. Practice with more 1 point compositions so you can master them. They are a great tool to have in your photo bag.
Improve Photography Plus members have access to Josh Corrigan's video, Master Real Estate Photography In 2 Hours. Josh talks about these compositions and their uses for real estate photography.
And if you're really interested in learning more about the business of real estate photography, be sure to check out Improve Photography's Real Estate Starter Pack. For just $15 you get:
- The real estate photo contract Jim uses for all his real estate shoots (a $250 value)
- 10 Lightroom presets to help you make bright, clean, and airy images
- The pricing template that Jim uses for his real estate shoots
See all the details here: https://improvephotography.com/real-estate-photographers-starter-package/
Thanks, Kirk, for a great easy to understand and informative article (without any math). These are great basic tips that will help me improve my skills!
Thanks Ken! I’m happy you found these helpful!
Very interesting and helpful!
I’m just a realtor who loves shooting my own listings. I have 2 great Nikons…D7100 and D80 plus SB 800 flash
I have, but don’t use my tripod for real estate
I also love shooting everything and anything else!
Any helpful info is appreciated!
Do a search for ‘real estate’ and you’ll pull up all the other articles on Improve Photography about the subject. I know you’ll find some great information.
wow, amazing information about real estate photography. Thank you for sharing.
You’re welcome, John!
We just spent 5 weeks shopping for a new home, and my biggest complaint would have to be the real estate photography, it’s very bad, generally. Once in awhile there’s a professional set, but in the main, for rentals, it’s smartphone photography with no thought to the lighting, and terrible composition and ridiculous converging and diverging lines. I don’t want something that shows in images better than what it is either, so it’s a balancing act, and imo, in a very active market setting, a pro is the best route. I’m a photography enthusiast, and appreciate the above info. Thanks.
You get what you pay for.
The amount of times I have gone in to reshoot a property that was either (a) shot by the agent themselves with a smartphone, or (b) done on the cheap to save money for advertising is astonishing. It’s up to the developer or the real estate agent to open their wallets and pay for quality work, or it just becomes more work to get a new home owner in the door.
Regarding the “bonus points” image…I’m thinking the point of convergence isn’t in the center because of the image being cropped in post?
Not quite! Not much significant cropping was done on this image.
I’m struggling to understand how Jims contract is “$250 value”. If you’re selling it for $15, isn’t it only worth $15?
It’s funny you never see any data on this kind of thing to backup the $x value claims.
Jim states this is how much he would charge a client to write a similar contract. Instead of charging the IP community $250, he is only charging $15.
I would have liked to have seen more lines illustrating the 1point compositions because I just don’t see it in the photos.
Try to image a point in the background (behind the image) where all the parallel lines sink into. Also, you can google “1 point perspective” to get an array of examples for further information.
Great article! I didn’t have the pleasure of art classes so all of this was new for me. As a recent home seeker, I now understand why some of the interior shots just turned me off. Thanks again!
Being a photography enthusiast/hobbiest, I love learning new skills and appreciate the valuable information that Improve Photography makes available with articles like this. As for the bonus question, my guess is that the image was shot using a tilt-shift lens.
You are correct, it was shot with a t/s lens, shifted down just a bit!
Sweet! I haven’t added one of those to the bag yet, but if I get into shooting interiors and or architecture, I’m sure it will only be a matter of time.
The $250 is what he’d charge to meet with and create a customized contract.
That’s something different to a one size fits all template sold without personal consultation/customization.