
Anyone who uses Lightroom knows that it is an incredibly powerful image editing tool. However, the post-processing features in the software are only half the package. Lightroom is also great for keeping images organized. Still, understanding and harnessing the full potential of Lightroom organization can be confusing at best. Why are there Folders and Collections? What is the difference and which should you use? And what in the heck are Smart Collections? Read on to find out the answers to these questions, and more!
This article will only offer some basic definitions and how the hierarchical system within Lightroom works. If you really want to get into the nuts and bolts of total image organization, check out Lightroom Medic in the Improve Photography Store. Jim Harmer will walk you through folder naming, keywording, image rating, and more, to get your Lightroom Catalog in tip-top shape.
First Thing's First – What is a Catalog?
Before diving into the main topic of this article, it may be a good idea to start with a discussion about the Lightroom Catalog. This will be a review for some, but will help to lay the basic groundwork for those who are not familiar with how Lightroom manages photos.
The Lightroom Catalog is a database that stores basic information about each image imported into Lightroom. The actual image files are not stored in the Catalog. Images can be stored on the computer's internal drive or on external storage. Information in the Catalog includes the location of the image files so they can be viewed or edited when you call them up.
A great analogy is the old card catalogs there were used in libraries. Each of the cards in those little drawers contained information about a book, such as title, author, publish date, etc. The books themselves were not in those little drawers (obviously). Rather, location information on the card told you where to find the book on a shelf somewhere else in the library. The Lightroom Catalog works the same way, except digitally.
Folders
The Catalog is where all the information about images imported into Lightroom lives. Folders are where the image files live. Folders are not saved inside of Lightroom, but are stored somewhere on an internal or external hard drive. When importing images into Lightroom, you specify where those images will be stored on your computer or an external hard drive. Lightroom “remembers” where those images are saved and the directions for finding them are part of the Catalog. This sounds confusing, but the folders are like any other folder on your computer. The ones with your images just happen to be referenced by Lightroom so the images can be viewed and edited within the software.
Organization within Lightroom is key. Jim Harmer just published an article on the Improve Photography website with some great tips for accomplishing this. One big step in the organizational process is to develop a good folder structure. There is a never-ending debate about how to set up folders and what to name them, but I won't go into that here. Choose a system that makes sense for your workflow and that works for you.
One tip that I would repeat is to keep all of your images within a single root folder. You can name it simply “Photos” or be more creative and call it “MyAwesomePictures”. It doesn't really matter; just pick something and keep all images inside that folder. Within that top tier folder is where you will have all the different subfolders that make up your folder structure. For instance, I have a root folder named “Photos” (really creative, I know). Within that folder, there is a subfolder for 2017, and within that is another folder titled Zion National Park. The images that I captured in Zion last month are saved in that folder on an external hard drive.
Collections
Using Collections is a great way to take your image organization within Lightroom to another level. There does, however, seem to be a lot of misunderstanding about what Collections are and how they work. Think of Collections like the playlists on your MP3 player. Just like adding songs to make a playlist, you add photos to a Collection. The important thing to remember is that adding a photo to a Collection doesn't mean the photo is copied to a new location. The original image stays in the folder where it was placed when imported. Adding it to a Collection gives you the ability to see the preview and reference the photo from that original folder location. A single photo can be added to as many Collections as you want, and there will still only be one original image file.
The Collections panel is accessed on the left side of the Lightroom interface from any of the Lightroom Modules. The Collections panel will be the last one on the list in that left toolbar. If you don't see the Collections panel, it can be revealed by right-clicking on any of the other panel names and selecting the option for it to be visible. Bonus tip: Right-click on any of the panels and select Solo Mode. That way, only one panel will be open at a time. Once a new panel is opened, the previous one will close automatically, and keep the workspace clean and easier to navigate. This feature is available for the panels on the right toolbar as well.
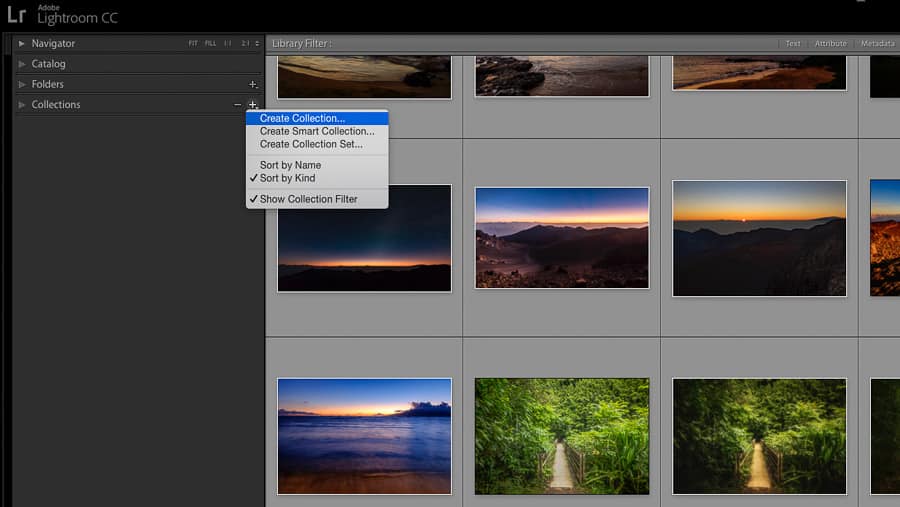
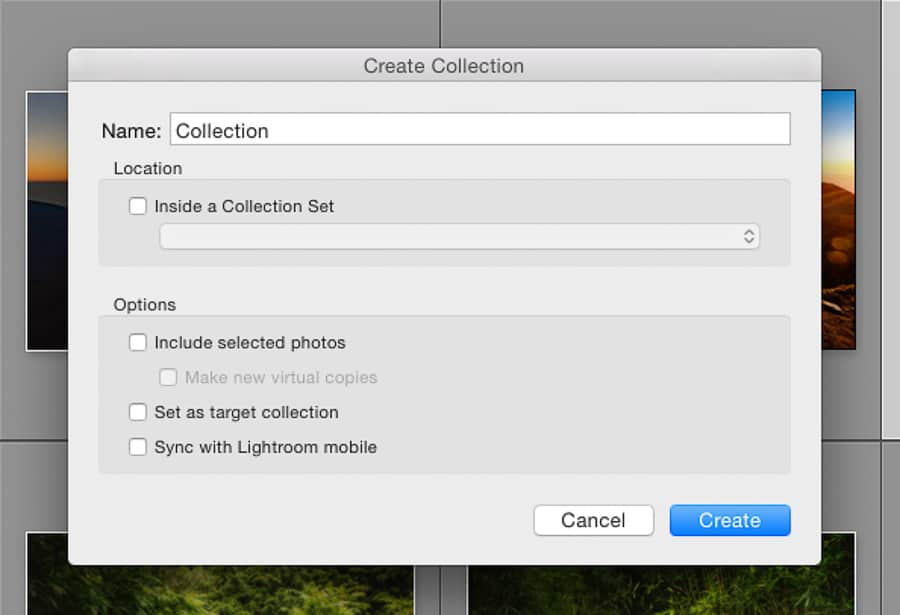
To create a Collection, click on the “+” sign to the right of the Collections tool panel, and choose the Create Collection option. A window will pop up giving you the option to name the Collection. There is also the option to place the Collection inside a Collection Set. More on what a Collection Set is in a moment. You can have all photos currently selected go into that Collection, set the new Collection as the target Collection, and sync the Collection with Lightroom mobile (for Adobe Creative Cloud users). After naming the Collection, click create and it will show up in the list in the panel below.
Collections vs. Collection Sets
Collection Sets are just another way of organizing images. A Collection is like a single album of photos that you select. A Collection Set is like a box of photo albums. Within a Collection Set can be multiple Collections. There are a number of ways this can be utilized in your workflow. Take for instance an annual top ten image selection. A Collection Set titled Top Ten is created. Within that Collection Set, will be a Collection for candidates that will be populated throughout the year, titled 2017 Candidates. As the end of the year approaches, that list will need to be narrowed down, so I will create a new Collection titled 2017 Picks for only my ten best images for the year.
Adding Photos to a Collection
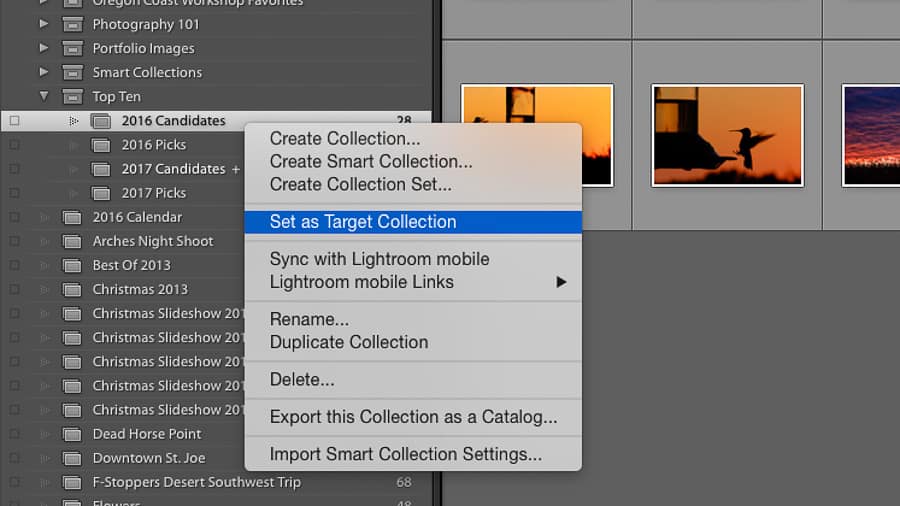
Once a Collection is created, there are a few ways to populate it with images. One way is to simply click on the image thumbnail in the library view or filmstrip and drag it to the desired Collection. Again, keep in mind that you are not actually moving the image file. Another way is to set a Collection as a target Collection. To do this, right-click on a Collection in the list and select Set as Target Collection. A little “+” symbol next to the Collection name will indicate it has been set as the target Collection.
To add a photo to a target Collection, right-click on the image and choose the Add to Target Collection option and the photo will be added. Better yet, as you scroll through the images, simply press the “B” on the keyboard and the image will automatically be added to the target Collection. This is a very quick and easy way to add the photos you want. Just don't forget to change the target Collection before moving on to the next shoot.
As if that weren't enough, there is yet another way to add images to a target Collection. in the filmstrip, notice a small circle in the upper right hand corner of each thumbnail image. Clicking that circle will add that image to the target Collection.
Smart Collections
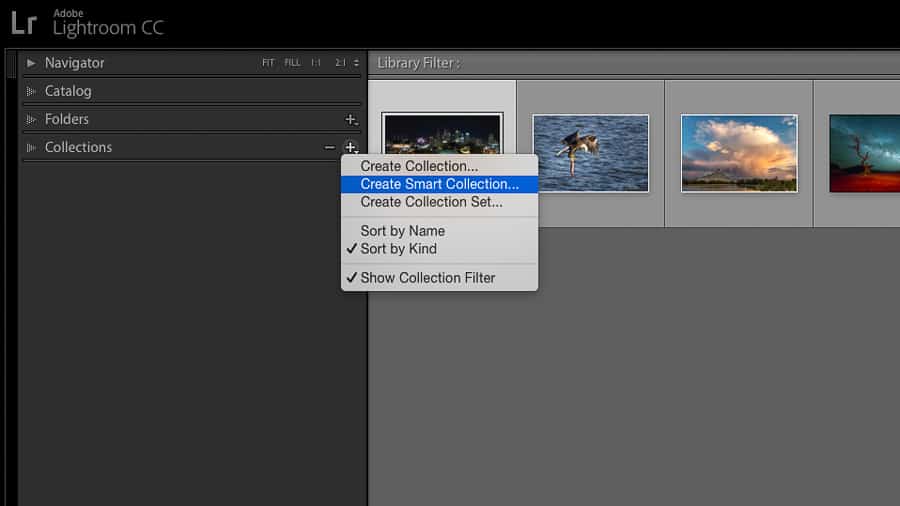
Smart Collections are the same as Collections in that photos are added without changing their location. They are set up very differently, however. A Smart Collection is set up using a variety of filters so that all images matching the prescribed criteria are automatically added. To create a Smart Collection, click on the “+” in the Collections panel and select Create Smart Collection. A dialog box will appear to add the Smart Collection name and a number of filtering options. Photos can be filtered by star rating, pick flags, color labels, file name, date, camera used, and many others.
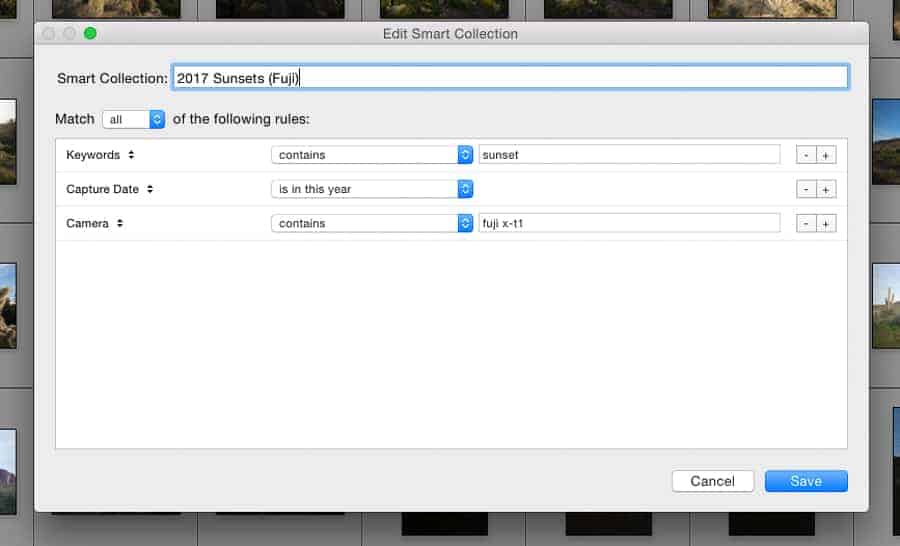
The possibilities are nearly limitless for creating Smart Collections. Let's say that I want to place all images in a Smart Collection with the keyword sunset, taken in 2017 with my Fuji X-T1 camera. After specifying the search criteria, select Create and BAM! A Smart Collection is created and instantly populated with all images that match that criteria. I could add even more filtering fields to narrow down the selections even more. Another use case would be in choosing your very best images for the year. If you don't place these into a Collection throughout the year, but do star ratings, you're in luck. Simply create a Smart Collection to include all images captured in 2017 with a star rating of 5. All of those images will automatically be added to the Smart Collection.
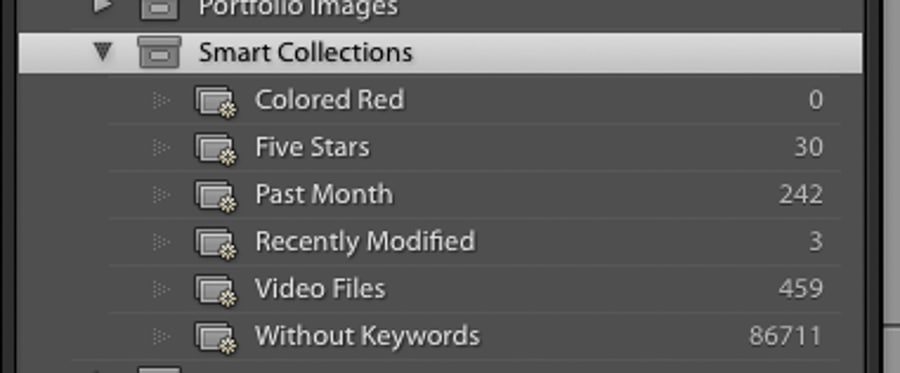
You may notice that there are already a few default Smart Collections in Lightroom. In my version, there is a Collection Set titled Smart Collections. Within that Collection Set are Smart Collections titled Colored Red, Five Stars, Past Month, Recently Modified, Video Files, and Without Keywords. Your version of Lightroom may be different. These default Smart Collections are being populated with all images that match these criteria. Tip: You can change the selection criteria of a Smart Collection by right-clicking on it and choosing Edit Smart Collection.
Quick Collection
Yes, there is even more! This one is not even found in the Collections panel, so it may not be obvious what it is for. It is located in the Catalog panel, which is only visible within the Library Module of Lightroom. As the name implies, this is a quick way to sort out selected images without going through the process of creating a Collection (yet). If none of the Collections or Smart Collections are set as the target collection, then the Quick Collection is targeted, and will have the little “+” symbol next to it. Therefore, any image can be added to the Quick Collection by either right-clicking to select Add to Target Collection, pressing the “B” on the keyboard, or clicking the small circle in the upper right corner of the image in the filmstrip.

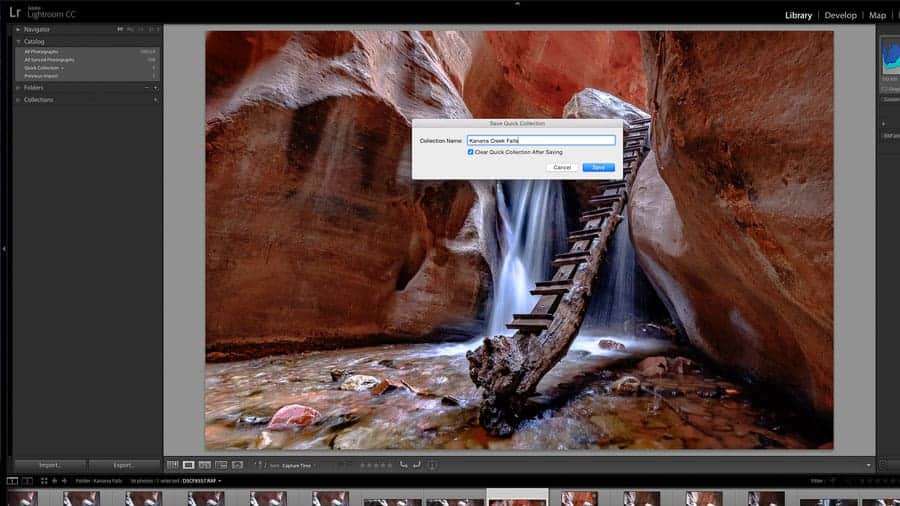
After going through a shoot and adding all the images you want to a Quick Collection, that Quick Collection can then be saved as a regular Collection. Right-click on Quick Collection and select Save Quick Collection. The dialog box that pops up will ask for the name of the collection and will also give you option to clear the Quick Collection after it has been saved.

So Many Collections
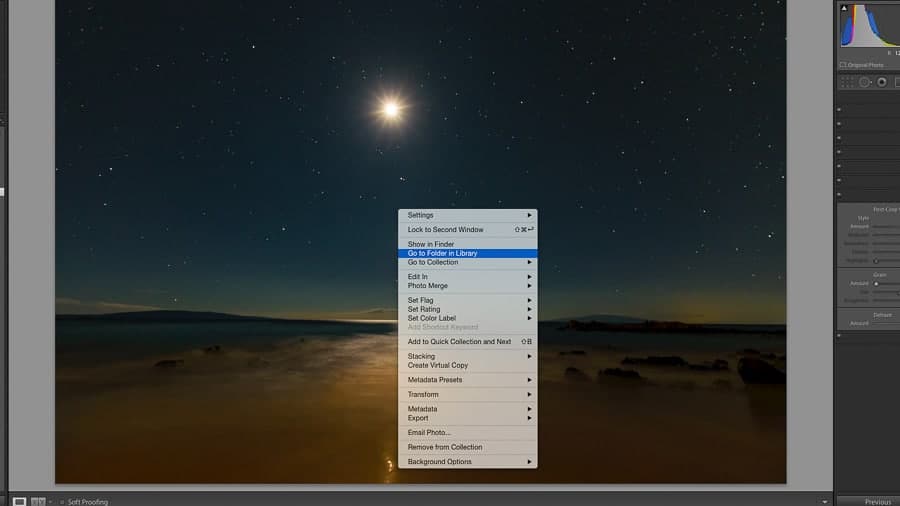
As you might guess, the number of Collections can really add up. Over time, as you keep adding images to Collections, you may actually forget where an original image file is located. A quick way to locate it is to right-click on the image and select Go to Folder in Library. You will be instantly transported to the folder in your Lightroom Catalog where that image resides.
One Big Caveat
It should be noted that, at least at this time, Collections are not written to image files and will not be recognizable in other software programs. This may be an issue for some, but for me personally, I don't find it to be a huge issue. It doesn't seem that Lightroom will be going away anytime soon, so my Collections appear to be safe for now.
In Conclusion
Hopefully this article has helped to clear up any confusion that may exist about the difference between folders and collections within Lightroom. They can be very important tools to help get (and keep) your images organized as well as easy to find. Starting with a good folder structure is a great first step in achieving this goal. There is really no right or wrong way to how yours is set up; just find what works best for you and be consistent.
Collections are an extremely useful and powerful tool to use for image organization within your Lightroom Catalog. Learning how to use them will help keep your images more manageable and easier to find.
“One big caveat…” As Jeff mentioned in the last Photo Taco, LR has hierarchical key words like landscape-milky way. If a keyword exists for each collection that the image is in, this info get written to the image file (non-raw) or to the XMP (RAW). This may make the keywords a little unruly, but just ask any Aperture user what it was like to loose their collection info when migrating away from that application. Also, with LR becoming really slow, if someone wants to make the jump to On 1 or something similar, having the collection info in your keywords almost guarantees that the “collection” info gets transferred to the new application. Just a thought.
Organizing photos within Lightroom, I’ve found to be quite challenging… With catalogs, folders and collections I’m often left questioning whether or not I’ve correctly structured my photo library. After reading your article, I feel more confident that I’m heading the right direction. Thank you Jim for sharing your expertize 🙂
I’d like to see a discussion of the relative merits of Lightroom v. Bridge photo organizing. I’ve been using Bridge for a long time and find that it does everything I need. Does Lightroom have more functionality? Thanks.
Thank you very much for the effort. Very informative. Now, organizing my images is a lot of fun. Thanks again.
Excellent, clear explanation. Thank you.
I must be dense, but I still don’t understand how it works. I have many collections and it all ,started off well until I wanted to make a collection not associated with my first set up. What I wanted was to have a heading, for example My Family, then under that, I wanted to place each of my children with their children under them. I also want to make other categories for things that don’t fit under My family, For instance, Travel or vacations. I don’t know how to make a separate category for travel. If I make another collection named travel, it always goes underneath something else instead of making it’s own collection. Help!!