

When shooting a lot of Team and Individual for youth sports it's bound to happen – an organization will book you and the facilities just don't have a good background for the pictures. Typically this is a school gym that has dirty walls or torn pads. It can also be a clubhouse/office space that looks nothing like the sport you are shooting. When this happens you have very limited options for a successful session. One option is to use a preprinted backdrop and that is a great one. However it is sometimes isn't possible to find a pre-printed backdrop.
If a pre-printed backdrop is something you want and are not able to find one at the many backdrop websites (Google/Bing “Photography Backdrops” for a comprehensive list) then getting a custom printed one is a great option, especially if you take advantage of FoamCorePrint's reseller program, to save a couple of bucks between you and your friends. When you have a suitable image for a backdrop labs such as www.coloradotimberline.com is highly recommended to print the image onto backdrop material. Sometimes though a pre-printed backdrop is just not a solution. When that happens using a green screen is the best solution.

Digital Background
When planning a green screen project the first thing you need to do is find the digital background. Different images have different positioning on the lighting. Some have stadium lights on the side(s) or from behind. Some have the sun positioned in a specific spot on the image and some don't have any obvious light source. This is important because as you setup your lights for the picture you will need to make sure to place any rim/hair lights to come from the right angle to help make the final image become more realistic.
Lighting Equipment
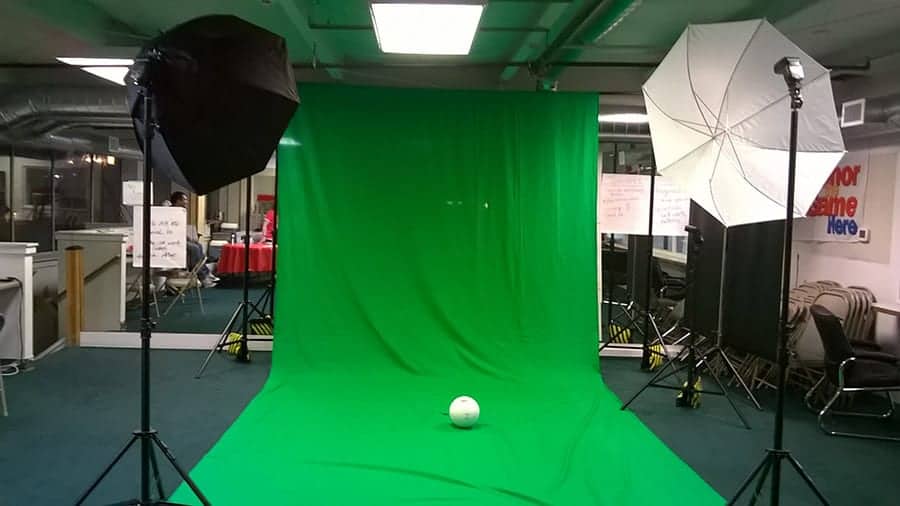
Typically for Green Screen sessions you will want 3 lights, Key light, Rim light and one for the backdrop. Since almost all my Sports Team and Individual work is outside or in a large gym running long extension cords is not a good option. I use speedlights for all my lights Off Camera Flash (OCF) as I have not invested the $1000's needed for a good strobe and battery pack system. What I do is I use 2 speedlights with a softbox (38″ Octabox is my favorite) for my key light and a 36″ shoot through umbrella with 2 speedlights for the fill light and a single bare flash for the backdrop.
Set your key and fill for the lighting\exposure needed. This is typically a flat lighting setup as most Team and Individual sports is about showing the players face with little or no shadows or you will get complaints from the parents. They just want little Johnie or Susie to look like their typical school picture but with the uniform on instead. You will also want to set you camera to F8 or something in that range. When it is time for the extraction step you will need the entire player to be as sharp as possible. Shooting at F2.8 or anything that will blur the edges of the subject will make automated extraction impossible.
Chroma Key Lab
Once you have finished your session and get home with your memory cards full of pictures it is time for the extraction part of the project. It is possible to do the extractions manually and if you have 20 or less subjects then I recommend manually extracting the images. However, when you are shooting Team and Individual Sports it's all about volume so having 100 – 600 images after a session is not uncommon. At this point automation is the key to keeping your labor costs down to a minimum. That is where a product such as Chroma Key Lab from Pixnub comes in to help out.
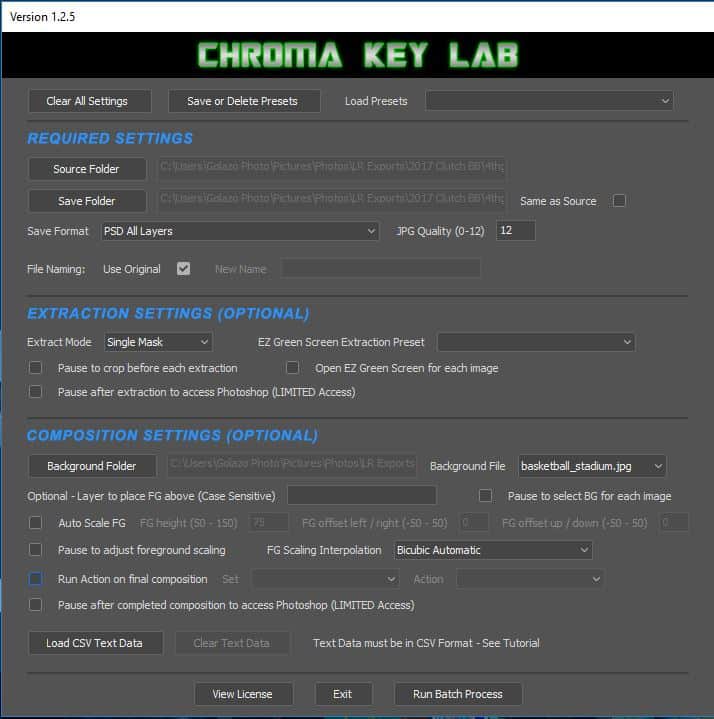
Chroma Key Lab comes in 2 variations Basic and Advanced. The Basic version is great for single image extraction and will supply you with a transparent PNG file or a PSD file depending on the options you select. The Advanced version is what most will need since it will batch process images and also place the image on a background as well. This is key since it saves a step in post processing. It works by selecting a source folder (images with green screen backdrop) and a Save (final) Folder plus a background file.
The are many advanced options as well such scaling. Scaling is an important feature since sometimes the subject is too small or too big for the background. If you were setup correctly and had the subjects standing in the same spot (a little gaffers tape to mark the spot helps) every time and your camera was in the same distance and height then simply setting this variable will make every image come out the same.
I recently had a shoot with a small Basketball Club with 6 teams and about 70 players. I was able to cull the images and run the Chroma Key Advanced on the players in about 30 minutes. If I had to extract each image individually it would have taken me 3 or more hours. I could have outsourced the extractions but at $1.50 per image that would have made a significant dent in the profits. While Chroma Key Lab is not low cost it won't break the bank and a one time investment will pay off very quickly.
Adding Green Screen to my offerings has allowed me to pick up more indoor organizations that would not have been possible in the past. It was a minimal investment that has paid off very well since and one I recommend to anyone interested in Team and Individual Sports photography.
I”d like you to review professor Green Screen too.
This is the biggest bang for the buck green screen photography software on the market. Compare to others costing well over $100. You may already know green screen photography allows you to frame your subjects in whatever background you’d like. From a peaceful meadow to the moon, your pictures can have any background at all thanks to the power of green screen software technology.