

I absolutely love the YN-560 flash and the YN-560 TX controller. They are absolutely awesome, and significantly easier to use than the Canon and Nikon brand flashes; however, there are still a lot of issues to consider when trying to trigger an off-camera flash.
I can't tell you how many times on workshops someone has showed me a “broken” flash that they are considering returning to the store when I turn it on and get it to fire the first time. So this is my step-by-step guide to getting your YN-560 flash to fire. But don't feel bad if you can't figure it out. I've spent many hours trying to figure out flashes myself, and hopefully this article will help.
[x_alert heading=”Quick Fix!” type=”success”]Be sure to follow all of these steps without skipping anything in order to fix your issue. If you're only trying to fire the flash attached to the camera, you'll only need steps 1-3 below. If you're going to use the flash off-camera with a YN-560TX controller, then follow all of the steps on this page in order.[/x_alert]
Step 1: Make Sure the Flash Itself Is Working and Has Power
With the flash turned off, press and hold the “on/off” button on your flash for a few seconds until it turns on. Press the “pilot” button. If the flash pops, then chances are good that there is nothing wrong with the flash and that we simply need to work on getting the right settings.
If the flash does not pop, put in brand new batteries (try not using rechargeables) and try again. If it still does not work, then the flash is defective. There is no setting that would prevent the pilot button from firing the flash.
Step 2: Factory Reset Your YN-560
To reset your YN-560, hold the audio and mode buttons (“C” and “D” in the diagram above). This is how you access settings. Now that you're in settings, press the up arrow key (“G” on diagram) until you see “CL EA.” Now hold the okay button and you'll see chasing squares at the bottom right. Once that gets done, it's reset.

Step 3: Make Sure the Camera and Flash Can Communicate
Attach the flash to the hotshoe of the camera. Be sure to push it TIGHT all the way forward and lock it down by spinning the plastic circle on the flash above the shoe. If it doesn't seat all the way forward, it won't fire. Turn on the flash and take a picture. If the flash fired, then move on to step 3.
Next, press button “E” (shown on the diagram above) on your flash until the flash looks exactly like the picture immediately above this section. This changes the receiver mode so the flash will accept the “fire now” signal from the hot shoe of a camera. On the back LCD of the YN-560, you should see a little flash symbol at the very top-left, and an “M” on the right side of it. Don't worry if the other numbers on the flash are different, but there shouldn't be any additional numbers showing anywhere on the flash.
[x_alert heading=”Quick Fix!” type=”success”]The most likely issue that prevents the flash from firing is if your CAMERA is in live view mode, on continuous low or continuous high drive mode. Be sure you're using the viewfinder and that when you press the shutter button down and hold it, only one picture is taken.[/x_alert]
Set your camera in single shot drive mode. This should mean that when you press your shutter button and hold it down, only one picture is taken. Many cameras will NOT fire a flash if it's in continuous high or continuous low mode. Be sure to check this. Turn on the flash and take a picture. If the flash fired, then move on to step 3.
If the flash hasn't fired yet, don't worry. We have some other things to check. Make sure you are using the viewfinder. Many cameras will not fire a flash when in live view mode. If the rear LCD is showing the picture before you take it, then you're in live view. Switch to viewfinder only. Turn on the flash and take a picture. If the flash fired, move on to step 3.
Rarely, but sometimes, a camera will not fire a flash if in continuous focus (written as “AF-C” on Nikon cameras or “AI-Servo” on Canon cameras). Change your focus mode to single shot focus. Take a picture. If the flash fired, move on to step 3.
Now, set your camera to manual exposure with a shutter speed of 1/100. Take a picture. If the flash fired, move on to step 3.
Next, be sure that your camera is not set on quiet shutter or “silent mode” as it is sometimes called. Also, check to make sure you're using mechanical shutter and not electronic shutter, which is a feature of most mirrorless cameras. You'll know you're using mechanical shutter if you hear a significant “click” sound when you take a picture.
The last thing to check for is to make sure you don't have a setting turned on that suppresses flash. Many cameras have a setting that suppresses flash so that if you're at an event where no flash is allowed, you can ensure that no flash will fire.
If the flash did not fire after following all of these steps, then something indeed could be wrong with the flash, or you could have purchased the wrong flash for your camera model. If you have a friend with a DSLR, try it on theirs. If it still doesn't work, then the flash could be defective and should be returned. At this point, we've gone through all of the possibilities that could be tripping it up.
Step 4: Make Sure the Controller and the Flash Can Communicate
Now we're going to take the flash off camera. Things are going to get a little more complicated, but fear not! I'll walk you step-by-step through this issue.
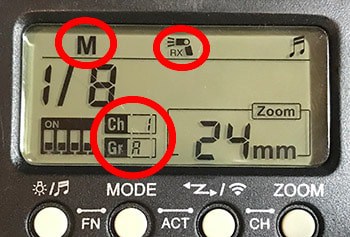
First thing we need to do is set up the flash to accept a signal from the YN560TX wireless trigger. To do that, press button “E” (on the diagram at the top) until you see a symbol of a flash with the tiny letters “RX” under it. This is wireless receive mode. BE CAREFUL NOT TO CHOOSE “TX!” I know it seems like you'd want TX since that's the name of the transmitter, but “TX” means you want to put the flash on the camera and use the flash itself as the trigger. Choose “RX.”
Next, we're going to check the channel and group of the flash. You can customize this later, but for now I want to make sure it's on channel 1, group A. This does not get set back to default when you reset the flash. You'll have to set this up.
To change the channel on the YN-560, simply press the center “okay” button on the 4-way selector (“G” on the diagram at the top of this article) and then press the up and down keys to get to the channel you want, then press the center button again.
To change the group on the YN-560, press buttons “E” and “F” (as listed at the diagram at the top of this page) at the same time. Then use the up and down keys to cycle through, and press the center okay button (part of “G”) to accept. You should now be on channel 1, group A.
Now set down the flash. It's set to go, and should look like the picture in this section. It's time to set up the YN-560TX controller.
The good news is that this part is super simple. Just hold the “Zoom/Ch” and “Mode” buttons at the same time for a few seconds to reset the YN560TX trigger. This will zero out all of your settings and put it in channel 1. That's all you'll need to do.
At this point, your YN-560 TX trigger and your YN-560 flash should be able to communicate with each other. Turn on both units. Press and HOLD the “Test” button on your YN560TX trigger. It should make the flash on your YN560 fire the flash.
Ta-DA!!!!! You're set to go. Now it's time to learn off-camera flash.
One Last Thing
Hooray! Your flash can fire now, but you're about to face a lot more issues as you learn to use your flash effectively. I can really shorten your learning curve with a video training I produced called “Lighting in a Flash” which THOUSANDS of photographers from all around the world have purchased.
In the video, I use the YN-560 flash exclusively to produce professional and creative portraits with an inexpensive YN-560 and an umbrella. I really think I could save you 2 years of a learning curve if you'll spend an evening watching the video. You can get Lighting in a Flash here. It's really reasonably priced.
I have to say, your tutorials are simply amazing! I have been struggling since I got my 560 flash and couldn’t get it to fire reliably. That is, sometimes it worked and sometimes it didn’t, with what seemed like for no reason (mind of its own?).
Turns out it was something so so simple: sometimes I have live view on, and sometimes I didn’t. Thanks to this article, I know the flash *will not* work in live view on my camera model. Switched to view finder and now it works! Being new to speedlites, I confirm that there’s definitely a learning curve…
If your videos are anywhere near as good as your tutorials, then I’m sure they are worth the money!
my yn860li has just stopped working, it was working fine before now. i have had a only 4 months old. It didn’t fall. the screen is on but it wont fire even the test flash wont in manual.
i have a problem with my flash. its able to turn on but cant fire. the beep sound does ring though.
when i click the zoom button, nothing happens.
i tried the above procedure but still my flash cant work.
any help???
Very useful. I was using all the required settings but still no joy. Then I wondered if despite researching prior to purchase that the flash unit was suitable for my Canon 6D Mark ii, that perhaps it wasn’t. So I popped the unit onto my old Canon 500D and it worked! Popped it back on the 6D and it has worked ever since! Very perculiar but who am I to question?
Thank you so much. I have been using my remote trigger flash for years, but decided on a food photo shoot to use a new PC sync cable. Worked great at the camera store and again when I tested it at home. On site, I could not get the trigger to work. No remote. I just read your article, and the live view was the culprit. Funny too, because I typically do not use live view. Just wanted to for the food shots. Thank you so much .
Hi Jim.
I have YongNuo YN685, but even after setting the External Flash to Hi-Speed Sync, after many shooting, the camera is not synchronized with the External Flash. For 2 images, only 1 image fired by the Flash. Then after a period later, for 3 images, only 1 image fired by the Flash.
Is there any setting I need to use to fix this.
Hi Jim.
I have YongNuo YN685. Even after setting the External Flash to hi-speed sync, the camera and the External Flash seem not to be synchronized. After several shots, then for 2 images, only 1 image fired by the External Flash. Then after several shots, for 3 images, only 1 image fired by the External Flash.
Is there any setting that I need to do to fix this?