
The question comes up again and again: what is the “go-to” setup for reception lighting? Here's the answer: there isn't one. I should say, there isn't only one setup. That's the thing about photographing an event or a reception–you can't rely on one setup to make great photos every time. The venue, the size of the crowd, the action, and the sequence of events all require a photographer to pick the best light setup for the situation.
That means you not only need to be skilled with different setups, but you also need to know how to figure out which one is best suited for the current reception. The good news is that you only need to think about a handful of techniques to make great reception photos. Another bit of good news is that no one needs reception photos to win a Pulitzer Prize. Reception photos just need to capture the moment in good light.
Over the course of this article, we'll consider bounce flash, off-camera flash, and a mix of both. Each setup has its place depending on the situation and the sequence of events. More than anything, you need to be able to anticipate the lighting needs and be prepared for whatever happens. I'll walk you through the different setups in relation to a recent wedding I photographed. Believe it or not, the reception required each setup at different times. I’ll describe the setup and the decision-making process behind it. Let's get started.
Gear Considerations
More good news: you don’t necessarily need a top-of-the-line camera to get great reception photos. That’s the benefit of using speedlights: you’ll get good light even with an entry-level camera. In fact, you don’t even need expensive flashes (I’m just giving you more and more good news!). I use the Yongnuo 560IV speedlights that Jim and some of the other writers and podcast hosts use. For more information about those speedlights, check out Part 1 and Part 2 of my flash tutorial articles.
For the reception I’ll outline in this article, my gear setup was as follows:
- Canon 6D body (full frame sensor)
- Sigma 35mm f/1.4 lens
- Three Yongnuo 560IV speedlights
- Yongnuo 560TX flash trigger
- Demb Flash Products “Big Flip-It!” speedlight reflector
- Two cheap light stands
- One Impact Clamp with Ball Head Mount
Clearly, you need to have a decent amount of gear. As of the publishing date, the camera and lens combine for around $2,500US. (I rented the lens for around $40US.) All of the lighting gear costs around $400US. If you need this tutorial for your first wedding, you should just use your wedding fee to buy the lighting gear–it’s not a huge investment.
Prior to the Reception
Before the reception, I photographed the ceremony and family formals with natural light. I didn’t have a flash mounted on my camera, nor was one on a stand anywhere. While no one will notice a flash during a reception, everyone will notice it during a ceremony. The only thing anyone should remember from the ceremony is how beautiful and emotional it was, not how annoying the photographer’s flash was.
I mention the situation prior to the reception because I needed to be able to transition to speedlights quickly and efficiently. Make sure your gear is easy to get to and ready to go. Don’t leave anything in your car anticipating that you’ll go get it during downtime. There’s no guarantee that you’ll have downtime at the right time! Put your gear somewhere readily accessible. Take speedlights out of any protective sleeves, make sure new batteries are in, attach any modifiers, and just be ready to transition.
If you and the bride have planned the schedule well, you should have time to set up your lights during the cocktail hour, before any important action. (If not, set things up as soon as you get to the venue.) As soon as family formals are finished, start putting speedlights on stands and get them into position. Attach whatever you need to your hot shoe, test your setup, and make your way back to the bride.
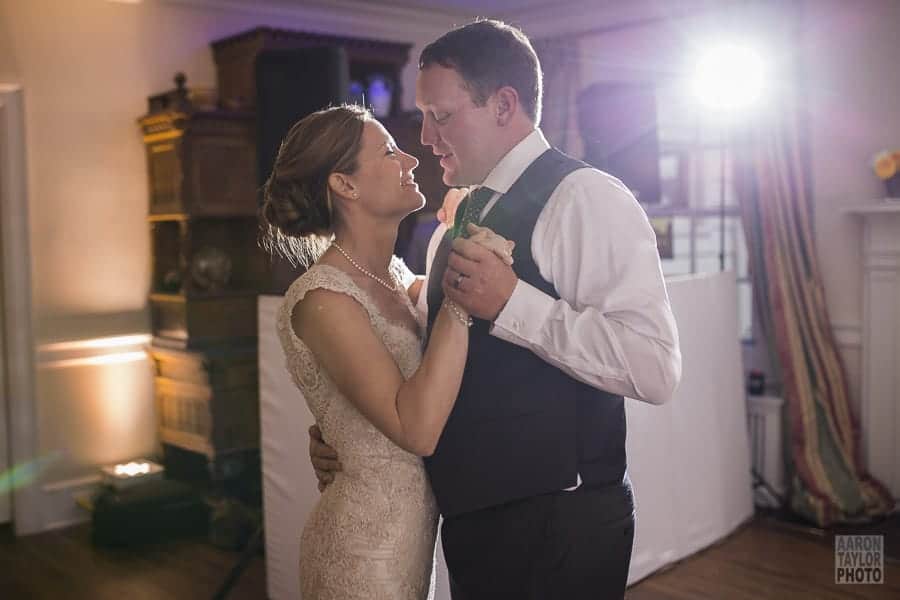
Setup #1 – Bounce Flash with Reflector
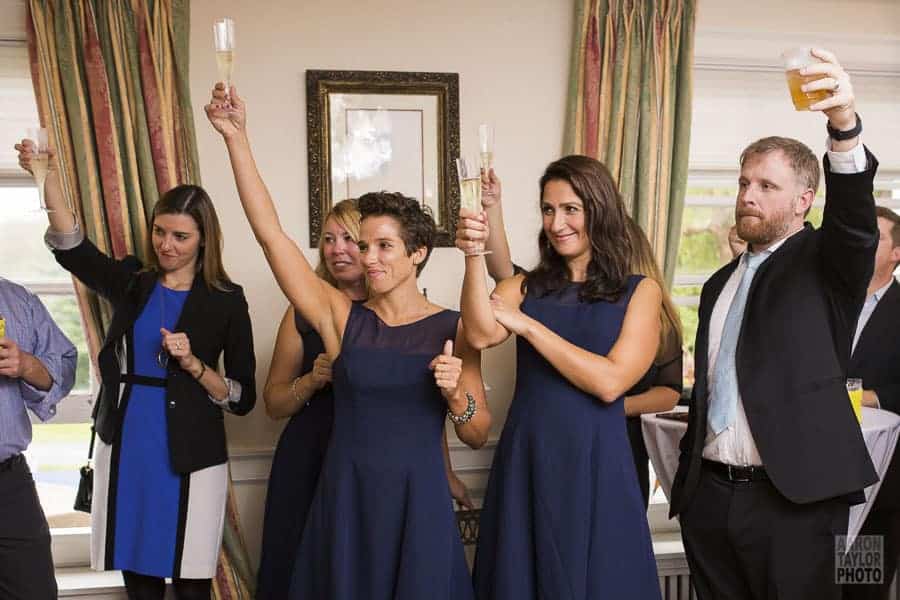
At the wedding I’m referencing to discuss these lighting techniques, the first moment that required me to provide the light was the toasts. As you’ll see in the photos, the toasts took place in a room with everyone gathered around, standing along the edges of the room. This room was also the dance floor. Prior to the toasts, I had already assembled my second setup (described in the next section), but I didn’t want to use those lights. The look would have been too dramatic, and I risked not lighting the entire scene well.
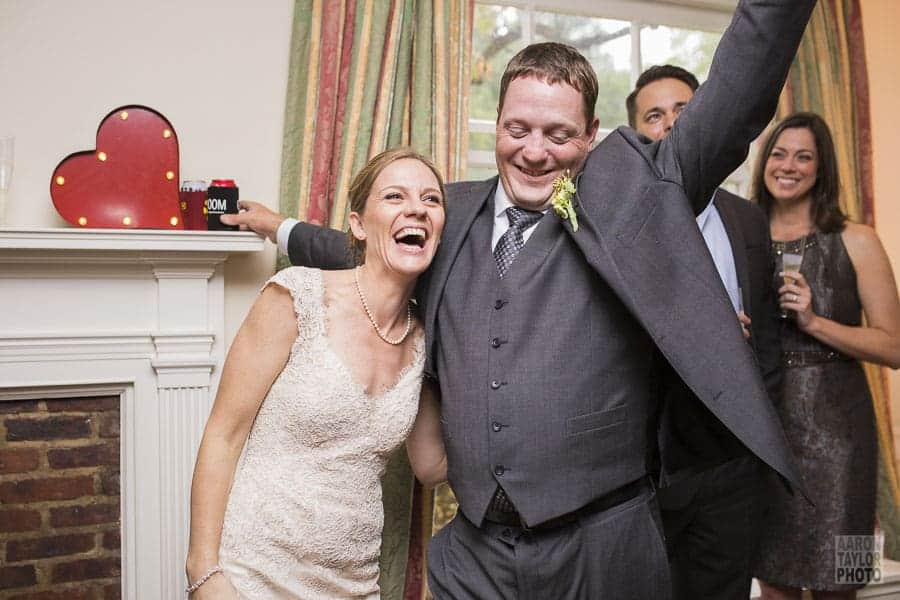
A moment like the toasts doesn’t need anything complicated–you just need to light the scene. And you need flexibility in case you need to move around to find the next person speaking. In my case, the bride and groom were against one wall while those toasting sometimes stood in the middle of the room, sometimes stood next to them, and at one point even pulled a surprise from another room. With action in so many places, I needed a flexible setup; thus, I used a simple bounce flash with a reflector.
I used only one Yongnuo 560IV speedlight mounted to my camera with the Demb Flash Products “Big Flip It!” attached. I aimed the speedlight straight up to the white ceiling. The reflector was angled back slightly, which reflected enough light to fill shadows on faces but not so much that distinct shadows were created directly behind anyone.
That’s why you need to be able to bounce a flash: you need to be able to create softer, more realistic shadows. The telltale sign of poor flash technique is a silhouette shadow that’s directly behind your subject. You don’t want that! For a moment like this, you want soft shadows and even light–nothing complicated. Just don’t point the flash directly at your subject. That’ll give you the awful silhouette shadow.
If I had used off-camera flash, I would have risked not lighting a certain moment or a certain person during the toasts. Too much was happening in too many different parts of the room. I needed my light to follow me. If you’re alone, bouncing your flash is the only way to get your light to follow you.
In fact, I also chose to bounce the flash because I knew what was happening after the toasts. We were heading to the next room for the cake cutting. Again, I needed my light to follow me. I could have lugged my light stands and used off camera flash, but I again wanted the flexibility of a bounce flash. While I initially had the bride and groom stand in a specific spot, I wasn’t sure how much they (or others) would move once the cake was sliced. I wanted my light to follow me, and I wanted even, soft light for the scene. Like the toasts, the cake cutting didn’t need drama or art: it just needed to be documented.
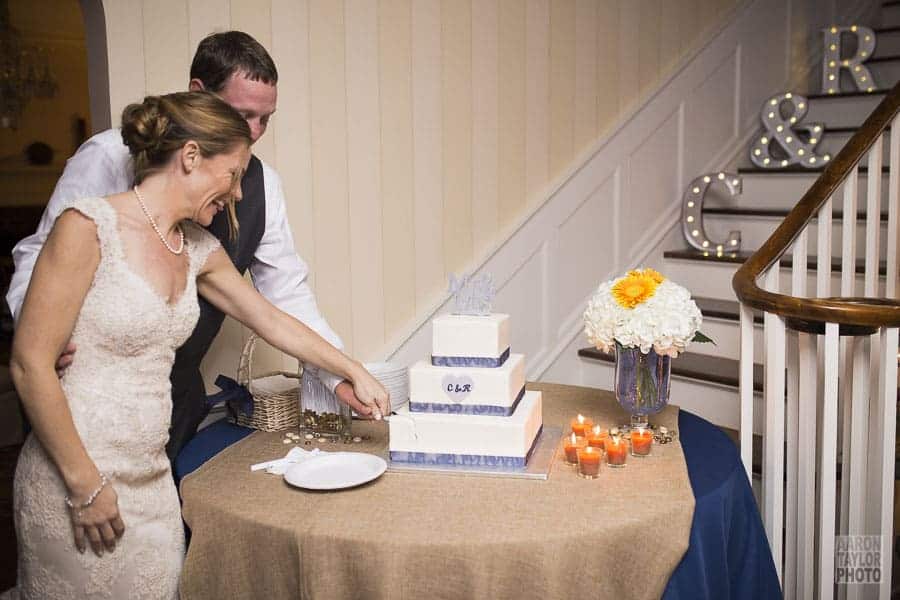
That’s one way I tend to think about light. What is the purpose of the photo? If I’m just documenting a moment in time as it is, then my light shouldn’t be something that anyone notices. My light should simply illuminate the scene.
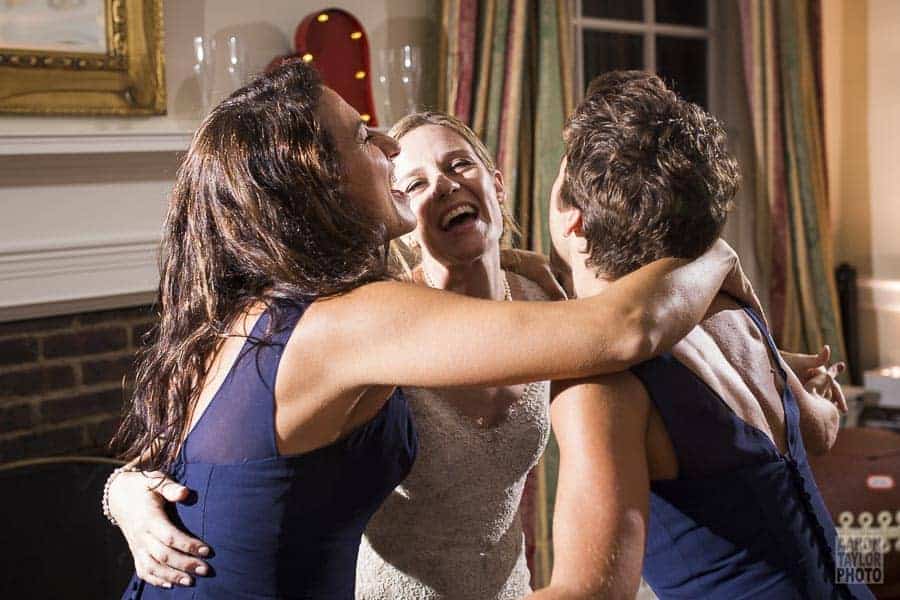
Setup #2 – Two Lights Off Camera
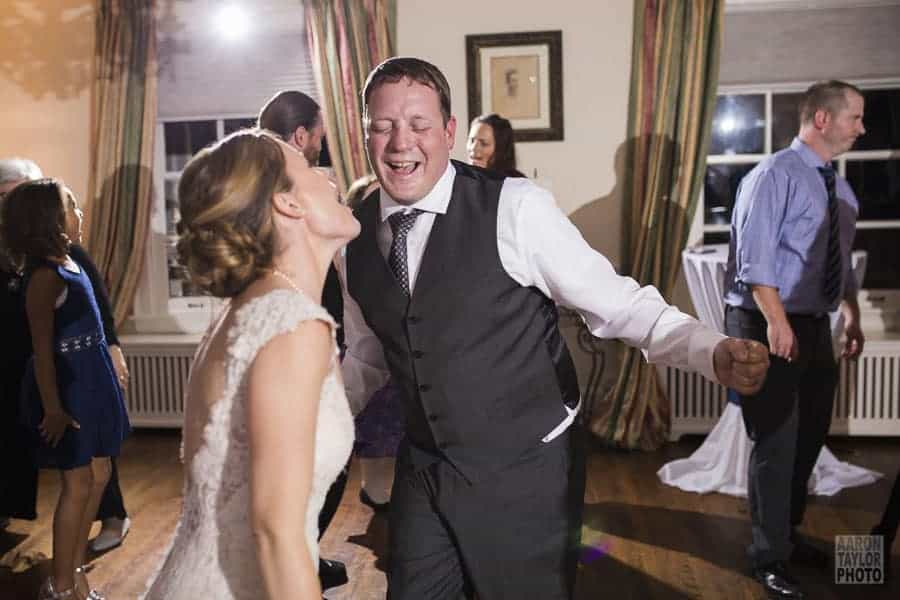
Here’s where things got complicated. After the cake cutting, we transitioned directly back to the toast/dance room for the couple’s first dance. Now I needed to leave the mindset of simply documenting in order to add some drama and interest to the scene. Dancing photos are all about the light. Even, soft light doesn’t necessarily cut it.
One great feature of the Yongnuo 560IV speedlights is that they can also function as a trigger for off-camera flashes. You can even disable the flash of your mounted speedlight and only use the unit to trigger those off camera. The interface on the screen isn’t the best, but with a little practice, you’ll be easily adjusting multiple flashes with your mounted speedlight.
Another bonus of the YN560IV’s is the little plastic stand each one comes with. On the bottom of each stand, there’s a place to screw in a light stand. While I would recommend using a flash bracket that can move and tilt, the included plastic stand can work in a pinch, which is the situation I found myself in. One of my flash brackets had come loose on the ride, and the piece that actually holds the flash on the bracket had come off completely. That little piece is spring-mounted. The tiny springs popped off and are still lost somewhere in my trunk. The little plastic stand with the screw-mount saved me from wasting a light stand and not having a second light source!
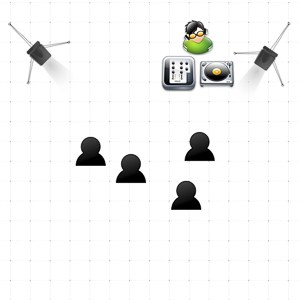
My two off-camera flashes were unmodified (no reflectors, no gels, nothing) on light stands in either corner of the room next to the deejay booth. Make sure that you raise the light stands above everyone’s head; otherwise, someone will inevitably block the light more often than you’d like.
With the two off-camera flash setup, I have several looks that I can play with:
Version 1: I can use just one flash, either as a main (or key) light or a backlight. To backlight the couple, I just have to disable one flash and stand directly across from the flash that’s fired.
Version 2: I can use one flash as a key light and one as a side light. I just have to stand so that one light illuminates most of the couple while the other provides an accent light. Just don’t stand directly in front of your key light. Otherwise, you’ll have essentially the same kind of light that you’d get with the flash just sitting in your hot shoe pointed directly at the subjects. Boring.
Pro Tip: As you use this setup, check a few images to be sure that you don’t have shadows splashed across important faces. The small screen on the camera can be deceiving. What looks like a great photo on the small screen might reveal something different on your computer. And you don’t want to see half of the bride’s face in shadow. Either move yourself or wait a split-second to make sure that faces are fully illuminated.
One limitation of this setup is that you only have light coming from one side of the room–in this case, the side with the deejay booth. If you stand on the opposite side of the room from the flashes, you’ll always have silhouettes, which means you’ve limited where you can stand to capture the action. The limitation brings me to another variation.
Version 3: Since I have a flash on my camera, I could always add it for some bounce flash. This might wash out some of the drama and shadow you can create when you only use the off-camera flashes, but it will help you fix the limitation to this setup.
If I had a fourth flash, it would have been set up to avoid the limitation. Yes, I could use Variation #3, but dancing is the time to get creative, and bounce flash is a little uninspiring. Once the first dances were over, I quickly changed to a new setup.
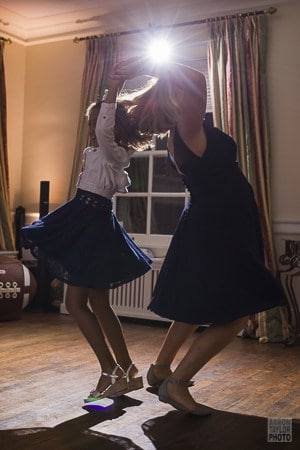
Setup #3 – Three Lights Off Camera
For the three-light setup, I took my hot shoe flash off of my camera, attached it to my Impact ball head clamp, and clamped it to a curtain rod on the opposite side of the room from my two other flashes. The flash was in a corner, not in the middle of the wall. That means three of the four corners now had speedlights, all of which were unmodified. I used the Yongnuo 560TX to trigger the flashes. Now I have some serious versatility
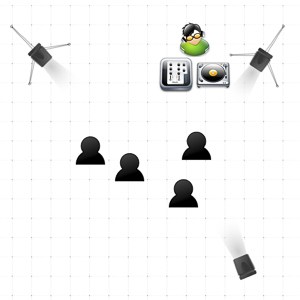
I could do the first two versions of the two-light setup, and I’ve added two more variations.
Variation 1: Now I can use all three lights to illuminate the scene. Adjust the levels of each light to achieve fill-light, rim-light, frontlight, backlight, and sidelight. Just be aware of the Pro Tip from above: watch the faces for shadow! With so many flashes being triggered, you increase the opportunity for shadows on faces. Remember, your bride and groom want to see people’s faces. Triggering all three flashes becomes complicated when you try to troubleshoot your light. In the energy and chaos of a dance party, it can be tough to tell which flash is ruining your photo. That’s the downside to firing all three at once.
Variation 2: Trigger two of the three flashes, always triggering one on the deejay side and one on the opposite side. This variation eliminates the limitation I mentioned in Setup #2. Now I can stand pretty much anywhere in the room and get a key light and a backlight or a sidelight. This was my favorite look during the reception. I liked the drama, I liked the shadows, and I liked seeing the flash burst in the photo. Seeing the flash made it look like more of a dance club and less of a bed and breakfast, which is where this wedding took place. For even more fun, I could have (and should have!) added a colored gel to one or two of the lights, at least for some of the photos.
Final Thoughts
Flexibility and a clear purpose are what reception light is all about. I described three setups–five variations in total–all of which I used at one wedding for specific situations. Sometimes the situation called for a certain type of light; sometimes I was limited by my gear and the sequence of events.
Also, don’t over-complicate things for yourself. Even if you have three speedlights set up, you don’t have to use all of them in every photo. In fact, using only one or two keeps things simple. Having three just gives you the flexibility to stand in more places and still get good light. The old adage holds true: sometimes less is more.
To create good reception photos, you need to be versatile and analytical. You need to have several different setups ready to go. With those setups, you need to pick the right one for the situation. That’s where your skill, judgment, and experience come in. No two receptions will be exactly the same. With the right setup, you’ll get great reception photos every time.