

I absolutely love the YN-560 flash and the YN-560 TX controller. They are absolutely awesome, and significantly easier to use than the Canon and Nikon brand flashes; however, there are still a lot of issues to consider when trying to trigger an off-camera flash.
I can't tell you how many times on workshops someone has showed me a “broken” flash that they are considering returning to the store when I turn it on and get it to fire the first time. So this is my step-by-step guide to getting your YN-560 flash to fire. But don't feel bad if you can't figure it out. I've spent many hours trying to figure out flashes myself, and hopefully this article will help.
[x_alert heading=”Quick Fix!” type=”success”]Be sure to follow all of these steps without skipping anything in order to fix your issue. If you're only trying to fire the flash attached to the camera, you'll only need steps 1-3 below. If you're going to use the flash off-camera with a YN-560TX controller, then follow all of the steps on this page in order.[/x_alert]
Step 1: Make Sure the Flash Itself Is Working and Has Power
With the flash turned off, press and hold the “on/off” button on your flash for a few seconds until it turns on. Press the “pilot” button. If the flash pops, then chances are good that there is nothing wrong with the flash and that we simply need to work on getting the right settings.
If the flash does not pop, put in brand new batteries (try not using rechargeables) and try again. If it still does not work, then the flash is defective. There is no setting that would prevent the pilot button from firing the flash.
Step 2: Factory Reset Your YN-560
To reset your YN-560, hold the audio and mode buttons (“C” and “D” in the diagram above). This is how you access settings. Now that you're in settings, press the up arrow key (“G” on diagram) until you see “CL EA.” Now hold the okay button and you'll see chasing squares at the bottom right. Once that gets done, it's reset.

Step 3: Make Sure the Camera and Flash Can Communicate
Attach the flash to the hotshoe of the camera. Be sure to push it TIGHT all the way forward and lock it down by spinning the plastic circle on the flash above the shoe. If it doesn't seat all the way forward, it won't fire. Turn on the flash and take a picture. If the flash fired, then move on to step 3.
Next, press button “E” (shown on the diagram above) on your flash until the flash looks exactly like the picture immediately above this section. This changes the receiver mode so the flash will accept the “fire now” signal from the hot shoe of a camera. On the back LCD of the YN-560, you should see a little flash symbol at the very top-left, and an “M” on the right side of it. Don't worry if the other numbers on the flash are different, but there shouldn't be any additional numbers showing anywhere on the flash.
[x_alert heading=”Quick Fix!” type=”success”]The most likely issue that prevents the flash from firing is if your CAMERA is in live view mode, on continuous low or continuous high drive mode. Be sure you're using the viewfinder and that when you press the shutter button down and hold it, only one picture is taken.[/x_alert]
Set your camera in single shot drive mode. This should mean that when you press your shutter button and hold it down, only one picture is taken. Many cameras will NOT fire a flash if it's in continuous high or continuous low mode. Be sure to check this. Turn on the flash and take a picture. If the flash fired, then move on to step 3.
If the flash hasn't fired yet, don't worry. We have some other things to check. Make sure you are using the viewfinder. Many cameras will not fire a flash when in live view mode. If the rear LCD is showing the picture before you take it, then you're in live view. Switch to viewfinder only. Turn on the flash and take a picture. If the flash fired, move on to step 3.
Rarely, but sometimes, a camera will not fire a flash if in continuous focus (written as “AF-C” on Nikon cameras or “AI-Servo” on Canon cameras). Change your focus mode to single shot focus. Take a picture. If the flash fired, move on to step 3.
Now, set your camera to manual exposure with a shutter speed of 1/100. Take a picture. If the flash fired, move on to step 3.
Next, be sure that your camera is not set on quiet shutter or “silent mode” as it is sometimes called. Also, check to make sure you're using mechanical shutter and not electronic shutter, which is a feature of most mirrorless cameras. You'll know you're using mechanical shutter if you hear a significant “click” sound when you take a picture.
The last thing to check for is to make sure you don't have a setting turned on that suppresses flash. Many cameras have a setting that suppresses flash so that if you're at an event where no flash is allowed, you can ensure that no flash will fire.
If the flash did not fire after following all of these steps, then something indeed could be wrong with the flash, or you could have purchased the wrong flash for your camera model. If you have a friend with a DSLR, try it on theirs. If it still doesn't work, then the flash could be defective and should be returned. At this point, we've gone through all of the possibilities that could be tripping it up.
Step 4: Make Sure the Controller and the Flash Can Communicate
Now we're going to take the flash off camera. Things are going to get a little more complicated, but fear not! I'll walk you step-by-step through this issue.
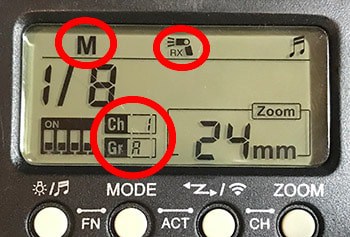
First thing we need to do is set up the flash to accept a signal from the YN560TX wireless trigger. To do that, press button “E” (on the diagram at the top) until you see a symbol of a flash with the tiny letters “RX” under it. This is wireless receive mode. BE CAREFUL NOT TO CHOOSE “TX!” I know it seems like you'd want TX since that's the name of the transmitter, but “TX” means you want to put the flash on the camera and use the flash itself as the trigger. Choose “RX.”
Next, we're going to check the channel and group of the flash. You can customize this later, but for now I want to make sure it's on channel 1, group A. This does not get set back to default when you reset the flash. You'll have to set this up.
To change the channel on the YN-560, simply press the center “okay” button on the 4-way selector (“G” on the diagram at the top of this article) and then press the up and down keys to get to the channel you want, then press the center button again.
To change the group on the YN-560, press buttons “E” and “F” (as listed at the diagram at the top of this page) at the same time. Then use the up and down keys to cycle through, and press the center okay button (part of “G”) to accept. You should now be on channel 1, group A.
Now set down the flash. It's set to go, and should look like the picture in this section. It's time to set up the YN-560TX controller.
The good news is that this part is super simple. Just hold the “Zoom/Ch” and “Mode” buttons at the same time for a few seconds to reset the YN560TX trigger. This will zero out all of your settings and put it in channel 1. That's all you'll need to do.
At this point, your YN-560 TX trigger and your YN-560 flash should be able to communicate with each other. Turn on both units. Press and HOLD the “Test” button on your YN560TX trigger. It should make the flash on your YN560 fire the flash.
Ta-DA!!!!! You're set to go. Now it's time to learn off-camera flash.
One Last Thing
Hooray! Your flash can fire now, but you're about to face a lot more issues as you learn to use your flash effectively. I can really shorten your learning curve with a video training I produced called “Lighting in a Flash” which THOUSANDS of photographers from all around the world have purchased.
In the video, I use the YN-560 flash exclusively to produce professional and creative portraits with an inexpensive YN-560 and an umbrella. I really think I could save you 2 years of a learning curve if you'll spend an evening watching the video. You can get Lighting in a Flash here. It's really reasonably priced.
This was a great article. I purchased my first set of 560’s a few weeks ago. I knew from experience that YongNuo doesn’t have the best user manuals, but I have experience with speedlights, it can’t be that hard, right?
I spent hours scouring the web for videos and articles on how to set them, especially to communicate with each other (I have some 560III’s, a 560TX, and a 560IV). This is the clearest, most direct guide I’ve seen on the subject.
Thanks Tim! It was a much needed guide. I too have spent many hours trying to figure things things out. They are actually easier to use than the Canon/Nikon speedlights, but the directions are absolutely unusable. Hopefully this helps some people.
Thank for this post. I’m just starting to get into using flash and purchased the 560 iv. However I think I made a mistake. I want to be able to use the flash as full flash outdoors during daylight. My camera is an Olympus OMD E-M10 ii. The max sync speed is 1/250. I think to get the shallow depth of field I want I will need high speed sync which the 560 doesn’t appear to have. What are your suggestions for this? Have you had success with the 560 for outdoor fill flash or is there a different Yongnuo model I should’ve purchase. Thank you.
I don’t think you made the wrong choice. I use these manual non-HSS speedlights all the time in daylight with a sync speed slower than that.
Very timely for me as I’m trying to order this setup….3-4 flashing and the controller. My only question is which to get. I’m a Olympus Micro Four Thirds user and I just can’t find out which version to get, Canon or Nikon. I’m told there is no difference but I’m still not sure. I’m also told that I’ll only lose the functionality of waking up the flashes with the shutter button. If true, how do I wake them up again if they sleep while shooting?
Either one should work for you.
Jim, I too followed all of these tips, and still had no luck. I purchased my lighting kit from Tim Payne’s website. After searching for an answer all over the internet, Tim actually messaged me and we exchanged pictures of the back of the flash and trigger. Finally we found that with Fuji, you need to have “Silent Mode” turned off to fire the flash as your article pointed out. I found the greatest help through IP+, and from Tim Payne, and would not hesitate to refer either of these businesses!
Thanks again for your help.
Monty Craig
Thanks for the comment Monty, but I missed something. You said that turning silent mode off fixed the flash, and the directions here say to do exactly that. So how didn’t it fix it?
I have one of the “older”models of this speedlight. I use natural light whenever possible, but on the occasions that I have used my flash (trying to get some much needed experience), I will admit to having multiple issues and not really knowing what I was doing. This information is SO very helpful!! Thanks for taking the time and effort to clarify and simplify things for those of us who are not so familiar with using flash. Your efforts are MUCH appreciated!!
Glad it helped, Charlene!
Excellent concise instructions Jim.
This is an extremely helpful format!!
Do you have or can you recommend a resource like this one for the yn685 unit? I have spent hours online and with the unit teying to figure out how to use it and am not have any luck. Thank you so much!
Thanks Sandy!
Jim, Once again I can’t thank you enough. Purchased the Youngnuo 560 way back when you recommended it and would not own any other brand. The new remote system is beyond belief great. Your simple tutorial got me up to speed easy peesy. Keep up the fantastic work you are doing.
Great article, but I still can’t make it fire off camera…
I’ve recently purchased the YN560III with RF603 canon trigger ver. II I intended to use with my X-pro1. I’ve been trying to set it up for days now. I’ve followed every step, but no luck. The blue LED on the flash will flicker when I press the shutter, as if the flash and the trigger are indeed communicating correctly, but no light comes out.
The only way I can trigger the flash remotely is by setting the trigger to TX mode rather than TRX and pressing the test button, but that’s not really helpful since I’m taking pictures this way:)
any ideas please? Do you have experience with RF603 triggers or should I just buy the 560TX?
On Nikon cameras (and probably others) with a pop up flash; there are flash position micros-switch that let the camera know if the flash is up or down. On some models there are small and fragile pieces of plastic that hold springs and/or clips that cause these to make contact. From what I can tell if these switches are not in the correct states they will not allow the circuit to be complete for the hot-shoe to trigger the flash. (Or for the on-camera to flash). If both the YN and the built in flash are not firing a broken switch may be your problem.
A symptom of a problem with these switches is the pop up flash not working. An example fix can be found here: http://youtube.com/watch?v=oUrV8rGxVEY. From what I can tell these switches also control if the hot shoe circuit is active. On the newer Nikons these switches are internal not easily accessible (you can see one on the D5100 teardown Step 11 (https://www.ifixit.com/Teardown/Nikon+D5100+Teardown/5271)
For a Nikon flash: If you don’t have another camera to test the flash (try this at your own risk) you can short circuit a pin on the flash to confirm the flash’s hot-shoe circuit is working. Remove the flash from the camera set it to M (manual) mode. Use something conductive with an insulated part you can hold (pocket knife blade, screwdrivers etc.) and carefully short circuit the center pin to the metal on the bracket (on the flash unit) . Be careful not to contact the other pins or you could damage the flash. Shorting the center pin should make the flash fire. If this works, then its another indication that the camera is the issue.
Thanks for posting these clear instructions. As a non-techie, I have felt constrained to work inside the Fuji system (which is limited), and I now have the confidence that with a bit of patience and perseverance I can get this set up properly. Also, the IP podcasts are favorites. I’ll be using YN on my X-T1.
Very useful article for me. I tried many on YouTube but were missing things as I was facing issues in syncing 560Tx with 560 iv. Only thia guide explains the setting menu and so on. Thanks for posting such a guide.
Thanks so much for this. I was trying to configure my YN550TX without much success; followed your guide and got it sorted so thanks. However, there was a stage where the pilot button would not fire the flash. You stated that there is no setting that would prevent the pilot button from firing the flash, I was ready to give up on the basis of that but I randomly pressed a few buttons out of frustration and something change which allowed the pilot to fire the flash. Before this lucky break, the little indicator light below the pilot light would flicker with a blue light each time I pressed the pilot. I don’t know if that means anything to you. I’m sorry, I don’t know what I did to clear this issue but its working now.
Hi, Thanks for this simple but Great review. I have YN560 IV speed light and YN560 TX controller, but i am having a small problem and I hope you could kindly help me. when I use the multi mode just on the YN560 IV it works, ie. 5×10 5 flashes in 10 hertz, but when I do the same from the YN560 TX in multi mode only one flash happens. I am using Channel 1 and Group A for both Manual and Multi. Can you help me to fix this problem please ?
I did everything in the article. Flash works on camera. TX is talking to flash. TX test button fires flash. But when I put TX on camera, flash does not fire.
Please tell me how to remove your notifications from my smartphone. Thanks.
Been a point and shoot user my entire life, I don’t know much about photography at all. Recently purchased a Fuji X-T20, I really wanted to get into the intricacies of photography. Bought a set of 2 x YN560 IV and 1 x YN560 TX as recommended by this website. Gone through your guide together with some youtube videos, I managed to get them all working fine and in synch. Thank you very much.
Wow you just saved me a tonne of cash. One of my off cameras stopped firing (green pilot light) and resetting it with the trick above made it recommunicate!
You need to write the instruction manuals for them! Maybe you have a how to for this already, but I am going to ask. How do I set up 2 YN560 flashes to fire with the remote trigger? Also it appears that they strobe, is that correct? If so how does that happen? I made one do it once and can’t duplicate. Thanks!
Hello! I have an issue with these flashes just stopping working. I had one where the zoom broke and so I bought another. Now I cannot get the one I bought to replace that one to fire at all. Not on camera, or off. I sometimes use them as a master/slave set up. How do you know it the flash is defective, it used to work and then stopped, or is it something else? I don’t want to have to buy a new flash every year. I love these flashes, but this is ridiculous. Any suggestions?