
From a photography perspective, Boston has something for everyone. It is a city rich with history, scenic skyline views to satisfy wide-angle photographers, and expressive people (both visually and conversationally…) to satisfy a street photographer. For those planning a visit, let this article be a detailed guide for your Boston photography excursion.
Getting Around and the Best Photo Spots
Since posting this article a year ago, we released an iPhone/iPad app of all the best places to photograph in Boston (and around the world). It' s a free app called Really Good Photo Spots and you can download it right here. The spots in this article are in the app, but also there are MANY MANY more in the app than in this article.
The app is essential for photographing Boston because you can just tap “Spots near me” at any time while out shooting and BOOM! You see all the best spots to take pictures near there. It's pretty cool.
By Car
For those who are unfamiliar with Boston, it is important to know in advance that it is not a city that was neatly planned in a grid pattern like Manhattan. In most areas of the city, Boston roadways are a nonsensical mess of streets that, even after driving on them for the past seven years, still continue to confound me. For those who want to travel around by car, be aware that parking can be expensive and often very hard to find. If you would rather someone else be behind the wheel, taxis are typically easy to find, and companies such as Uber and Lyft have developed a presence in the city that makes it possible to get somewhere when you need to.
By Bike
For those less inclined to travel by car in a crowded city, biking is another option. Boston has a bike sharing system called Hubway that features rental stations throughout the city to get you from Point A to Point B on two wheels. However, keep in mind that as poorly as the roads were planned for cars, they are even worse for bikers in many areas, with very few standalone bike lanes that separate you from the notoriously aggressive drivers.
By Public Transit
If public transit is more your speed, Boston offers a subway and bus system to help move people throughout the city. The subway, ubiquitously referred to as the “T” because of the logo posted at the transit stations and on vehicles, is broken up into separate lines named after colors. The Green Line moves in a generally east-west direction across the city, branching out to different neighborhood as your travel west. The Red Line runs generally north–south, connecting the nearby cities of Cambridge and Somerville north of the Charles River to points south. The Orange Line runs in a north to southwest direction. The Blue Line connects downtown to East Boston and the northeast suburbs across Boston Harbor. The bus system connects the gaps between T stations and in areas where no subway service is offered.
By Foot
By city standards, downtown Boston is a fairly small area that is very walkable. If you have good weather and don’t mind moving around by foot, Boston was recently ranked the 3rd most walkable city in the United States behind only New York City and San Francisco.
With all that out of the way, on to the photography locations!
Longfellow Bridge
Why to Go and What to Bring:
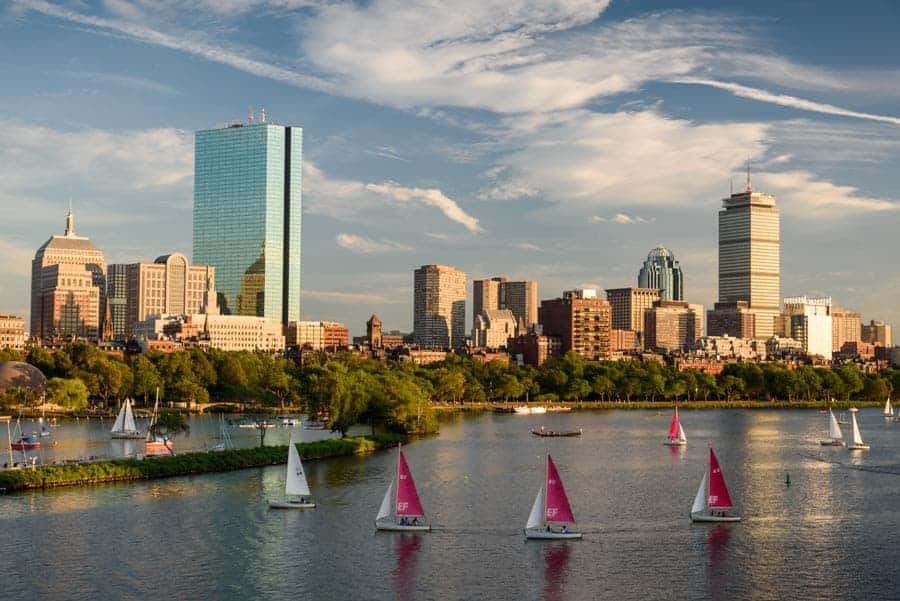
Although it is under construction until at least 2018, the Longfellow Bridge was recently opened back up to foot and bike traffic. The bridge spans the Charles River, connects Beacon Hill to Cambridge, and provides great views of the Boston skyline. The Longfellow bridge is the place to go for great views of the John Hancock Tower and the Prudential building (referred to as “The Pru” from here on out), as well as the iconic sail boats and duck boats that float along the river in the foreground.
Any general walkaround or kit lens should give you the right focal length to get a skyline shot from Longfellow.
When to Go:
The skyline view from the Longfellow Bridge faces southwest, meaning it isn’t a great midday location unless you have cloudy skies. At sunrise and sunset, however, you can catch an orange glow reflecting off the buildings, and blue hour and night shots are fantastic. You may be able to get some sunset color on the clouds during the shortest months of the year and the sun sets to the west. However, during summer months the sunset moves more towards the northwest, putting prime color too far out of your frame.
How to Get There:
The Red Line stops on either side of the Longfellow Bridge, making either the Kendall/MIT stop or the Charles/MGH stop options to get you there. The Charles/MGH stop will technically be a bit closer to the best angles of the skyline, but only by a few hundred yards.
Harvard Bridge
Why to Go and What to Bring:
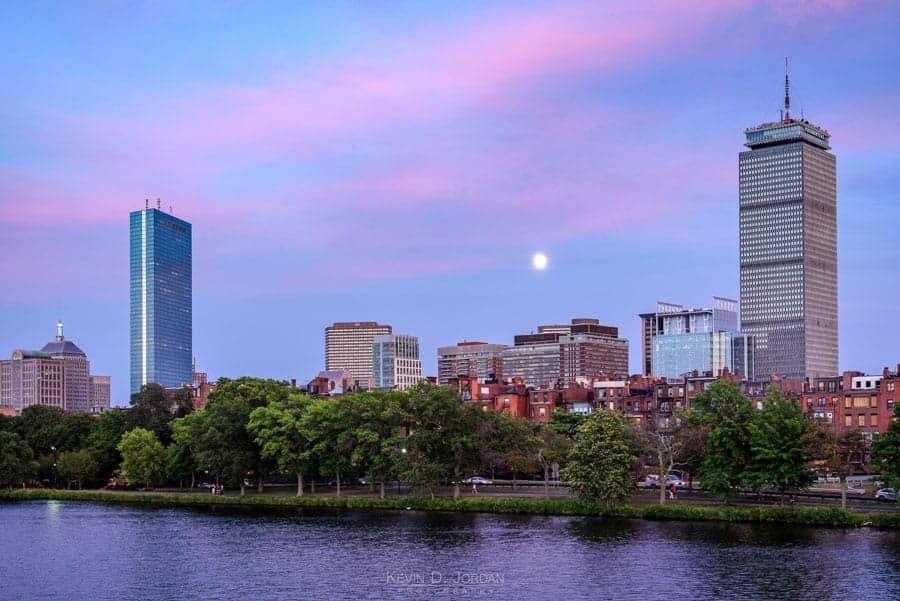
Similar to the Longfellow Bridge, the Harvard Bridge (also referred to as the Mass. Ave. Bridge), provides fantastic views of the Boston Skyline, although from a different angle. The Harvard Bridge is another great vantage point for the John Hancock Tower and The Pru, but also provides a view of the skyline that is too close to the Longfellow Bridge to get a good angle. The Harvard Bridge is a great spot to catch a full moon rise in between the Hancock building and the Pru, or a telephoto image of the skyline near Beacon Hill, including the golden dome of the Massachusetts State House nestled among the other surrounding buildings.
A walkaround lens or kit lens will be fine for the nearby skyline view. However, something in the 100mm or more range on a full frame camera will be needed for the far off skyline looking east. Keep in mind that if you are looking to take a long exposure on a tripod here, passing cars and buses will vibrate the sidewalk you’ll be standing on just enough that you will have trouble getting maximum sharpness, especially at longer focal lengths.
When to Go:
Similar to the Longfellow Bridge, the Harvard Bridge is not a prime spot for sunrise or sunset since the best views are to the southeast and far off to the east. A winter sunrise could yield some good color once the sun rises more in the east than it does in the summer months (when it is further to the northeast), but keep in mind you would have to be shooting at a longer focal length to avoid having the far off skyline to the east be tiny and potentially uninteresting. As with Longfellow, the Harvard Bridge makes for a great night location, but traffic on the bridge will limit how long your shutter speed can be. For a sharper night shot, consider walking along the Charles River in Cambridge near the northern side of the Harvard Bridge.
How to Get There:
Aside from accessibility by car, walking, and biking, the Harvard Bridge is located about a 5 minute walk from the Hynes Convention Center stop on the Green Line. Every branch of the Green Line other than the E train can get you to the Hynes Convention Center stop.
Boston University Bridge

Why to Go and What to Bring:
Continuing with the bridge theme, the Boston University Bridge (B.U. Bridge), which is the next bridge crossing the Charles River to the west of the Harvard Bridge, provides yet another great view of the skyline. From the B.U. Bridge, the iconic portions of the skyline (the Hancock building and The Pru) appear to be closer together and one behind the other. As an added bonus, it is also possible to add the iconic Citgo into the frame, which from this angle will be slightly closer to you than The Pru. In addition to the skyline, there is also a railroad bridge covered in graffiti that runs at an angle below the B.U. Bridge, which can serve as an interesting contrast to an otherwise clean and modern looking skyline.
You will want to bring a telephoto lens with you to the B.U Bridge since the iconic composition with the Hancock building, The Pru, and the Citgo sign is fairly far away. A shot at about 120 mm on a full frame will keep them all tightly in the frame. As with the Harvard Bridge, cars and buses will be passing behind you, so a long exposure shots may not be quite as sharp as you would like.
When to Go:
The downtown skyline from the B.U. Bridge is due east, so sunrise is a possibility during the fall and winter months. Morning hours will be tough with the sun in your eyes. However, by midday to late afternoon the sun with either be off to your right or behind you, giving you more possible times to visit this bridge in decent light than Longfellow Bridge or Harvard Bridge. Night time makes for a great show, just keep in mind that passing traffic could cause camera shake. Also, the Citgo sign is not only iconic, its bright and different sections of it turn on an off in a nonsensical pattern. Therefore, some, if not all of the sign, will be blown out in shots taken after a certain time.
How to Get There:
The Boston University section of Boston is one of the more safely bike-able spots in the city due to some bike lanes, so walking, biking, and driving are all possibilities. If you are riding public transit, take the B train on the Green Line to the Boston University West stop, which is a short walk from the bridge.
Zakim Bridge
Why to Go and What to Bring:
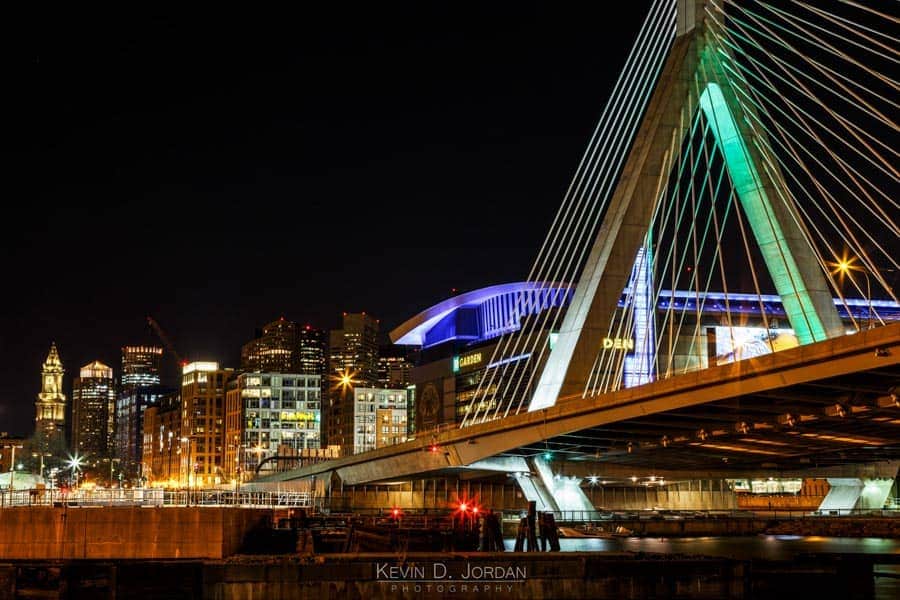
This is the last bridge, I promise. The Zakim Bridge is an iconic staple of Boston. It’s a unique suspension bridge situated on the eastern side of the city that transports cars driving north or south on Interstate 93. There are several different angles from which to view the bridge, my favorite being North Point Park on the east side of the highway. From North Point Park you can take a pedestrian walkway beneath the bridge to Paul Revere Park on the east side. Here is a time to start exploring, however, because an interconnected system of sidewalks and footpaths can take you to any number of different angles to view the bridge in new light.
Just given the size of the bridge, you will want an wide angle lens when photographing near the Zakim. A 16-35 mm lens on a full frame camera would be very useful for most spots nearby, while a slightly longer lens might be more useful for more distant shots from the outskirts of North Point Park or the nearby walkways.
When to Go:
Due to how many vantage points there are near the Zakim Bridge, there really isn’t a bad time to go see it. If the sun is in your eyes from one side of the bridge, the other side will provide good lighting for a shot. Since the Zakim lights up different colors throughout the night and throughout the year, this is also a prime location to shoot at night. As with any spot in an urban area, make sure to stay aware of your surroundings. The parks and walkways around the Zakim are fairly well lit, but there are still dark parts with poor lighting and you’ll be carrying potentially expensive camera equipment…
While you are in the area, take a walk across the street to the Museum of Science. The view from the top of the parking garage gives another good vantage point for the skyline. However, construction on the Longfellow Bridge will dampen the view a bit until the work is completed.
How to Get There:
The closest “T” stop to the Zakim Bridge is Science Park on the Green Line. However, if you happen to find yourself on the Orange Line, the Community College and North Station stops are each under a 15 minute walk to the bridge. As always, driving, biking, and walking are also possibilities.
Beacon Hill
Why to Go and What to Bring:
Beacon Hill is less of a specific vantage point and more of a place to wander and explore. It looks like quintessential Boston, with brick sidewalks and buildings, narrow roads, and a few cobblestone streets. It has some of the smallest houses and most expensive properties in the city, and is home to many politicians, academics, students, and more. Take a stop by Acorn Street, rumored to be one of the most photographed streets in the country, and the Massachusetts State House.
For Beacon Hill, bring whatever gear is best for your style of photography, there are plenty of side streets and areas to explore, so anything from an ultra wide angle lens to a telephoto can serve a purpose.
When to Go:
Anytime, day or night.
How to Get There:
Parking is a premium in Beacon Hill, so don’t plan on driving unless you either want to go on a ruthless hunt for nearby parking, or are willing to park and walk a ways to get to your shooting location. The nearest “T” stops are Charles/MGH and Park Street, both on the Red Line. Park Street also serves all trains on the Green Line.
Public Garden
Why to Go and What to Bring:
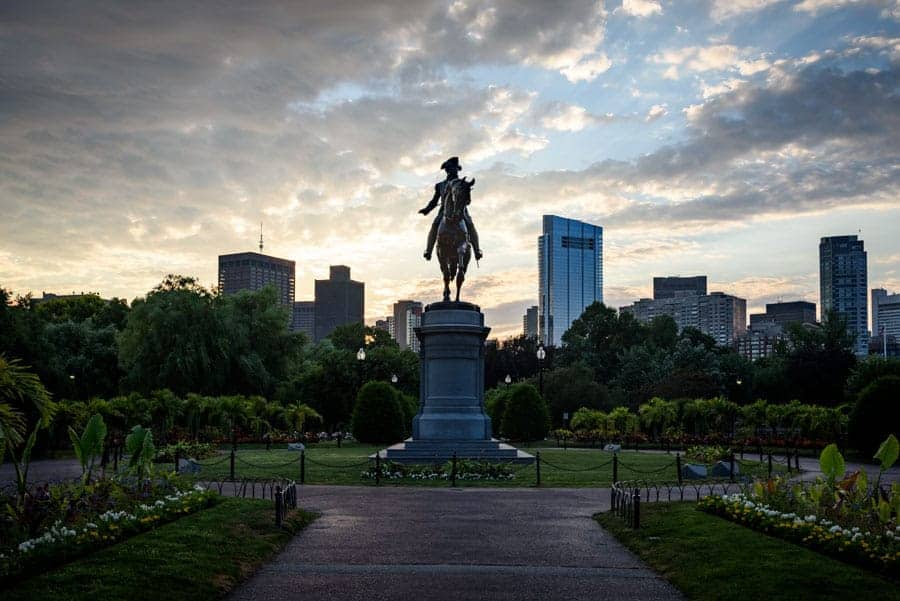
The Public Garden is a must-see stop during a trip to Boston. Depending on the time you visit, you can photograph landscape/cityscapes, flowers, and/or street photos, potentially all at once. For highlights, check out the iconic swan boats, the Make Way for Ducklings statues honoring the famous children’s book, the flowers, the George Washington statue, or even the famous bench where Matt Damon and Robin Williams shot their famous scene in Good Will Hunting. The adjacent Boston Common provides plenty of other spots to roam, but is more recreational and less picturesque than the Public Garden. If you only have time for one, stick to the garden.
As with Beacon Hill, bring the lens that suits your photography. I’ve taken shots in the public garden ranging anywhere from 15 mm to 250mm and probably everywhere in between.
When to Go:
There isn’t a bad time to visit the Public Garden. Summer is popular due to street vendors and performers, as well as the flowers that start blooming early in summer. Depending on the year, late May and early June are great times to see blossoming trees and blooming tulips that line the walkways throughout the garden. Summer is also a great time to shoot sunrise and sunset, since you either have a chance for great color on clouds over the nearby skyline, or reflecting off the buildings themselves.
How to Get There:
The Public Garden is about as centrally located as it gets in Boston. Take the Green Line to either the Arlington or Boylston stop, or the Red Line to Park Street. There is also a parking garage below Boston Common for those who want to drive but don’t want to deal with hunting for a spot and parallel parking.
North End
Why to Go and What to Bring:
Before you even take out your camera, just go to the North End and eat. Once that and digestion are out of the way, the North End provides another chance to walk around a classic Boston neighborhood full of Revolutionary history. Take shots of the narrow North End streets, local characters, restaurants, the Old North Church, Paul Revere’s House, and much more. The North End has a lot to offer in a fairly small area.
Just like with Beacon Hill, bring the gear that suits your style of photography. There is certainly no right or wrong gear to have here as long as it works for you.
When to Go:
There really isn’t a bad time to go to the North End, but it sure would be a shame to go at a time when you couldn’t eat at any of the restaurants…
How to Get There: The North End is another neighborhood to avoid parking in, so the “T” is the best way to get to there. Take the Green Line or Orange Line to the Haymarket stop or the Blue Line to the Aquarium or Government Center stops.
Copley Square
Why to Go and What to Bring:
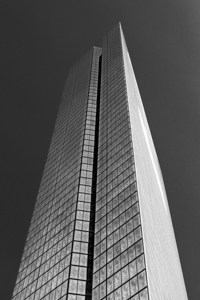
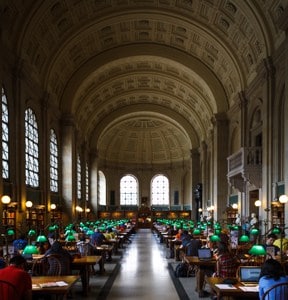
Copley Square is less of a location in itself and more of a gateway to many different photographic opportunities. Not only is Copley Square flanked by the John Hancock building (the tallest building in New England), Trinity Church, and the Boston Public Library, but it is also within short walking distance of several other iconic buildings including the Pru , 500 Boylston Street, and the Christian Science Center, an ornate gold building and reflecting pool a ten minute walk from Copley. Be sure to venture inside these buildings as well, especially to see the iconic Bates Hall in Boston Public Library. Also, the famous finishing line for the Boston Marathon lies in Boylston Street nearby Copley Square.
Copley Square is another area where any lens will do, but with sky scrapers looming directly above you, you may want to make sure you have wide angle glass just in case you want all of one in a single shot.
When to Go:
With so much to see, Copley Square can be visit anytime. Keep in mind, however, that it is a very crowded area, so if you don’t want too many people or crowds in your shots, better to go early mornings or at night to avoid throngs of tourists and Bostonians alike.
How to Get There:
Copley Square is conveniently situated on the Green Line and is serviced by any of the four branches. The Back Bay Orange Line stop is also a few blocks away. There are worse places to try to park in the city since there is a public parking garage beneath the Pru, but where Copley Square is so centrally located in downtown Boston, my preference is normally to take the T.
Skywalk Observatory
Why to Go and What to Bring:
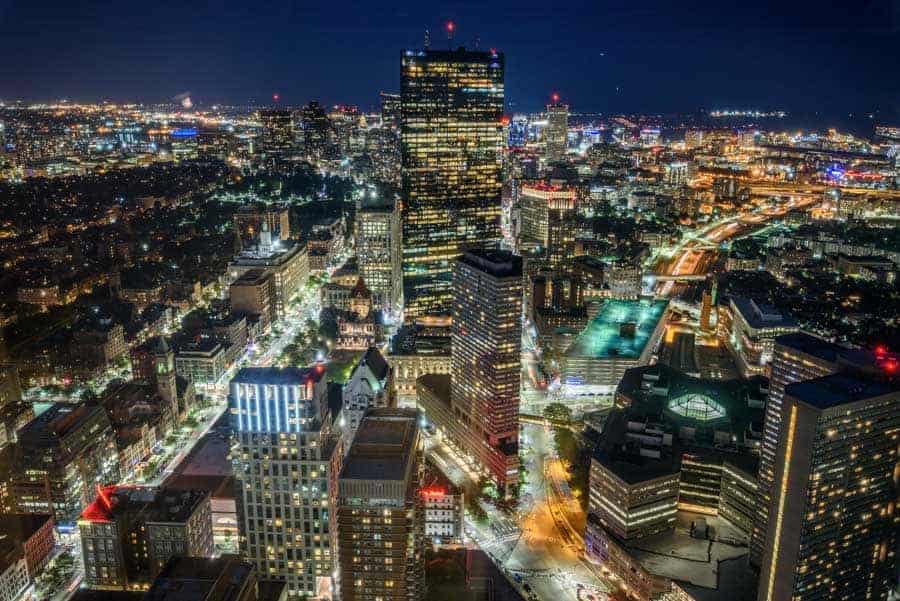
The Skywalk Observatory is the key to your aerial view of Boston. 50 stories above the ground, the observatory gives you panoramic views of the city and surrounding area. Unless you rent a ride in a helicopter, the observatory is currently the only way to get these aerial views of Boston, and the views are pretty darn good.
Your packing list for the Skywalk Observatory should be a little more specific than other locations. If you intend to get shots after dark, bring a dark t-shirt with you to cut down on glare reflecting off of the windows and into your lens. You are technically not allowed to have a tripod, so be prepared to be told to put it away if you decide to break the rules. I definitely didn’t use a small tripod for the shot above…
As for lenses, the shot above was taken with a 15-30 mm lens on a full frame camera. Telephoto shots can certainly be interesting from this height, however, so don’t totally ignore a zoomed-in shot in favor of the sweeping wide angle views. Also, keep in mind that the observatory isn’t free, so plan to fork over $18 as of this writing to get in. Another option would be to head up two more floors to the Top of the Hub restaurant and lounge for the price of a drink, but you’ll have to be a bit sneakier with your photos.
When to Go:
Glare is going to be tough to contend with during the midday sun. However, since the observatory has 360 degree views, you’ll still be able to shoot away from the sun with good results. Sunset and blue hour are prime time, however, when the city lights begin to twinkle on and become visible in your shots.
How to Get There:
The Pru has its own “T” stop on the E branch of the Green Line. However, it is also easily reachable from the Copley Square and Hynes Convention Center stops on the main Green Line. There is also a parking garage beneath the Pru, for those who want to take a car.
Fenway Park

Why to Go and What to Bring:
Whether you are a baseball fan or not, Fenway Park is a part of Boston’s history. As cramped an uncomfortable as it is majestic and awe-inspiring, Fenway is bit of an enigma. It’s a stadium that was opened in 1912 that has been slowly renovated, piece by piece, over the years in a way to keeps it almost modern (“almost” being the key word) while still retaining its charm. Seeing a game is a great way capture photos of Fenway at its best. However, if you’re not interested in seeing a game (or just plain can’t get tickets), tours of the park are given throughout the year that get you into the nooks and crannies of the park that may be inaccessible to fans during game time.
If you plan to photograph during a game, both a wide angle lens and a telephoto will come in useful. The former will capture sweeping views of the stadium and the game as a whole, while the telephoto will bring you into the action happening either on the field, in the bullpen, or even in the stands. You most likely won’t get away with using a tripod, but the lighting is good enough that you really won’t need it.
When to Go:
Game time is the best time, but Fenway also hosts other sporting events and concerts throughout the year. If baseball isn’t your speed, you can still take in all that Fenway has to offer with a different atmosphere. Check the Red Sox website for tours, which will get you access to the park that you wouldn’t otherwise have during game time.
How to Get There:
The T is far and away the easiest way to get to Fenway, especially for a game. The park is within walking distance from the Hynes Convention Center, Kenmore, and Fenway Green Line stops. There are many parking lots around that serve fans during games, but expect to pay upwards of $40 for a spot if you can find one and you’ll still have to walk.
Seaport and Fan Pier
Why to Go and What to Bring:
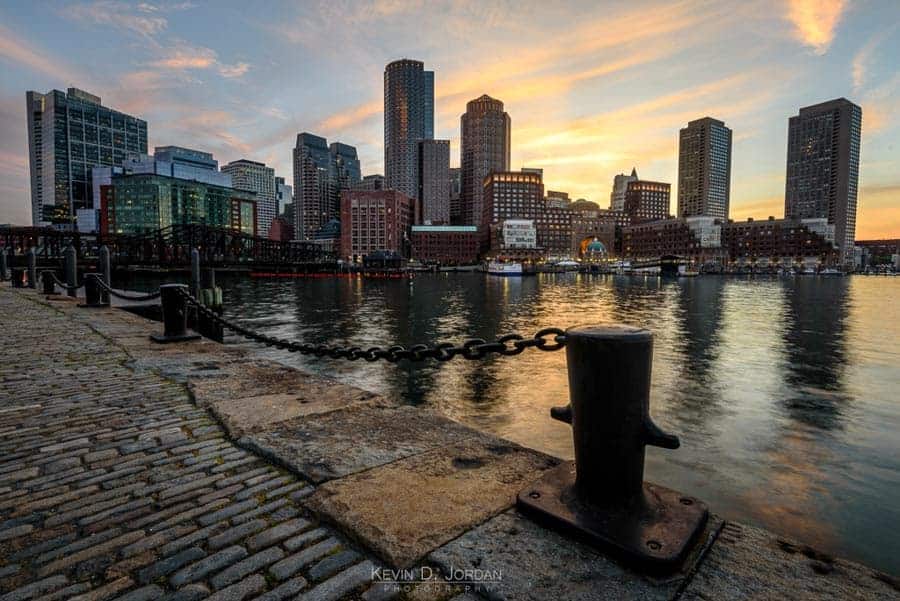
Seaport is one of the fastest changing areas of Boston at the time of this writing. The skyline is rapidly changing, and views of downtown Boston that existed last year can now be blocked by new buildings. If you find yourself in this area, the main view to catch is the view of the downtown Boston skyline from Fan Pier. This is a common shot, as it places an old, oversized black chain in the foreground of an otherwise modern shot. It’s tough to find a unique composition from this area, but its arguably the most iconic shot of Boston. You don’t go to Yosemite and not take a photo of Half Dome, so regardless of how popular the shot is, it’s still one worth capturing. While you’re in the area, check out the nearby Institute of Contemporary Art.
Too get the classic shot from Fan Pier, you’re probably going to want to go wide. The shot above was taken as 15 mm on a full frame camera. However, I’ve also taken shots from this area with 24 mm on full frame. As always, make the scene your own, but know that if you want the chains, stone walkway, and skyline in one shot, you will need a large field of view.
When to Go:
If wide angle landscapes are your thing, Fan Pier is arguably the best spot in Boston for a sunset shot, especially in summer since the view faces to the west-northwest. Sunrise also yields some nice lighting during golden hour, and the view shines even more once it starts to get dark. Honestly, the view is so good that there aren’t too many bad times to visit.
How to Get There:
Seaport is a about a ten to fifteen minute walk from the South Station “T” stop on the Red Line. A bus route known as the Silver Line also runs from South Station into Seaport if you want to get dropped off a bit closer to the action. Where Seaport is still under development, there are some more surface parking lots left than in other parts of the city.
Arnold Arboretum

Why to Go and What to Bring:
Arnold Arboretum is an escape from the city while you’re in the city. Located in the Jamaica Plain and Roslindale sections of Boston, the Arboretum is owned by Harvard University and gives you a chance to take a walk in the flowers and trees. The Arboretum is one of the places in Boston you may want to bring a macro lens with you because of all of the different species of plants and flowers in the park. There is even a bonsai garden if tiny, ridiculously old trees are your thing.
When to Go:
Each season offers something different at the Arboretum. Regardless of the time of your visit to Boston, there will be something to see at the Arboretum, with stick season (bare trees and no snow) potentially being the exception.
How to Get There:
The Arboretum is one of the few places in Boston where I might recommend taking a car to get there, but it isn’t necessary. The entrance to the park is a short walk from the Forest Hills stop on the end of the Orange Line if you are taking public transit.
Cambridge
Why to Go and What to Bring:
Although it is technically not part of Boston, Cambridge is easily accessible by car, bike, walking, or the Red Line, and is home to plenty of photographic opportunities. A walk along the Cambridge side of the Charles River provides great views of the Boston skyline. Also, the campuses of Harvard University and the Massachusetts Institute of Technology each provide interesting architecture to grab shots of. Iconic Harvard Square is a maze of tourists, students, shops, and makes for a great street photography opportunity. Bring whatever lens suits your photography and snap photos to your heart’s content.
When to Go:
Whenever. With a location category this vague, you could get a photo any time of day and any time of year!
How to Get There:
The Red Line runs directly through Cambridge, with the main stops for iconic parts of the city being the Kendall/MIT and Harvard stops. However, the city is also widely accessible by car, bike, and foot.
East Boston
Why to Go and What to Bring:
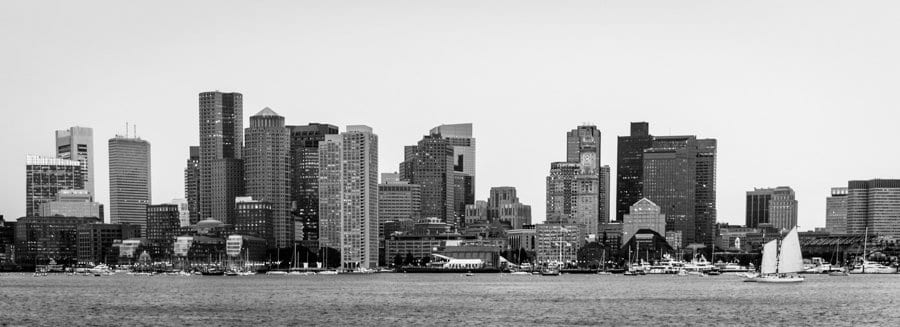
Last but not least, head across the Boston Inner Harbor to East Boston for one last great view of the skyline. There are a few vantage points of the skyline from East Boston, including Lopresti Park, Piers Park, and the Hyatt Regency Boston Harbor hotel. A wide angle lens won’t do you too much good here, as the skyline is far enough away that you will need a little bit of reach to get a detailed shot of the skyline.
When to Go:
The view of the skyline from East Boston is a prime sunrise and sunset location during the shorter days of the year, but the sun shifts out of your frame during the summer months. Either way, this view is great in soft light, so consider making the trip during Golden Hour or Blue Hour for best results.
How to Get There:
East Boston is best accessed by either car or the Blue Line. It is also situated next to the airport, so those flying in or out could easily make a stop at this location in conjunction with travel plans. If you are using public transit, Piers Park and Lopresti Park are a short walk from the Maverick stop on the Blue Line.
Beautiful.! Thanks for writing this. Now I won’t be stuck wondering what to do on my trip to Boston this summer. Looking forward to a tip for other cities. Pittsburg?
Happy to help! Enjoy your trip. I’ve unfortunately never been to Pittsburgh, so I’m no help for locations there 🙁
Thanks for this! I am traveling to Boston in September and now I know what to shoot! Fantastic guide and beautiful work.
Thanks, Brenda! I hope your enjoy your trip and get some good shots!
Thanks..I go there a lot…I noticed you left out the great cathedral there..Cathedral of the Holy Cross and the park alongside St. Charles river, the Esplanade?…Your great shots do the city an honor. You inspired me to look at it with new eyes.
Thanks, Raj! Much appreciated. The Esplanade is definitely a good spot, I just already had so many spots along the Charles that I figured it would be hard to miss 🙂 I’ve never been to the cathedral, though. That looks like it would be a great place to shoot!
Great list! Favorite places in & around the city to photograph the super moon tomorrow?
Really helpful! I’ve been to Boston plenty of times but I’m still relatively unfamiliar with the T system. Knowing where the nearest stops are to each location is great. Thanks.
THANKS! Very kind of you to post this info.
Thanks a lot Kevin, really helpful! Would love to share some memories with you 🙂
I might use these spots as a guide to capture some beautiful shots in my upcoming trip to Boston. Thanks for sharing! Great write up.
Thanks for the write-up. I appreciate that there are a few god spots for photos in Boston, but to be honest, I find Boston pretty uninspiring overall for cityscape photography. I’ve lived here for about 3 years and the best photography IMO is from the seaport overlooking the water onto the financial district skyline. Longfellow is OK (Back Bay skyline is not very pretty IMO) and Zakim needs really good lighting or optimal long exposure shooting at night from the right vantage point.
My recommendation for visitors is to take day trips out to other New England cities if possible or to shoot street photography in the financial district, Chinatown, or the various squares in Cambridge (Central, Davis, Porter, etc.).