
A lot of photographers have been interested in getting into real estate photography lately, and for good reason. I've written several posts on the topic, and I've mentioned a few times that I often get much better results by using a painter's pole instead of flying my DJI Phantom drone to get the exterior photos of the home.
When photographing real estate, shooting from an angle slightly higher than normal standing height almost always presents a more compelling shot. If you look at professional real estate photography, you'll see that most of the exterior shots are done from about 15-20 feet (5 – 7 meters) in the air.
No tripod is that tall, so you'll have to get creative. I've used my DJI Phantom Drone (costs about $1,000) for many of my real estate shoots, but I haven't been happy with the quality of the camera on the DJI Phantom 3.
So another option, which is faster and much less expensive, is to simply attach your regular camera to the end of a long painter's pole. That's the technique I want to show you in this post.
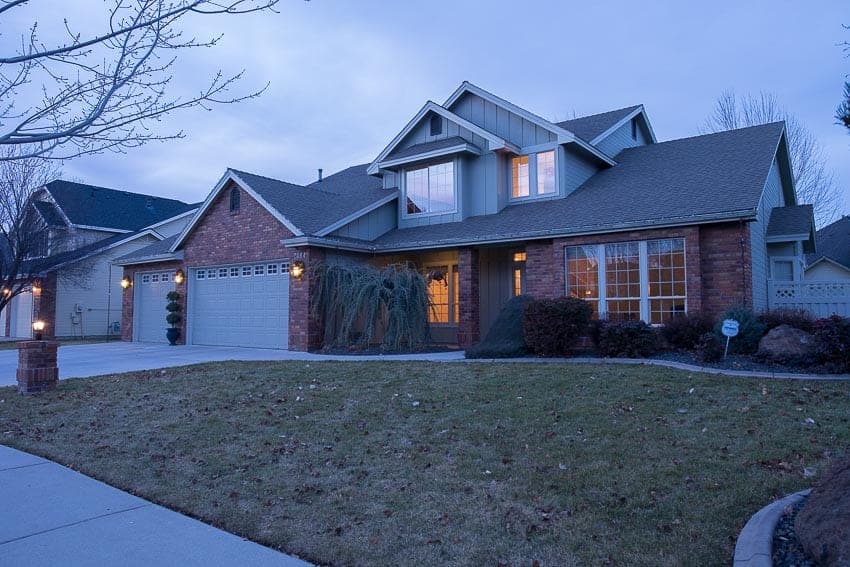
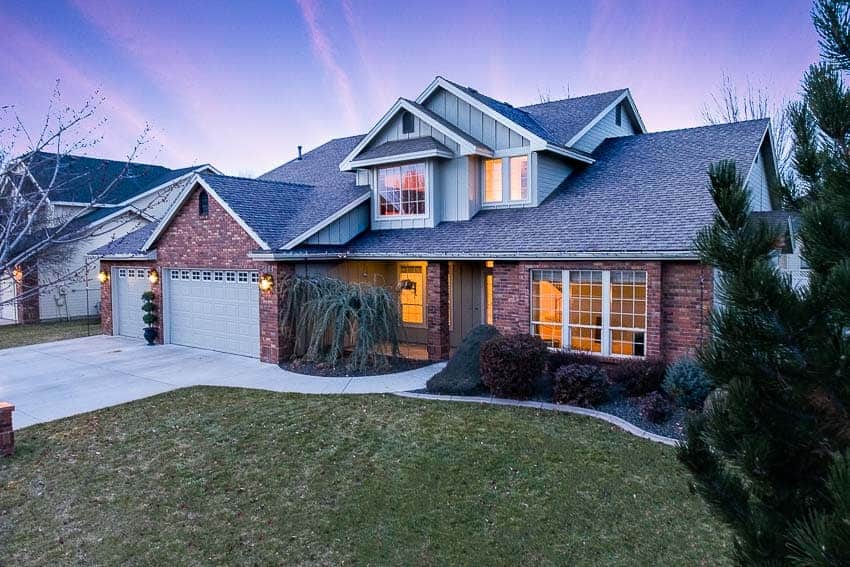
The photos below are of the front of my home. You can see how much of a difference the elevated perspective makes (in addition to a little Lightroom love).
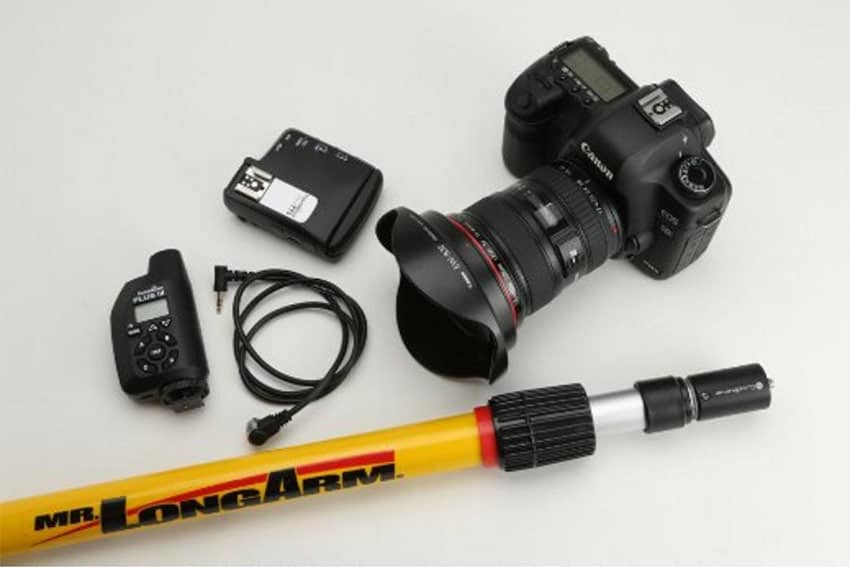
Recommended Materials (Under $40)
- Painter's pole (link goes to Amazon for the painter's pole length I like) – You can decide how high you need your painter's pole to extend. For me, I got the longest one (6-12 feet, which is 1.5 to 3.6 meters), but you may not need one that tall. Remember that you'll be holding this up, so you can add your height to the length of the pole, plus another couple inches for the camera and adapter.
- Camera adapter (link goes to Amazon's listing page for the right adapter) – The end of a painter's pole is a weird blunt screw that won't hook onto your camera's tripod socket without an adapter. Amazon has everything… including a painter's pole to camera screw adapter. Awesome! This adapter will make ANY painter's pole fit in ANY camera. Doesn't matter what camera brand you shoot.
- Any camera you want to shoot with
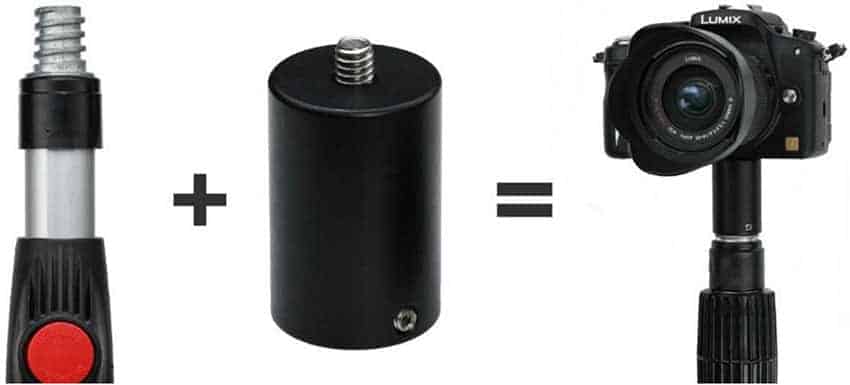
Once you have those materials, this becomes a very simple project. You just screw the adapter on the end of the painter's pole and then attach your camera to the adapter by screwing it in the tripod socket on the bottom of your camera. Done!
A Few Tips
- The first time you photograph the front elevation of a home, I guarantee you'll be tempted to lift the camera too high. I made that mistake a bunch of times before I got the height just right. If you go too high, it puts more emphasis on the roof than the siding of the house.
- This probably goes without saying, but be sure to increase your shutter speed. You won't be holding the camera very steadily, so you probably need a shutter speed of around 1/100 or 1/200. This really isn't a problem even when shooting in the evening hours since you can always just increase your ISO. Real estate photos are typically viewed quite small on an MLS, so a little noise in the picture doesn't hurt anything.
- Be sure the adapter is screwed in very tight before each shoot. You obviously want to avoid the nightmare of a camera coming crashing down from 15′ in the air. The tripod socket is unlikely to work its way lose, but the end of the painter's pole has a loose screw-type connection that could wiggle loose over time. The reason I recommend this particular adapter is that it has an extra allen wrench screw on the side of the adapter that you can use to affirmatively lock the adapter onto the pole. It's quite well made.
- If you're interested in earning a little side income from real estate photography, check out my post about how much to charge for real estate photography.
I heard you mention this on the podcast and just had to come see for myself what you were using. Thank you.
How do you compose when you can’t see what the camera sees from 15ft? I’m 50. Reading the back of the LCD from that far away — not possible.
Many newer cameras have wifi built in that you can connect to your phone via an app, you can compose shots that way. Otherwise the old trial and error comes in.
Good point though as I personally use Canon 5D MK3 and the only option is WiFi + Phone App, however I would prefer my camera to have a rotated screen like Canon 70D. Anyway, I often use both hands to hold my monopod, so I am kind of forced to use the trial and error method , which is still OK as it only requres taking a few more shots to get the right angle.
An excellent addition to stabilize the painter’s pole is a salt water fisherman’s rod belt gimbal.
https://www.ebay.com/i/251536953783?chn=ps
I have several of these that I use for fishing. They really do the job on stabilizing the painter’s pole. Just make sure that the butt of the painter’s pole fits into the gimbal cup you have selected…
I just clicked on the pole adapter which took me to Amazon Canada (cause I’m in Canada) $86. Hefty price difference . ouch
Just search for “painter’s pole adapter” on Amazon and you’ll find one for $47 Cdn which is much better.
http://www.amazon.ca/ClickSnap-PROPOLE-ProPole-Painters-Adapter/dp/B00EVWS1JK/
I live in Canada as well and I get the$86 price tag too. Try modifying the search box, I removed the manufacturer’s name “ProPole – Painter’s Pole Adapter – Camera” and there are some cheaper results that show up for the exact same adaptor $ 47.
use .co
insteaf of .ca
use .com
instead of .ca
John – That’s odd. I just clicked on it and it is $21.
I heard you mention this on the podcast and just had to come see for myself what you were using
I think the painter’s pole is a great option for getting those overhead exterior real estate photos. But it got me thinking…
Jim mentions that no tripod will get you to the required height, but a light stand will! I have the 13′ Impact light stand linked below. I initially purchased the stand for my Zoom H6 audio recorder to get the mics above the crowd for live music recordings. I think this might also be a great option for getting those elevated real estate shots. Yes, at $70 US it costs more than the painter’s pole option, but you can also use the stand for other applications. If you need a little extra height there are many extension poles available.
http://www.amazon.com/Impact-Air-Cushioned-Heavy-Duty-Light-Stand/dp/B006U6NWFS/ref=sr_1_1?ie=UTF8&qid=1457927594&sr=8-1&keywords=impact+ls-13hab
@Scott Steiner – A light stand is a good option for longer exposures and such. Definitely has some stability advantages. One negative, however, is that without a head on it, you won’t be able to tilt the camera. It will just always shoot straight forward and cut off the bottom of the house unless you hold the light stand and tilt it down–in which case it just makes more sense to use the cheaper painter’s pole. But a good option to bring up. Thanks for the idea, Scott.
I finally took the plunge a few weeks ago and ordered the adapter and painters pole, and I’m stoked with the results. I use a wireless trigger and an eyefi card on my 5D mkiii, so after taking the shot I can get a quick indication on my phone if the positioning is close. I had previously looked at dedicated poles, that although they did not flex, cost over $1k AUD. My clients are more than happy with the results, and that is the main thing.
For the lower price, don’t use: http://www.amazon.ca/ClickSnap-PROPOLE-ProPole-Painters-Adapter/dp/B00EVWS1JK/
Use instead: http://www.amazon.com/ClickSnap-PROPOLE-ProPole-Painters-Adapter/dp/B00EVWS1JK/
Word if warming – always check for overhead power lines before raising or moving the pole. In Australia most of our houses have overhead power lines to the house.
I found your blog to be very informative. I am greatly inspired by your posts and thinking of writing mine now. Thanks for being an inspiration to me as I was also trying to write blogs but was not getting the appropriate genre.
How are you getting these types of shots though, what are your exposure settings and how are combining these in post?
That’s what I was looking for. We needed a professional camera that can capture the exterior and interior beauty of a house and my search is over here after reading this post. Thanks for sharing.