
Zion National Park is one of the most popular destinations for photographers worldwide, and over the last several years. In fact, the Park reports that traffic has gone up 40% in the last two years.
While Zion is a gorgeous location, it is also tricky to know where the best locations are, and what time of day to photograph them. Some of the challenges that most photographers face in Zion is that the main canyon is only accessible by shuttle for much of the year, and lighting in the canyons can be difficult to predict unless you've photographed the area before.
IMPORTANT TIP! Since publishing this article, we created the ULTIMATE tool for planning a photography trip to Zion National Park. It's called Really Good Photo Spots. It's a free iPhone and iPad app with THOUSANDS of the best photo locations in the world all in one app. Nearly every country in the world has many spots, and southern Utah is absolutely COVERED in spots on the app. It's really convenient for travel photography because you can just tap “Spots near me” and BOOM! It lists all the best spots to take pictures near you. Download really Good Photo Spots for the iPhone or iPad right here.
Photo Locations in Zion
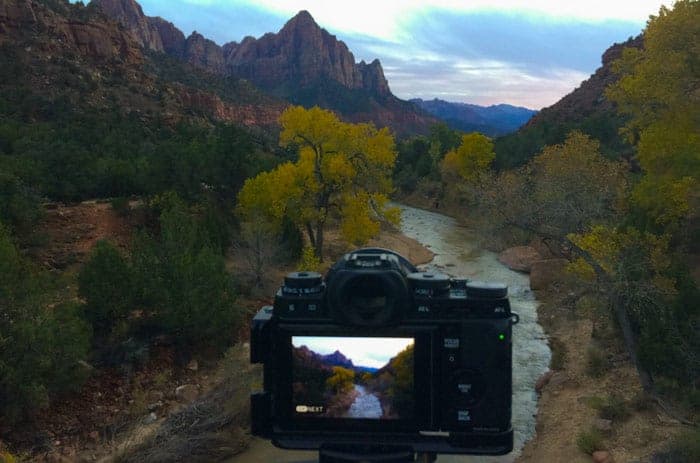
Watchmen from the Bridge
Best time to shoot: Sunset
Access: Drive right up to it. It's just past the visitor center–right across from where the shuttle entrance is. No need to take a shuttle to this location unless parking is an issue.
Awesomeness Score: 9
Okay, let's start with the most obvious spot in Zion. The bridge over the river where you view the Watchmen. It has been photographed a bazillion times, but that's because it's a gorgeous spot.
Don't expect to be alone to photograph this spot. It wouldn't be unusual to stand shoulder-to-shoulder with 75 other photographers at this location, and there is really only a small area that you can get “the shot” from. To get an idea of how crowded it is, check out this Youtube video.
Officially, Zion National Park does not recommend photographing from this location because of it's dangerous placement along the road near a bend, but it doesn't prohibit photos from this area for individual shooter either. But it does not allow groups or workshops under a permit to shoot from here and instead recommends shooting from the Paurus foot bridge instead, which ruins the composition.
Hop Valley
Best time to shoot: Sunrise or sunset
Access: Drive straight to the parking lot. 3 mile hike to the valley, but lots to see along the way.
Awesomeness Score: 7
I was very fortunate to take the Hop Valley hike on the first day of snow in the fall of 2015 (first week of November). The snow made for gorgeous contrast against the red peaks of the mountains nearby. I probably got more “keepers” in Hop Valley than anywhere else in the park, despite the fact that this is not a popular photography destination within the park.
The Hop Valley Trailhead is easy to locate and drive to–usually with ample parking. The hike to Hop Valley is 3 miles one-way but there is a lot to photograph along the route. The trail is very flat for the almost all of the hike, so it's good for novices, kids, and able-bodied elderly people.
Towers of the Virgin from Behind the Human History Museum
Best time to shoot: Sunrise
Access: Drive straight to the Human History Museum.
Awesomeness Score: 4
On the day that I went to photograph this popular location, there were at least 75 photographers lined up and arguing over who was in whose shot. The location itself was somewhat lackluster to be honest. I think this is a classic example of a location that is famous merely because some blog said it's a good spot to shoot and so everyone goes there. I think it's one you could skip in favor of better locations, frankly.
It is said that the morning light on the Towers of the Virgin looks like blood dripping down the cliff face due to the multi-colored rock.
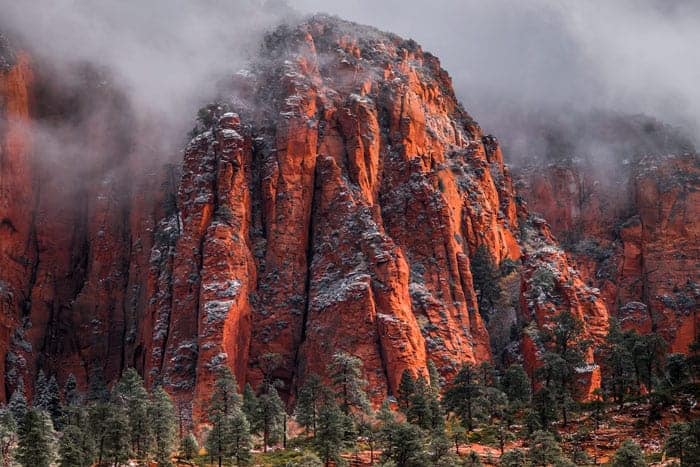
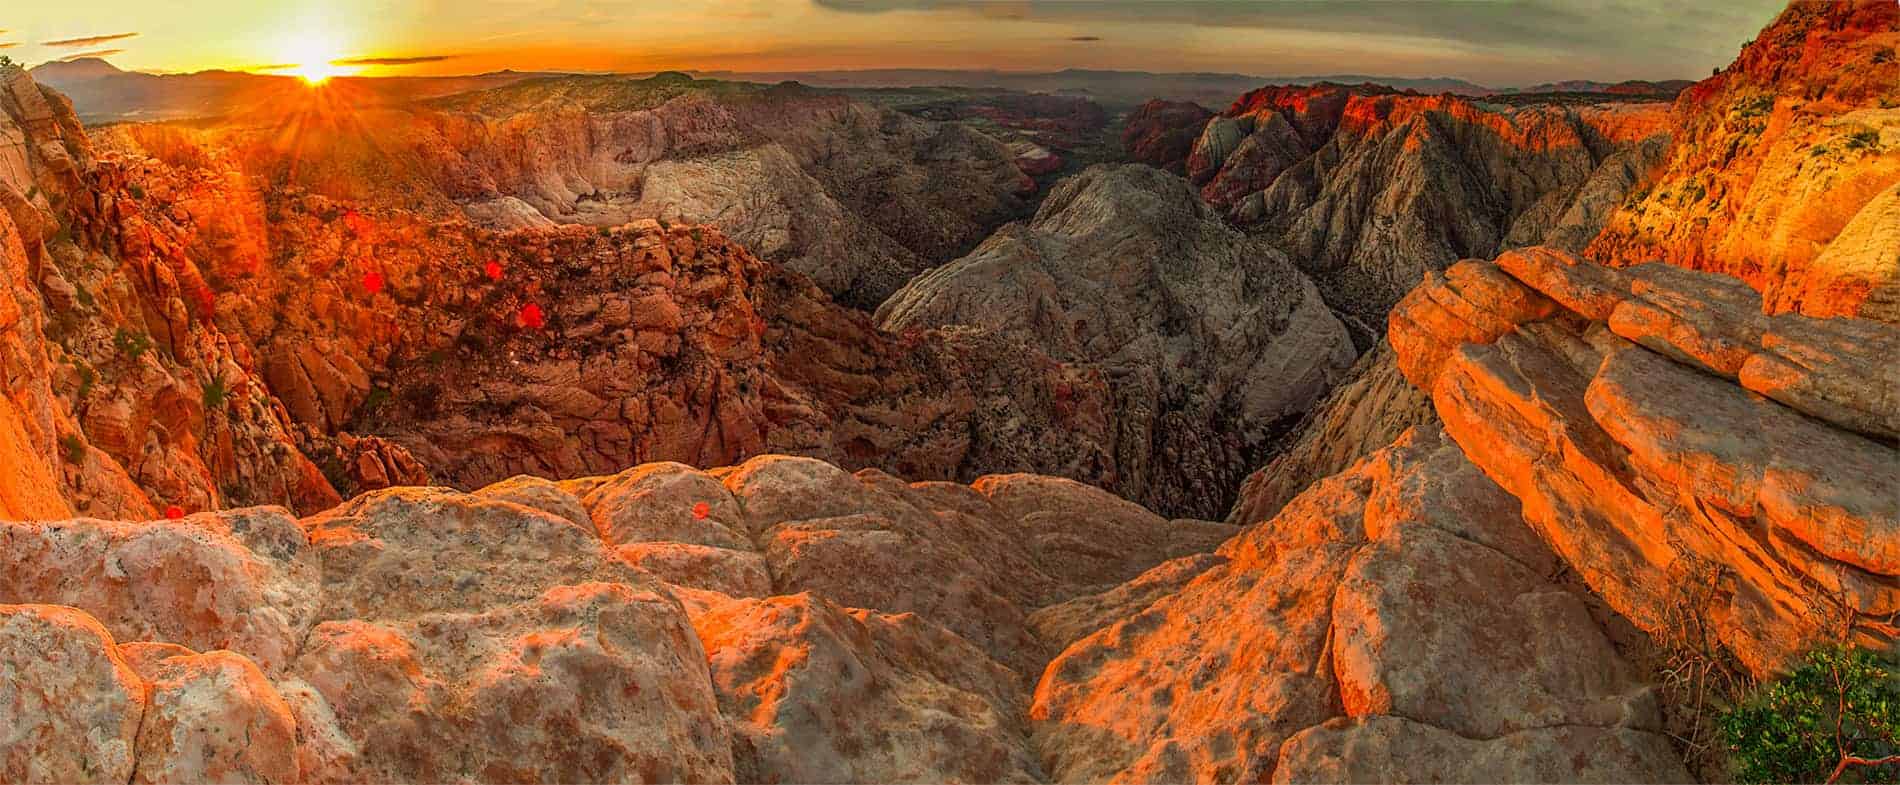
Kolob Terrace Road
Best time to shoot: Sunrise or Sunset
Access: Drive all along the road
Awesomeness Score: 6
There are many places to shoot along Kolob Terrace Road (different from Kolob CANYON road). The very first pullout is a gorgeous shot of an open valley, but the light never quite hits the peaks quite right in my opinion.
My favorite spot was the third pull out from the top of the road, which is where the above photo was taken.
The Kolob Terrace road winds quite a bit, so you're actually okay to shoot this spot at sunrise OR sunset. You'll just be shooting different pullouts depending on where the light is.
This area of the park gets very little pressure, so it's a good drive on weekends during the summer when the majority of the park is slammed with other visitors.
 Hoodoo Heaven
Best time to shoot: Sunset or night
Access: Drive straight to the parking lot. 3 mile hike to the valley, but lots to see along the way.
Awesomeness Score: 7
GPS Coordinates: 37°20'38” N 113°6'41” W
This place is called Hoodoo Heaven for a reason. It's basically a large collection of hoodoos (pointed rock formations) out in the middle of the desert. This provides an excellent foreground element for use in night photography or in sunsets.
The location is somewhat difficult to find, but you can actually spot it right from the road if you look carefully.
The hike into the spot is about 15 minutes, but be sure to stay UP TOP on the spine of the ridge near the parking lot and follow that over to the hoodoos, and then descend. If you go down straight from the pull-out, you'll be doing a much more strenuous hike than is needed. The hike is somewhat steep, but quite short at only .25 miles.
The easiest way to find the location is to go to the Hop Valley Trailhead and follow the road PAST the trailhead for .25 miles, then look off to the right side of the road. There is a tiny pullout. You can also enter the above GPS coordinates into Google Maps (just type it in the search box) on your phone and you'll get there. There is another webpage online that gives directions to hoodoo heaven as being northwest of the Hop Valley Trailhead. That is COMPLETELY WRONG! Don't follow those directions. Just type in the GPS coordinates in Google Maps. You should be able to see the hoodoos from the road. Don't hike until you see them or you'll be on a wild goose chase like I was the first time I went here.
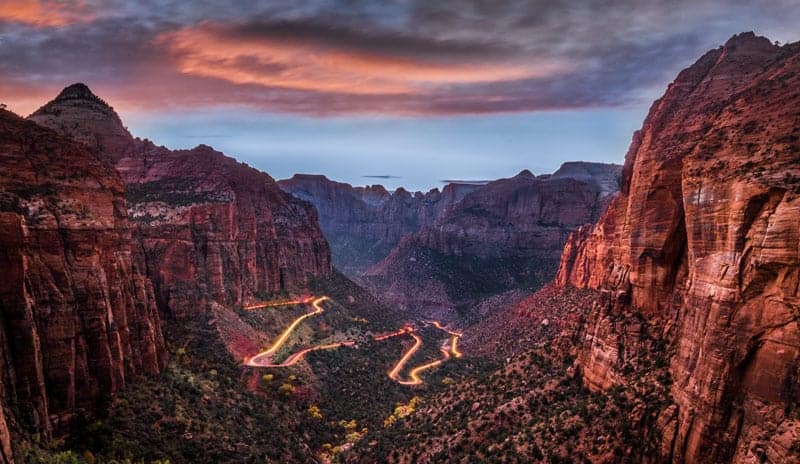
Canyon Overlook
Best time to shoot: 25 minutes after sunset
Access: Drive straight to the parking lot. 1 mile hike to the Overlook.
Awesomeness Score: 9
Canyon Overlook is the best overlook in Zion–hands down. The view shows a large valley below and is best at sunset with the sun setting just to the left of the end of the canyon. There view is quite wide and can accomodate many photographers without getting in each others' way. I found the best view was just to the left of the fence so that you could get the creek below right in the middle of the composition.
I would suggest NOT leaving this location too early in the evening. Most photographers packed up and left at sunset, but the most interesting view was after the sun had dropped when the light trails of cars driving on the distant windy road became brighter. Use a long exposure as the cars drive quite slowly and you're sure to capture something pretty fantastic.
I didn't even break a sweat on the 1-mile hike in. It's a very short hike and not difficult for anyone in reasonable shape. However, we had some older people in our group who did not like the hike because it is uneven and gave them issues with balance. I also wouldn't hike the trail with kids as you'll be near a cliff face at the end of the hike and there are some drop offs along the way. It's a very easy hike for most people, though.
The trailhead starts just a hundreds yards past the Zion Mount Carmel tunnel and is off to the left of the road. Parking usually gets congested in this area, so go early to get a parking spot or you'll have to walk quite a distance.
Angel's Landing
Best time to shoot: Mid-day with clouds in the sky
Access: Accessible only via shuttle. Stop and the Angel's Landing stop.
Awesomeness Score: 9
Angel's landing is about the scariest hike on planet earth, and is not for the faint of heart, but is a very do-able hike for those who are adventurous and want a tale to tell. The photos from this hike can be breathtaking because of the precarious trail you follow. In fact, one photographer in my group told me she has seen grown men sitting down on the ground holding on to rocks and sobbing because they were so scared (no, not kidding).
Angel's landing is a long hike straight along the ridge of a cliff. You sometimes have to hold a chain on a very narrow ledge as you hike.
There really is no way to access this hike right at sunset or sunrise because it takes quite some time to get to the interesting part of the hike. So plan on using white puffy clouds on the blue sky as your background for the shots.
Angel's landing gets its name because it was once said that it is a trail so high that only angel's could land there.
The Subway
Best time to shoot:3 hours after sunrise or 3 hours before sunset (those are the times to BE AT the prime spots in the narrows)
Access: Drive straight to the parking lot. 1 mile hike to the Overlook.
Awesomeness Score: 10
The subway is a long and strenuous hike, but may not be quite as bad as the park service makes it out to be on their page about it. Here's how the park service describes it:
[x_blockquote cite=”Zion National Park Website” type=”left”]This is a strenuous 9.5-mile hike that requires rappelling skills, 60 feet of rope, and extensive route finding experience. The route also requires swimming through several deep pools of very cold debris-filled water. The trail begins at the Wildcat Canyon Trailhead and ends at the Left Fork Trailhead. Both trailheads are located on the Kolob Terrace Road.[/x_blockquote]
The Subway usually does NOT require rappelling. There are rock scrambles, though. It is difficult to get lost on the trail, but there are a few places that can lead you on a path that is more difficult to follow.
The main limitation to photographing the subway is the requirement of a permit that needs to be applied for months in advance. However, if you go during non-peak times, there are often permits left over from groups who were awarded permits but did not come to pick them up. Go to the park permit office at 8AM each day and ask if there are any unclaimed permits. You just might be in luck.
There are several iconic locations along the subway to photograph–it's not just about the final bend in the cave that is work the hike.
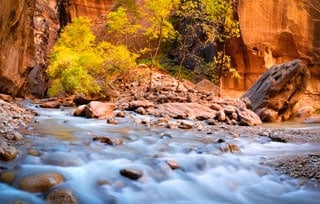
The Narrows
Best time to shoot: 3 hours after sunrise or 3 hours before sunset (those are the times to BE AT the prime spots in the narrows)
Access: Take the shuttle to the last stop–Temple of Sinawava
Awesomeness Score: 8
The Narrows is a very popular hike through a large slot canyon with a river running through it. The hike itself can be bitter cold with water varying between knee-deep in spots when the river is low, to chest-high when their is a higher flow in the river.
The Narrows hike goes for a full mile from the shuttle stop (Temple of Sinawava). After you get in the water and start in on the slot canyon, the first mile in the water is less than inspiring as far as the photography is concerned. There are a few places you can set up to shoot an okay shot, but I recommend just making time to get further into the
Photo Locations Near Zion
Zion National Park sits very close to Bryce Canyon, Arches, and other popular photography destinations. If you only look up photo locations in Zion proper, you'll miss many other excellent spots.
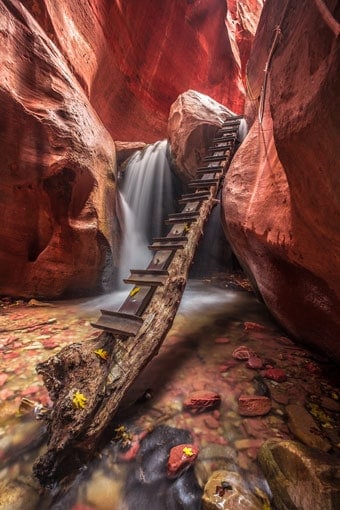
Kanarra Creek Falls
Best time to shoot: 3 hours before sunset (that's the time to BE AT the waterfall)
Access: Drive to an improved parking lot ($10) and hike in 1.25 miles
Awesomeness Score: 10!
This is one of my favorite locations for landscape photography in the area. It's the shot I'm most excited with from my travel to Zion, but it's not actually in Zion National Park. Kanab Creek Falls is on BLM land near the tiny town of Kanaraville.
The town of Kanaraville has built a nice parking lot at the end of 100 North Street (touching the mountain). Parking costs $10, so have cash ready, but this isn't a heavily trafficked hike. When I hiked in early November, I only saw two people over 4 hours.
The hike is moderate difficulty and is 1.75 miles to the waterfall. When hike up to the entrance to the slot canyon, you are within 100 yards of the waterfall. Although this is a short slot canyon, NEVER enter a slot canyon if there is rain in the forecast. EVER!
After 100 yards of beautiful twists and turns in the slot canyon you reach the small waterfall (about 9′ tall). The beauty of this location is really the makeshift ladder, but you can never really predict what the ladder will look like. It's constantly changing as ladders are washed out in flash floods and replaced.
I recommend shooting this location in late afternoon, but before sunset. About an hour after sunrise, I got a short glow in the canyon, but it was gone within minutes and never really heated up. Late afternoon is a better bet so the falling sun will come through the back of the canyon.
You'll need a tripod as it's quite dark in the canyon. My settings were 30″ shutter, ISO 400, f/9. Use a polarizer to cut the reflections on the rocks above the water fall, which effectively increases your dynamic range. You might also consider using the light on your cell phone to subtly light paint the lower portion of the photo, which otherwise is too dark.
I wrote a full article on photographing Kanarra Creek Falls that includes directions and more helpful info.
Snow Canyon Overlook in Saint George
Best time to shoot: Sunrise
Access: Either drive right to the canyon or do a 40-minute hike
Awesomeness Score: 8
Snow Canyon is in the nearby city of Saint George and is a 43 minute drive from Zion, but worth it if you have already captured what you wanted to shoot in Zion.
The Snow Canyon Overlook is a beautiful vista high above the canyon below with red rocks as far as the eye can see. This is definitely a sunrise location, and because of the high perspective, you'll need to be in place before sunrise. So this is a set-the-alarm-for-3-am-and-hike-with-headlamps-in-the-dark kind of place.
The 4 mile roundtrip hike climbs only 470 feet, so it isn't too steep and is suitable for any healthy teenager or adult. It took me about 40 minutes to hike in with a headlamp to guide the way. Full directions to the start of the trailhead are here. The only thing I'd add is that if you feel like you're on someone's property at the start, be cautious not to trespass, but you're probably just fine and on the actual trail. There are several cattle fences, but the actual trail is okay to travel.
Yant Flats
Best time to shoot: Sunrise and Night
Access: Drive to the Leeds exit, which is in the nearby town of Saint George
Awesomeness Score: 7
Yant Flat is a fairly remote location that provides excellent foregrounds of strange-shaped red rock, which is perfect for a sunrise shot or for night photography. Nobody will be bothered by you waving around flashlights to light paint out here.
Yant Flat is officially in the Red Cliffs National Conservation Area.
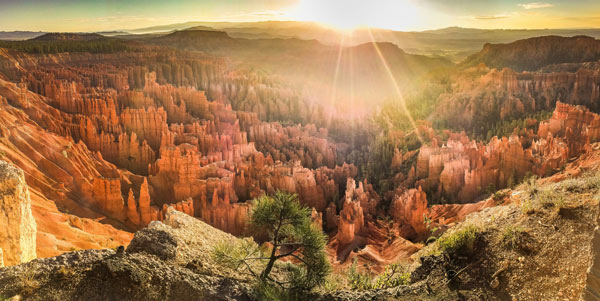
Bryce Canyon
Best time to shoot: Sunrise
Access: Two hour drive from Zion. Accessible by car with only a short 200 foot walk.
Awesomeness Score: 8
Bryce Canyon is only a two hour drive from Zion National Park, which makes it a close destination for visitors–especially if you'll be driving north after your visit to get to the Salt Lake Airport. It's certainly worth a stop.
Most of the locations in Bryce are huge, wide panoramic shots viewing the entire amphitheater of rock formations below, but those who spend more time here can certainly get into the hikes and go down into the canyon to find many more unique perspectives.
My favorite overlook for photography at Bryce is Sunrise Point.
For almost every photo in Bryce Canyon, the best time to shoot is at sunrise because the drivable portion of the Park faces east. That means you'll be shooting toward the sun, which produces a warm glow over the entire area. At sunset, the horizon blocks the light from entering the canyon and produces a rather lackluster landscape. Without question, the best time of the year to photograph Bryce is when there is a little snow. The red rocks contrasted with new fallen snow is gorgeous.
Brett Edge wrote a great article about photographing Bryce Canyon.
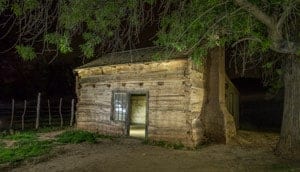
Grafton Ghost Town
Best time to shoot: Night, Sunrise, or Sunset
Access: Grafton Ghost Town is 5 minutes from the main entrance to Zion. You can drive right to it.
Awesomeness Score: 7
Grafton is a small ghost town just outside Zion National Park. There are three structures left in the ghost town–a church, a store, and a cabin. The ghost town is accessible 24/7 and is a great spot for light painting at night.
You can drive right to the ghost town on a slightly bumpy dirt road. The easiest way to find the ghost town is to simply type “Grafton Ghost Town” in your Google Maps app. It'll come right up, but if it doesn't, you'll want to know that it's at the end of Bridge Road. You'll reach two forks on the road, and you'll want to stay to the RIGHT on both of them.

How to Make Red Rock Look Good in Lightroom
I see sooooooo many photos come out of Zion National Park that are photographed beautifully in-camera, but look really lackluster. You really have to learn how to use Lightroom to make the red rock look as gorgeous as it does in person. Cameras usually make red rock look like a dull brown without some work in Lightroom.
I created a package of 16 Lightroom presets just for Zion National Park that specifically target the red channel and make the rock look just as beautiful as it does in person. I really think these presets will do wonders for your photos, so I'm making them available for the no-brainer price of just $15.
Get my Zion National Park preset collection for $15 here. There are 16 presets in the bundle. It'd be crazy to travel around the world and spend a week working to get the photos, and then not have them turn out right just because you hadn't styled them properly in Lightroom.
I have downloaded the Lightroom Preset for Zion. Pardon my ignorance, how do I access these presets in Lightroom CC.
@Don – We have full install instructions at https://improvephotography.com/installpresets
I have been listening to your podcasts. Recently you said you had a buy on learning videos. I cannot find on your website. I don’t usually have this much trouble navigating a website??
Some great tips here but the directions for the Watchman (from the Bridge) are confusing. This location is NOT just over from the visitors centre, there IS a bridge there but its not the right one! Take the shuttle (or car) to stop 3 on the Zion Shuttle route. Just before you arrive at the shuttle stop you cross the bridge (parking is just before the bridge on the LHS). You can walk from the visitors centre but I think its a mile and a half so factor in that if you are short on time. Jim, any chance you can update the directions or are you trying to keep numbers on the bridge down 😉
Awesome tips, thank you! Wish my overlook shot was half as good as yours. Second the comments on the bridge but it was easy to figure out in the end.
Love the presets for Zion! Thanks Jim!
Hi, I’m a student from Westmoor high school and I would like to know if it’s possible if you could lend me some of your pictures of Zion National Park for my web design project, because my teacher told us that all images have to be original.
@Jim Harmer
You’re welcome to use the images from this post in your project. Good luck!
Nice photos Jim!
Do you think I need to bring 100-400 lens to Zion or nearby parks?
Thanks
Jim, I wish I had read this article before we went to Arizona last winter. We spent 3 days in Page and I would of loved to see some of these sites if I had known about them. Guess we’ll have to plan another trip.
Hi, I reallly enjoyed this article, Plus I loved your video on shooting Panther falls in Washington. My planned fall trip to the gorge had to be canceled due to the fire?. Panther Falls was on the shot list. (I had actually gone so far as to pack heavy rope, then heard your comment about dental floss & thought it was hilarious )
So I’m going to do Southwest Utah instead. Better than making lemonade from lemons! Anyways, I love editing,but wanted to ask if any of your presets can be used in Adobe CC, or On1? Getting from A-Z faster is fine by me. Also are your presets editable? Thanks!