
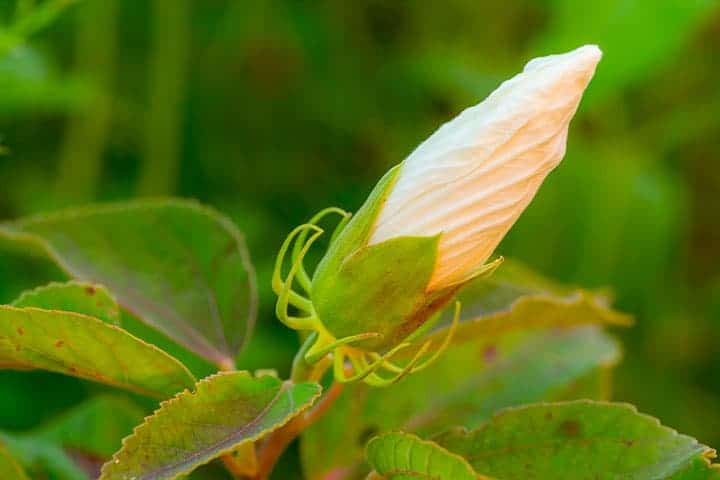
I’ve always had a fondness for nature and the great outdoors, so it’s only natural (pun intended) that my photographic interests have gravitated in that direction. Furthermore, if there is one aspect of nature that seems to grab my attention and draw me in for a closer look, it is flowers. There is just something about the inherent beauty of a flower; the wide variety of colors, shapes, and patterns that provides drama and interest to the landscape. Whether growing wild in a field or prairie, deep in the forest, or in the back yard, flowers are all around to showcase the beauty of the natural world.
Flowers are willing subjects and lend themselves quite well to being photographed. This much is evident when you look at the numerous photos of flowers posted on social media and photo sharing sites every day. However, not all flower photographs are created equal. As with any type of photography, there are general rules and guidelines, and tips and tricks to make the best images possible. The basic idea is to make our photos stand out from the rest; to create something unique and inspiring; something with that “wow” factor. Hopefully these tips will provide at least a starting point to getting more creative images of flowers and inspire you to try techniques and ideas that you may not have tried before. If nothing else, at least trying some of these will get us all out shooting more, and that can’t be a bad thing.
Tip #1: Change your perspective
One common mistake, and one I’m sometimes guilty of myself, when out shooting is to simply put the camera to your eye and shoot away. We all generally see the world at eye level, so what you will end up with are images that are quite often just boring images. In order to make images that are a little more creative and dynamic, you will need to change your perspective a little. This means that you will need to get up high or down low and shoot at different angles. The key is to try different things, or ‘work the scene’ as it is so often called. Don’t just settle for the status quo, but become more deliberate and shoot for an end result that will be more creative.
You may decide to shoot straight down at the flower, or perhaps shoot from your knees so that you are shooting from the same height as the flowers, or maybe even lying down and shooting up at the flowers. The subject, the background, and the light will dictate what angles will work best in a particular situation. Either way, wear clothing that you won’t mind getting dirty and don’t be afraid to get down as low as you can go. Experiment with different camera angles to find what works best for you.
Tip #2: Isolate the subject
This one is pretty basic, but should not be overlooked. We’ve all seen images of flowers, birds, people, etc. that have a cluttered or ugly background. The main subject gets lost in the mess and the photo just doesn’t work. Flowers are beautiful and our images of them should accentuate that beauty as much as possible. Compose the image in a way that keeps the flower the predominant focus by avoiding things that will be distracting. Keep in mind that distractions come in many forms, such as having too much of the image in focus, uncomplimentary patterns or colors, or areas of the image that are too bright (‘hot spots’). All of these things will cause the viewer’s eyes to wander and possibly lose interest in the star of the photo. So, much as with the first tip above, and as a general rule, be deliberate and thoughtful when making these images. The end result should be pleasing and maybe even inspire others to get out and enjoy making images of the natural world.
Tip #3: Location isn’t everything
You may think that you need to travel to some exotic location to take beautiful flower photos, but that’s just not the case. If you don’t live in or can’t travel to Costa Rica, Hawaii, or some other tropical location, not to worry. There are plenty of other places to shoot. One of the nice things about flower photography is you don’t even have to leave home. The flower garden in the back yard might be a good place to start, or possibly the city park down the street. Perhaps there is a botanical garden in your area where you could shoot a wide variety of flowers. However, note that photography guidelines will likely vary at botanical gardens, and that you may not be able to use the photos for commercial purposes without obtaining a permit first. The point is this: just get out there and do it. Flowers can be found everywhere, so if that’s the type of photography you want to do, you can get lots of practice and there’s no excuse for not shooting.
Tip #4: Get up close
Flowers are such beautiful things and some are so intricately detailed that you will want to shoot as close as possible. The best choice for this would be to use a dedicated macro lens on your camera. A macro lens will allow you to get really close and still be able to focus on the flower. However, if you don’t have a macro lens there are other options. In his article Best Macro Lenses: Unbiased Review of 8 Lenses, Jim reviews three dedicated macro lenses to consider, but also takes a look at some much less expensive alternatives that could provide you with great results. (Be sure to watch the video, too!) Beware that when shooting up close, the depth of field will be razor thin, and could present some challenges for getting enough of the flower in focus. If there is enough light available, you can stop your lens down (increase the aperture number) to f/11, f/16, or even f/22. Doing this will increase the depth of field, but will require you to lower the shutter speed and/or raise the ISO to compensate for the smaller opening in the lens. Another method that I have used with some success is to back up a little, taking the picture a greater distance from the flower, then cropping the image in post-processing to provide a closer view. With the amount of megapixels at our disposal in modern cameras, it is possible to crop pretty aggressively and still get a high quality image.

Tip #5: Keep it steady
A tripod may not always be necessary when shooting flowers, but if you shoot macro or close-up images, or try focus stacking techniques, you will need to mount the camera and lens on a very steady base. When creating these types of shots, you will likely be near the minimum focus distance of your lens, zoomed in close, and have a very thin depth of field. Hand-holding the camera may work, but even in good lighting conditions you could end up with a lot of blurry photos due to camera shake. One advantage of using a tripod is that it will force you to slow down and take your time setting up the best compositions for the shot. Furthermore, using a wired cable shutter release or wireless trigger will prevent the need to touch the camera to take the picture, possibly causing vibration and camera movement. If you don’t have a cable release or wireless trigger, you can also use your camera’s self-timer mode to accomplish the same thing. Just be sure to set the timer for two seconds (instead of the default 10 seconds) or each shot will feel like an eternity to make.
Tip #6: Use live view
This tip will apply primarily when you set up your camera on a tripod. The live view function on your camera is a very useful tool to help you compose the image and to establish critical focus. With live view turned on, you can see the composition on the LCD screen and adjust the camera’s position as necessary. Once you get the desired composition, zoom in on the screen to the area you want to focus on and switch to manual focus on the lens. This technique will be especially helpful when shooting macro or close-up images of flowers. Use the focus ring on your lens to manually focus on the flower, then take the shot. When reviewing the shot, be sure to zoom in on the LCD to make sure the image is tack sharp.
Tip #7: Block the wind
It seems that whenever I decide to go out shooting flowers, and particularly macro or close-up shots, the wind is invariably blowing. Even the slightest breeze can really make these types of shots a real challenge. It may seem like a calm day, but you will be surprised how much a flower will move, especially right when you want to take the shot. For this reason, it’s a good idea to have something with you that can be used to block the wind to keep the flower from moving around while you are trying to focus and get the shot. Any number of things could be used for this, such as a reflector, diffuser, a small board, or even an umbrella.
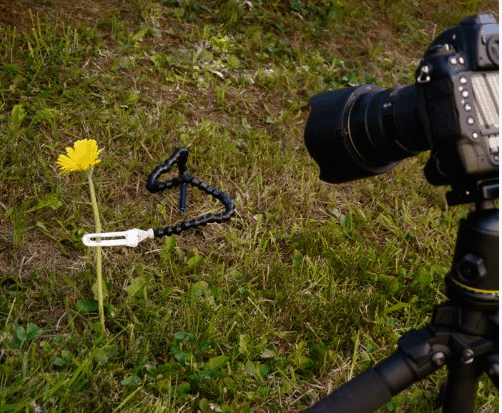
Tip #8: Use a Plamp
You are probably thinking that this is a typo and should read “clamp”, and you are actually not far off. A Plamp, or plant clamp, is essentially two clamps at either end of an articulating arm. The first thing you may ask yourself is if you could make this simple device on your own for much less money, and the answer is a resounding yes. Just a few basic items from the hardware store, or you may already have them in your garage right now, is all you will need. Two small to medium-sized clamps (one for each end), about two feet of some type of relatively stiff but flexible wire, and some cable ties and/or duct tape to attach the clamps to the wire, and you can make your own for about five bucks or less.
This gadget is something that you will find many uses for, especially when shooting flowers. Clamp one end to a tripod leg or to a small tree nearby and the other end to the stem of the flower to hold it steady. Be sure to use some foam material inside the clamp to prevent crushing the flower’s stem. Because the plamp is made using a flexible wire, it can be bent and moved in a variety of directions to position your flower however you want. Maybe you want the flower at a slightly different angle or in front of a more pleasing background. In addition to holding the plant steady, the plamp can come in handy for a variety of things. You may want to make more than one of these, as one could hold the flower in place and a second one could be used to hold a small reflector or diffuser, or even to hold distracting elements out of the frame.
Tip #9: To stack or not to stack
When shooting close-up or macro photography, the depth of field can be so thin that it is virtually impossible to get enough of the subject in focus in a single image. This is especially true of flowers, which come in so many different shapes and sizes, and with so many little details that need to be in focus to make the image more interesting. One technique employed by macro photographers to deal with this challenging situation is the use of focus stacking. Just like the name implies, focus stacking is the process of taking several images of the flower, with each image focused on a slightly different part of the flower, then stacking all the images together to create a single image that is mostly or completely in focus. This technique requires a tripod to keep the camera and lens totally stationary (read: rock solid) as the focal point is changed and each of the images are taken. Once all these images are captured, they are imported into Photoshop, Photoshop Elements, or focus stacking software, such as Helicon Focus or Zerene Stacker. The images are aligned and the in-focus areas of each of the images are blended together into a single image with a seemingly amazing depth of field. This is a great way to show incredible detail in a flower and create a very dynamic and interesting image.
Tip #10: Look at the big picture
Sometimes showing more of the surroundings will make for a more interesting and engaging image. Perhaps there’s not just a single flower you want to focus on, but rather several flowers, or even an entire field of flowers. Or maybe there are some wildflowers growing next to a stream and you want to include some of the water to provide context for the image. You’ve probably heard the expression “can’t see the forest for the trees” and that can apply in flower photography. Sometimes, I find myself getting so caught up in focusing on the details that I forget to step back and just look at the bigger picture. Details are great, but it may be a good idea to include some images that will tell more of the story. So take a few steps back or put a wide-angle lens on your camera and take in more of the scene. When you see the complete picture that these images provide, you’ll be glad you did.

Tip #11: Use fill light
As a general rule, the best light is going to be in the morning right before and shortly after sunrise and in the evening shortly before and after sunset. However, the lighting isn’t always going to be perfect. The flowers you want to shoot may be in deep shadows beneath trees or other vegetation or maybe overcast skies just aren’t giving you the contrast that you want. In these cases, you may need to add some of your own light to really make your flower images pop. One way that you might be able to accomplish this is by using a reflector to direct more light onto the subject. Any type of reflective material could work, such as a white sheet of foam core or even a piece of white poster board. In a pinch, these can be picked up at an office or hobby store, but they aren’t going to be the easiest to carry with you in the field and aren’t going to last very long before they get wet, ripped, or blown away by the wind.
A 5-in-1 reflector is a relatively inexpensive solution that works great for this type of photography. These reflectors are typically round and have reversible sheet that is black on one side and white on the other, then when turned inside out, is silver on one side and gold on the other. Sandwiched in the middle is a diffusion disc that can be used in many ways as well. Depending on your situation, you can use the gold side to provide warmer light or the silver side for a cooler image. There are lots of uses for this versatile and indispensable tool and it folds up to make it easy to carry with you.
You may find that you need a little more light or that the reflector just isn’t reflecting enough light onto the flower that you are shooting. This could be a good time to break out the flash and see what can be created. It may be best to get the flash off the camera using remote triggers to provide more depth and dimension to the image. Plus, just a little kiss of light may be all you need to really make that image sing, so start out with the flash at low power and adjust as necessary. The number of different flash configurations and variety of flash gear is seemingly endless, so I won’t go into too much detail here. Check out these great articles and for more detailed information on using flash. And here is more information about recommended flash gear.

Tip #12: Just add water
If you’re looking for that little extra something to push your flower photography over the top, this might just be it. It’s such a simple and small thing, but I think it really adds drama and interest. ‘What possibly could it be,’ you may ask. As the title of this tip implies, just add water. If you’re out shooting shortly after a rain shower or early in the morning when there is dew on the flowers, it’s already been done for you. However, if you need to add your own, a small spray bottle will suffice. Just spritz a little bit of water on the flower, and then take your best shot. This water will accomplish three things for you in preparation for some great images. First, the flower may be dusty and the water will clean it off. Secondly, the water will bead up on the flower petals and other flower parts and just makes the image much more interesting. Finally, the flower will glisten as light is reflected off the sheen of water and make it appear more vibrant in your images. Give it a try…it’s a simple technique that could make a huge difference.

Tip #13: Paint with light
Lightpainting is a technique whereby a long shutter speed is used in a relatively dark setting and light is ‘painted’ on the subject while the shutter is open. This will be done at night or maybe inside in a dark room if the flower can be moved inside. First, set up the camera and lens on a steady tripod and use the live view function to compose the shot and focus on the flower. Make sure you have a way to trigger the shutter without touching the camera, either using a cable release or remote trigger or the self-timer on the camera. Then, open the shutter to begin the exposure. Once the shutter is open, use a small flashlight to paint parts of the flower. After the shutter closes, review the image on the LCD to see what you created. You’ll want to take several shots to adjust the amount of light and try different light patterns until you get a desirable result.
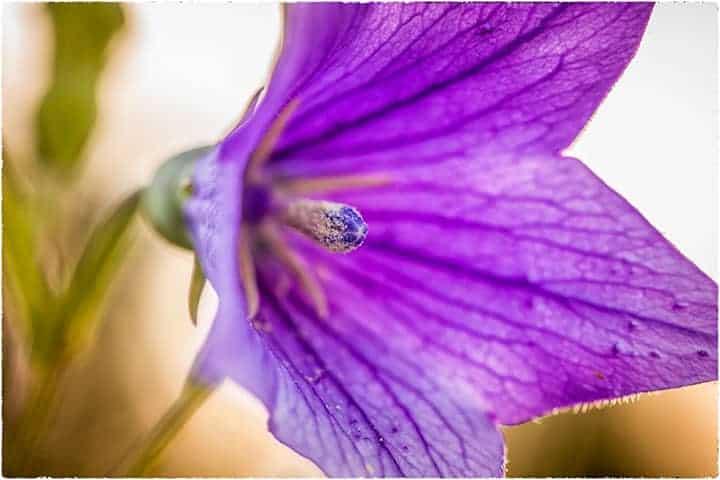
Tip #14: Think (and shoot) outside the box
It is not necessary to always compose your flower images with the whole flower in the shot. Try something different and more creative. Only show a small part of the flower; perhaps only a petal or part of a petal, the stamen, or some other part of the flower. Abstract images of this nature evoke a sense of mystery and curiosity. The viewer will see what is in the image and try to piece together the rest in their imagination.
Tip #15: Show some movement
Just because the wind is blowing that field of wildflowers doesn’t mean that you have to set up a wind block and attempt to shoot a stationary subject. Try using the wind to your advantage in making a more creative image of the flowers. With the camera set up on a tripod, stop down the aperture to achieve a relatively slow shutter speed. Depending on how strong the wind is blowing and how much light is available, you may even need to use a neutral density filter to slow the shutter speed enough to show movement. Once you have established the camera setting necessary for the shot, make an image and review it on the LCD. Make adjustments, if necessary, to speed up or slow down the shutter speed for the desired result. The shutter should remain open for a second or two as the wind is blowing the flowers. The result will be a more artistic and dynamic image showing the blurring of the flowers as they move to and fro.
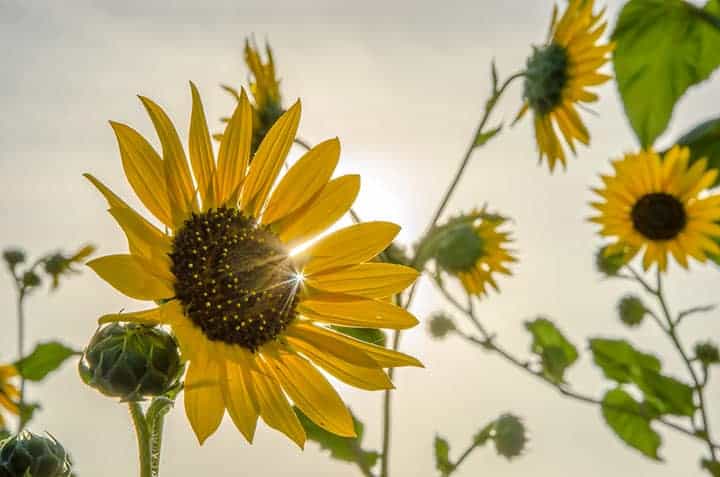
Tip #16: Have fun with the sun
Ideally, you will be making images close to sunrise or sunset when the sun is low in the sky and the light is best. Place the flower between the camera and the sun, with just a hint of the sun peeking out from the edge of the flower to create a starburst effect. This will require the lens aperture to be small, in the neighborhood of f/16 or f/22. Be sure use a tripod and use live view to compose and focus. Do not look directly toward the sun through the viewfinder, as this could damage your eye. Also, take advantage of the beautiful colors in the sky just as the sun is about to rise or right after sunset. Compose the image of the flower to show the setting sun and sky to make a very dramatic image.
Tip #17: Show the flower’s life cycle
One great way to tell a story with your flower images is to select a flower and show its life cycle with a series of images taken throughout the growing season. Preferably, use a flower in your backyard garden so you will have easy access and won’t have to travel anywhere. Start with an initial image showing the flower just as it is planted or beginning to grow. Over time, take an image every few days or a week to illustrate the transformation of the flower as it begins to bloom, fully opens, and eventually dies at the end of its life cycle or when the weather changes. Depending on the number of images taken, you may even be able to put them together to create a time-lapse video of your flower.
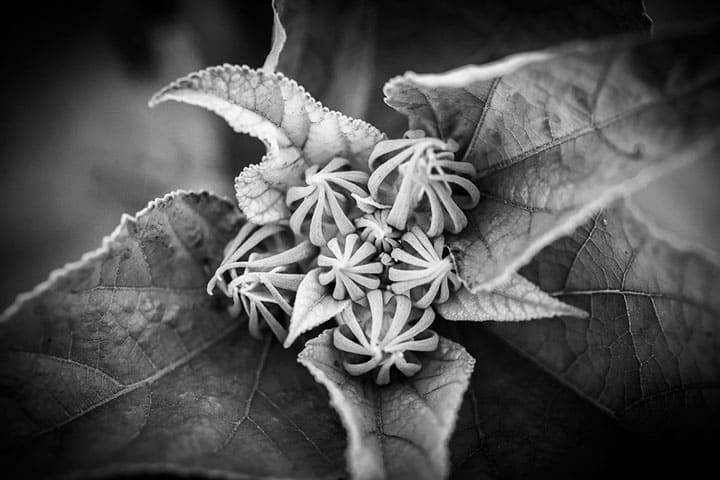
Tip #18: Be an artist
When you are shooting that flower image, keep in mind the end result and the post-processing potential. One wonderful aspect of photography is that you have the freedom to create not just what you see, but also what you feel in an image. You don’t have to follow conventions. That flower may be colorful, but perhaps you would prefer to make the image black and white. You may even choose to selectively color the image (gasp!). Half the fun is post-processing. The raw image is just a starting point, a kind of canvas for your work of art. So make those flower images and have fun with them!
Tip #19: HDR is not a dirty word
There are situations when the dynamic range is just too great to capture in a single image. In these situations, photographers sometimes take a series of bracketed images at different exposure values and blend them into a single image in post-processing. This is called high dynamic range, or HDR, photography. HDR has gotten kind of a bad rap because so many times it is way overdone and the resulting images just don’t look good at all. However, if done properly, this can be a great tool to create the image you want and it won’t even be apparent that it is an HDR image. Many modern cameras have an auto bracketing function that allows you to take 3, 5, 7, or even 9 images at different exposure values. Check your manual to see how to access and set up you camera for auto-bracketing. It will be best to set up the camera on a tripod to do this. Once set up, composed, and focused, use the self-timer or a cable release to take the bracketed images. In post-processing, use Photoshop or HDR software to combine and blend the images. For more tips about how to shoot and process HDR images, watch this video.
Tip #20: Fade to black
You don’t have to use the background in your flower image at all. Using flash and a relatively high shutter speed, you may be able to illuminate the flower and drop the background completely out of the image. This will work best when shooting from above, looking straight down at the flower. With the camera in manual mode, set the shutter speed to about 1/125 of a second and aperture to f/5.6 or f/8. Use a manual flash set to about 1/8 or 1/16 power to provide just a small pop of light on the flowers. The idea is to light only the flowers and not the background. These settings are only a starting point and may need to be adjusted depending on the amount of ambient light that is present. You may not be able to completely drop out the background in camera, but this can be accomplished easily in Lightroom. Moving the shadows slider all the way to the left and/or using the adjustment brush to selectively lower the exposure in parts of your image should do the trick.
Tip #21: Do a project
Another great way to get inspired and to possibly provide a spark of inspiration is to complete a flower photography project. There are many different possibilities, but here are just a few to consider:
- Shoot as many images as you can of just one type of flower
- Shoot images of only blue (or yellow, or pink) flowers
- Learn the names of all the different flower types that you shoot
- Create a time-lapse video of a flower as it opens first thing in the morning
A project will get you out shooting a lot, which is a good thing. The saying goes that practice makes perfect or that perfect practice makes perfect. While I don’t believe that anyone will ever attain perfection, it certainly wouldn’t hurt to get out and shoot as much as possible. The best way to get better at shooting is to get out and shoot.
I hope that you will find one or maybe all of these tips helpful and inspiring. I encourage you to get out and try new techniques and come up with interesting ways to make your own images more creative.
Article written by Rusty Parkhurst.
Really Great tips Rusty i am a budding photographer i was inspired to take a few floral photos after reading a few of these tips i would it if you could give me a feedback of the quality of work done
Thanks Rusty for sharing that – there is always something new to learn,
Thanks for the great tips. I am a beginner with a Sony a6000 my interest being macro, flowers and nature. I’m learning slowly yet inspired and amazed every day.
Fantastic tips Rusty.
Thank you for these tips! I will definitely be doing more macro flower photography this season and will use many of them to step up my game.
It’s a wonderful thing when you don’t treat your lawn and see the beauty of all the wee life that sprouts! 🙂
Great post. I love advice number two. Have been a reckless photographer. Thanks.
Fantastic tips Rusty.
Amazing thanks for the help
Very nice photography tips. thanks for sharing with us. really very helpful stuff.
Great an wonderful tips thank you very much ♥
Thank you.
Great….I love this!
Hi ma bhi ak photo click Kiya hai aapko send kasa kru
Thank you for these tips. I am so impressed; I had to comment
Loved it a lot. Thanks a lot for these tips Rusty!!
Some very lovely photos. Thanks for the inspiration. I have started doing a bit of horticultural writing. However, I really want to be able to put pictures to my words to give readers a better understanding of what I am trying to communicate. And sometimes, I just want the image to do that by itself!