
If you know who MacGyver is, you are the right audience for this, because it means you remember watching TV in the 80’s. Since then you may have noticed that you and your friends look better in good lighting. This is where the clamshell lighting setup comes in. This is a setup used in studio photography to give models look the skin of a 12 year old and sparkling eyes with a catch light above and below the pupil.
Background
Let’s back up for a minute and think about the challenges of shooting indoors. First of all, unless you are a professional photographer in a studio setting, you are probably shooting friends and family in a gathering that is taking place in somebody’s home. Everyone knows you are the photography enthusiast and trust you to capture flattering images. There are a few obstacles to this in the home setting that need to be overcome.
To begin, indoor lighting comes from multiple sources that are difficult to control. Window lighting can be excellent when it is broad and diffuse, but can be challenging when sun is coming directly through the window. Also, windows will tend to produce an area of highlight clipping in the background, which may distract from the subject and weaken the overall composition. To make matters worse, the generally lower light levels encountered inside forces us to shoot at higher ISO settings, which decreases the dynamic range the sensor is capable of recording.
The other light source in homes is artificial lighting, which can come from recessed lighting, sconces and lamps. All of these have the potential to be mismatched in the color temperature they produces and the light direction and intensity is often unfavorable. Take ceiling lights for example, which are multiple point sources. Each light has rapid falloff, meaning the main illumination on the subject is coming from the nearest light, which is directly overhead. This throws hard shadows on the face of your subject, accentuating skin imperfections, casting odd shadows, and making the eyes hollow and dark. These days, indoor lights are often LED, which can look reasonably close to incandescent, or fluorescent, which have large voids in their color spectrum, especially in the reds.
The Technique
So let’s get to the MacGyvering! If you are willing to look around, there are all sorts of household items to shoot the flash at or through to create a broader, more diffuse light. Sometimes these are near your camera, but other times, some additional creativity is required. The first task is to take your flash off the camera and put it somewhere else, where it will bounce light effectively onto your subject. Another tip is to use more than one flash. 3rd party flashes are your friend here. Yongnuo 560 III flashes are only about $75 each and can be triggered using a Yongnuo RF-603, which come as a pair for $30. These are manual flashes, which means they cannot do TTL or high speed sync, neither of which are likely to be useful for off-camera applications.
So now you are using two off-camera flashes in manual mode. You will also need to use the camera in manual mode. Before you stop reading, let me tell you that you can do this and will enjoy the process and the results. Let me share some of the advantages before we continue. First of all, this amount of flash power will allow you to keep up with strong ambient light, or completely overpower the ambient light. It will make your images tack sharp, because the flash strobes at up to 1/20,000 of a second (but as low as 1/300th at full output). This freezes your subject regardless of shutter speed. It also allows you to do away with some of the compensation you have done to deal with low interior light levels. If you have a fast aperture lens, you might have opened up your aperture to f/2.8 or wider to keep your shutter speeds up, but this makes focus fussy, depth of field vanishingly small and the lens less sharp in the center and edges. You may have also taken advantage of the incredible technology in cameras today and turned up your ISO to 3200 or higher, which introduces noise, decreases color depth and dynamic range, and reduces detail rendering.
What if you could shoot near base ISO, at f/7.1-f/9, and had flattering lighting with nice catch lights in the eyes? Your friends and family would look like they were shot in a studio, but they would be in a comfortable setting. This is where we get to MacGyver some household items together to make a clamshell. Let’s start with a decent background, like a fireplace or something that creates a sense of place or season. Now set up some seating for your subject, like a chair or an ottoman, set forward from the background by a few feet.
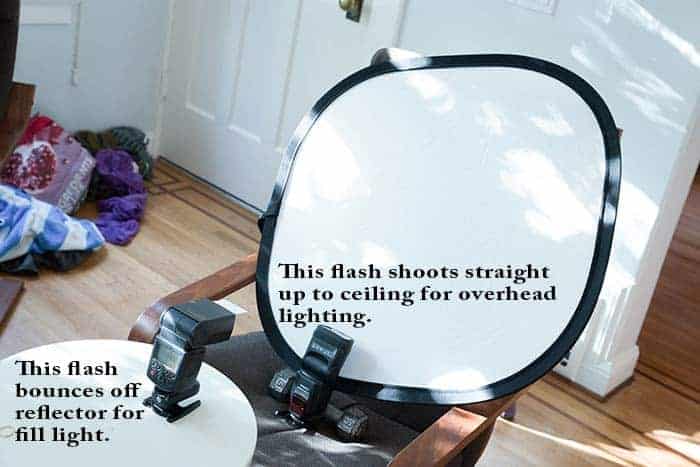
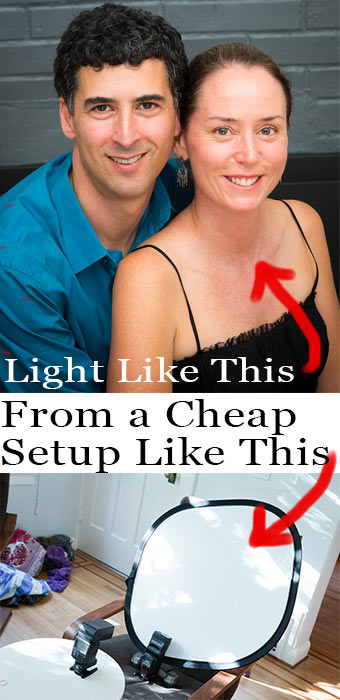
Now you need to create a clamshell lighting rig. The key light is the main source of illumination, and will come from directly in front of the subject at a 45 degree angle up. We create this by firing an off camera flash at a low white ceiling. Let’s say you are shooting from 8 feet away from your subject. In that case you want the key light to light up the ceiling right over your head, so that it is about 8 feet hight and 8 feet in front of the subject. Now we need a fill light that comes from a few degrees below the subject’s face. For this we will set a second flash to bounce off a broad, white surface at about thigh level. To do this, we can put a white towel or apron over the back of a chair, facing the subject and fire a flash at it from the seat of the chair. If you have a reflector, this is a good place to use it.
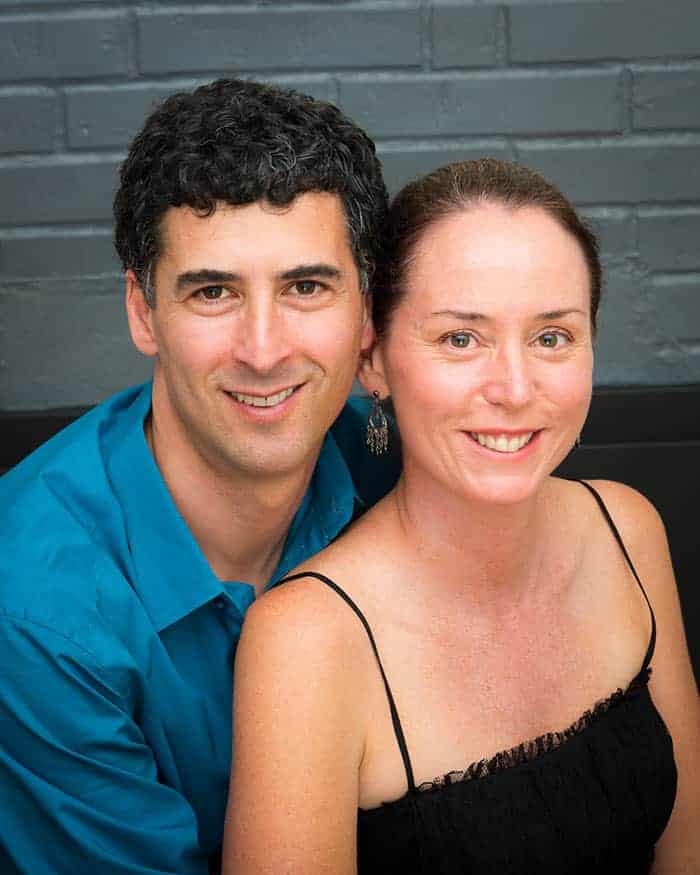
Now we have a setup that bounces flash off a white diffusing surface above and below the face. If the lights are at the right angle, you will see two white catch lights in the eyes, one above and one below the pupil. The lower the ceiling and the closer the fill setup, the larger the the light source will be. The result will be softer light, with graded shadows and brighter, more attractive catch lights.
So how do we go about tuning the exposure and lighting? Start by setting your camera to manual exposure and ignore the camera meter. You will be adding light to the scene that will be many stops above the existing light. Start with a shutter speed below your x-sync speed, like 1/200th. Go to an aperture of f/5.6 or higher, depending on your desired depth of field. If possible, set ISO to a low native level, such as 100-400. These settings will produce sharp focus, with no motion blur, reasonable depth of field for 1-3 people and maximal sensor performance.
First try releasing the shutter with both flashes off, and you will see a scene that is close to black. Now add the main flash, set to manual, with radio triggering, at 1/1 power with a patient subject in the frame to adjust flash power and position. If you can run the flash at less than full power, you will get faster recycling and more exposures before changing batteries. Adjust the zoom setting of the flash to get the effect you want. Wider flash zoom settings will spread the light on the ceiling and may give you more wrap around the sides of the subject’s face. Check your histogram to make sure you don’t have clipping. Now add the fill flash at about 1/32 power. You should see a lower catch light appear in the eyes, and the area under the chin and under the eyebrows will begin to get more illumination. Adjust the power to get the most flattering effect, without overdoing it. You want to set the zoom on the fill flash to be quite wide, since it is bouncing light off something close and large.
 Tips and Tricks
Here are some tips for success. Make sure you avoid lens flare and glare by shooting from a place that keeps direct flash off the lens. Focus on the eyes of your subject to make sure the image is sharp. With more than one person, try to get all eyes on the focal plane so that they are all in focus. This may require that you go to a small aperture (higher f-stop). If you do this, you will need to make a compensatory change of an equivalent EV with the ISO. If you stop down aperture by one stop, you will need to double the ISO. Shutter speed will have essentially no impact on subject exposure in this case, since the flash is dominant.
Look for the catch light. For higher ceilings, aim or move the main flash back from the subject to lower the angle of the incident light, so that the main light reflex is visible below the upper eyelid. You may have to increase the flash power or raise the ISO to achieve this. You can also shoot from slightly above your subject’s eye level to get them to tilt their head up and essentially pivot their entire face up toward the main light. Try different poses to get the best effect.
So to sum it up, even the youngest people look better with good lighting. The clamshell lighting scheme looks great and takes years off the face, but it requires heavy and bulky professional equipment, often best left to a studio setup. This pseudo-clamshell rig, using two low-cost manual flashes and some white surfaces, produces a similar effect with minimal setup. Give it a try at your next family gathering, and you’ll come away with some beautiful, studio-like images of your family to share and print. With a little equipment and some MacGyvering, you can have much more than a snapshot to record that special gathering.
I can’t wait to try to setup. Great guide.