
From the sunset picture example, you have learned the importance of taking full control over the exposure on your camera. Now, it's time to dig into your camera and learn the three most basic tools available to you in controlling the exposure.
Those tools are shutter speed, aperture, and ISO. After I explain what each one does, I'll explain why we need three separate tools to control the brightness or darkness of the photo.
Aperture
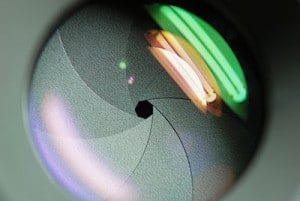
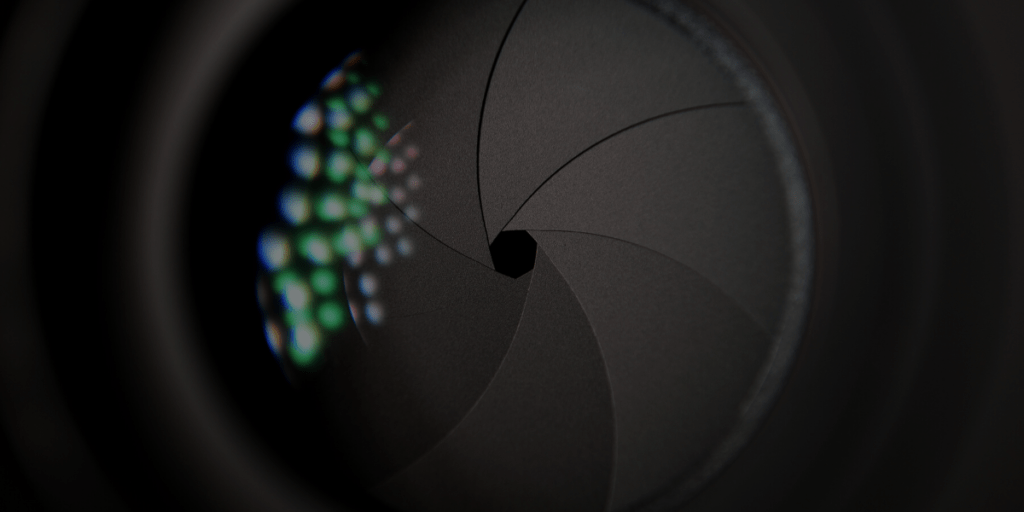
The aperture is a small set of blades in the lens that controls how much light will enter the camera. The blades create a octagonal shape that can be widened (we photogs call it shooting “wide open”), or closed down to a small hole. Obviously, if you shoot with the aperture wide open, then more light is allowed into the camera than if the aperture is closed down to only allow a tiny hole of light to enter the camera.
So suppose you take a picture that is too bright. How do you fix it? Simply choose a smaller aperture. Simple! Aperture sizes are measured by f-stops. A high f-stop like f-22 means that the aperture hole is quite small, and a low f-stop like f/3.5 means that the aperture is wide open.
Let's test your knowledge to make sure you have it down. If you take a picture and it's too dark at f/5.6, would you choose a lower f-stop number or a higher one? Yep! You'd choose a lower f-stop number, which opens up the aperture to let in more light. The size of the aperture controls more than the brightness or darkness of the picture, though.
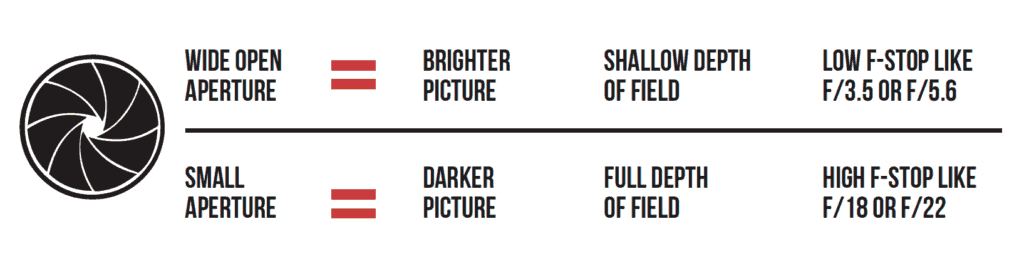
The aperture also controls the depth-of-field. Depth-of-field is how much of the picture is sharp, and how much is blurry. If you want to take a picture of a person with a blurry background, you'd use shallow depth of field. If you want to take a picture of a sweeping mountain vista, you'd want to use a small aperture size (high f-stop number) so that the entire scene is in sharp focus. If you, like me, are more of a visual learner, then I think this graphic will help solidify the information about aperture. Take a minute and make sure you understand this info before moving on.
Shutter Speed
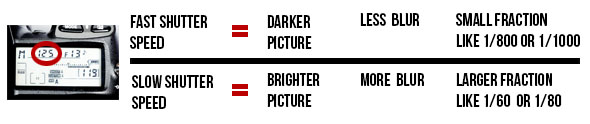
The shutter is a small “curtain” in the camera that quickly rolls over the image sensor (the digital version of film) and allows light to shine onto the imaging sensor for a fraction of a second. The longer the shutter allows light to shine onto the image sensor, the brighter the picture since more light is gathered. A darker picture is produced when the shutter moves very quickly and only allows light to touch the imaging sensor for a tiny fraction of a second. The duration that the shutter allows light onto the image sensor is called the shutter speed, and is measured in fractions of a second. So a shutter speed of 1/2 of a second will allow more light to touch the image sensor and will produce a brighter picture than a shutter speed of 1/200 of a second. So if you're taking a picture and it is too dark, you could use a slower shutter speed to allow the camera to gather more light.
Just as the aperture affects the exposure as well as the depth-of field, the shutter affects more than just the exposure. The shutter speed is also principally responsible for controlling the amount of blur in a picture. If you think about it, it makes sense that the shutter speed controls how much blur is in the picture.
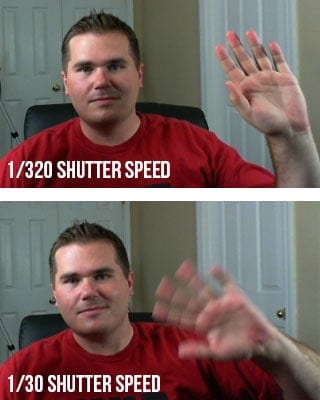
Imagine me sitting here at my computer desk waving to you (you don't have to imagine very hard if you just look at the picture on the right). If you take a picture of me with a shutter speed of 1/30th of a second, then my hand will have moved in the time that the camera is recording the picture. To get rid of the blur, you need to increase the shutter speed to around 1/320th of a second. At this speed, my hand is still moving, but the camera takes the picture so fast that my hand travels only such a small distance that it is not noticeable in the picture.
The next question that most people ask is, how slow of a shutter speed can you use and still get a sharp picture? My blog post on Minimum Shutter Speeds will answer your question!
ISO
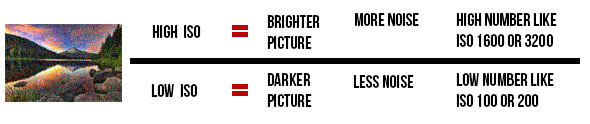
The funny thing about ISO is that it is an acronym, but nobody really knows what it stands for. It is always just called ISO even though it really stands for International Organization for Standardization. Every once in a while, you'll hear an older photographer pronounce it “I-so”, but almost everyone pronounces it “I.S.O.” The ISO controls the exposure by using software in the camera to make it extra sensitive to light.
A high ISO such as ISO 1,600 will produce a brighter picture than a lower ISO such as ISO 100. The drawback to increasing the ISO is that it makes the picture noisier. Digital noise is apparent when a photo looks grainy. Have you ever taken a picture at night with your cell phone or your pocket camera, and noticed that it looks really grainy? That is because the camera tried to compensate for the dark scene by choosing a high ISO, which causes more grain.
What constitutes a “high” ISO is constantly changing. Camera companies are constantly improving the ability of cameras to use high ISOs without as much grain. A few years ago, only the highest-end pro DSLR cameras could achieve 2,000 ISO, and now even entry-level DSLR cameras can shoot at this level. Since each camera is different, you would do well to do a few tests with your camera to see how high of an ISO you can shoot at without making the image overly grainy.
Right now, you will commonly find new DSLRs that advertise expandable ISO ranges.
Putting It All Together
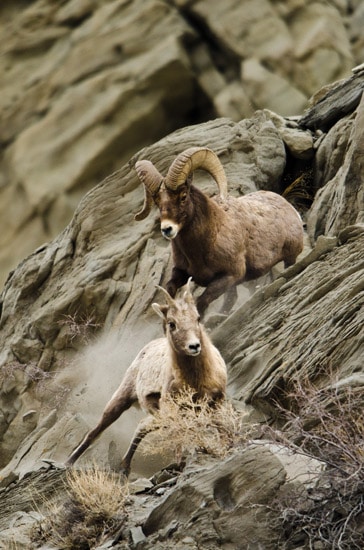
I know exactly what you're thinking. “Why do I need three tools to control the exposure? Wouldn't one suffice?” The answer is no, and I'll explain why with an example. In January, I took a trip to my favorite place on the planet to take pictures–Yellowstone National Park. My guide informed us that the bighorn sheep in the park were dying off very quickly due to whooping cough, so I worked hard that week to capture pictures of the last few sheep in that area of the park.
Around 9AM on a cloudy day, I found a small group of bighorn sheep and started photographing them with a long 600mm lens. The early hour and clouded sky made the situation quite dark for shooting.
Let me help you out. The lens I was working with cost around $12,000, but don’t worry. You can get really good results with a much more affordable 600mm lens. I’m considering selling my expensive lens.
Anyway, it had a maximum aperture size of f/4. So I set my aperture at f/4 to gather as much light as possible. This also impacted the depth-of field to blur out the rocks behind the bighorn sheep. Next, I set my shutter speed. I wanted to capture action in the photo, so I set my camera to 1/1000th of a second shutter speed. I knew that this fast of a shutter speed would prevent any motion blur from the sheep running on the mountain side. Then, I took a picture. WAAAY too dark! I couldn't compromise my shutter speed or aperture, so I knew I needed to use the third player in the exposure triangle–the ISO.
I played around with my ISO and found that if I increased it to ISO 640, it made the picture bright enough to take the picture without making it overly grainy. This combination of shutter speed, aperture, and ISO worked out perfectly. It feels so good to hone in the camera settings!
Now can you see why you need to know how to shutter, aperture, AND ISO, and know how to set them independently on your camera!
If you're a visual learner and want to really learn your camera, then be sure to check out my Photography Start Course. Just a reminder, it's a series of 22 videos where I take you on location to shoot waterfalls, landscapes, people, kids, and macro photos. You can look over my shoulder and see exactly how I set up my camera to take professional photos.

Now, you need to learn how to apply these settings on your camera to take advantage of your new-found nuggets of knowledge.
Thanks for providing this information. Most websites do an ok job of defining the components and explaining their usage. What they don’t necessarily do is offer a clean, easy understanding of how to put it all together. Your instruction is well-written and easy to follow. Thank you.
Very helpful!!!!!
I am just starting out, learning photography. I must say that I enjoyed this piece. May Divinity bless your finger, such that it clicks better. Lol.
Thank you very much
In the college studying both videography and photography.You are doing an excellent job🙏
-My dream is to bevone of the best photographer/videographer and above all,to be a self employed person and TRAVEL ABROAD🙏
thanks very much for the tips. they will be of importance to me as a beginner in photography
With your example I am now beginning to understand the relationship between aperture, shutter speed and ISO. They all work hand in hand.
agreed.
Iso
Thank you very much for this learning article! I have learn a lot from you though im still a beginner ill try to improve more 🙂
Sir, you are a fantastic teacher.. Most simple language with great understandability. You are simply great in in short..
suck my dick bitch aint nobody got time for you.
BET!!!!
wow……………really?!
People are stupid, I knew. Now I have seen one. You bastard, nobody invited you here. And you bloody, a waste of space on Earth, consider this when your dope sucking shit of a tiny brain clarifies between shots, THAT this guy has over a million followers on internet and there you ARE even your father does not listen to you (assuming you have one!)
by bitch i am sure you meant your mama. this is our mentor and a great photographer. he is taking time off to explain the basics of photography to the world and you are babbling bullshit here. you dope headed bastard son of a bastard son.
This helps a lot as a beginner to photography. Thanks Sir.
I am really liking this series! Thanks so much for putting it together!
There is one minor error that you may want to fix. It can be found in the last sentence of the first paragraph of the section called “Shutter Speed”
You wrote: “So if you’re taking a picture *an* it is too dark, you could use a slower shutter speed to allow the camera to gather more light.”
But you should have written: “So if you’re taking a picture *AND* it is too dark, you could use a slower shutter speed to allow the camera to gather more light.”
(Sorry. I’m an English minor in college. I’ll let you know if I spot any more. =) )
Hummmmm….correct me if I’m wrong but isn’t this article with regard to some technical aspects of photography, and NOT about the correct way of writing a paragraph? But, firstly; since you brought it up, as the English minor, you claim to be….how is that you could pass by,welllllllll (and yes; incorrectly spelled on purpose) miss the incorrect spelling of shutter, in the sentence, directly above the one that you picked on? Secondly; and you shouldn’t have to be an English anything to know it…the proper way to write a paragraph, and the appropriate manner of speaking; is and would be to; start positive, make mention of a negative, but ALWAYS end, with a positive. It’s just a good and positive manner of communication! And; lastly…..and once again, NO necessity, to be an English anything, just a caring and feeling human being; move on! Shame on you to take the time, to pick apart, composition!! Really? As I’m sure most people were reading, this material for its content and weren’t even looking for what you pointed out, and shall I remind you, as an English minor in college, what YOU MISSED! So being, that your comment, is now just over two years ago, I hope as you progressed in your college studies, that you also progressed on how to carry yourself, in life! Feel free to let me know, if you saw this, as well as what your feelings and thoughts are, at [email protected]. Good Day to you!
Woah chill fam
u CHILL VRO
that is good enough friendship////
it worked thank you
pp
big pp
small pp
Jason, it’s considered extremely rude to make such a big deal out of something so small. If the entire article was riddled with typo’s I might understand the necessity for a critique. However this was a small mistake and probably just an oversight during the writer’s proof read. I know you were only trying to help, but here’s an extremely useful piece of advice: you don’t always have to be honest! Good luck with your studies (at time of writing you have probably graduated, so I hope it went well!), but I hope your qualifications don’t encourage you to become a pedant. All the best.
Jason,
I am so sorry that other’s have decided you are horrible for aiding this author in maintaining his well created website. I am sure the author appreciated your comment and that you took the time to politely let him know. I know I would. Please don’t let others that commented bring you down.
can I get a booty wrapped in bacon please and thank u
will that be for here or to go?
to go.
also can I get a soft serve of dat ass
okay your total will be $82.50. go to the first window.
wtf
I’m new to the world of photography. I have just bought my first DSLR two weeks ago. I appreciate your articles. Thanks for sharing!
Good impressive explanation, thanks alot
Okay who asked?? There’s a pizza roll in my ass.
bruh n u don’t even share. smfh
come eat me out then damn always playing these games
finna eat u out to not sharing smh
this is really nice post .thank you
wonderful, concise information. I’m slowly learning to move from auto to manual. Thanks for the help!
Wow great you are number 1
Thanks for any other informative site. Where else could I get that kind of info written in such an ideal manner?
I have a venture that I’m simply now operating on, and I have been on the
glance out for such information.
Thank you so much… this make way more sense then some trying to explain…. now I can say I know a little bit more on photography – I used to just snap away and get lucky with the pics
thank you for this post
Brilliant!
Simple and easy to follow, enjoying the learning experience.
Thank you for making this available.
Oh my GOSH. Thank the maker for your way with words! You have taught me more in my 30 minutes of reading your photography basics than I have learned in MONTHS of trying to understand it from any other photographer, website or video I have (no knowingly) wasted my time on! Thank YOU!
***(Now Knowingly) *** of course 😉
hi welcome to chilis may I take ur oder
yes i would like some burger king foot lettuce with a subway sandwich thank u 🙂
Thanks for this. You explained it in a easy way to understand without trying to sound like you are sophisticated by using big words, like a lot of people do.
Paragraph writing is also a fun, if you be familiar with then you can
write otherwise it is complex to write.
Thank you for the visuals! I only noticed them after I had started writing something very similar hahah
rawr xD uwu u look totes kawii :3
Thank you this is the guide that I was looking for.
ISO doenst change the “brightness” of an exposure. Changing the ISO requires changes to either shutter speed or aperture to give the exact same EV or “brightness.” The only effect on the picture itself should be increased noise, more depth of field or less camera blur, the EV is the same. The reason dark motifs appear brighter, is that dumb modes in the camera exposure system try to move average brightness to zone 5. This is the main reason for shooting manual, so that a motif can be rendered in the correct zone – i.e. a dark scene might look better shot at the correct zone instead of being artificially moved up to average brightness. If you don’t want to do a bunch of post process, and want to control your images without a bunch of bracketing, you need to get away from matrix metering and take control of exposure by using the zone system previsualization and setting a EV that is appropriate for the motif.
This is the clearest, simplest lesson I’ve ever had on how to use my camera! Thank you!!!! You should get paid for this! Seriously.
Albert Einstein said, ““If you can’t explain it simply, you don’t understand it well enough.” You, sir, have a stellar understanding of the art and mechanics of photography.
Your explanations are great and thank you for putting them in terms everyone can understand! Thank you for sharing your expertise with us!
“The funny thing about ISO is that it is an acronym, but nobody really knows what it stands for.”
ISO is not an acronym. See here:
http://www.iso.org/iso/home/about.htm
And the correct pronunciation is EYE-so (you can ask them yourself if you like), though most photographers get it wrong. In my experience, people who deal with ISO in other industries (chemicals, etc) are much more likely to get it right.
@Keithy, I guess I was being a bit sarcastic. I don’t mean that NOBODY knows what it stands for, but that it’s not common knowledge.
So …. I S O stands for International Organization for Standardization? Shouldn’t that be “IOS” instead? Am I missing something?
Great article by the way! Thanks much!
It’s a European organization with three names–a Russian one, an English one, and a French one (Organisation internationale de normalisation!).
They normalised their own acronym, they claim, to ISO from the Greek work isos, which means “equal”. This is fairly standard practice for international orgs with names in different languages, which you’ll notice more and more if you look for them!