
Recently, Adobe announced that Lightroom 6.2 adds local adjustment capabilities with the dehaze slider. I'm really excited for this new feature, as I've been loving dehaze!
I've been pretty critical of Adobe lately and the litany of bugs in Lightroom that have slowed its performance to a near halt. But while the slowness has been driving me absolutely insane, I also feel like tipping my hat to the genius Adobe engineers who released the “Dehaze” tool only a few months ago.
The purpose of the dehaze tool in Photoshop and Lightroom is to either add or remove atmospheric haze from a photo. If you have a photo with some low-lying fog in the picture that is ruining the detail in the background, a lot of it can be removed by using the dehaze slider. Similarly, you can enhance some fog by adding haze (although I haven't found this to be as effective).
Also, random question. If you ADD something called DEhaze, what happens? They really should have just called it the “haze filter”, not “dehaze” since you can slide both ways.
The Dehaze tool has changed a lot of the way that I use Lightroom and Photoshop now. I use it for all kinds of things that have nothing to do with haze, but make a profound impact. In fact, I'm using it many many of the Lightroom presets that I'm putting together for this year's Lightroom Steal on Black Friday (end of November).
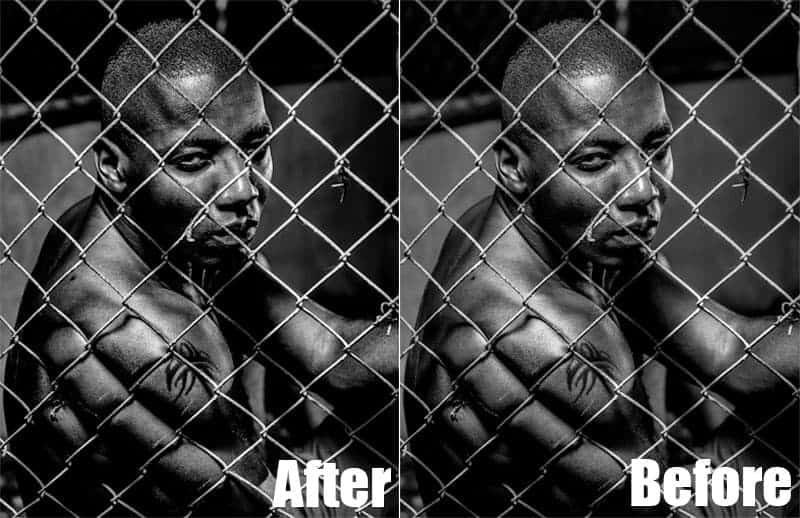
Unbelievably Gorgeous Black and Whites
Black and white photos usually need a lot of contrast to look good. Everyone knows that. The problem with most contrast is that it is either haphazard (contrast slider) which makes the whites whiter and the blacks blacker without giving you any ability to choose which specific tones to brighten or darken, or it is more defined but still global (using the tone curve to dial the contrast in for just the right shades.
Often, what a photo needs, especially a black and white photo, is to add contrast just to one tone. If there is a large patch of middle gray in the photo, it looks boring. It's much more interesting to have a gradient of gray to add interest to that spot in the photo.
That's where the dehaze tool shines–adding contrast to large patches of middle gray. Bingo!

Night Photography Wizardry!
Right after the Adobe press event where dehaze was announced, I was still under an NDA so I couldn't talk about it, but I got a bunch of photos in my Lightroom library ready to test the new dehaze slider. As I was flipping through my photos looking for shots with large areas of low contrast (haze), I saw a photo I had of the milky way and I got curious about how it would do.
As soon as I got to test the tool, I anxiously tried it and I was AMAZED!
One of the most challenging things with night photography is that you have to crank up the ISO so high that the area between the stars begins to look gray instead of black. This is easier if your camera is ISO invariant because you can make this adjustment to the ISO with just the highlights slider or just in the stars, but either way the photo starts looking well… a little hazy 🙂
For years I have advocated using the blacks slider instead of noise reduction in night photography, but the dehaze slider does even better.
Removing Light Fog from Your Lens
As winter approaches in the northern hemisphere, I always have to remember to be cautious about condensation forming on my lens. If I'm ever careless and take the camera out of the bag too quickly, it can cause condensation to form on the front of the lens which can take 15 minutes or more to disappear.
Sometimes, it can be hard to tell when the condensation is fully and completely gone and won't impact the photo.
I looked through my photos and found one with some light amounts of condensation on it, and the dehaze filter was excellent at removing it. It's certainly not as good as remembering to let the camera acclimate, but it's a good to know that some recovery is still possible after the fact.
Removing the Blue Haze on Distant Mountains
Okay, so this one more conventional. But all the example photos I keep seeing on blogs is of removing fog, but I just wanted to remind everyone that it works great on the haze visible on distant mountains.
If you've ever bought a “UV haze filter” for your camera and found that it actually does nothing to remove the haze in distant objects in a landscape, join the club. They just don't work.
I've tested polarizing filters for the same purpose and they might make a smidgen of difference in some situations, but other times it does nothing.
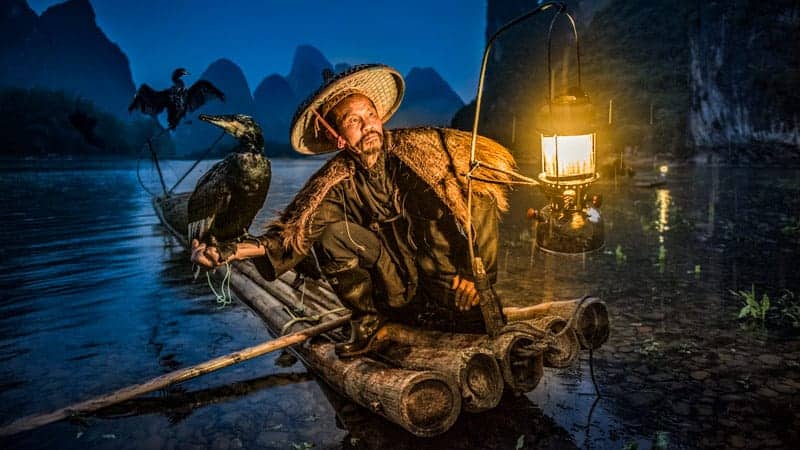
The dehaze filter works beautifully in this kind of situation. I used it on the photo of a cormorant fisherman and you can see the peaks in the background are very clear. They were faded out before.
And before anyone accuses me of animal cruelty again, please read my response about photographing cormorant fishermen before launching that judgment.
Reducing Glare from Windows
Since I'm frequently traveling to meet up with readers of Improve Photography around the world in our completely free photography workshops, I often take the opportunity to shoot through the windows of the plane to get a unique perspective of the clouds or the pattern on the landscape below.
The problem is that the double-thick windows on an airplane causes a lot of glare and reduced contrast. How do you fix it? You guessed it. Dehaze to the rescue.
Conclusion
Dehaze is an exciting new tool. Those who have written it off as “a gimmicky new name for contrast” have missed the mark and are losing out on a valuable tool for many photography uses.
Give it a shot! Any time you find a large grayed out area, you've found a good candidate for the dehaze tool. You'll definitely be seeing it used in the Lightroom Steal this Black Friday.
What’s the best way to contact you re Workshops?
ruou thuoc cuong duong là bài thuốc cường dương tốt nhất hiện nay được nhiều người tìm kiếm và tin dùng có nguồn gốc từ bài thuốc gia truyền của người Thái