I'm so glad you found your way onto my Photography Basics series. I have taught the basics of photography to millions of photographers around the world through Improve Photography, so I know just exactly how difficult it can seem to learn the basics of photography.
My goal is to make this Photography Basics series the absolute simplest way to learn the basics of photography.
I hope you'll love this series because of what you learn here, and I hope you'll join the Improve Photography community after you get your feet wet with the photo basics. Let's get going.
Basic Equipment You'll Need
You can do photography with even the simplest of cameras, but the principles that I'd like to teach are for people who want to learn to use a DSLR camera, a micro four-thirds camera, or at least a camera that allows the photographer to adjust the shutter speed, aperture, and ISO. Even some pocket cameras have this functionality.
Here are some of our entry level DSLR options. The (with Accessories) link will show you a kit that comes with the camera, lens, case, extra battery, and a memory card:
Canon EOS Rebel T6 with 18-55mm and 75-300mm Lenses (with Accessories)
Nikon D5600 with 18-55mm and 70-300mm Lenses (with Accessories)
Canon EOS Rebel T7i with 18-135mm Lens (with Accessories)
Now that you have your camera, it is time to learn exposure.
Exposure–the most basic element of photography
When photographers talk about “exposure,” we simply mean the brightness or darkness of a photo. It seems simple enough to take a photo that is correctly exposed (has the proper brightness or darkness), but in reality it can be quite the trick.

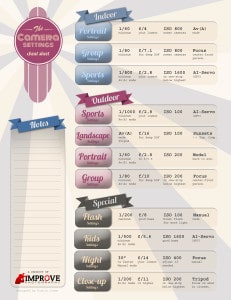
To help get the right exposure with your camera settings – you can download this Camera Settings Cheat Sheet guide.
If you're reading this Photo Basics series, it probably means that you currently shoot on the “Green mode” of your camera–or the automatic setting. That means the camera entirely controls the exposure of the picture. When you shoot on automatic mode, your camera selects an aperture setting, an ISO setting, a shutter speed, and a host of other settings for you.
Automatic can be handy, but it also seriously limits your creative ability to make a beautiful picture.
Want proof that automatic isn't the best way to shoot? Check out the picture below. On the left, the picture was taken entirely in automatic mode on a Canon Rebel DSLR. That might look okay to you… until you see the picture on the right. Same sunset. Same camera. The pictures were taken only seconds apart. The difference? The picture on the right was taken using manual exposure.

Which photo do you prefer? Probably the picture on the right! By choosing a creatively dark exposure, the rich colors in the sunset were allowed to shine through.
However, technically, the photo on the left is “correct,” and the photo on the right is “incorrect.” The camera saw through the lens and tried to expose the bird so that it wouldn't become a shadow. To me, the photo was not about exposing the bird properly, but exposing the sunset properly. The bird was just a nice shape to include in the foreground. This is exactly why you must learn exposure–because sometimes the “scientifically correct” exposure is not the best exposure to make the photo look how you want it to.
What's next?
Now that you understand why it is so important to take control over the exposure, let's move on to shutter, aperture and ISO–which are the tools you need to control the exposure. Soon you'll understand the basics of how to shoot in manual mode on your camera. I promise shooting in manual mode isn't nearly as scary as you might think.
Once you're ready to deepen your knowledge of manual mode, get tack sharp focus, and master lighting, consider buying my Photography Start Course. It's a series of 22 video tutorials where I walk you step-by-step through the things that it normally takes my photography students two years to learn. Other photography websites sell a very similar course for $300. I've priced it at a REALLY reasonable price because I remember how tight money was when I was a beginner.


wow!! you are sharing nice information about photography. And is there another secret which can help me?
Many times I tried to understand the basics of photography, now these articles were the best I’ve ever read on the subject! Straight-forward, visual, and with good examples. I only have a Sony RX-100, but yesterday I played a little with the tools and it all made sense. Thanks for the articles!
Thanks, it helped a lot
Nice basic tips to look up to. Thank you very much for sharing this article , it was helpful.
Hi Cyril Thanks for sharing. I think the scene on the left is shot in fully automatic mode. Therefore, the exposure is automatically done based on the sun (which is many times brighter than other objects),so the entire schen is over-lightened .
By the way, this is a pretty imagine 🙂
Hi there. Thank you for your lessons.
I am new to photography and I plan to start taking pictures from next semester(August 2018). What camera do you suggest I get? And what lessons do you suggest I know?
I just don’t want to get a small camera and then still have to get one later. I’d rather get a good one that works perfectly now.
I will greatly appreciate your help here.
Thanks you!
Raphael Akinpelu
I don’t quite understand the implications
For photography, we can DSLR camera. The main part of the DSLR camera is the body and lens of the camera. For beginners, when they will take any photo, they need to keep the photo in JPEG format, they need to set the proper shutter speed etc. The DSLR camera needs to maintain properly from the moisture, to keep the camera good.
I’m really enjoying the design and layout of your website.
It’s a very easy on the eyes which makes it much more
pleasant for me to come here and visit more often. Did you hire out a
developer to create your theme? Superb work!
Hey, I’m student in year 11 and i wanted to use your two automatic exposure images in my assignment. Therefore i’m asking for permission , for using those two photos in my website if you don’t have any privacy concerns. PLEASE REPLY
Thanks
You have made some really good points there. I looked on the net to learn more about the issue and found most people
will go along with your views on this web site.
Great resource for beginners!!
Netgear EAX20 Setup helps you to boost your wi-fi network when there is lack wi-fi signals. Reach out professional experts and solve your problems regarding Netgear extender setup.
Thanks. Am a beginner
nice to be a photojournalist
nice to be a photojournalist
I want to be a photojournalist because it is a good job
Wonderful web site. Plenty of helpful information here.
I’m sending it to some buddies ans additionally sharing in delicious.
And of course, thanks for your sweat!
I desire to be a photographer
can you do it?
Thanks for sharing your thoughts on bad ice-cream unblocked.
Regards
Great piece of information. it is always better to shoot in manual mode, after learning the basic parameters like aperture, shutter speed and iso. This will help anyone to shoot in any lighting conditions.
Lovely article! I simply love with your article.
Hi! I’ve been following your web site for a while now and finally got the courage
to go ahead and give you a shout out from Porter Texas!
Just wanted to say keep up the good job!
I feel this is among the most important information for me.
And i’m glad studying your article. However should remark on few general
things, The website style is ideal, the articles is in reality great :
D. Excellent process, cheers
i am very much interested in photography .. kindly tell me how can i join , if you have any problem in office 365 support then contact me
Great piece of information. it is always better to shoot in manual mode I desire to be a photographer.If you need Windows Tech Support then contact me.
The photos are very beautiful and unique, thank you for sharing these photos to the reader, so that readers can see the unique beauty from your photos.
I leik dis wehbsite itz coool