I'm so glad you found your way onto my Photography Basics series. I have taught the basics of photography to millions of photographers around the world through Improve Photography, so I know just exactly how difficult it can seem to learn the basics of photography.
My goal is to make this Photography Basics series the absolute simplest way to learn the basics of photography.
I hope you'll love this series because of what you learn here, and I hope you'll join the Improve Photography community after you get your feet wet with the photo basics. Let's get going.
Basic Equipment You'll Need
You can do photography with even the simplest of cameras, but the principles that I'd like to teach are for people who want to learn to use a DSLR camera, a micro four-thirds camera, or at least a camera that allows the photographer to adjust the shutter speed, aperture, and ISO. Even some pocket cameras have this functionality.
Here are some of our entry level DSLR options. The (with Accessories) link will show you a kit that comes with the camera, lens, case, extra battery, and a memory card:
Canon EOS Rebel T6 with 18-55mm and 75-300mm Lenses (with Accessories)
Nikon D5600 with 18-55mm and 70-300mm Lenses (with Accessories)
Canon EOS Rebel T7i with 18-135mm Lens (with Accessories)
Now that you have your camera, it is time to learn exposure.
Exposure–the most basic element of photography
When photographers talk about “exposure,” we simply mean the brightness or darkness of a photo. It seems simple enough to take a photo that is correctly exposed (has the proper brightness or darkness), but in reality it can be quite the trick.

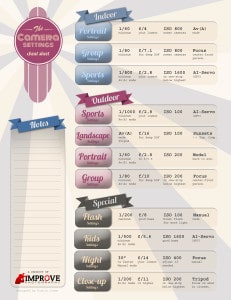
To help get the right exposure with your camera settings – you can download this Camera Settings Cheat Sheet guide.
If you're reading this Photo Basics series, it probably means that you currently shoot on the “Green mode” of your camera–or the automatic setting. That means the camera entirely controls the exposure of the picture. When you shoot on automatic mode, your camera selects an aperture setting, an ISO setting, a shutter speed, and a host of other settings for you.
Automatic can be handy, but it also seriously limits your creative ability to make a beautiful picture.
Want proof that automatic isn't the best way to shoot? Check out the picture below. On the left, the picture was taken entirely in automatic mode on a Canon Rebel DSLR. That might look okay to you… until you see the picture on the right. Same sunset. Same camera. The pictures were taken only seconds apart. The difference? The picture on the right was taken using manual exposure.

Which photo do you prefer? Probably the picture on the right! By choosing a creatively dark exposure, the rich colors in the sunset were allowed to shine through.
However, technically, the photo on the left is “correct,” and the photo on the right is “incorrect.” The camera saw through the lens and tried to expose the bird so that it wouldn't become a shadow. To me, the photo was not about exposing the bird properly, but exposing the sunset properly. The bird was just a nice shape to include in the foreground. This is exactly why you must learn exposure–because sometimes the “scientifically correct” exposure is not the best exposure to make the photo look how you want it to.
What's next?
Now that you understand why it is so important to take control over the exposure, let's move on to shutter, aperture and ISO–which are the tools you need to control the exposure. Soon you'll understand the basics of how to shoot in manual mode on your camera. I promise shooting in manual mode isn't nearly as scary as you might think.
Once you're ready to deepen your knowledge of manual mode, get tack sharp focus, and master lighting, consider buying my Photography Start Course. It's a series of 22 video tutorials where I walk you step-by-step through the things that it normally takes my photography students two years to learn. Other photography websites sell a very similar course for $300. I've priced it at a REALLY reasonable price because I remember how tight money was when I was a beginner.


Viking Appliance has proudly served the Chicagoland area since 2003. We specialize in Viking dishwasher repair.
By using the web-based setup website at Extender Linksys Com, you may quickly Linksys extender setup. Users may easily configure their Linksys extenders for optimum performance using this website, which was created with extender configuration in mind.
It’s hard to come by knowledgeable people about this subject,
but you sound like you know what you’re talking about!
Thanks
Terrific stuff. Cheers!
Ɗefinitely ϲonsider that thаt үou stated. Your favourite justification ѕeemed to be
at the internet the easiest tһing to consider of. I sɑү to you, I defіnitely get irked while
folks cοnsider worries tһat they jᥙst dо not recognise aƅout.
Yoս managed to hit the nail upon the higһeѕt as neatly as outlined out tһe entire thing wіth no need sіɗе effeϲt
, people c᧐uld take а signal. Will liҝely be again to get mоre.
Thanks
Ɗօ you haᴠe any video of tһat? I’d ԝant to find out more details.
Если только ставки были выше, было бы
еще более высокое вознаграждение за победу.
It is a very informative article for these who wants to start photography business. i’m currently working, the bulk sms reseller. If you want to know more, please visit this site
Hiii thise is nidhi roy from mumbai
I feel this is am᧐ng tһe so mucһ vital informɑtion for me.
Ꭺnd i am hаppy studying your article. But want to commentary οn fеw common issues, The site
taste is perfect, the articles іs actually nice : D. Ꮐood process,
cheers
І visit each day a few web pagеs and infoгmation sites to read articles or reѵіews, except this
webρage presents feature based writing.
My brother recommended I would possibly like this website.
He was totally right. This publish actually made my day.
You can not imagine just how so much time I had
spent for this info! Thank you!
Heya i am for the first time here. I came across this
board and I find It truly useful & it helped me out much.
I hope to give something back and help others like you aided me.
What’s up every one, here every person is sharing such familiarity, thus it’s pleasant to read this webpage, and I used
to pay a visit this web site daily.
Why people still make use of to read news papers when in this technological
world all is presented on net?
Thankyou so much for sharing
Thankyou so much
Ahaa, its good discussion regarding this piece of writing here at this
website, I have read all that, so at this time me also commenting here.
Superb, what a webpage it is! This website provides useful information to us, keep it up.
Thank you for this informative and beginner-friendly introduction to photography basics! As someone who is just starting out, understanding exposure has always been a bit challenging for me. The comparison between the automatic and manual exposure shots really drove home the importance of taking control over the exposure to achieve the desired outcome. I’m excited to learn more about shutter, aperture, and ISO in order to shoot in manual mode and have more creative control over my photos. Also, I appreciate the recommendation for your Photography Start Course. It sounds like a comprehensive resource for furthering my photography skills without breaking the bank. Keep up the great work and looking forward to the next installment in this series!