
Last month, I wrote an article on Low Key Photography. The first comment on the article was frustrated with the article, feeling it was too complex. So I want to try and boil down the techniques to exceedingly simple things that you can practice in your home, with or without models/family members/significant others. The aim of this article is to get your eye more comfortable with seeing low key moments, or what could be captured as a low key moment photographically.
First, let’s talk about the light types. In this context, I’ll be boiling down all light to two types, constant (or continuous), and flashing. For the sake of this discussion, the light source itself doesn’t actually matter. The sun is considered continuous light, a blinking red light would be considered flashing.
Generally speaking, when attempting to convey low key photography, you want to use either flash technology or continuous light in a dark environment. This boils down to what your camera will pick up in the environment around your subject when you actually physically capture the image. You will have a more difficult time creating a darker ambient image when you are using a low powered continuous light, because you will already have to open up your camera to more light in order to capture the same effect.


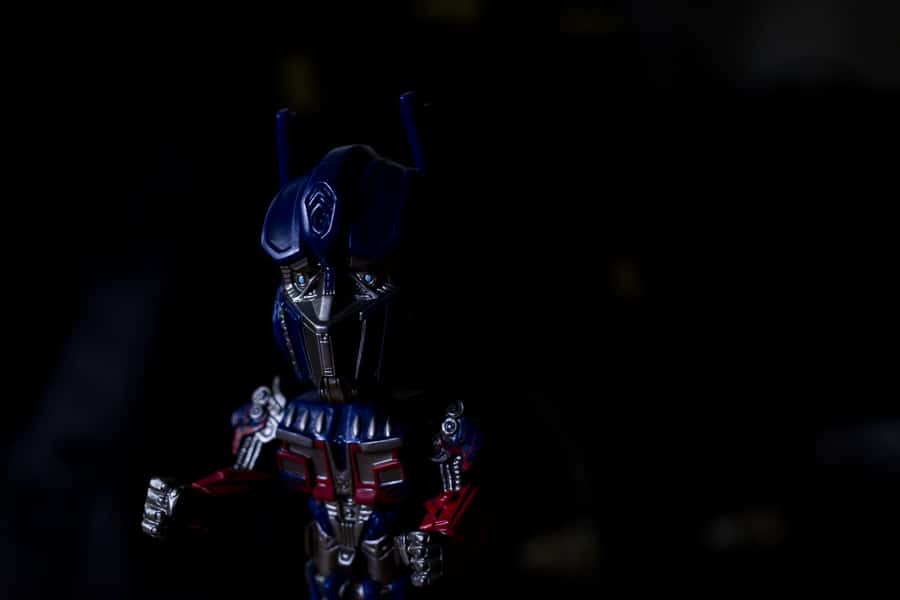
To demonstrate what I’m talking about, take this transformer bobble-head (quickly becoming my favorite model). When I had the model sitting on the stand initially, I had the light coming in the window from behind me, as well as the room lights on. When I capture the photo, the wall can be seen clearly (out of focus, but the color and luminance is there).
However, by turning off the lights, I’m able to limit the residual ambient light; I recompose the image, turn the transformer so that the light is crossing the face in a more pleasing way, and when I capture the image, I have a darker image.
What’s not seen as clearly is that I also placed some black guitar cases behind the subject. This helped amplify the darkness, thus making it feel immensely more moody and effective as a low key image. This image would be distinctly easier to capture in this setting with a flash, because it becomes functionally easier to darken the background and use the flash technology to illuminate just your subject.
Consider also this quick capture of my nephew. As I was working on this article, he wandered into the room, and I quickly grabbed my camera, and captured his image. In the first of the two, he’s being lit both with the light from the hallway AND with the light from the room itself. What results is a fairly bright environment all around, an image that is more properly exposed (but still appears UNDER exposed) across the histogram.

In the second, I once again took a moment to turn off the lights directly above him, and what results is a side cast light with a darker ambient environment. The latter of the two would be far more of a low key image. If he hadn’t recently learned to walk and thus feel the need to run around everywhere, I may have even taken a moment to clean the area before taking the image. Alas, he was gone a few seconds after I captured the second image.

It’s important to know that this is a distinct disadvantage to using constant lights when you are trying to create low key imagery. You have to be able to control a majority of the environment of your subject to create shadows and darkness, and that isn’t always possible, and sometimes it’s not always easy. As a result, most domestic environment low key photography is captured in late afternoon/evening or early morning, before the light streams in through the windows in force. It can also be imitated if you have a room with a window that faces west, in the morning. Because the light won’t be streaming in to the window as directly and brightly as it will be in the afternoon hours, you can use this to your advantage to find those darker areas of your house, apartment, flat, etc. So basically, if you don't have a flash yet, or more importantly, if you're not comfortable with your flash yet, it is still possible to create this effect; practice with your flash, though, so that you can create this technique more easily in time! Motivation!
If you are able to creatively darken the environment you live in, and have access to shooting at different times of day, you have everything you need to truly get started in low key photography. Start playing with doors to control what light does or does not come into a room. Take this scene for example:
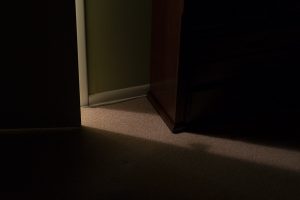
Anyone can create this scene to some degree. The only light that I have in this scene is the hallway light. I turned it on, and closed the door to just a bit of light, and I have a perfect setup for a low key image. If you wanted to be truly technical, this image alone is a low key image. Notice all the shadows that ominously press in on that piece of light. If you don't have a light in your hallway? Use a desk lamp! You can always find a way, I believe in you!

Now, throw a subject in there, and you have a beautiful beam of light that you can use to evoke emotion. I had my dog come into the room and sat her down and fiddled with her position to get her face closer to the beam of light, and captured some images.
You can use this effect to great success if you move a bed into the beam of light, or a chair, or use a dresser as a stand, etc. The options are as endless as your creativity, and your willingness to potentially make a bit of a mess, or at least disorganization. In fact, when you graduate to eventually using flash units, all you’re really doing is imitating these moments of light and further controlling your ability to get smaller apertures (more in focus/deep depth of field).
So far we haven’t used any piece of technology that doesn’t exist in most houses. House lights, windows, and doorways. But let’s start adding in light we can moderately control. Consider your technology, what is something that you probably take with you everywhere, and functions as a light source? Your phone!
Your phone can create some really beautiful low light scenes. As can your computer (laptop or desktop). On both types of devices you can generally control the brightness of the screen, which means you already have more control over what light is spilling into the nearby environment.
To clarify, I’m not suggesting using the flashlight of your phone (though that will be coming up soon as well). I want you to think of the screen of the phone itself as your light source. So let’s look at what this can mean for our photos.
I'll demonstrate with just my computer monitor. Here’s an image with my computer screen directly to my right, creating a fairly harsh shadow across the midline of my face. The only light happening here is the my computer monitor at 100% brightness, and some slight ambient light coming in from the hallway.

Just to show the difference, here are two more images of more or less the exact same scene, but I changed the monitor brightness to 50% and 25%, respectively. Notice how drastic the changes are each time I halve the light. The ambient light from the hallway becomes more and more apparent, because it becomes more and more equalized with the light from the screen


Now, so that you understand how much light can pollute your images, here's one more with the screen at 100%, but with the ambient light of the hallway turned off. What a difference! Look at how much more creepy the subject of the photo looks. Not the best look for a Facebook profile photo, but it definitely conveys a particular mood. All could be considered low key images to some degree of success, but the amount of light allowed to enter your photo can drastically alter that feel and mood of the image. Play with this.

I won’t show you images with a cell phone for the light. Not because they aren’t fun to shoot, but because I want you to be the ones who go out and experiment. Grab a friend, spouse, significant other, nephew, whomever, and curl them up on a chair with the phone lighting their face. One of the absolute best parts about continuous light is you know exactly how the light will look when captured by the camera. It’s constantly modeling for you, so you can very clearly direct your model or move the light so that you have an interest light dispersion. Go play.
Done playing? Good. Let’s get into more types of light. But first, a quick reprieve to point out that any type of light that you can move is something I would consider light that you can control. There is a complicated relationship between the distance of a light source to the subject, and how much brightness is on that subject. We’re not worried about that. Just know that the closer you move your subject to the light, there is proportionally more light being cast on them, and the PRETTIER the light will look on them (prettier, in this context, being synonymous with “soft” light).
A lot of beginning photographers in the light game will believe that light pulled further away will somehow look better. My personal belief is this is because of the hot-spot that ends up present when you use smaller light sources. The hot-spot is simply the point of greatest intensity of light on the subject. I've over exaggerated it in this photo to make it really apparent.

They balk from the hot-spot, and pulling the source away (or the subject away from the source) seems to mitigate the issue. However, they also make the light more harsh and contrasty, along with a generally drastic decrease in the actual brightness of the source.
What this means is that while I’m playing with house lights and digital screens, all of these same things can be accomplished with lamps, Christmas lights, literally anything that generates light. Take a flashlight, take different types of flashlights, and see what happens when you use them on a subject.
Here are some example shots of the transformer bobble-head again.
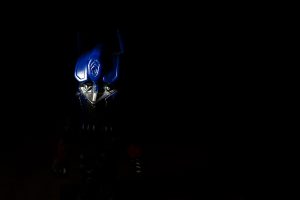


With the last three images, especially, notice how event the placement of the light can impact the feeling of the image. In the first the light was slightly further away, resulting in less luminance (brightness). The second image, the light was sitting right against my lens hood, pointed right at the subject. This created a much flatter image light-wise, and you start to see more of the background creeping in. The final image had the light more above the subject. The result of this, plus the different camera angle, is an image with hidden eyes, more black negative space, and a long shadow. These are moods that create feelings, especially when replaced with humans.
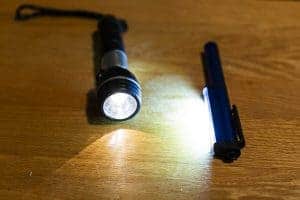
Two very different style of flashlights (pictured below) were used to light these. One is just a standard $5 flashlight you can find at any convenience store. Incandescent tungsten light, fairly direct beam of light (generally travels straight forward, very little lateral motion). The other is a bit more unique, more of an ice light if I were to liken to a photographic product (If you're interested in this type of light, check it out by clicking here. They're pretty cool.). It’s an LED flashlight, very bright, with a very wide spread. Still fairly directional, but with a much different shape than the other flashlight.
Using just these flashlights and a subject, you’re able to create some fairly unique lighting situations. For all of these images, I was hand holding my camera (shooting at 1/60th of a second with a 50mm lens) with my right hand, and using my left hand to play with the location of the light on the subject.
This is all the playing that you need to do; once you start playing with light in this way, you may get hooked. It can be amazing to try and locate low key situations out in the natural world. Night time street signs (neon, led, or incandescent), slivers of light as the sun sets, all manner of opportunity for natural light low key photography exist. But my firmest recommendation for you, if you truly want to get an eye for the style and for the settings your camera needs to be set to, is to practice in an environment that affords you as much control as possible. Your house is probably your best bet. Be brave and bold. Don't feel as though you need to conform to one style of imagery, or one type of subject. You don't need to have a model to practice this, you can use an apple, a mug, a hat. The important thing for you to do is to try. Experiment. Learn how your camera starts to see light, and embrace failure for what it is, an opportunity to learn.
Learn to put the light source in the image. Learn to put the light source in the image, but still block it creatively from the camera. Learn to turn your subject so the light hits them in a slightly different pattern. Pay close attention to the shadows. Low key photography is a photographic technique related very closely to painting techniques such as chiaroscuro and tenebrism. Most importantly, learn to play, and take the constant lights in your life and put them to use to learn how to make an image stunning in all of its darkness! Drop your practice images below, and hopefully this will help get you even more off the ground with low key photography than my previous article! When you feel ready – start using flashes in place of constant lights. Your world will never be the same, I promise.
thanks for sharing this Information.
Thanks for your suggestion, I would try this. This is all the playing that you need to do; once you start playing with light in this way, you may get hooked. This is the simple way of taking low key photography even more simple.
Highly informative article. This site has lots of information and it is useful for us. Thanks for sharing your views. – electromagnetic flow meter manufacturers, electromagnetic flow meter suppliers in uae
Your phone can create some really beautiful low light scenes
Your phone can create some really beautiful low light scenes.
Woah! I’m enjoying the template/theme of this website. It’s simple, yet effective. A lot of times it’s very hard to get that “ perfect balance” between superb usability and visual appeal. I must say you’ve done a very good job with this.
Buy Generic Medicine is an online store that offers medicines for customers at an affordable price. For any kind of inconvenience, feel free to talk with us through the mail. The customer support team of Buy Generic Medicin is always ready to help you through any kind of problem. So, buy medicines from Buy Generic Medicin and get a healthy life.
If the Windows Update contains any new printer driver, install it and check whether this fixes the issue with your printer.
Before getting started, install reliable anti-virus software on your computer to thwart any viruses you may get while torrenting. Then, read the articles below in order from top to bottom.
URL submission is the action of submitting your URL to search engines, manually, for faster indexing. … After you submit the URL, it may take two to four weeks to get indexed. A page can be resubmitted if you’re not happy with its rank. This action is used for SEO purposes.
We Are Impressed By The Details That You Have on Your Site. Thanks For Your Suggestion, I would Try This. keep Sharing This Types of Content …..